
Are you ready to elevate your dinner game? This Creamy Sun Dried Tomato Chicken is rich, flavorful, and easy to make. With tender chicken smothered in a luscious cream sauce, this dish will impress your family and friends. In this post, I’ll share the simple ingredients, step-by-step instructions, and helpful tips to make this meal a breeze. Let’s dive into making a dinner that’s both satisfying and delicious!
Why I Love This Recipe
- Deliciously Creamy: This dish features a rich and creamy sauce that perfectly complements the tender chicken, making every bite an indulgent experience.
- Quick and Easy: With a total cooking time of just 30 minutes, this recipe is perfect for busy weeknights while still delivering on flavor.
- Fresh Ingredients: Incorporating fresh spinach and sun-dried tomatoes creates a burst of color and nutrients, elevating the dish both visually and health-wise.
- Versatile Serving Options: This creamy sun-dried tomato chicken can be served over pasta, rice, or alongside crusty bread, making it adaptable to various meal preferences.
Ingredients
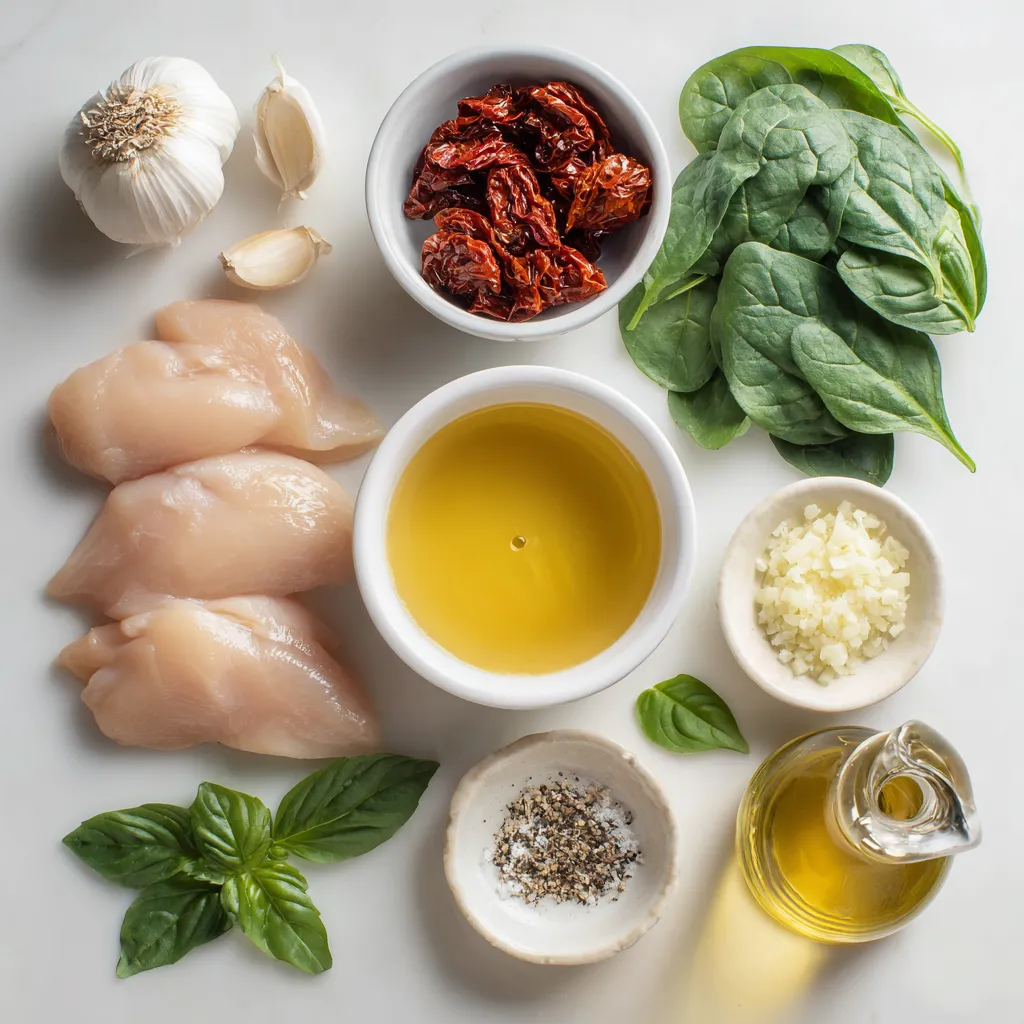
List of Ingredients
– 4 boneless, skinless chicken breasts
– 1 cup sun-dried tomatoes in oil, well-drained and chopped
– 1 cup heavy cream
– 1 cup chicken broth
– 2 cloves garlic, finely minced
– 1 medium onion, finely chopped
– 1 cup fresh spinach, roughly chopped
– 1 teaspoon Italian seasoning
– 2 tablespoons olive oil
– Salt and freshly cracked black pepper to taste
– Fresh basil leaves for garnish (optional)
Ingredient Substitutions
Heavy cream alternatives
If you want a lighter option, use half-and-half or coconut cream. Both add creaminess, but the flavor will change slightly.
Chicken breast substitutes
You can swap chicken breast for thighs or even turkey. They are both juicy and will work well with the sauce.
Spinach and herb variations
You can replace spinach with kale or arugula. If you like, try using fresh herbs like parsley or thyme for added flavor.
These swaps keep the dish tasty and flexible for your needs. Enjoy experimenting!
Step-by-Step Instructions
Preparation Steps
1. Start by patting the chicken breasts dry with a paper towel. This helps the seasoning stick well.
2. Season both sides of the chicken with salt, black pepper, and Italian seasoning. Make sure to cover every bit.
3. Heat two tablespoons of olive oil in a large skillet over medium-high heat. You want it hot enough to sizzle.
Cooking the Chicken
1. Carefully add the seasoned chicken to the skillet. Sear each side for about 5-6 minutes. Look for a golden-brown crust.
2. Check the internal temperature. It should reach 165°F (74°C) for safety. Once cooked, transfer the chicken to a plate and set aside.
Building the Sauce
1. In the same skillet, lower the heat slightly. Add the finely chopped onion and minced garlic. Sauté for 2-3 minutes. Stir often, so nothing burns.
2. Add the chopped sun-dried tomatoes next. Cook for another minute, letting them mix with the onion and garlic.
3. Pour in the chicken broth, stirring to combine. Bring the mixture to a gentle simmer.
Finalizing the Dish
1. Now, reduce the heat to medium-low. Slowly stir in one cup of heavy cream. Mix until fully combined. Let it simmer for about 5 minutes. This thickens the sauce.
2. Once thick, toss in the chopped spinach. Stir until it wilts, which only takes about 2 minutes.
3. Finally, return the seared chicken to the skillet. Let it soak in the creamy sun-dried tomato sauce for another 2 minutes. This melds the flavors nicely.
Tips & Tricks
Cooking Tips
To get a perfect sear on chicken, start with a dry surface. Pat the chicken breasts with a paper towel. This helps create that nice golden crust. Heat olive oil in a hot skillet. Place the chicken in the pan gently. Cook without moving it for 5-6 minutes. Flip it and cook for the same time. Check if the internal temperature reaches 165°F. This ensures the chicken is safe to eat.
For thickening the sauce, let it simmer gently. Stir in the heavy cream slowly. This helps it combine well with the other ingredients. If the sauce is too thin, let it cook longer. Keep an eye on it, so it doesn’t burn.
Serving Suggestions
Creamy sun-dried tomato chicken pairs well with several sides. I love serving it on a bed of pasta. You can also serve it with crusty bread. This lets you soak up all the rich sauce. For an added touch, garnish with fresh basil leaves. They add color and a fresh flavor to the plate.
To plate for aesthetic appeal, use a large white plate. Place the chicken in the center. Carefully pour the sauce over the chicken. Add a sprinkle of basil on top. This makes your dish look inviting and delicious.
Time-Saving Tips
For meal prep, you can season the chicken ahead of time. This allows the flavors to soak in. You can chop the sun-dried tomatoes and spinach earlier too. Store them in the fridge until you are ready to cook.
If you’re short on time, swap heavy cream with half-and-half. This will still give you a creamy texture but saves time. You can also use precooked chicken if you have it. Just add it to the sauce at the end to heat through.
Pro Tips
- Choose High-Quality Sun-Dried Tomatoes: The flavor of your dish will greatly depend on the quality of the sun-dried tomatoes. Opt for those packed in oil for a richer taste.
- Deglaze the Pan: After removing the chicken, consider adding a splash of white wine to the skillet to deglaze it. This will help lift the flavorful bits stuck to the bottom and enhance your sauce.
- Use Fresh Spinach: Fresh spinach wilts beautifully and adds vibrant color. If using frozen spinach, make sure to thaw and drain it well to avoid excess water in your sauce.
- Serve with a Side: This dish pairs perfectly with a side of pasta, rice, or crusty bread to soak up the delicious creamy sauce. Consider adding a sprinkle of parmesan for extra flavor.
Variations
Different Proteins
You can switch the chicken for shrimp or tofu if you want. Shrimp cooks fast and adds a nice flavor. Tofu is a great option for a plant-based diet. Just make sure to press it well to remove extra water. This helps the tofu absorb the sauce better.
Flavor Enhancements
To brighten up the dish, add some lemon zest. It gives a fresh taste that pairs well with the creamy sauce. You can also mix in different herbs like thyme or oregano. These herbs add layers of flavor and make the dish even more delicious.
Pasta Variations
Feel free to mix the sauce with any pasta type you like. Spaghetti or penne work well. You can also turn this dish into a creamy casserole. Just pour the chicken and sauce over cooked pasta in a baking dish. Top it with cheese and bake until bubbly for a cozy meal.
Storage Info
Refrigeration Guidelines
To store leftovers, let the creamy sun-dried tomato chicken cool first. Place it in an airtight container. Glass or plastic containers work well. Make sure to cover it tightly. It helps keep the flavors fresh and prevents spills. You can store it in the fridge for up to 3 days.
Freezing Instructions
If you want to freeze the dish, let it cool completely. Then, transfer it to a freezer-safe container. Leave some space at the top to allow for expansion. Seal it tightly to avoid freezer burn. You can freeze it for up to 3 months. When ready to eat, thaw it overnight in the fridge. To reheat, warm it gently on the stove or in the microwave until heated through.
Shelf Life
Creamy sun-dried tomato chicken lasts about 3 days in the fridge. Check for any changes in smell or color. If it smells off or looks strange, it’s best to throw it away. Always trust your senses when it comes to food safety.
FAQs
How do I know when the chicken is cooked?
The chicken is done when it reaches an internal temperature of 165°F (74°C). You can check this with a meat thermometer. Insert it into the thickest part of the chicken breast. If it reads 165°F, your chicken is safe to eat. If not, cook it a bit longer and check again. Perfectly cooked chicken is juicy and tender, not dry.
Can I make this recipe gluten-free?
Yes, you can make this creamy sun-dried tomato chicken gluten-free. Use gluten-free chicken broth and check the labels on sun-dried tomatoes. Most brands are gluten-free, but it’s good to confirm. If you want a gluten-free side, serve this dish with rice, quinoa, or gluten-free pasta.
Is it possible to make this dish in advance?
You can prepare this dish ahead of time. Cook the chicken and make the sauce. Store them separately in airtight containers. Keep them in the fridge for up to three days. When ready to eat, reheat the chicken and sauce in a skillet over low heat. Add a splash of broth or cream if the sauce thickens too much.
What can I substitute for sun-dried tomatoes?
If you can’t find sun-dried tomatoes, you can use fresh tomatoes. Chop them and add them to the sauce. You might need to cook them a bit longer to soften. Another option is roasted red peppers. They add a sweet flavor. Just chop them and stir them in when you add the sun-dried tomatoes.
This recipe for creamy sun-dried tomato chicken is easy and rewarding. You learned about key ingredients, useful tips, and ingredient swaps. Cooking is fun, and this dish proves that!
Remember, you can personalize this meal with your favorite flavors. Enjoy making it your own, and share it with family. With these steps, you’ll impress everyone at the table. Happy cookin


