As the leaves turn and the air gets cool, there’s nothing better than a warm bowl of Creamy Pumpkin Chicken Chili. This hearty dish combines tender chicken, rich pumpkin, and zesty spices, making it perfect for fall. With easy steps and tasty tips, you’ll impress your family and friends. Let’s dive into the comforting goodness that will warm your heart and fill your home with delicious smells! Ready to cook?
Why I Love This Recipe
- Comforting Flavor: This chili combines the warm, comforting flavors of pumpkin and spices, making it perfect for chilly evenings.
- Nutritious Ingredients: With the addition of pumpkin and black beans, this dish is packed with nutrients while being deliciously hearty.
- Easy to Prepare: The straightforward cooking process means you can whip up this dish quickly, making it ideal for busy weeknights.
- Versatile Serving Options: Serve it in fun ways, like in mini pumpkins or with crusty bread, to elevate your dining experience.
Ingredients
Main Ingredients
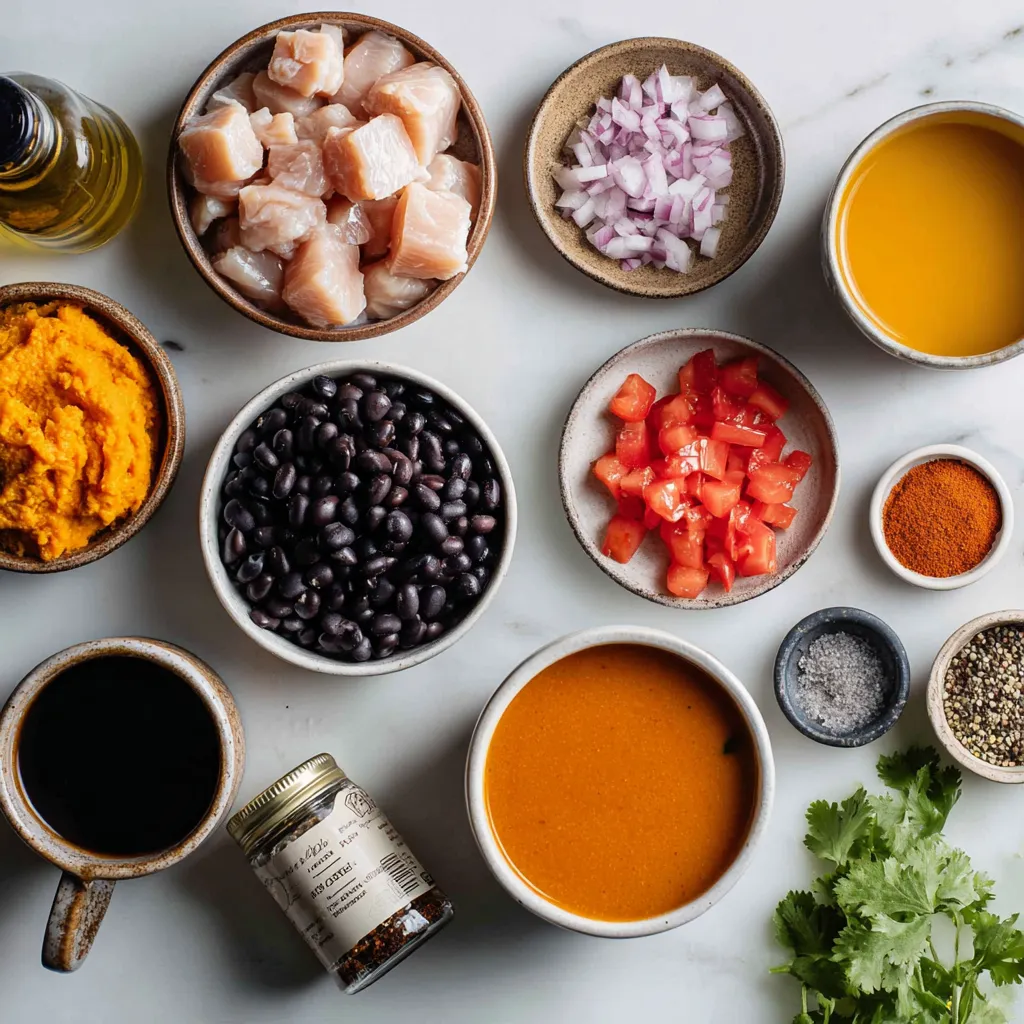
– 1 lb boneless, skinless chicken breasts, diced into bite-sized pieces
– 1 can pumpkin puree (15 oz)
– 1 can black beans (15 oz), drained and rinsed
– 1 can diced tomatoes in juice (15 oz)
– 1 medium onion, finely diced
– 3 cloves garlic, minced
– 2 cups chicken broth (low sodium preferred)
– 1 cup heavy cream
The main ingredients in this creamy pumpkin chicken chili create a rich and hearty dish. The chicken provides protein, while the pumpkin adds creaminess and a slight sweetness. Black beans offer fiber and texture, and diced tomatoes add acidity. Onions and garlic give depth to the flavor, while chicken broth enriches the base. Finally, heavy cream brings it all together, making each bite smooth and satisfying.
Spices and Seasonings
– 2 tablespoons chili powder
– 1 teaspoon ground cumin
– 1 teaspoon smoked paprika
– Salt to taste
– Black pepper to taste
Spices turn a good chili into a great one. Chili powder adds warmth and depth. Ground cumin provides an earthy flavor, while smoked paprika introduces a mild smokiness. Salt and black pepper are essential for balancing all the flavors. These spices work together to create a comforting and fragrant chili that warms you up on chilly days.
Optional Garnishes
– Fresh cilantro leaves
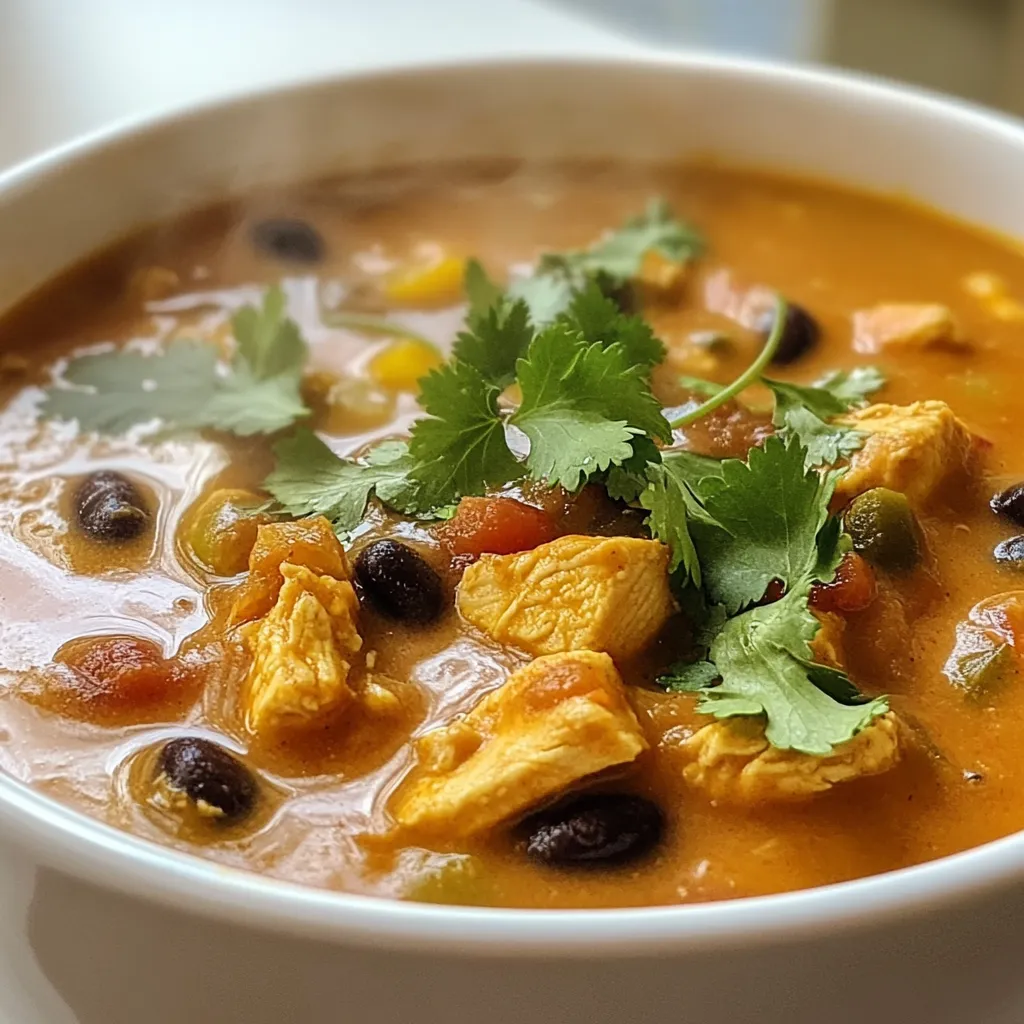
For a pop of color and freshness, you can garnish your chili with fresh cilantro leaves. This herb brightens up the dish and adds a lovely contrast to the rich flavors. You can also serve the chili in hollowed-out mini pumpkins for a festive look. Pairing it with crusty bread makes it perfect for dipping.
Step-by-Step Instructions
Preparation of Ingredients
First, you need to gather your ingredients. Start by dicing 1 pound of boneless, skinless chicken breasts into bite-sized pieces. Next, finely dice 1 medium onion. Then, mince 3 cloves of garlic. These steps ensure the flavors blend well in your chili.
Cooking Process
Now, let’s cook! In a large pot or Dutch oven, pour in 2 tablespoons of olive oil and heat it over medium heat. Once the oil shimmers, add the diced onion. Sauté for about 5 minutes until the onion is soft and clear. Then, add the minced garlic and cook for 1 more minute, stirring often.
Next, raise the heat to medium-high. Carefully add the diced chicken to the pot. Season the chicken with salt, black pepper, 1 teaspoon of ground cumin, 2 teaspoons of chili powder, and 1 teaspoon of smoked paprika. Sauté the chicken for 5 to 7 minutes until it turns brown on all sides. Stir occasionally to cook evenly.
After browning the chicken, stir in the 15 ounces of pumpkin puree, 15 ounces of diced tomatoes with their juice, and 15 ounces of drained black beans. Pour in 2 cups of low-sodium chicken broth. Increase the heat to bring everything to a gentle simmer. This step helps the flavors mix together.
Once simmering, reduce the heat to low. Let the chili cook for 20 minutes, stirring every so often. This prevents sticking and allows the ingredients to blend beautifully.
Final Steps
After 20 minutes, gently stir in 1 cup of heavy cream. This gives the chili a rich, creamy texture. Let it warm for an extra 5 minutes, tasting and adjusting the seasoning as needed. If you want, you can add more salt or spices to suit your taste. Enjoy the warmth and comfort of this delightful dish!
Tips & Tricks
Perfecting the Chili
To make the best chili, start with the right cooking time. After you sauté the onions and garlic, add the chicken. Cook it until brown, about 5-7 minutes. This step adds great flavor. Once you add the other ingredients, let the chili simmer gently for 20 minutes. This helps all the flavors mix well. Stir often to avoid sticking on the bottom of the pot. If you notice it sticking, lower the heat a bit.
Creamy Texture Tips
Achieving a creamy texture is simple. When you add the heavy cream, do it slowly. Stir gently to combine without curdling. If you stir too fast, the cream might separate. Let the chili warm up for a few minutes after adding the cream. This helps it stay smooth and creamy. Always taste your chili before serving. Adjust the salt and pepper as needed for the best flavor.
Presentation and Serving Suggestions
For an eye-catching presentation, serve your chili in hollowed-out mini pumpkins. It looks festive and fun! Pair it with crusty bread for dipping. This adds great texture and taste. You can also sprinkle some cumin on top for an extra touch. A few cilantro leaves will brighten the dish and add freshness. Enjoy your meal in a cozy setting, perfect for fall!
Pro Tips
- Use Fresh Ingredients: Opt for fresh herbs and spices to elevate the flavor of your chili. Fresh cilantro adds a vibrant touch to the final dish.
- Control the Heat: Adjust the spiciness by adding diced jalapeños or a dash of cayenne pepper if you like it hotter. Taste as you go!
- Make it Ahead: This chili tastes even better the next day! Make a big batch and store leftovers in the fridge for a quick meal later.
- Garnish Creatively: Beyond cilantro, consider topping with avocado slices or a dollop of sour cream for added creaminess and flavor contrast.
Variations
Ingredient Swaps
You can easily change up the protein in this chili. Try using turkey or beef instead of chicken. These meats will still give you that hearty feel. If you’re looking for a different texture, swap in chickpeas or kidney beans for the black beans. For a lighter option, use vegetable broth instead of chicken broth. This will keep the flavors bright and fresh.
Spicy Version
If you love heat, you can spice things up! Add diced jalapeños right at the start with the onions. You can also mix in hot sauce when you add the heavy cream. Start with a little and taste as you go. This way, you can find the perfect heat level for your chili.
Vegetarian Adaptation
Want to go meatless? No problem! Just skip the chicken and add more veggies. Zucchini, bell peppers, or corn work great. You can also use lentils for a protein boost. They will add heartiness and soak up the chili’s flavors. This makes a filling meal even without meat.
Storage Info
Storing Leftovers
To store your creamy pumpkin chicken chili, use airtight containers. Glass or plastic containers work well. Let the chili cool down before sealing. It lasts in the fridge for 3 to 4 days. If you want to enjoy it later, freezing is a great option.
Freezing Instructions
To freeze the chili, first, let it cool completely. Transfer it to freezer-safe bags or containers. Remove as much air as possible to prevent freezer burn. Label each bag with the date. You can freeze it for up to 3 months. When ready to eat, thaw it in the fridge overnight before reheating.
Reheating Tips
Reheat the chili gently to keep it creamy. Use a saucepan over low heat. Stir often to avoid sticking. If it seems thick, add a splash of chicken broth or water. You can also microwave it in a bowl. Cover the bowl to keep moisture. Stir halfway through to warm evenly. Enjoy your comforting meal!
FAQs
Can I make this chili in a slow cooker?
Yes, you can! To make this chili in a slow cooker, start by sautéing the onion and garlic in a pan. Then, add everything to the slow cooker. Include the chicken, pumpkin puree, black beans, diced tomatoes, chicken broth, and spices. Cook on low for 6-8 hours or on high for 3-4 hours. Stir in the heavy cream just before serving. This method allows the flavors to blend beautifully.
How can I make it dairy-free?
To make this chili dairy-free, simply swap the heavy cream for coconut cream or a dairy-free cream alternative. You can also use almond milk, but be mindful of its flavor. Just add it in the same way as the heavy cream. This keeps the chili rich and creamy without dairy.
What do I serve with Creamy Pumpkin Chicken Chili?
This chili pairs well with many sides. Here are some tasty options:
– Crusty bread for dipping
– Cornbread for a sweet touch
– A fresh salad to balance the flavors
– Rice or quinoa for added heartiness
These sides enhance the chili and make the meal more filling.
How spicy is this chili?
This chili has a mild to medium spice level. The chili powder and smoked paprika give it warmth without overwhelming heat. If you like spice, add more chili powder or toss in jalapeños. Adjust it to your taste for the perfect kick.
Can I use fresh pumpkin instead of puree?
Yes, fresh pumpkin works well! To use it, peel and chop the pumpkin into small cubes. Cook the pumpkin until soft, then blend it until smooth. You can also roast it for added flavor before blending. Use this fresh pumpkin in place of the canned puree.
This blog post covered how to make a delicious creamy pumpkin chicken chili. I shared the key ingredients, spices, and seasonings. You learned how to prepare, cook, and perfect this dish with easy tips. There are even fun variations and storage methods to keep your chili fresh.
Try it out and adapt the recipe to fit your taste. Enjoy your warm bowl of chili, and share it with friends or family for a cozy mea


