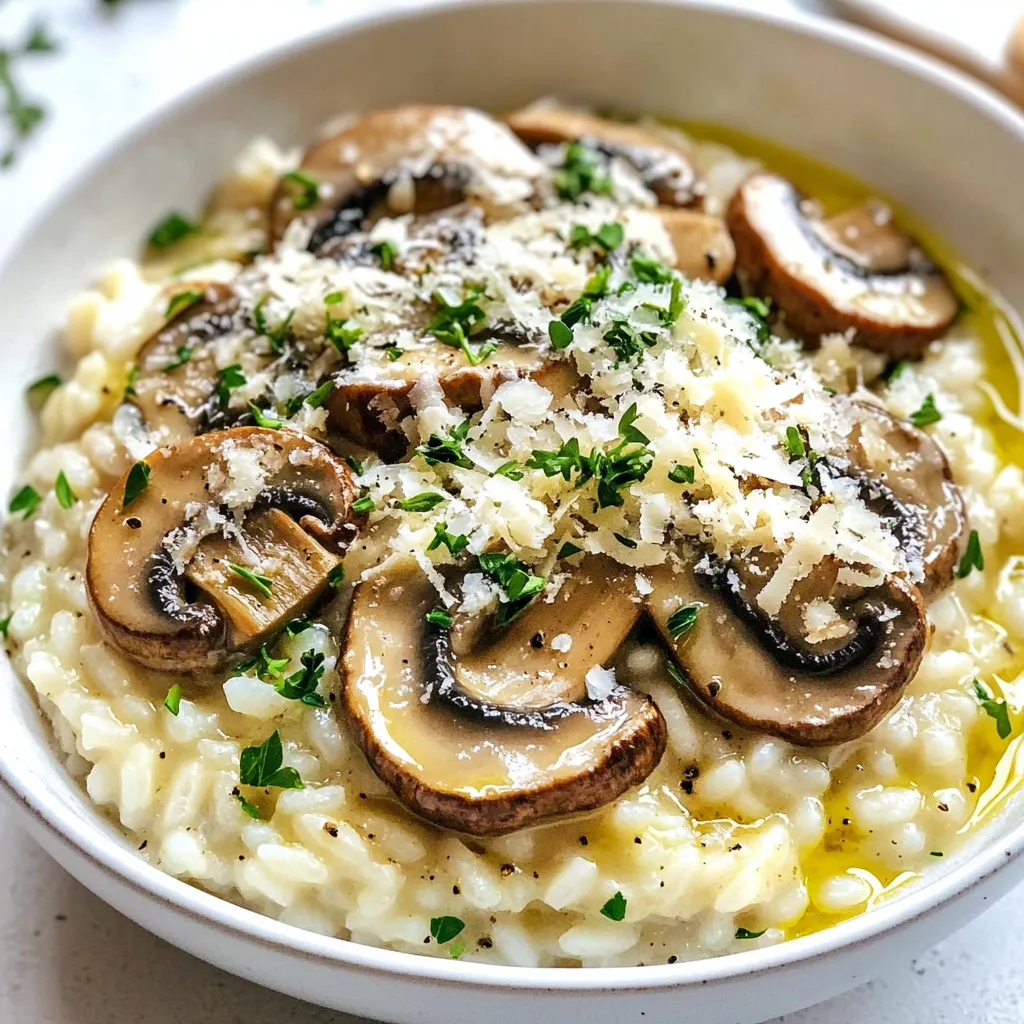
Looking for a delicious and simple dish that impresses without the fuss? My Creamy Mushroom Risotto is just what you need! With rich flavors from mixed mushrooms and creamy Parmesan, this recipe ticks all the boxes for comfort food. I’ll guide you through easy steps to achieve that perfect texture. Let’s dive into this mouthwatering adventure and transform your weeknight meals into something special!
Why I Love This Recipe
- Comforting Creaminess: This risotto offers a rich, creamy texture that feels like a warm hug in a bowl.
- Umami Explosion: The combination of mixed mushrooms adds deep, savory flavors that elevate this dish.
- Easy to Customize: Feel free to add your favorite herbs or vegetables to make it your own!
- Impressive Presentation: Garnishing with parmesan and parsley makes it look as good as it tastes!
Ingredients
Main Ingredients
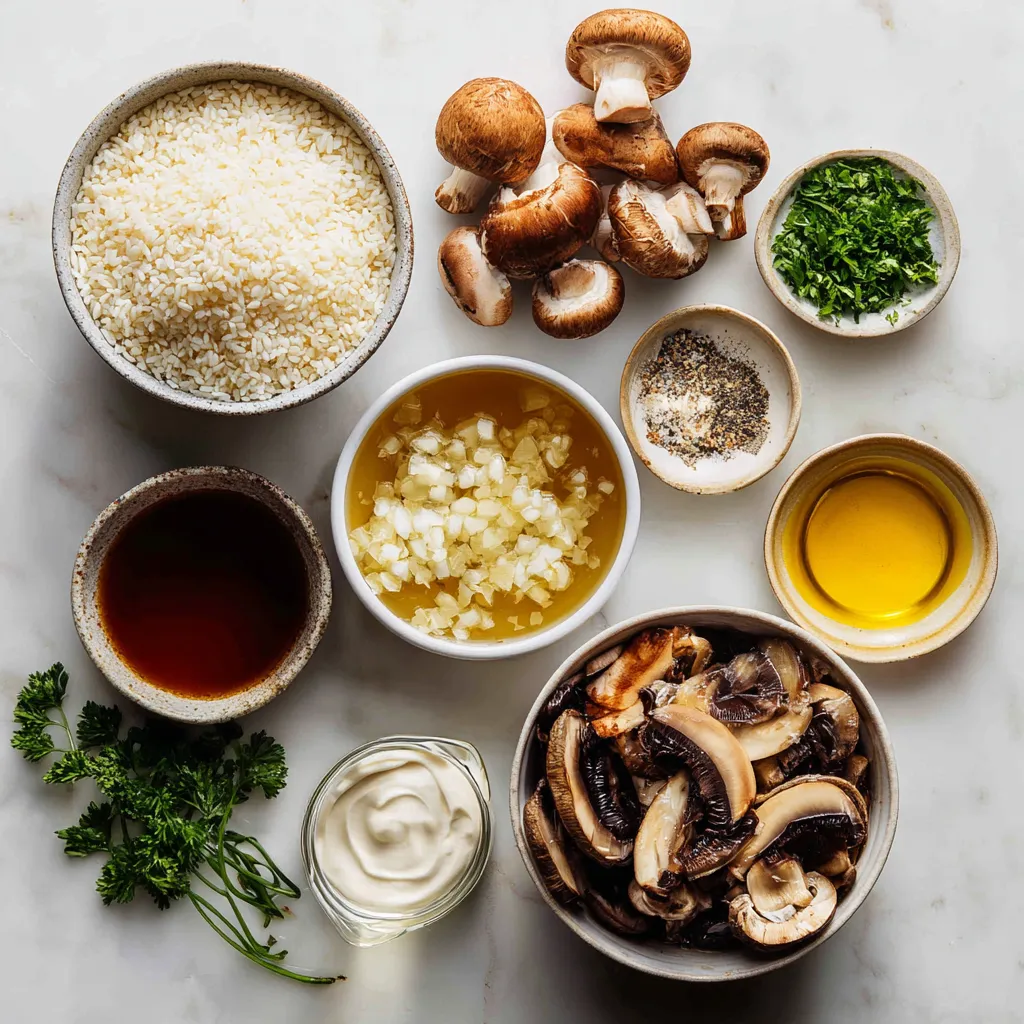
– 1 cup Arborio rice
– 1 cup mixed mushrooms (shiitake, cremini, and button), sliced
– 4 cups vegetable broth (plus extra, if needed)
Additional Ingredients
– 1 small onion, finely chopped
– 2 cloves garlic, minced
– 1/2 cup fresh parmesan cheese, finely grated
– 1/4 cup heavy cream
– 2 tablespoons extra virgin olive oil
– Sea salt and freshly ground black pepper, to taste
When cooking creamy mushroom risotto, it’s vital to use the right ingredients. Arborio rice is a must. Its starch gives risotto that creamy texture. Mixed mushrooms add depth and umami flavor. Shiitake brings earthiness, while cremini and button mushrooms add mildness.
Next, we need vegetable broth. It’s the base of our dish. Keeping it warm while cooking is key. This helps the rice cook evenly.
For the additional ingredients, onion and garlic lay the flavor foundation. They sauté well and give a sweet aroma. Parmesan cheese and heavy cream bring richness. They elevate the dish to a new level.
Extra virgin olive oil adds a touch of fruitiness to the mix. Sea salt and black pepper enhance all the flavors. Choosing fresh herbs like parsley for garnish also brightens the dish.
Gather these items before you start. It makes the cooking process smooth and fun!
Step-by-Step Instructions
Preparing the Broth
To start, heat your vegetable broth in a medium saucepan. Use medium heat and keep it warm, but do not let it boil. This helps the rice cook evenly. If the broth gets too cool, the risotto won’t be creamy.
Sautéing the Base
In a large skillet, pour in two tablespoons of olive oil. Heat it over medium heat. Add one finely chopped onion and cook for 3-4 minutes. Stir it often until it turns translucent. Next, add two minced garlic cloves. Sauté for one more minute until you smell its nice aroma. Then, toss in one cup of sliced mixed mushrooms. Cook them for about five minutes. They should be tender and golden brown. Season with a sprinkle of sea salt and black pepper to boost the flavor.
Making the Risotto
Once your mushrooms are ready, add one cup of Arborio rice to the skillet. Stir it for about two minutes. This step helps the rice soak up the flavors. Now, gradually pour in the warm vegetable broth, one ladle at a time. Stir often and only add more broth when most of the liquid is absorbed. Keep this up for 18-20 minutes. The rice should be al dente and creamy by now.
Final Touches
After the rice is cooked, take the skillet off the heat. Stir in 1/4 cup of heavy cream and 1/2 cup of finely grated parmesan cheese. Mix well until it is creamy. Taste your risotto and adjust the seasoning. Add more salt and pepper if needed. Let it sit for a few minutes to thicken before serving.
Tips & Tricks
Perfecting the Creaminess
To get that rich, creamy texture, stirring is key. You need to stir the rice often. This movement helps release the starches. Starch makes the risotto creamy. You want to keep the rice moving for even cooking.
When you add broth, timing matters. Always add it slowly, one ladle at a time. Wait until most of the liquid is gone before adding more. This lets the rice absorb the flavors well. Keep the broth warm, but don’t let it boil.
Enhancing Flavor
To boost the taste, use fresh herbs. I love adding thyme or rosemary. They pair well with mushrooms. For seasoning, a pinch of sea salt and black pepper work great.
Choosing cheese is important too. Fresh parmesan adds a nice touch. Grate it finely for better mixing. If you want a different flavor, try pecorino cheese.
Cooking Equipment
The right pan makes a big difference. Use a wide, heavy-bottomed skillet. This helps the rice cook evenly. A non-stick pan can also help prevent sticking.
For even cooking, keep your heat steady. Medium heat works best. If the risotto cooks too fast, it may burn. Stirring often will also help with even cooking.
Pro Tips
- Use Fresh Mushrooms: Opt for fresh mushrooms rather than canned for a more robust flavor and better texture.
- Stir Constantly: Keep stirring the risotto as you add the broth; this helps release the starch from the rice, making it creamier.
- Adjust Liquid Gradually: Add the broth gradually and allow the rice to absorb it fully before adding more for optimal cooking.
- Finish with Butter: For an extra layer of richness, stir in a tablespoon of butter just before serving.
Variations
Mushroom Variations
You can try many types of mushrooms in this dish. Shiitake, cremini, and button mushrooms work well together. Each type brings unique flavors and textures. You might also explore using portobello or oyster mushrooms. They add great depth to your risotto. If you want, throw in seasonal vegetables too. Spinach, peas, or asparagus brighten the dish. Just add them in the last few minutes of cooking.
Ingredient Substitutions
Not everyone can use cream or cheese. If you want a lighter option, use cashew cream. Blend soaked cashews with water for a creamy touch. Nutritional yeast can replace parmesan for a cheesy flavor. If you prefer vegan risotto, use vegetable broth and skip the cheese. This way, you keep all the flavors but make it plant-based.
Flavor Add-Ins
Herbs and spices can change the taste of your risotto. Try adding thyme or rosemary for a fresh kick. A pinch of nutmeg can add warmth too. For protein, consider adding cooked chicken, shrimp, or even lentils. These options make your dish more filling and nutritious. Mix and match to find your favorite flavors!
Storage Info
Refrigerating Risotto
Store leftover risotto in an airtight container. Let it cool first. This helps keep it fresh. Use glass or plastic containers that seal tightly. A good seal prevents air from getting in.
Reheating Tips
To reheat, use the stove, microwave, or oven. If using the stove, add a splash of broth. Stir often to keep it creamy. For the microwave, heat in short bursts. This helps you avoid overcooking. Always check if it’s hot all the way through.
Freezing Risotto
To freeze risotto, cool it completely first. Then, put it in freezer-safe bags. Remove as much air as you can. This helps prevent freezer burn. For thawing, place it in the fridge overnight. Reheat on the stove with a bit of broth to restore creaminess.
FAQs
What is the best rice for risotto?
The best rice for risotto is Arborio rice. This rice has high starch content. It becomes creamy when cooked, making your dish rich and smooth. Arborio rice absorbs flavors well. It cooks evenly, giving you the perfect texture. You can find it in most grocery stores. Always choose good quality rice for the best results.
Can I make risotto ahead of time?
Yes, you can make risotto ahead of time. Cook it fully, then cool it down quickly. Store it in an airtight container in the fridge. When you are ready to eat, reheat the risotto gently. Add a little broth or cream to bring back the creaminess. Stir it well to heat evenly. This way, you save time and still enjoy a warm meal.
How can I adjust the recipe for dietary restrictions?
You can easily adjust this recipe for dietary restrictions. For a gluten-free version, ensure your broth is gluten-free. For vegan risotto, skip the cheese and cream. Use plant-based cheese or nutritional yeast for a cheesy flavor. Coconut cream can be a great dairy-free option. These changes keep the dish tasty and enjoyable for everyone.
What to serve with creamy mushroom risotto?
Creamy mushroom risotto pairs well with many side dishes. A simple green salad adds freshness. Grilled vegetables bring a nice crunch. You can also serve it with garlic bread for a comforting meal. A light soup complements the risotto well. Consider serving a glass of white wine for a special touch. These sides enhance the experience and make a full meal.
This article covered how to make a creamy mushroom risotto. We discussed key ingredients like Arborio rice, mixed mushrooms, and broth. I shared step-by-step instructions to guide you through cooking the risotto, enhancing its flavor, and perfecting the texture.
Finally, I offered tips on variations and storage. With these insights, you can create a risotto that suits your tastes and can be enjoyed fresh or reheated later. Happy cookin


