Creamy Mushroom Chicken Thighs Rich and Easy Recipe

Are you ready to make a meal that impresses without the stress? My Creamy Mushroom Chicken Thighs recipe does just that! This dish is rich, flavorful, and oh-so-easy to whip up, perfect for any night of the week. Let me guide you step-by-step through preparing tender chicken thighs with a luscious mushroom sauce. Say goodbye to boring dinners and hello to comfort on a plate! Get ready to cook!
Why I Love This Recipe
- Comforting Flavor: This dish combines tender chicken thighs with rich, creamy mushroom sauce, making it a perfect comfort food for any occasion.
- Quick and Easy: With a prep time of only 10 minutes and a total cooking time of 30 minutes, this recipe is ideal for busy weeknights.
- Versatile Ingredients: Using simple ingredients like mushrooms, garlic, and onions, you can easily customize it with your favorite flavors or add extra veggies.
- Impressive Presentation: Serve it over rice or mashed potatoes, and sprinkle with fresh parsley for a restaurant-quality meal right at home.
Ingredients
Main Ingredients for Creamy Mushroom Chicken Thighs
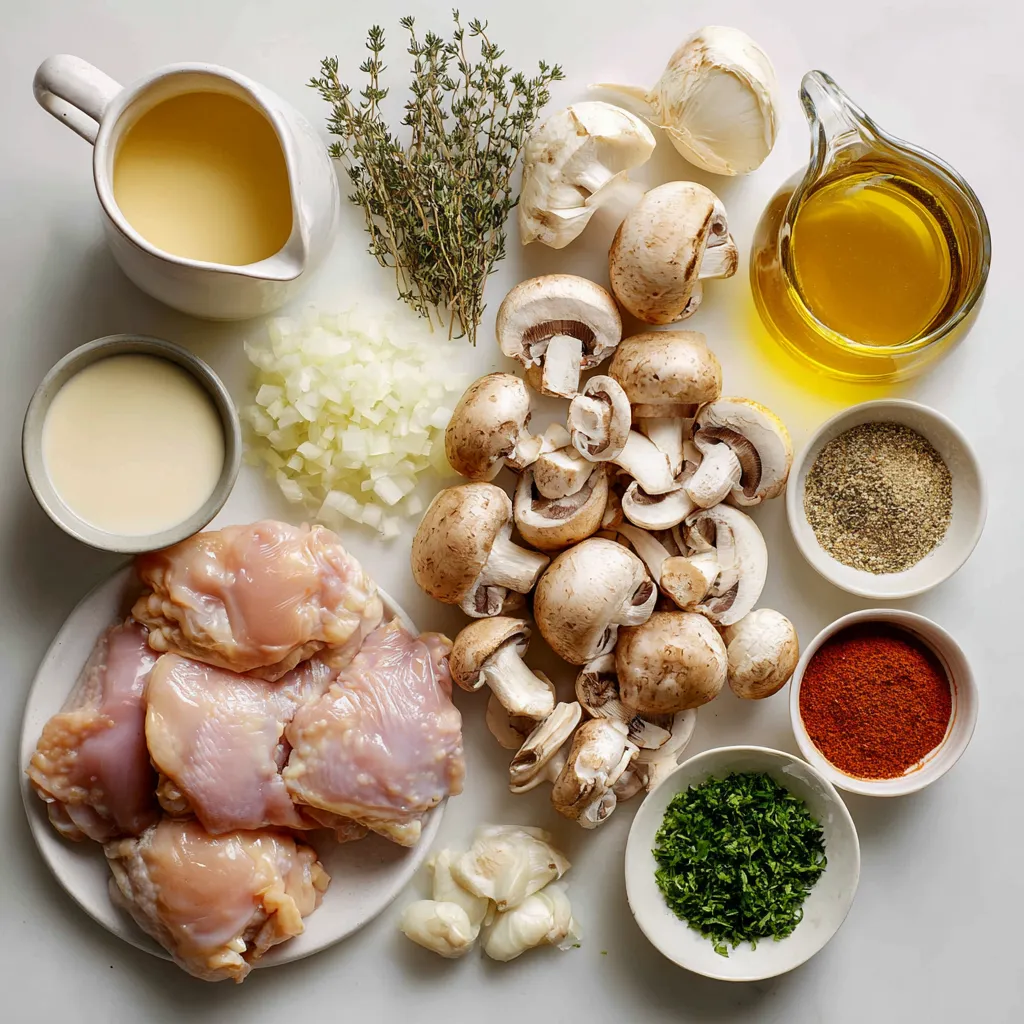
For this tasty dish, you will need:
- 4 boneless, skinless chicken thighs
- 2 cups of sliced mushrooms (button or cremini work well)
- 1 medium onion, finely chopped
- 3 cloves of garlic, minced
- 1 cup of heavy cream
- 1 cup of chicken broth (either homemade or store-bought)
- 2 tablespoons of olive oil
Seasoning and Flavor Enhancers
To boost flavor, gather these:
- 1 teaspoon of dried thyme
- 1 teaspoon of smoked paprika
- Salt and freshly cracked black pepper to taste
Garnishing Options
For a pretty finish and fresh taste, consider:
- Fresh parsley, chopped

Step-by-Step Instructions
Preparing the Chicken Thighs
Start by heating 2 tablespoons of olive oil in a large skillet over medium heat. While the oil warms, season 4 boneless, skinless chicken thighs. Use salt, black pepper, and 1 teaspoon of smoked paprika. Make sure each thigh gets an even coat. Once the oil shimmers gently, place the chicken thighs in the skillet. Sear them for 6-7 minutes until they turn golden brown. Flip the thighs and cook for another 6-7 minutes. When done, remove the chicken and set it aside on a plate.
Cooking the Vegetables
In the same skillet, add 1 medium finely chopped onion. Sauté for 2-3 minutes until the onion becomes soft and fragrant. Next, add 3 cloves of minced garlic and stir for 1 minute. The aroma will fill your kitchen! Then, toss in 2 cups of sliced mushrooms. Cook them for about 5-6 minutes. Stir occasionally until they soften and release their moisture.
Making the Creamy Mushroom Sauce
Now, pour in 1 cup of chicken broth. Use a wooden spoon to scrape any tasty bits from the bottom of the skillet. Let this simmer for 2-3 minutes. This step helps blend the flavors. Lower the heat and stir in 1 cup of heavy cream and 1 teaspoon of dried thyme. Mix well and let it simmer for 3-4 minutes. The sauce will thicken and become rich and creamy.
Combining Ingredients
Return the seared chicken thighs to the skillet. Nestle them in the creamy sauce. Cover the skillet and let the chicken cook on low heat for 5-7 minutes. This ensures the thighs are cooked through and soak up the sauce’s flavor. Afterward, taste the sauce and adjust the salt, pepper, or thyme if needed. Enjoy the rich aroma and the creamy delight you have created!
Tips & Tricks
Choosing the Right Mushrooms
For this dish, I recommend using button or cremini mushrooms. Both types add great flavor. Button mushrooms offer a mild taste, while cremini has a deeper, earthier flavor. Slice them evenly for even cooking. You can also mix different types for a fun twist.
Perfecting the Cream Sauce Texture
To get a rich and creamy sauce, use heavy cream. This helps the sauce thicken nicely and adds a velvety feel. After adding the cream, let it simmer gently. This allows the flavors to blend well. If your sauce is too thin, let it cook a bit longer. You can also add a cornstarch slurry if you need a quick fix.
Cooking Techniques for Juicy Chicken
Searing your chicken thighs properly is key. Start with medium heat and don’t rush it. Let each side brown for about 6-7 minutes. This builds a great crust. After searing, let them rest for a few minutes before returning them to the sauce. This keeps them juicy and tender. Cover the skillet while they simmer to trap moisture and flavor.
Pro Tips
- Choosing the Right Mushrooms: Opt for a mix of button and cremini mushrooms to enhance the dish’s flavor complexity.
- Perfectly Seasoned Chicken: Ensure you season the chicken thighs generously before searing to lock in flavor.
- Thickening the Sauce: Let the sauce simmer longer if you prefer a thicker consistency; this also intensifies the flavor.
- Garnishing for Appeal: Use freshly chopped parsley not only for flavor but also to add a vibrant color contrast on the plate.

Variations
Mushroom Alternatives for Unique Flavors
You can switch up the mushrooms for different tastes. Try shiitake mushrooms for a meaty flavor or portobello for a robust bite. If you want a milder taste, go for button mushrooms. Mixing different types can create a nice depth of flavor in your dish. Each type adds its own twist to the creamy sauce.
Adding Vegetables for Extra Nutrition
Adding vegetables boosts the nutrition and flavor. You can toss in spinach or kale for greens. Carrots or bell peppers add color and sweetness. Chop them into small pieces and add them when cooking the onions. This way, they will soften and blend well with the sauce. You’ll create a heartier meal that everyone will love.
Adjusting Creaminess with Dairy Alternatives
If you want a lighter dish, you can switch the heavy cream. Use coconut milk for a dairy-free option. It adds a nice sweetness and creaminess too. If you prefer lower fat options, try using Greek yogurt. Just stir it in at the end to keep it smooth. Each choice gives a different flavor profile while keeping the sauce rich.
Storage Info
How to Store Leftovers Properly
To store your creamy mushroom chicken thighs, let them cool first. Place the chicken and sauce in an airtight container. This keeps it fresh and prevents odors. Store it in the fridge for up to three days. Make sure to cover the container tightly.
Reheating Tips for Best Results
When you are ready to eat, reheat the chicken gently. Use a skillet over low heat. Add a splash of chicken broth or water to keep it moist. Stir occasionally until heated through. You can also use the microwave. Heat in short bursts, stirring in between.
Freezing Instructions for Future Meals
If you want to save some for later, freezing works well. Place the cooled chicken and sauce in a freezer-safe container. Label it with the date. You can freeze it for up to three months. To eat, thaw it in the fridge overnight. Reheat as mentioned above. Enjoy your meal anytime!
FAQs
What side dishes pair well with Creamy Mushroom Chicken Thighs?
You can serve Creamy Mushroom Chicken Thighs with many tasty sides. Here are a few ideas:
- Fluffy rice for soaking up the sauce
- Silky mashed potatoes for a comforting touch
- Steamed green vegetables like broccoli or asparagus for balance
- A fresh salad for a light, crisp contrast
Can I use chicken breasts instead of thighs?
Yes, you can use chicken breasts. They will cook faster than thighs. Keep an eye on them to avoid drying out. Use the same cooking steps. Adjust the cooking time to about 5-6 minutes per side. This way, you keep them juicy and tender.
How can I make this recipe lighter?
To lighten up this dish, try these tips:
- Use low-fat cream or Greek yogurt instead of heavy cream
- Swap chicken thighs for skinless chicken breasts
- Serve with a salad or steamed veggies instead of rice or potatoes
These changes help cut calories while keeping the flavor.
How long does it take to fully cook chicken thighs?
Cooking chicken thighs takes about 12-14 minutes total. Sear them for 6-7 minutes on each side. After that, let them cook in the sauce for 5-7 minutes. Always check that the internal temperature reaches 165°F (75°C) for safety.
Creamy Mushroom Chicken Thighs are a delightful dish that combines rich flavors and simple steps. We covered key ingredients, cooking methods, and tips for the best outcome. Remember to experiment with mushrooms and veggies to make it your own. Proper storage helps keep leftovers fresh, and a few reheating tips ensure the meal tastes great later. Enjoy trying this recipe for a tasty, satisfying dinner any night of the week. You’ll impress anyone who tries i

Creamy Mushroom Chicken Thighs Delight
Ingredients
- 4 pieces boneless, skinless chicken thighs
- 2 cups mushrooms, sliced
- 1 medium onion, finely chopped
- 3 cloves garlic, minced
- 1 cup heavy cream
- 1 cup chicken broth
- 2 tablespoons olive oil
- 1 teaspoon dried thyme
- 1 teaspoon smoked paprika
- to taste salt
- to taste freshly cracked black pepper
- for garnish fresh parsley, chopped
Instructions
- Begin by heating the olive oil in a large, heavy skillet over medium heat. While the oil heats, season the chicken thighs with a generous sprinkle of salt, black pepper, and smoked paprika, ensuring they are evenly coated.
- Once the oil shimmers gently, carefully place the seasoned chicken thighs in the skillet. Sear each thigh for approximately 6-7 minutes on one side until they develop a beautiful golden-brown crust. Flip and repeat on the opposite side. Once cooked, remove the chicken from the skillet and set it aside on a plate.
- In the same skillet, toss in the finely chopped onion and sauté for 2-3 minutes until the onions turn translucent and aromatic. Then, add the minced garlic, stirring for an additional minute until it releases a delightful fragrance.
- Next, introduce the sliced mushrooms to the skillet. Sauté them for about 5-6 minutes, stirring occasionally, until they soften and begin to release their moisture, creating a savory base for the sauce.
- Carefully pour in the chicken broth, using a wooden spoon to scrape the flavorful browned bits from the bottom of the skillet. Allow this mixture to come to a gentle simmer for about 2-3 minutes to infuse the flavors.
- Reduce the heat to low and carefully mix in the heavy cream and dried thyme. Stir well to combine and let it simmer again for 3-4 minutes. This will allow the sauce to thicken slightly and become rich and creamy.
- Return the seared chicken thighs back into the skillet, ensuring they are nestled in the sauce. Cover the skillet and let the chicken cook on low heat for an additional 5-7 minutes, or until the chicken is cooked through and the sauce is delectably creamy.
- Taste the creamy sauce and adjust the seasoning if necessary, adding more salt, pepper, or thyme to suit your preference.


![- 4 chicken thighs (bone-in, skin-on) - 2 tablespoons jerk seasoning - 1 tablespoon olive oil - Salt and pepper to taste - 1 ripe pineapple, peeled and diced into small cubes - 1 red bell pepper, diced into small pieces - 1 small red onion, finely chopped - 1 jalapeño, deseeded and minced (adjust for spice preference) - Juice of 1 fresh lime - Fresh cilantro, chopped (for garnish) For this jerk chicken with pineapple salsa recipe, use chicken thighs for their rich flavor. The jerk seasoning adds a spicy and smoky kick. The pineapple and vegetables bring freshness and sweetness to the dish. - Adjust spice levels: If you want less heat, skip the jalapeño or use less jerk seasoning. - Additional garnishes: Lime wedges and extra cilantro make great toppings. You can also add avocado for creaminess. Feel free to customize these ingredients according to your taste. The key is to balance heat, sweetness, and freshness. For the full recipe, check out the [Full Recipe]. Start by mixing the chicken thighs with jerk seasoning, olive oil, salt, and pepper. Use your hands to coat each piece well. This step is key for flavor. Cover the bowl with plastic wrap and place it in the fridge. Marinate for at least 1 hour, but overnight gives the best taste. In a clean bowl, combine diced pineapple, red bell pepper, red onion, and jalapeño. Squeeze the juice of one lime over it and add a pinch of salt. Stir gently to mix. Let this salsa rest for at least 15 minutes. This resting time allows the flavors to blend nicely. Heat your grill or grill pan to medium-high. Take the chicken out of the marinade and let any extra drip off. Grill the chicken for about 6-8 minutes on each side. Use a meat thermometer to check that it reaches 165°F (75°C). This ensures it is fully cooked and safe to eat. Arrange the grilled jerk chicken on a platter. Spoon the bright pineapple salsa over the top. For a finishing touch, sprinkle fresh cilantro on the dish. You can also serve it on a rustic wooden board with lime wedges and extra pineapple chunks. This adds a fun, tropical vibe to your meal. For the full recipe, check out the [Full Recipe]. The key to great jerk chicken is marinating well. Many people rush this step, but a good marinating time is essential. Aim for at least one hour, or overnight if you can. This allows the chicken to soak up the flavors deeply. Common mistakes to avoid: - Skipping the marinade: This makes the chicken bland. - Using too much heat: Jerk seasoning has a kick. Balance it with other flavors. - Not resting the chicken: Skipping this step makes the meat dry. Flavor enhancements: - Add some lime zest to your marinade for extra tang. - Try a bit of honey for a hint of sweetness. - Use smoked paprika for a deeper, richer flavor. The salsa adds brightness to the dish. Choosing ripe pineapples is key to great flavor. Tips for selecting ripe pineapples: - Look for pineapples with a sweet smell at the base. - The skin should be golden and slightly firm. - Press gently; it should give just a little. Variations for additional flavor: - Add diced mango for extra sweetness. - Mix in some chopped mint for a fresh twist. - Try a dash of cumin for a warm, earthy note. These tips will help you create a jerk chicken dish that shines. Don't forget to check out the Full Recipe for more details! {{image_4}} You can swap chicken for other meats. Try pork or turkey. Both soak up jerk flavor well. If you prefer seafood, shrimp or fish works too. Just keep an eye on cooking times. Seafood cooks quickly, so grill it for just a few minutes. Feel free to play with the vegetables. You can use different peppers like green or yellow. Red onions are great, but sweet onions add a nice touch too. Want to mix it up? Add diced mango or avocado to the salsa. Fresh herbs like mint or basil can add fun flavors too. For gluten-free options, check your jerk seasoning. Make sure it has no gluten. You can enjoy jerk chicken without any worries. If you're looking for low-carb choices, skip the sugar in the salsa. You can also serve the chicken with a salad instead of rice. This keeps it fresh and light. To store leftovers, place the jerk chicken in an airtight container. Let it cool to room temperature before sealing. This helps keep it fresh longer. Jerk chicken can stay in the fridge for up to three days. When you are ready to eat, reheat it in the oven or on the grill. Heat it to 165°F (75°C) for safe eating. Avoid reheating in the microwave if you want crispy skin. Yes, you can freeze jerk chicken. Wrap it tightly in plastic wrap and then place it in a freezer-safe bag. It can last up to three months in the freezer. For thawing, move the chicken to the fridge overnight. If you need it fast, you can also use the microwave on the defrost setting. After thawing, make sure to heat it well before serving. This keeps it tasty and safe to eat. For the full recipe, visit the [Full Recipe]. I suggest marinating the chicken for at least one hour. For the best flavor, try to marinate overnight. This allows the jerk seasoning to soak in deeply, making the chicken tasty and juicy. Jerk chicken pairs well with a variety of sides. Some great options are: - Rice and peas - Grilled vegetables - Coleslaw - Fried plantains - Cornbread These sides balance the rich flavors of the chicken. Yes, you can make the salsa ahead of time. I recommend preparing it a few hours before serving. This gives the salsa time to rest. The flavors will mix better, making it even more delicious. Jerk seasoning has a unique and bold flavor. It combines heat from peppers, sweetness from spices, and a hint of smokiness. Common ingredients include allspice, thyme, and garlic. This mix creates a savory and vibrant taste. The spice level of jerk chicken can vary. It depends on the amount of jalapeño you use. If you want less heat, remove the seeds. For more spice, add extra jalapeño or a hotter pepper. Adjusting the seasoning lets you enjoy the dish at your preferred heat level. You learned about making jerk chicken with easy steps and key ingredients. Focus on marinating the chicken and crafting the pineapple salsa for the best flavor. Enjoy grilling techniques to get that perfect char. Remember to avoid common mistakes while cooking. You can also try different proteins and flavor swaps for variety. Store leftovers properly to enjoy later. Your jerk chicken can impress anyone at the table. Now, it’s time to put this knowledge to use and enjoy your delicious creation!](https://dishtreats.com/wp-content/uploads/2025/06/27cc5104-89a5-4e73-8f97-3d018bc709fa-768x768.webp)
![To make Classic Chicken Marsala, you will need: - 4 boneless, skinless chicken breasts - Sea salt and freshly cracked black pepper, to taste - 1/2 cup all-purpose flour, for dredging - 4 tablespoons extra virgin olive oil - 2 tablespoons unsalted butter - 8 ounces cremini mushrooms, thinly sliced - 1 cup low-sodium chicken broth - 2 tablespoons freshly squeezed lemon juice - 1/4 cup fresh parsley, finely chopped, for garnish Using fresh ingredients makes all the difference in your dish. Fresh chicken tastes better and has better texture. Fresh mushrooms add depth and flavor. Fresh herbs, like parsley, bring vibrant notes to your plate. Fresh ingredients enhance the overall taste and make your meal more enjoyable. They can transform a simple dish into something special. If you can't find certain items, don't worry! Here are some easy swaps: - Chicken breasts: You can use chicken thighs for a richer flavor. - Cremini mushrooms: Use button mushrooms if cremini are not available. - Olive oil: Use canola or vegetable oil if you're out of olive oil. - Chicken broth: Vegetable broth works well for a lighter taste. - Lemon juice: You can use vinegar as a tangy alternative if you lack lemons. These substitutes will keep your Chicken Marsala flavorful and delicious, even with changes. 1. First, season the chicken breasts with salt and pepper. 2. Dredge each breast in flour. Shake off any extra flour. 3. Heat 2 tablespoons of olive oil in a skillet over medium heat. 4. Place the chicken in the skillet. Cook for 5-6 minutes on each side. 5. Remove the chicken from the skillet and keep it warm on a plate. 6. Add the remaining olive oil and butter to the same skillet. 7. Once the butter melts, add the sliced mushrooms. Sauté for 5 minutes. 8. Pour in the chicken broth and lemon juice. Scrape the skillet's bottom. 9. Simmer the sauce for 5 minutes until it thickens. 10. Return the chicken to the skillet. Spoon sauce over the top. 11. Simmer everything together for 2-3 minutes. 12. Finish with parsley before serving. To get the best Chicken Marsala, focus on these techniques: - Dredging: Flour helps create a crust. It locks in moisture and adds flavor. - Searing: Cooking the chicken on medium heat gives a golden crust. - Deglazing: Scraping the skillet adds depth to the sauce. - Simmering: Letting the sauce thicken enhances the flavor. Here are some tips to avoid issues while cooking: - Skipping seasoning: Always season the chicken well. It makes a big difference. - Overcrowding the skillet: Cook in batches if needed. This keeps the heat high. - Not checking doneness: Use a meat thermometer. Chicken should reach 165°F. - Rushing the sauce: Let it simmer. This builds the best flavor. For the complete cooking process, check the Full Recipe. Serve Chicken Marsala on a large plate. Spoon the rich mushroom sauce over the chicken. Pair it with creamy mashed potatoes or steamed vegetables. These sides add color and balance to the dish. I love adding a bright green salad too. It makes the meal complete and fresh. To boost flavor, season the chicken well with sea salt and pepper. Dredging it in flour gives it a nice crust. Be sure to use fresh mushrooms for the best taste. Cremini mushrooms add a deep, earthy flavor. Deglazing the skillet with chicken broth is key. It helps pick up all the tasty bits left behind. A splash of lemon juice brightens the dish. It cuts through the richness and makes every bite pop. When it comes to drinks, I suggest a dry white wine. A good Sauvignon Blanc or Chardonnay works well. These wines complement the chicken and sauce without overpowering them. If you prefer something non-alcoholic, try sparkling water with lemon. It refreshes your palate between bites. Enjoy your meal with a suitable drink for a perfect dining experience. Check out the Full Recipe for more details. {{image_4}} You can add herbs and spices to give Chicken Marsala a fun twist. Try adding fresh thyme or rosemary for a fragrant touch. Paprika can add a bit of heat and color. You can also use garlic powder or onion powder to deepen the flavor. Mix these into the flour before dredging the chicken. This small change can make a big difference in taste. If you want a vegetarian or vegan version, replace the chicken with hearty mushrooms or eggplant. Both options soak up the sauce well. Use vegetable broth instead of chicken broth for a rich flavor. You may also try tofu for a protein boost. Dredge the tofu in flour like the chicken for a satisfying crunch. You can play with the sauce to change the flavor profile. For a creamier version, add heavy cream to the broth. This will give you a rich, luscious sauce that coats the chicken well. You can also use Marsala wine for a sweeter touch. If you want a tangy flavor, use balsamic vinegar instead of lemon juice. Each of these swaps can help you create a unique dish. For the full recipe, check the [Full Recipe]. To store your Classic Chicken Marsala, let it cool first. Place the chicken and sauce in an airtight container. Make sure to separate the sauce from the chicken if you can. This helps keep the chicken moist. Place the container in the fridge. It’s best to use the leftovers within three days for the best taste. When reheating Classic Chicken Marsala, use a skillet for the best results. Warm it over medium heat. Add a splash of chicken broth or water to keep it moist. Stir gently until heated through. You can also microwave it, but be careful not to overheat. This can dry out the chicken. Classic Chicken Marsala lasts about three days in the fridge. If you want to keep it longer, freeze it. In the freezer, it will last up to three months. Just remember to store it in a freezer-safe container. To enjoy it later, thaw it in the fridge overnight before reheating. For more details on making this dish, check out the Full Recipe. Chicken Marsala is made of simple, tasty ingredients. You need chicken breasts, mushrooms, and Marsala wine. The sauce gets its flavor from chicken broth and lemon juice. You also use flour to coat the chicken. Olive oil and butter add richness. Fresh parsley gives a nice touch at the end. Yes, you can prepare Chicken Marsala ahead of time. Cook the chicken and store it in the fridge. Keep the sauce separate to avoid sogginess. When you are ready to serve, just reheat both. This keeps the chicken juicy and the sauce fresh. The best wine for Chicken Marsala is a dry Marsala wine. This wine adds depth and sweetness to the dish. If you can't find Marsala, you can use dry sherry or white wine. These alternatives work well but may change the flavor slightly. Always choose a wine you enjoy drinking! In this article, we covered the crucial ingredients for Chicken Marsala and why freshness matters. I shared step-by-step instructions to help you cook it perfectly. We explored tips for serving and pairing drinks, as well as variations for every taste. Finally, I explained how to store leftovers safely. Cooking Chicken Marsala can be easy and fun. With the right tips and knowledge, you can enjoy a delicious meal every time.](https://dishtreats.com/wp-content/uploads/2025/06/e9aedbd7-71f4-4133-b36d-4fb1a0e8152d-768x768.webp)

![- 1 cup green or brown lentils - 1 tablespoon olive oil - 1 medium onion, finely chopped - 2 cloves garlic, minced - 2 medium carrots, diced into bite-size pieces - 2 stalks celery, diced - 1 red bell pepper, diced - Ground cumin - Smoked paprika - Turmeric - Salt - Black pepper - 6 cups vegetable broth (preferably low-sodium) - 1 (14-ounce) can diced tomatoes, including their juices - 2 tablespoons fresh lemon juice In this vegan lentil soup, I love using green or brown lentils. They add a hearty feel. The olive oil helps to sauté the veggies, making them soft and full of flavor. The mix of vegetables is key. You need an onion for sweetness. Garlic adds a nice kick. Carrots and celery give texture. The red bell pepper adds color and sweetness. For spices, I use ground cumin and smoked paprika. They bring warmth and depth. A bit of turmeric adds a lovely golden hue. Salt and black pepper round out the flavors. Liquid ingredients are vital too. I use vegetable broth for a rich base. Diced tomatoes add acidity and sweetness. Lastly, fresh lemon juice brightens the dish. You can find the full recipe above for all the details! - Rinse the lentils and chop the vegetables. - Heat olive oil and sauté onion and garlic. Start by rinsing one cup of green or brown lentils under cold water. This helps remove any dirt or debris. While the lentils drain, chop your vegetables. You will need one medium onion, two cloves of garlic, two medium carrots, two stalks of celery, and one red bell pepper. Next, in a large pot, heat one tablespoon of olive oil over medium heat. Add the chopped onion and cook for about five minutes. Stir until it becomes soft and clear. Then, add the minced garlic. Cook for one more minute to release its wonderful aroma. - Incorporate remaining vegetables and spices. - Add lentils, broth, and tomatoes, bring to a boil. Now, add the diced carrots, celery, and red bell pepper to the pot. Cook for another five to seven minutes. Stir often until the vegetables become tender. To build flavor, sprinkle in one teaspoon of ground cumin, one teaspoon of smoked paprika, and half a teaspoon of turmeric. Mix well and cook for one more minute. After the spices bloom, add the rinsed lentils, six cups of vegetable broth, and one can of diced tomatoes with their juices. Increase the heat and bring this mixture to a boil. Once it boils, reduce the heat and cover the pot. Let it simmer for 25 to 30 minutes, or until the lentils are soft but not mushy. - Simmer and add kale. - Season and serve. Once the lentils are cooked, stir in two cups of chopped kale. Let it simmer for an additional five to seven minutes. The kale should turn bright green and wilted. Now, season your soup with salt, freshly ground black pepper, and two tablespoons of fresh lemon juice. The lemon juice adds a nice zing. Taste it and adjust the seasoning as needed. Serve the soup hot, garnished with fresh parsley for a hint of color and flavor. For a full recipe, please see the [Full Recipe]. Enjoy your warm and nourishing vegan lentil soup! To boost the taste of your vegan lentil soup, consider these tips: - Add spices: Try bay leaf for depth or chili flakes for heat. - Sauté longer: Cook your vegetables a bit more. This gives a richer, deeper flavor. This soup shines when paired with the right sides. Here are my favorite ways: - Bread: Serve it with homemade bread for a warm, cozy meal. - Garnishes: Top it with nutritional yeast for a cheesy flavor or creamy avocado for richness. Lentils are packed with nutrients. Here’s why they are great: - Nutritional benefits: They provide protein, fiber, and iron, making them a healthy choice. - Leafy greens: Adding kale boosts vitamins and minerals. It also adds color and texture. For the full experience, check out the Full Recipe. These tips will help you create a dish that's not just tasty but also nourishing! {{image_4}} You can switch lentils for other beans or pulses. Black beans or chickpeas work well. Each bean adds a unique taste and texture to the soup. You can also use seasonal vegetables. Try zucchini in summer or butternut squash in fall. These swaps keep your soup fresh and exciting. To make your soup creamier, add coconut milk. It gives a rich texture and a hint of sweetness. You can also use fresh herbs like basil or cilantro. They add bright flavors and an herbal kick. A sprinkle of fresh herbs before serving makes a big difference. If you want a faster option, try an Instant Pot. Cook the soup on high pressure for about 15 minutes. You can also use a slow cooker. Simply set it on low for 6-8 hours. For a creamy version, use a blender. Blend half the soup and mix it back in. This makes the soup thick and smooth. Explore the [Full Recipe] for more ideas on making this soup your own! After enjoying your vegan lentil soup, you can store leftovers easily. Let the soup cool down first. Then, transfer it to airtight containers. Glass or plastic containers work well for this. Store it in the fridge for up to five days. For longer storage, freeze the soup. Use freezer-safe containers or bags to prevent freezer burn. The soup can last up to three months in the freezer. When it’s time to enjoy the soup again, reheat it gently. You can use a pot on the stove or a microwave. If using a pot, heat it over medium-low until warm. Stir occasionally to prevent sticking. In the microwave, use a microwave-safe bowl. Heat in short bursts, stirring in between. This helps heat evenly. Avoid overcooking, as the lentils may become mushy. Preparing for future meals is smart and easy with this soup. Chop your vegetables ahead of time, like onion, garlic, and carrots. Store them in the fridge for quick use. You can also rinse your lentils in advance and keep them in a container. Making larger batches is a great idea too. This way, you always have a warm, nourishing meal ready. Just follow the full recipe and freeze extra portions for busy days. Green and brown lentils are great for soup. They hold their shape well. Green lentils have a slightly peppery taste. Brown lentils are milder and cook faster. Both work well in this vegan lentil soup. Yes, you can adapt this recipe. If you prefer meat, try adding cooked chicken or sausage. For dairy, a splash of cream or some cheese can add richness. Just remember, this makes it less vegan. To thicken your soup, you have a few options. You can mash some lentils against the pot. Adding a spoonful of tomato paste also helps. If you want a creamier feel, blend a portion of the soup. These techniques will help you achieve the perfect consistency. For more details, check the full recipe. This blog post covers the key aspects of making a hearty lentil soup. We discussed the essential ingredients, including lentils, vegetables, and spices. I shared step-by-step instructions for preparing and cooking the soup. We explored tips for enhancing flavors and serving suggestions. You can create variations with different ingredients and learn best practices for storing and reheating leftovers. Lentil soup is a healthy, versatile meal that is easy to make. Enjoy experimenting with your own flavors and keep discovering new ways to make it.](https://dishtreats.com/wp-content/uploads/2025/06/c46bc7f1-46e5-4579-b786-1848127316df-768x768.webp)