Creamy Feta Pasta Salad Simple and Flavorful Dish

Looking for a dish that’s quick, tasty, and sure to impress? This Creamy Feta Pasta Salad has it all! With rich feta, crunchy veggies, and a zesty dressing, it’s perfect for parties or a light lunch. Follow my easy steps and create a flavorful meal that everyone will enjoy. Dive into this recipe and elevate your pasta salad game today!
Ingredients
Essential Ingredients
- 8 oz (225 g) fusilli pasta
- 1 cup feta cheese, crumbled
- 1/2 cup Greek yogurt
- 1/4 cup extra virgin olive oil
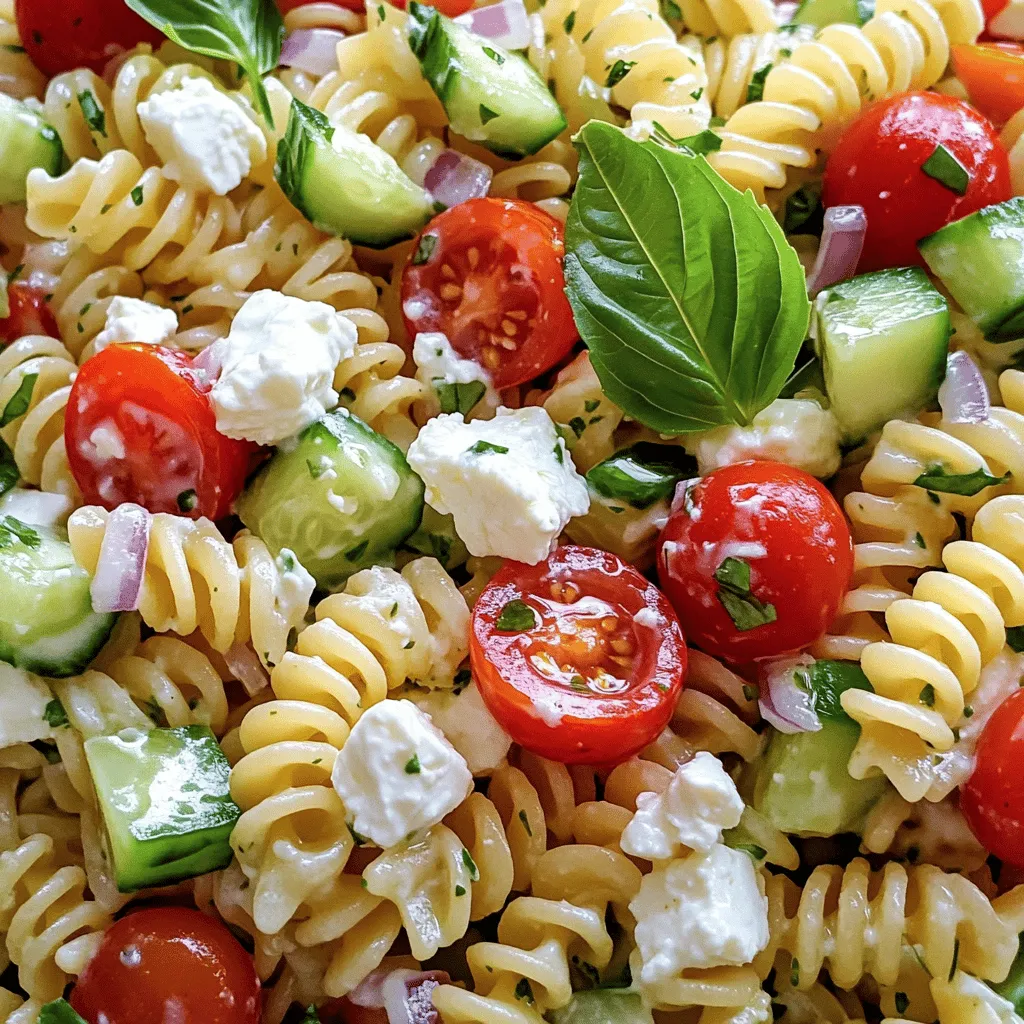
The heart of this creamy feta pasta salad lies in its essential ingredients. Fusilli pasta twists hold the creamy dressing well. I love using crumbled feta cheese for its rich taste. Greek yogurt adds a nice tang. Extra virgin olive oil brings a smooth finish.
Fresh Produce Components
- 1 cup cherry tomatoes, halved
- 1 cucumber, diced
- 1/4 red onion, finely chopped
Fresh produce makes this dish pop! Cherry tomatoes add sweetness and color. Diced cucumber gives a nice crunch. Finely chopped red onion adds a zesty bite. Together, they create a bright and fresh flavor.
Seasonings and Condiments
- 1 tablespoon fresh lemon juice
- 1 teaspoon dried oregano
- 1/2 teaspoon garlic powder
- Salt and pepper to taste
Seasonings bring all the flavors together. Fresh lemon juice brightens the dish. Dried oregano adds a warm, earthy note. Garlic powder gives a hint of savory depth. Don’t forget to add salt and pepper to taste. These small touches make a big difference!
Step-by-Step Instructions
Cooking the Pasta
To start, bring a large pot of salted water to a boil. This step is key. The salt helps to flavor the pasta as it cooks. Once the water boils, add the fusilli pasta. Cook it according to the package instructions. You want it to be al dente, which means it should still have a bite. This usually takes about 8-10 minutes. After cooking, drain the pasta in a colander. Rinse it under cold water. This stops the cooking and helps cool it down. Set the cooled pasta aside for later.
Preparing the Creamy Dressing
Next, let’s make the creamy dressing. In a medium bowl, add the crumbled feta cheese and Greek yogurt. Use a fork to mash these together until smooth. Then, pour in the extra virgin olive oil and the fresh lemon juice. Add the dried oregano and garlic powder too. Don’t forget a pinch of salt and pepper! Mix everything well. Taste it and adjust the seasoning if needed. This creamy dressing is what makes the salad shine.
Assembling the Salad
Now it’s time to combine everything. In a large mixing bowl, add the cooled fusilli pasta. Then, toss in the halved cherry tomatoes, diced cucumber, and finely chopped red onion. Mix these gently so the pasta and veggies blend well. Next, drizzle the creamy feta dressing over the pasta mixture. Use a spatula to toss it all together. Make sure every piece is coated with the dressing. Finally, cover the bowl and chill the salad in the fridge for at least 30 minutes. This allows all the flavors to meld beautifully. Enjoy your creamy feta pasta salad!
Tips & Tricks
Tips for the Best Creamy Feta Pasta Salad
- Importance of chilling: Chilling your salad is key. It helps flavors blend. After mixing, cover the bowl and place it in the fridge for at least 30 minutes. This wait makes a big difference.
- Adjusting flavors with seasoning: Taste your dressing as you mix. You can add a pinch more salt or lemon juice. These small tweaks can really elevate the dish.
- Using high-quality ingredients: Choose fresh pasta and good feta cheese. Quality can change the taste. A rich, creamy feta makes the salad special.
Presentation Ideas
- Serving suggestions: Serve the pasta salad in a big bowl for sharing. Or, portion it into smaller bowls for a nice touch.
- Garnishing with fresh basil: Fresh basil leaves make a great garnish. They add color and a lovely aroma. Just sprinkle them on top before serving.
- Serving in different dishware: Use a colorful plate or a glass bowl. These choices can make your dish pop and look more inviting.
Making Ahead
- How long it lasts in the fridge: The salad stays fresh for about 3 days when kept in the fridge. Just make sure it’s sealed well.
- Reheating tips and reminders: You can enjoy this salad cold or at room temperature. If you heat it, don’t microwave for too long. This keeps the texture nice.

Variations
Protein Additions
You can boost the protein in your creamy feta pasta salad easily.
- Adding grilled chicken: Cook some chicken breast on the grill. Slice it up and toss it in the salad for a hearty meal. The smoky flavor pairs well with the creamy dressing.
- Incorporating shrimp or salmon: If you like seafood, shrimp or salmon works great. Cook shrimp until pink and mix it in. For salmon, bake or grill it and flake it into the salad. Both options add a tasty twist.
Vegetarian Alternatives
Even if you want to keep it vegetarian, there are fun swaps to try.
- Substituting feta with another cheese: If you don’t have feta, try goat cheese or ricotta. Both will give your salad a creamy texture and rich taste.
- Adding more veggies like bell peppers: Load up on colorful veggies! Diced bell peppers, zucchini, or even spinach can add crunch and freshness. This makes your salad more vibrant and healthy.
Different Dressings
Changing up the dressing can really change the dish.
- Using lemon vinaigrette: If you want a lighter option, mix olive oil, lemon juice, and a hint of honey. This will give a zesty kick to the salad.
- Experimenting with pesto: Pesto is another great choice. It adds a fresh, herbal flavor. Just mix it in with your pasta and veggies for a new taste.
Storage Info
Short-Term Storage
To keep your creamy feta pasta salad fresh, store it in the fridge. Place the salad in an airtight container. This keeps out moisture and other odors. Make sure to cover it tightly. Your salad will stay good for about three to five days.
Long-Term Storage
You can freeze this salad, but be aware it may change texture. If you freeze it, use a freezer-safe container. When you want to eat it, thaw it overnight in the fridge. Avoid refreezing to keep the best taste.
Signs of Spoilage
Check for signs of spoilage before enjoying your salad. Look for any unusual smells or changes in color. If the salad feels slimy or has visible mold, it’s time to toss it. Typically, the salad lasts three to five days in the fridge. Always use your best judgment.
FAQs
How do you make Creamy Feta Pasta Salad?
To make this salad, start by cooking fusilli pasta until it is al dente. Drain and cool it under cold water. In a bowl, mix crumbled feta, Greek yogurt, olive oil, lemon juice, oregano, garlic powder, salt, and pepper. Mash these ingredients until creamy. Next, combine the cooled pasta with cherry tomatoes, cucumber, and red onion. Drizzle the creamy dressing over the pasta and toss gently. Chill the salad for at least 30 minutes before serving. This allows the flavors to mix well.
Can I use different pasta shapes?
Yes, you can use different pasta shapes. I recommend using bowtie or penne pasta for a fun twist. These shapes hold the dressing well and add texture. You can also try whole wheat or gluten-free pasta for a healthier option. Just make sure to adjust cooking times based on the pasta you choose.
Is it possible to make this salad vegan?
Absolutely! To make this salad vegan, replace feta with a vegan cheese option. You can also use dairy-free yogurt instead of Greek yogurt. For an extra flavor boost, add some nutritional yeast. This will give a cheesy taste without dairy. Using fresh herbs can also enhance the flavor, keeping it vibrant and fresh.
How long can I keep leftovers?
You can store leftovers in the fridge for up to three days. Make sure to cover the salad tightly to keep it fresh. If the salad becomes too dry, add a splash of olive oil or lemon juice before serving. Always check for any signs of spoilage before eating. If it smells off or looks strange, it’s best to toss it out.
This blog post covered how to make a Creamy Feta Pasta Salad. We looked at essential ingredients like fusilli pasta, feta, and fresh veggies. Detailed instructions guided you through cooking pasta and preparing a creamy dressing. I shared tips for enhancing flavor and presentation. Variations allow for protein additions or different dressings. Lastly, I provided storage advice to keep your salad fresh.
Enjoy making this easy, tasty dish for any gathering or meal!


![- 1 lb boneless, skinless chicken breast, thinly sliced - 1 large bell pepper (red or yellow), sliced into strips - 1 cup broccoli florets, cut into bite-sized pieces - 1 cup snap peas, trimmed - 1 medium carrot, julienned - 1/4 cup low-sodium soy sauce - 1 tablespoon honey - 1 tablespoon rice vinegar - 2 tablespoons sesame oil, divided - 3 cloves garlic, finely minced - 1 tablespoon fresh ginger, finely minced - Sesame seeds for garnish - 3 green onions, chopped (white and green parts kept separate) Using these ingredients, you can create a dish that bursts with flavor. Each element adds its own unique taste. The chicken breast serves as a great protein base. Bell peppers and broccoli contribute crunch and color. Snap peas and carrots add sweetness and texture. When you use sesame oil, garlic, and ginger, you create a rich aroma. These cooking essentials infuse the dish with depth. Finally, the sesame seeds and green onions provide a delightful finish. They enhance the dish's look and add a touch of brightness. For the full recipe, check the detailed instructions. Heat a large skillet or wok over medium-high heat. Add 1 tablespoon of sesame oil. When the oil shimmers, add the thinly sliced chicken. Season it with salt and pepper. Cook the chicken for 5-7 minutes. Stir it often until golden brown and fully cooked. Once done, remove the chicken from the skillet and set it aside. In the same skillet, add the second tablespoon of sesame oil. Let it heat up. Then, add the minced ginger and garlic. Sauté these for about 30 seconds. This step helps unlock their amazing flavors. Now, add the sliced bell pepper, broccoli florets, snap peas, and julienned carrot to the skillet. Stir-fry the vegetables for 4-5 minutes. You want them tender but still crisp. This keeps the dish colorful and crunchy. Return the cooked chicken to the skillet with the vegetables. In a separate small bowl, mix the soy sauce, honey, and rice vinegar. Whisk these until they blend well. Pour this sauce evenly over the chicken and veggies in the skillet. Stir everything together gently. Bring the mixture to a simmer over medium heat. This helps combine all the flavors and makes the dish more delicious. Next, slowly add the cornstarch slurry to the stir-fry. Stir constantly as you add it. Cook for 1-2 more minutes until the sauce thickens to your liking. This gives the dish a nice glossy finish. Remove the skillet from the heat. Add the chopped green tops of the green onions. Toss everything gently to combine. Serve the stir-fry on plates. Sprinkle sesame seeds on top for extra crunch. Enjoy this delightful meal! For the full recipe, you can refer to the earlier sections. For the best chicken stir-fry, use boneless, skinless chicken breast. Thinly slice it for quick cooking. This cut stays tender and soaks up flavors well. Heat your skillet over medium-high heat. This helps sear the chicken quickly, locking in moisture. Want to spice things up? Try adding a dash of red pepper flakes for heat. You can also mix in a splash of hoisin sauce for extra sweetness. Serve this stir-fry with jasmine rice or noodles. Both options soak up the sauce nicely. To plate your dish, start with a mound of rice in the center. Arrange the chicken and veggies around it. This creates a beautiful, colorful display. For garnish, sprinkle sesame seeds and chopped green onions on top. This adds a nice crunch and fresh flavor. For the full recipe, click here: [Full Recipe]. {{image_4}} You can easily change the protein in this dish. If you don’t like chicken, try these options: - Pork: Thinly sliced pork loin works well. - Beef: Flank steak adds great flavor. - Tofu: Firm tofu is perfect for a vegetarian option. - Shrimp: Quick-cooking shrimp gives a seafood twist. For vegetarian or vegan options, stick with tofu or tempeh. These protein sources soak up flavors well and add a nice texture. If you use tofu, press it to remove excess water for better frying. You can swap vegetables based on what’s in season or what you like best. Here are some great choices: - Zucchini: Adds a nice crunch and color. - Mushrooms: They bring an earthy flavor. - Asparagus: Great for spring dishes. - Cauliflower: A fun way to add some fiber. Mixing different veggies can also create a more colorful dish. Try to use at least three different kinds for variety. Adjust the sauce to match your taste. If you like it sweeter, add more honey. For a spicier kick, toss in some red pepper flakes. You can also switch vinegars. Here are some options: - Apple cider vinegar: It gives a fruity flavor. - Balsamic vinegar: Adds depth and sweetness. - White vinegar: For a sharper taste. Experimenting with these changes makes the dish your own. Don’t be afraid to try new flavors! For the full recipe, check the original instructions. To store leftovers, let the stir-fry cool down first. Place it in an airtight container. This keeps it fresh for up to three days in the fridge. When you're ready to eat, just take out the portion you want. If you want to freeze the stir-fry, use a freezer-safe bag or container. Remove as much air as possible to prevent freezer burn. You can freeze it for up to three months. Remember, some veggies may lose crunch when thawed, so choose your mix carefully. To reheat, the best method is on the stovetop. Add a splash of water or broth to keep it moist. Heat it over medium until hot. If you prefer the microwave, use a microwave-safe dish. Cover it with a damp paper towel to keep steam in. This helps maintain the texture and flavor. You can make this dish your own by adding personal touches. Try using different vegetables like zucchini or bok choy. You can also swap chicken for shrimp or tofu. Add your favorite nuts for a crunchy texture. Experiment with spicy sauces to kick up the heat. Each change can give you a new dish! Yes, frozen vegetables work well in this stir-fry. They save time and are easy to use. However, keep in mind that they may cook faster than fresh ones. You might need to adjust your cooking time. Aim for 3-4 minutes instead of 4-5 minutes for the veggies to stay crisp. Stir-fry goes great with several side dishes. Serve it with steamed jasmine rice for a classic touch. You can also pair it with brown rice for a healthier option. Noodles, like soba or rice noodles, also work well. Add a simple side salad for freshness and extra crunch. Absolutely! This sesame ginger chicken stir-fry is perfect for meal prep. Cook a big batch and divide it into containers. It stores well in the fridge for up to three days. To reheat, use a microwave or skillet. Just be sure to add a splash of water to keep it moist. To make this dish healthier, try a few simple swaps. Use less oil, or replace it with cooking spray. Choose low-sodium soy sauce to cut down on salt. Add more vegetables to increase fiber and nutrients. You can also cut back on honey for fewer calories. This blog post covered how to make a tasty Sesame Ginger Chicken Stir-Fry. We discussed key ingredients like chicken, fresh veggies, and flavorful sauces. I shared step-by-step cooking instructions, along with tips to enhance flavor and presentation. We also explored variations for dietary needs and the best ways to store leftovers. In summary, stir-fry is easy, fun, and flexible. You can customize it to suit your tastes. Enjoy making this dish your own, and share it with friends and family!](https://dishtreats.com/wp-content/uploads/2025/06/887f9040-7330-4bb7-a0e7-766c5efe9124-768x768.webp)

![To make this dish, you need a few key items. These ingredients work together for great flavor. Here’s what you will need: - 4 chicken thighs, bone-in and skin-on - 1/4 cup honey - 1/4 cup low-sodium soy sauce - 4 cloves garlic, finely minced - 1 tablespoon fresh ginger, grated - 1 teaspoon sesame oil - 1 tablespoon olive oil - Salt and freshly ground black pepper to taste While the main ingredients shine, you can add optional items for extra flavor. Try using these to enhance your dish: - A splash of rice vinegar for acidity - A pinch of red pepper flakes for heat - Fresh herbs like cilantro or parsley for freshness Presentation matters when serving food! Beautiful garnishes make a dish pop. Here’s what to top your chicken with: - 2 green onions, finely sliced - Sesame seeds for a crunchy finish First, grab a medium mixing bowl. Add 1/4 cup honey, 1/4 cup low-sodium soy sauce, 4 minced garlic cloves, 1 tablespoon of grated ginger, and 1 teaspoon of sesame oil. Whisk them together until mixed well. This sweet and savory blend will become your marinade and glaze. It infuses the chicken thighs with tasty flavor. Next, season the chicken thighs. Use salt and freshly ground black pepper on both sides. Heat 1 tablespoon of olive oil in a large skillet over medium-high heat. Once hot, place the chicken thighs skin-side down. Let them sear for about 6-8 minutes. You want that skin golden brown and crispy. This step adds great texture and taste. After searing, flip the chicken thighs. Pour the honey garlic mixture over them. Let it simmer gently, coating the chicken in flavor. Cover the skillet and reduce the heat. Cook for 15-20 minutes until the chicken reaches 165°F (75°C) inside. When the chicken is ready, remove the lid. Turn the heat back up to medium-high. Let the sauce simmer for 5 minutes, stirring often. This will thicken the sauce, helping it stick to the chicken. Once thickened, take the skillet off the heat. Allow the chicken to rest for a few minutes. This lets the juices settle, keeping the meat tender. Serve the chicken on a platter, drizzling the sauce over the top. Add a sprinkle of sliced green onions and sesame seeds for a bright finish. Enjoy your Honey Garlic Chicken Thighs! For the full recipe, refer to [Full Recipe]. To get crispy skin, start with bone-in, skin-on chicken thighs. Pat the skin dry with paper towels. This step removes moisture and helps the skin crisp up nicely. Heat olive oil in a hot skillet before adding the chicken. Sear it skin-side down for 6-8 minutes. Resist the urge to move the chicken too much. Let it cook undisturbed for a golden crust. For tender chicken, season it well with salt and pepper. This enhances flavor and locks in moisture. When cooking, keep an eye on the internal temperature. Aim for 165°F (75°C) to ensure it’s fully cooked. Let the chicken rest after cooking. This lets the juices settle back in, making each bite juicy and satisfying. Honey garlic chicken pairs well with several sides. Try serving it with steamed rice for a classic combo. The rice soaks up the tasty sauce. You can also serve it with a fresh green salad. The crunch of the veggies complements the soft chicken perfectly. Roasted vegetables add color and flavor, making for a well-rounded meal. For the full recipe, check out [Full Recipe]. {{image_4}} You can change the taste of honey garlic chicken thighs by swapping some ingredients. For a fruitier twist, try using maple syrup instead of honey. This will give your dish a rich, deep flavor. You can also replace soy sauce with coconut aminos for a gluten-free option. If you like citrus, add some fresh orange juice to the marinade. It brightens the flavor and adds a zesty note. While chicken thighs are juicy, you can use other cuts too. Chicken breasts work well if you prefer leaner meat. Just remember, they may dry out faster, so watch the cooking time. Drumsticks are another tasty option. They are fun to eat and stay moist during cooking. Whichever cut you choose, make sure it is about the same size for even cooking. Want some heat? It's easy to spice things up! Add red pepper flakes or sriracha to the marinade for a kick. You can also use fresh jalapeños or chili paste for a bolder flavor. Adjust the amount based on your heat tolerance. If you love spicy food, this will make your honey garlic chicken thighs truly exciting. For the full recipe, check out the [Full Recipe]. Store your honey garlic chicken thighs in an airtight container. Make sure to let them cool to room temperature first. They will stay fresh in the fridge for up to 3 days. This keeps the flavors intact and ensures the chicken remains juicy. To reheat, place the chicken thighs in a skillet over low heat. Cover the skillet to keep moisture in. Heat until warmed through, about 5-10 minutes. You can also microwave them, but cover the dish to prevent drying out. You can freeze the chicken thighs for later use. Wrap each thigh in plastic wrap, then place them in a freezer bag. They will last for about 2-3 months in the freezer. Thaw them in the fridge overnight before reheating. This method keeps the chicken tasty and tender. For the full recipe, refer to the section above. You should cook chicken thighs for about 20-25 minutes. Start by searing them for 6-8 minutes on the skin side. Then, flip them over and pour the sauce on top. Cover the skillet and let them simmer for 15-20 minutes. This method helps keep the meat juicy and full of flavor. Yes, you can use boneless chicken thighs. They will cook faster than bone-in thighs. Sear them for about 5-7 minutes on each side. Make sure to check their internal temperature. It should reach 165°F (75°C) to be safe to eat. The best way to check if the chicken is done is with a meat thermometer. Insert it into the thickest part of the thigh. When it reads 165°F (75°C), the chicken is ready. You can also cut into the meat. If the juices run clear, it’s cooked. To adjust the sweetness, add more honey for a sweeter taste. If you want it less sweet, add more soy sauce or a splash of vinegar. Taste the sauce as you go. This way, you can find the perfect balance for your dish. For the full recipe, please check the [Full Recipe]. Honey garlic chicken thighs are simple and tasty. We covered the key ingredients and optional marinades. You learned how to prepare the marinade and cook the chicken. I shared tips for crispy skin, tender meat, and delicious sides. We also explored variations and storage tips to keep your meals fresh. When you try this recipe, it will impress your family and friends. Enjoy the rich flavors and make it your own!](https://dishtreats.com/wp-content/uploads/2025/06/32d13aa5-8be9-48e3-be5a-1699ade8ce81-768x768.webp)

![- 1 cup all-purpose flour - 1 cup whole wheat flour - 1 tablespoon baking powder - 1/2 teaspoon baking soda - 1/4 teaspoon salt I love using both all-purpose and whole wheat flour. The all-purpose flour gives the muffins a light texture. The whole wheat adds a nutty flavor and a bit of extra fiber. Mixing these flours helps balance taste and nutrition. - 1 cup plain Greek yogurt - 1/2 cup granulated sugar - 1/4 cup honey - 2 large eggs - 1 teaspoon vanilla extract - Zest of 1 lemon - Juice of 1 lemon Greek yogurt is key for moisture. It makes the muffins rich and creamy. The combination of sugar and honey gives a nice sweetness. The eggs help bind everything together. Lemon juice and zest brighten the flavor, making each bite fresh and zesty. - 1 cup fresh or frozen blueberries - 2 tablespoons melted coconut oil or butter Blueberries are the star of this recipe. They burst with flavor and add a great texture. You can use fresh or frozen. If you use frozen, they still work well! The melted coconut oil or butter adds richness, but you can skip it if you prefer a lighter muffin. You can find the full recipe for these delightful muffins online. Happy baking! First, preheat your oven to 375°F (190°C). This step is key for even baking. Next, prepare your muffin tin by lining it with paper liners or greasing the cups. This helps with easy muffin removal later. Now, let’s mix the dry ingredients. In a large bowl, combine: - 1 cup all-purpose flour - 1 cup whole wheat flour - 1 tablespoon baking powder - 1/2 teaspoon baking soda - 1/4 teaspoon salt Whisk these dry ingredients well. Make sure there are no lumps. In another bowl, add the wet ingredients. You will need: - 1 cup plain Greek yogurt - 1/2 cup granulated sugar - 1/4 cup honey - 2 large eggs - 1 teaspoon vanilla extract - Zest of 1 lemon - Juice of 1 lemon Whisk these until smooth. This helps blend all the flavors together. Now, it’s time to combine the two mixtures. Gently fold the wet ingredients into the dry ones using a spatula. Stir slowly. This helps keep your muffins light and fluffy. Don’t overmix! Overmixing makes the muffins dense. Once you see a few floury spots, stop mixing. Next, it’s time for the blueberries. Add: - 1 cup fresh or frozen blueberries - 2 tablespoons melted coconut oil or butter Fold these in gently. You want to keep the blueberries whole for bursts of flavor. Now, scoop the batter into your prepared muffin cups. Fill each cup about two-thirds full. This allows space for the muffins to rise. Place the muffin tin in your preheated oven. Bake for 18-20 minutes. To check for doneness, insert a toothpick into the center of a muffin. If it comes out clean, they are ready! After baking, let the muffins cool in the tin for about 5 minutes. This helps them set. Then, move them to a wire rack to cool completely. These steps will lead you to a batch of delicious Blueberry Lemon Yogurt Muffins. For the complete recipe, see [Full Recipe]. To get the best muffins, do not overmix the batter. Mixing too much can make the muffins tough. When you mix, just combine until you see no dry flour. This way, your muffins stay light and fluffy. When folding in the blueberries, do it gently. If you stir too hard, the berries will burst and color the batter. Just use a spatula and fold them in lightly. This keeps the berries whole and gives you lovely pops of flavor in each bite. You can add even more flavor to your muffins. Consider adding lemon zest for a bright taste. You might like to include nuts, like walnuts or pecans, for crunch. When it comes to blueberries, fresh berries taste great, but frozen ones work too. If you use frozen berries, do not thaw them first. This helps keep your batter cold, giving you a better rise. Using the right tools helps a lot. A non-stick muffin tin is your best bet. You can also use paper liners for easy cleanup. For mixing, a large bowl works well. I suggest a sturdy spatula for folding the batter. This combo makes mixing fun and easy. With the right tools, your baking will be smooth and enjoyable. For the full recipe, check out the details above. {{image_4}} You can make these muffins gluten-free. Simply replace the all-purpose flour with a gluten-free flour blend. Many blends work well, so pick one you like. Just ensure it has a good balance of starches and protein to mimic regular flour. This way, you can enjoy the same tasty muffins without the gluten. Want to mix it up? Try adding chocolate chips or walnuts for a delightful twist. They add a nice crunch and richness. You can also use other fruits like raspberries or cranberries. They pair well with the lemon and blueberry flavors. Each fruit adds its own unique taste, making each batch special. You can switch up the yogurt too. Use flavored yogurts like vanilla or lemon for extra taste. If you prefer dairy-free options, there are many great alternatives available. Look for coconut or almond-based yogurts. They keep the muffins moist and tasty, making it fun to experiment with flavors. For the full recipe, check out the details above. To keep your blueberry lemon yogurt muffins fresh, store them in an airtight container. This will keep them moist and tasty. You can keep them at room temperature for up to three days. If you want them to last longer, put them in the fridge. They can stay fresh for about a week in the refrigerator. Freezing muffins is a great way to keep them longer. To freeze, let the muffins cool completely. Then, wrap each muffin in plastic wrap. Place them in a freezer bag or container. This method helps prevent freezer burn. You can enjoy them for up to three months. When you're ready to eat a frozen muffin, take it out and let it sit at room temperature for about 30 minutes. For a warm treat, heat it in the microwave for 15-20 seconds. This will make it soft and delicious again. Blueberry lemon yogurt muffins are perfect for any time of day. I love having them for breakfast or as a snack. They also make a great dessert. To make it even better, try pairing these muffins with yogurt or a drizzle of honey. This adds a nice touch and enhances the flavor. Enjoy your muffins fresh from the oven or at room temperature! If you want to explore more recipes, check out the Full Recipe for even more delicious ideas. Blueberry lemon yogurt muffins stay fresh for about 2 to 3 days at room temperature. Keep them in an airtight container to maintain their moisture. If you store them in the fridge, they can last for up to a week. Just make sure to seal them well to prevent them from drying out. Yes, you can easily swap ingredients. If you want less sugar, use less granulated sugar or honey. For flour, you can mix all-purpose flour with whole wheat flour or use a gluten-free blend. You can also use flavored yogurt instead of plain yogurt for a fun taste twist. If your muffins turn out dense, check your mixing technique. Overmixing can cause this issue. Make sure to mix just until combined. You can also try adding a bit more baking powder or soda to lighten the texture. Lastly, ensure your ingredients are fresh, especially baking powder. To make these muffins healthier, reduce the sugar by a third. You can also replace some all-purpose flour with whole wheat flour to add fiber. Adding oats or ground flaxseed can boost nutrition without changing the flavor much. Enjoy these muffins while keeping health in mind! For the full recipe, refer to the earlier section. This blog post covered how to make delicious Blueberry Lemon Yogurt Muffins. We explored ingredients, step-by-step instructions, and tips for perfect texture. Variations like gluten-free options and different mix-ins add fun twists. Proper storage helps keep your muffins fresh. These muffins are a tasty way to enjoy healthy snacks or breakfast. Remember, baking is about having fun and experimenting. Enjoy every bite!](https://dishtreats.com/wp-content/uploads/2025/06/d36ee35c-287f-4b25-b661-333d5a68e192-768x768.webp)
