
Looking for a quick, tasty meal to impress? Try my Creamy Coconut Chickpea Curry! It’s packed with flavor and uses simple ingredients you might already have. Chickpeas, creamy coconut milk, and a mix of warm spices come together for a satisfying dish. Perfect for busy weeknights or meal prep, this curry is easy to customize. Let’s dive into how to make this delicious and creamy dish!
Why I Love This Recipe
- Quick and Easy: This recipe takes only 35 minutes from start to finish, making it perfect for busy weeknights.
- Flavorful and Aromatic: The combination of spices and coconut milk creates a rich, fragrant dish that delights the senses.
- Nutritious: Chickpeas provide protein and fiber, while coconut milk adds healthy fats, making this a well-rounded meal.
- Versatile: This curry can be served with rice, quinoa, or even enjoyed on its own, adapting to your dietary preferences.
Ingredients
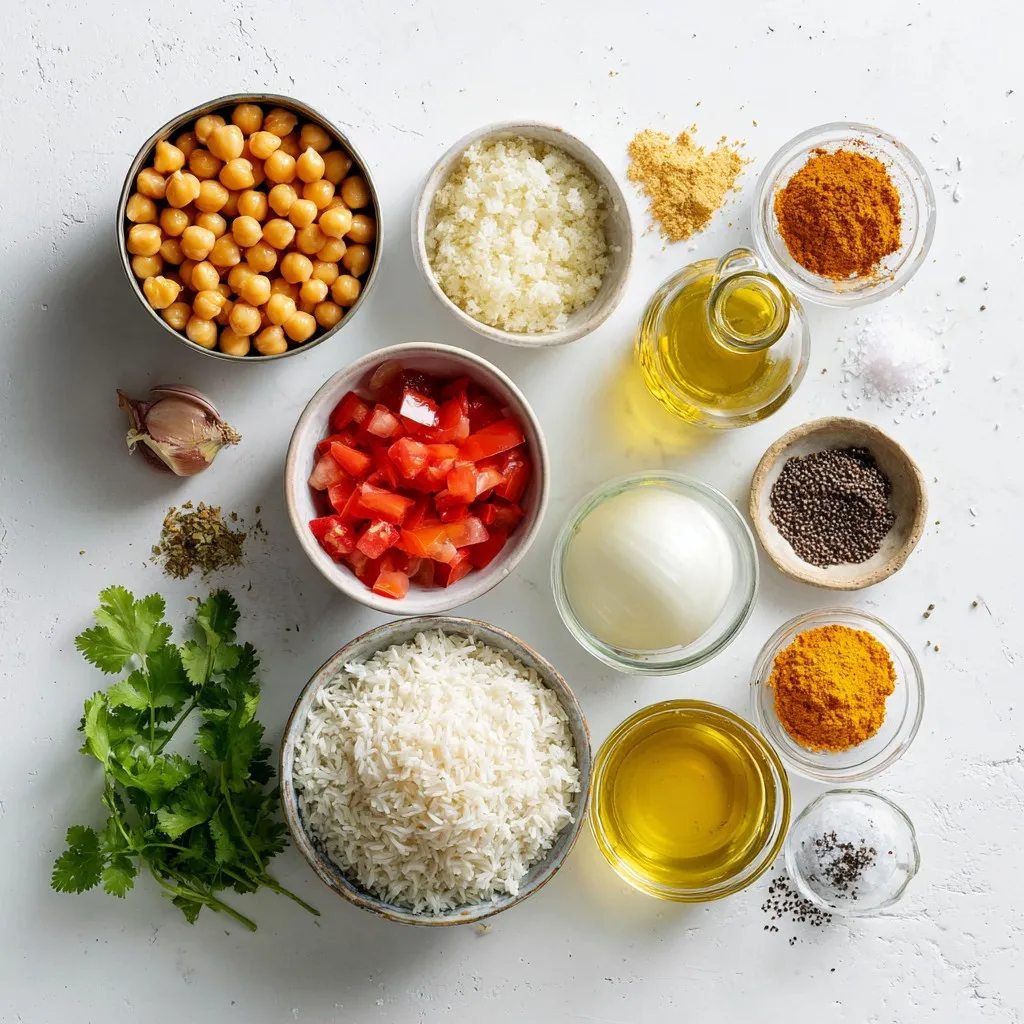
Main Ingredients
– 1 can (14 oz) chickpeas, drained and rinsed
– 1 can (14 oz) coconut milk
– 1 medium onion, finely chopped
– 2 cloves garlic, minced
– 1 tablespoon fresh ginger, grated
Chickpeas are the star of this dish. They bring protein and fiber. Coconut milk adds creaminess and a rich flavor. The onion, garlic, and ginger create a strong base for the dish. This mix gives the curry a warm and inviting aroma.
Spices and Seasonings
– 1 tablespoon curry powder
– 1 teaspoon ground cumin
– 1 teaspoon turmeric
– 1 teaspoon chili powder (adjust to taste)
Spices are key to a great curry. Curry powder adds the main flavor. Ground cumin gives a warm, earthy taste. Turmeric not only colors the dish but also adds health benefits. Chili powder adds heat, which you can control based on your taste.
Additions and Garnish
– 1 cup diced tomatoes (fresh or canned)
– 1 cup vegetable broth
– Fresh cilantro leaves, for garnish
– Salt and pepper, to taste
Diced tomatoes add acidity, balancing the creamy coconut. Vegetable broth enhances the depth of flavor. Fresh cilantro brings brightness and a fresh finish. Don’t forget to season with salt and pepper to bring out all the flavors!
Step-by-Step Instructions
Preparing the Base
1. Heating olive oil: Start by pouring 2 tablespoons of olive oil into a large pan. Place it over medium heat. Allow the oil to warm for a few moments.
2. Sautéing onions: Once the oil is hot, add 1 medium onion, finely chopped. Sauté the onion for about 5 minutes, stirring often. It should become soft and turn translucent.
Adding Aromatics and Spices
1. Incorporating garlic and ginger: Next, stir in 2 cloves of minced garlic and 1 tablespoon of grated ginger. Cook this mixture for about 1 minute. You want the garlic to be lightly golden and aromatic.
2. Cooking the spice mixture: Now, add 1 tablespoon of curry powder, 1 teaspoon of ground cumin, 1 teaspoon of turmeric, and 1 teaspoon of chili powder. Stir the spices constantly for 1 minute. This helps release their fragrant flavors.
Combining and Simmering
1. Mixing in tomatoes and chickpeas: Add 1 cup of diced tomatoes to the pan. Stir them in and let the mixture cook for 3-4 minutes. The sauce will start to thicken.
2. Simmering for flavor melding: Pour in 1 can of drained chickpeas, 1 can of coconut milk, and 1 cup of vegetable broth. Stir everything well. Bring the curry to a gentle simmer and cook uncovered for about 15-20 minutes. This helps all the flavors blend together nicely.
Tips & Tricks
Enhancing Flavor
To boost the flavor of your curry, adjust spices to your taste. Start with the curry powder. If you like it spicier, add more chili powder. You can also add a squeeze of lime juice. This gives the dish a fresh taste and brightens the flavors.
Perfecting Consistency
If you want a thicker curry, let it simmer longer. The sauce will reduce and become rich. For a creamier texture, add more coconut milk. This will make the curry smooth and luscious.
Serving Suggestions
Serve your creamy coconut chickpea curry with fluffy rice or quinoa. These grains soak up the sauce nicely. For garnishes, fresh cilantro is a must. You can also add lime wedges for an extra zing.
Pro Tips
- Use Fresh Ingredients: Opt for fresh herbs and spices whenever possible to enhance the flavor profile of your curry.
- Adjust Spice Levels: Feel free to modify the amount of chili powder to suit your heat preference; you can always start with less and add more.
- Let It Rest: Allow the curry to rest for a few minutes after cooking to let the flavors settle before serving.
- Experiment with Add-Ins: Consider adding vegetables like spinach, bell peppers, or sweet potatoes for added nutrition and texture.
Variations
Ingredient Swaps
You can easily change the legumes in this recipe. Instead of chickpeas, try black beans or lentils. Each of these options adds a unique flavor while keeping the dish hearty. You can also add fresh vegetables like spinach or bell peppers. Both options brighten the dish and increase its nutrition. Just toss them in during the simmering step for best results.
Dietary Adjustments
This curry is naturally vegan and gluten-free. If you want to keep it low-calorie, you can use light coconut milk. It still tastes creamy without the extra fat. You can also reduce the amount of oil or serve it with cauliflower rice instead of regular rice. These swaps help you enjoy a delicious meal while keeping your diet in check.
Alternative Cooking Methods
You can use an Instant Pot for a quicker meal. Just sauté the onions and spices, then add your other ingredients. Set it to high pressure for about 10 minutes. If you prefer a slow cooker, combine all ingredients and cook on low for 6-8 hours. This method deepens the flavors. For a one-pan option, you can cook everything in a large skillet. Just make sure to cover it while it simmers for even cooking.
Storage Info
Storing Leftovers
– Refrigeration tips: Allow the curry to cool down first. Transfer it to an airtight container. It will stay fresh in the fridge for about 3 to 5 days.
– Freezing instructions: For longer storage, place the curry in a freezer-safe container. It can last up to 3 months in the freezer. Make sure to leave some space for expansion.
Reheating Guidelines
– Best methods for reheating the curry: The microwave works well for quick reheating. Alternatively, heat it on the stove over low heat for even warming.
– How to maintain flavor and texture: Add a splash of water or vegetable broth while reheating. This helps keep the curry creamy and prevents it from drying out.
Shelf Life
– How long the curry lasts in the fridge or freezer: In the fridge, it lasts up to 5 days. In the freezer, it can last up to 3 months.
– Signs of spoilage: Check for an off smell, mold, or changes in color. If you see any signs, it’s best to discard the curry.
FAQs
Can I make this curry in advance?
Yes, you can make this curry ahead of time. It saves time on busy days. Just prepare the curry as directed and let it cool. Store it in an airtight container in the fridge for up to three days. When ready to eat, reheat it on the stove. This curry often tastes even better the next day as the flavors blend.
What can I serve with Creamy Coconut Chickpea Curry?
You have many great options for sides. Here are some ideas:
– Cooked rice (white or brown)
– Quinoa
– Naan bread
– Fresh salad
– Steamed vegetables
Each of these sides pairs well with the rich flavors of the curry.
Is this recipe suitable for kids?
Yes, this recipe can be kid-friendly with some tweaks. Reduce the chili powder for less heat. You can also use mild curry powder. Adding some extra coconut milk can make it creamier and smoother. Serve with rice, which kids often love. This makes the meal more appealing for young eaters.
This blog post covered the main ingredients, instructions, and tips for making Creamy Coconut Chickpea Curry. You learned about essential ingredients like chickpeas and coconut milk, along with spices that add depth to the dish. I shared techniques to enhance flavor and tips for storage, ensuring your meal lasts.
Remember, cooking is about creativity and enjoyment. Feel free to experiment with different ingredients and methods. Enjoy making this curry and sharing it with other


