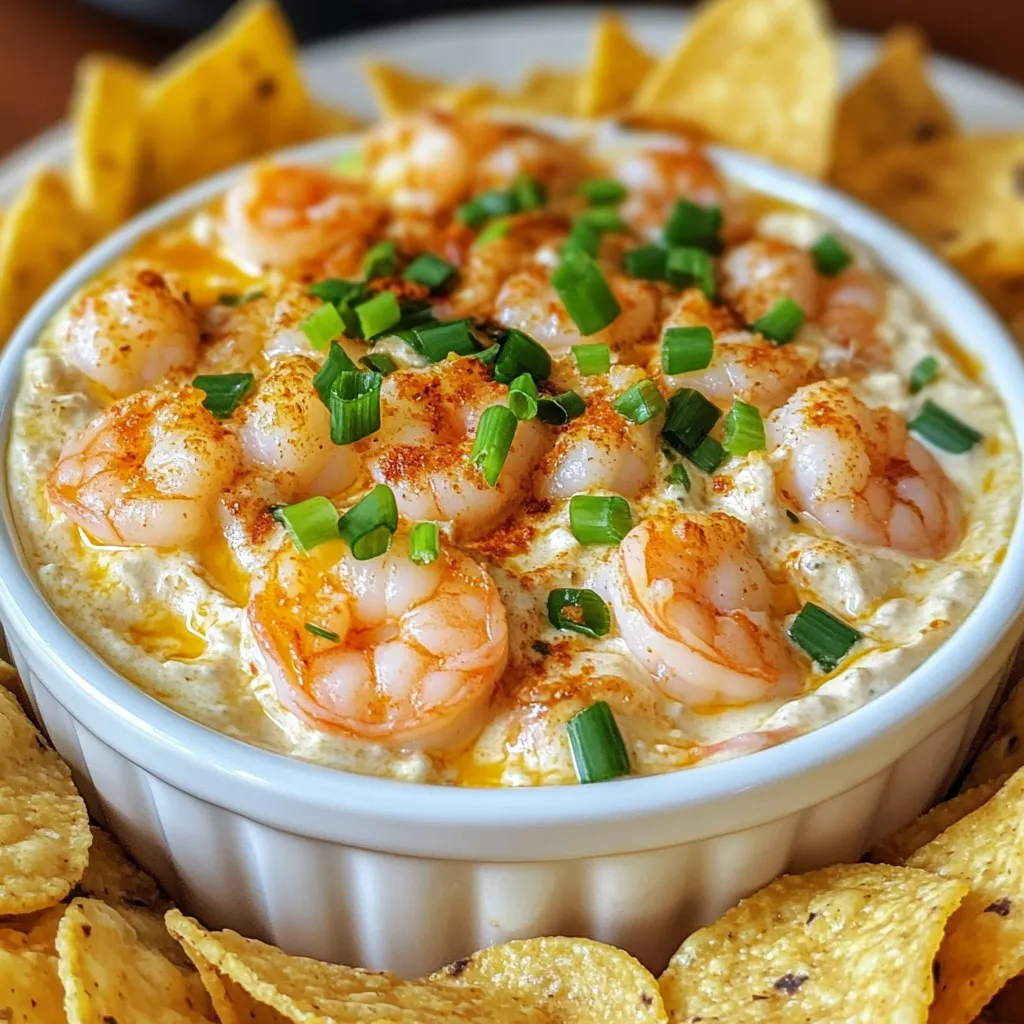
Are you ready to spice up your next gathering? This Creamy Cajun Shrimp Dip is not only flavorful but also super easy to make. With rich cream cheese, zesty Cajun seasoning, and fresh shrimp, it’s sure to impress your guests. I’ll guide you through step-by-step instructions, tips, and creative serving ideas that make this dip a standout. Dive in, and let’s bring some fun to your table!
Why I Love This Recipe
- Bold Flavors: This dip is packed with the bold and vibrant flavors of Cajun seasoning, making every bite a delicious experience.
- Perfect for Gatherings: Whether it’s a party, game night, or a casual get-together, this dip is always a crowd-pleaser.
- Easy to Make: With just a handful of ingredients and simple steps, you can whip up this creamy dip in no time.
- Versatile Serving Options: Serve it with tortilla chips, baguette slices, or your favorite crackers for endless dipping possibilities!
Ingredients
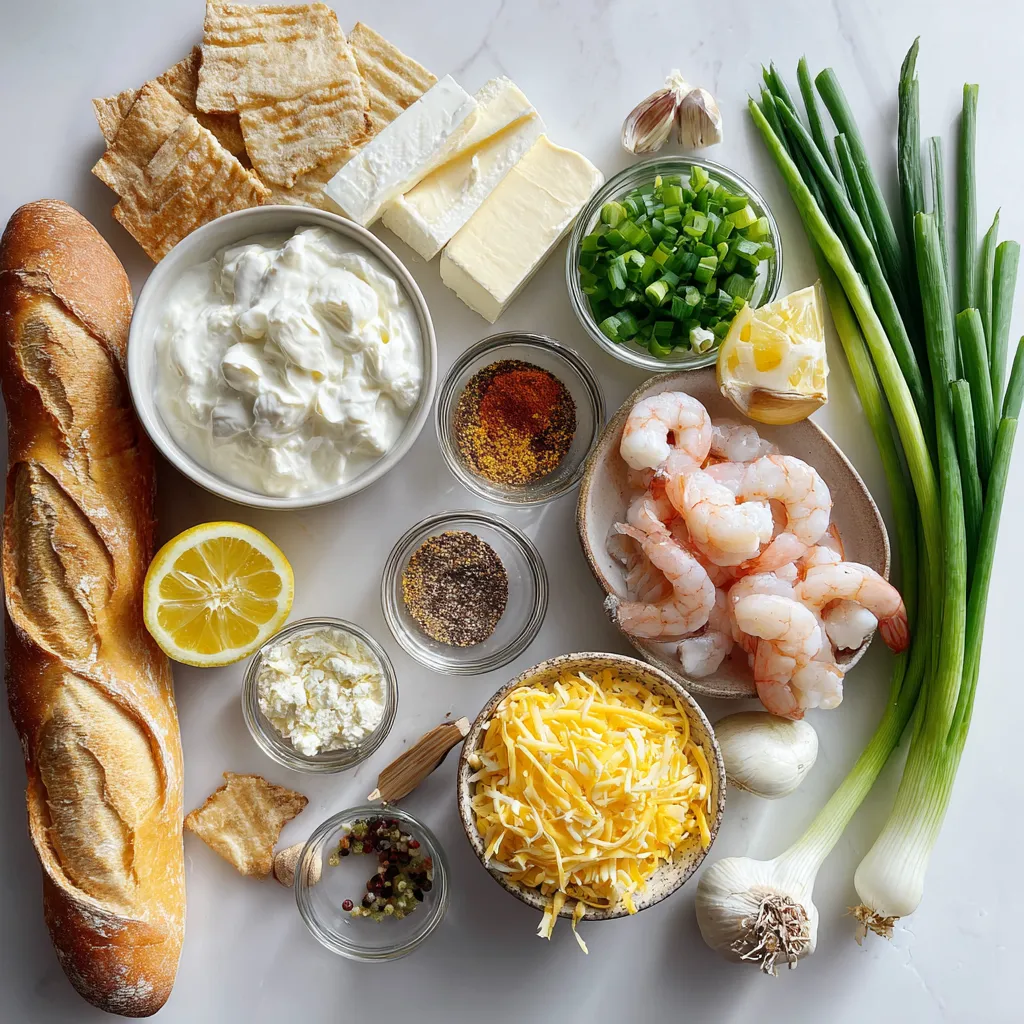
Main Ingredients
– 1 pound raw shrimp, peeled and deveined
– 8 oz cream cheese, softened
– 1 cup sour cream
– 1 cup shredded sharp cheddar cheese
Seasonings and Extras
– 2 tablespoons Cajun seasoning
– 1 tablespoon fresh lemon juice
– 1 clove garlic, minced
– 1/4 cup green onions, chopped (plus extra for garnish)
Serving Suggestions
– Tortilla chips
– Sliced baguette
To make this dip, you need fresh and simple ingredients. Start with raw shrimp. I love using fresh shrimp for the best taste. The cream cheese and sour cream give the dip its creamy base. They blend well together and make a rich texture.
Next, the shredded cheddar cheese adds a sharp flavor. It helps balance the dip’s creaminess. The Cajun seasoning brings the heat. Adjust the amount to suit your taste. A squeeze of fresh lemon juice adds brightness. It makes the dip lively.
Don’t forget the garlic! It adds depth to the flavors. Finally, finish it off with chopped green onions. They give a nice crunch and color.
When serving, tortilla chips are a classic choice. They add a great crunch. Sliced baguette is another option. It soaks up the dip well.
Step-by-Step Instructions
Cooking the Shrimp
To start, heat a large skillet over medium heat. Add a splash of water or olive oil. Once it’s hot, carefully add the raw shrimp. Cook the shrimp for about 3-4 minutes. You know they are done when they turn pink. Remove them from the heat and let them cool for a bit. Once they are cool enough to touch, chop them into bite-sized pieces and set them aside.
Preparing the Dip Base
Next, grab a large mixing bowl. Add the softened cream cheese and sour cream. Use a hand mixer or a spatula to blend these two until they are smooth and creamy. This step is key for a great texture.
Combining Ingredients
Now it’s time to add flavor. Stir in the shredded sharp cheddar cheese, Cajun seasoning, lemon juice, minced garlic, and chopped green onions. Mix everything well until it’s all combined. Then, gently fold in the chopped shrimp. Make sure the shrimp is evenly spread throughout the dip. Taste it and season with salt and freshly ground black pepper to your liking.
Chilling and Garnishing the Dip
Transfer your dip to a serving dish or bowl. Cover it up and refrigerate for at least 30 minutes. This chilling time lets the flavors meld beautifully. Just before serving, sprinkle extra chopped green onions on top for a fresh touch.
Tips & Tricks
Perfecting Flavor
To make your dip shine, adjust the seasoning levels. Start with the amount in the recipe, then taste. If you want it spicier, add more Cajun seasoning. If it’s too salty, balance it with more cream cheese or sour cream.
Choosing the right type of Cajun seasoning can change everything. Look for a blend that has a good mix of spices. It should have some heat but not overpower the dish. Many brands offer different spice levels, so pick one that suits your taste.
Textural Enhancements
For a creamier dip, ensure the cream cheese is very soft. If it’s too cold, the dip won’t mix well. You can also add a splash of milk or cream to improve the texture.
Incorporating different cheeses can add depth. Try mixing in some cream cheese with herbs or a bit of mozzarella. These choices can make the dip even more delicious and unique.
Serving and Presentation Tips
Get creative when serving your dip. A colorful platter of tortilla chips or sliced baguette makes a great display. You can even arrange the chips in a circle around the dip bowl.
For plating, use a nice bowl to hold the dip. Sprinkle chopped green onions on top for color. Adding lemon wedges around the bowl gives a fresh touch and extra flavor. This not only looks great, but it invites everyone to dig in!
Pro Tips
- Fresh Shrimp is Best: For optimal flavor, use the freshest shrimp you can find. If possible, buy shrimp that is still in the shell and peel them just before cooking.
- Perfect Cream Cheese Consistency: Ensure your cream cheese is softened to room temperature before mixing for a smoother dip. This will help it blend seamlessly with the sour cream.
- Adjusting Spice Levels: If you prefer a milder dip, start with less Cajun seasoning and gradually add more to taste. You can also serve extra seasoning on the side for guests to customize their servings.
- Make Ahead: This dip can be made a day in advance. Prepare it and store it in the refrigerator, allowing the flavors to meld overnight for an even richer taste.
Variations
Spicy Twist
You can give your dip a spicy twist. Try adding hot sauce to boost the heat. Just a few dashes can make a big difference. You can also chop some fresh jalapeños into the mix. They add not just heat but also a nice crunch. Adjust these to match your spice level.
Vegetarian Alternatives
If you want a meat-free option, swap the shrimp for vegetables. Diced bell peppers, zucchini, or even artichoke hearts work well. They add great flavor and texture. You can also make a completely meat-free dip. Just use a mix of your favorite veggies and leave out the shrimp.
Different Flavor Profiles
Don’t be afraid to play with flavors. Try using different spices instead of Cajun seasoning. Smoked paprika or even taco seasoning can change the taste. You can also experiment with cream cheese flavors. Look for garlic herb or jalapeño cream cheese to add depth. Each variation can bring a new twist to this classic dip.
Storage Info
Refrigeration Guidelines
The creamy Cajun shrimp dip lasts about 3 to 5 days in the fridge. To keep it fresh, store it in an airtight container. This helps prevent it from absorbing other smells in the fridge. Make sure to cover the dip well. If you notice that the top layer has dried out, just stir it up before serving. Always use a clean spoon to scoop out the dip to avoid any germs.
Freezing Instructions
Yes, you can freeze the dip! Just place it in a freezer-safe container. It can stay good for about 2 months in the freezer. When you’re ready to eat it, move the dip to the fridge to thaw overnight. For reheating, place it in a microwave-safe dish. Heat in short bursts, stirring in between. This keeps it smooth and creamy.
Signs of Spoilage
Check for any strange smells or colors. If the dip looks off or has mold, it’s best to throw it out. A sour taste is also a sign that it has gone bad. Always trust your senses. To avoid spoilage, store it right away and consume it within the recommended time. Keeping your fridge at the right temperature helps too.
FAQs
How do I make my Creamy Cajun Shrimp Dip spicier?
To add heat, you can try these tips:
– Use more Cajun seasoning.
– Mix in hot sauce, like Tabasco.
– Add chopped jalapeños or cayenne pepper.
– Serve with spicy tortilla chips.
These small changes can give your dip a nice kick without overpowering the flavor.
Can I prepare the dip in advance?
Yes, you can make this dip ahead of time!
– Mix all the ingredients and store in the fridge.
– Cover the dip tightly to keep it fresh.
– You can prepare it a day before serving.
This allows flavors to blend even better before you enjoy it.
What can I serve with Creamy Cajun Shrimp Dip?
Great options to pair with the dip include:
– Tortilla chips for a crunchy bite.
– Sliced baguette for a soft touch.
– Fresh vegetable sticks for a healthy crunch.
– Crackers for added texture.
These choices make it fun and easy to enjoy your dip.
Is it possible to make this dip without shrimp?
Yes, you can make a shrimp-free dip!
– Swap shrimp for cooked chicken or crab.
– Use diced veggies like bell peppers or artichokes.
– Try adding white beans for a creamy texture.
These alternatives still keep the dip tasty and flavorful.
This blog post covers how to create a tasty Creamy Cajun Shrimp Dip. You learned about the main ingredients like shrimp, cream cheese, and seasonings. Step-by-step, you saw how to cook the shrimp and prepare the dip. I shared tips to enhance flavor and texture. You can even try fun variations, like adding spice or making it vegetarian.
Enjoy this dip for parties or family gatherings. It’s easy to make and delicious for everyon


