Creamy Buffalo Chicken Pasta Flavorful and Easy Dish

Are you ready to impress your dinner guests with a dish that’s both creamy and bold? Creamy Buffalo Chicken Pasta combines tender chicken, zesty buffalo sauce, and rich, velvety cream for a meal that bursts with flavor. This easy recipe will make your weeknight dinner a hit and keep everyone coming back for more. Let’s dive into the simple steps and tasty variations that make this dish a crowd-pleaser!
Why I Love This Recipe
- Bold Flavor Combination: This dish perfectly balances the spicy kick of buffalo sauce with the creaminess of heavy cream and sour cream, creating a flavor explosion in every bite.
- Quick and Easy: With a total cooking time of just 30 minutes, this recipe is perfect for busy weeknights or when you want a delicious meal without spending hours in the kitchen.
- Comfort Food Upgrade: This pasta dish takes classic comfort food to the next level by incorporating the beloved flavors of buffalo chicken, making it a crowd-pleaser.
- Customizable: You can easily adjust the level of spiciness or add your favorite toppings, like crumbled blue cheese or extra veggies, to make it your own.
Ingredients
When making creamy buffalo chicken pasta, gather these key ingredients:
- Pasta Types: 2 cups rotini or penne pasta
- Chicken: 2 cups shredded cooked chicken breast
- Aromatics: 2 tablespoons olive oil, 1 small onion (finely chopped), 3 cloves garlic (minced)
- Buffalo Sauce and Dairy: 1 cup buffalo sauce, 1 cup heavy cream, 1/2 cup sour cream, 1/2 cup grated Parmesan cheese
- Seasonings: Salt and black pepper to taste
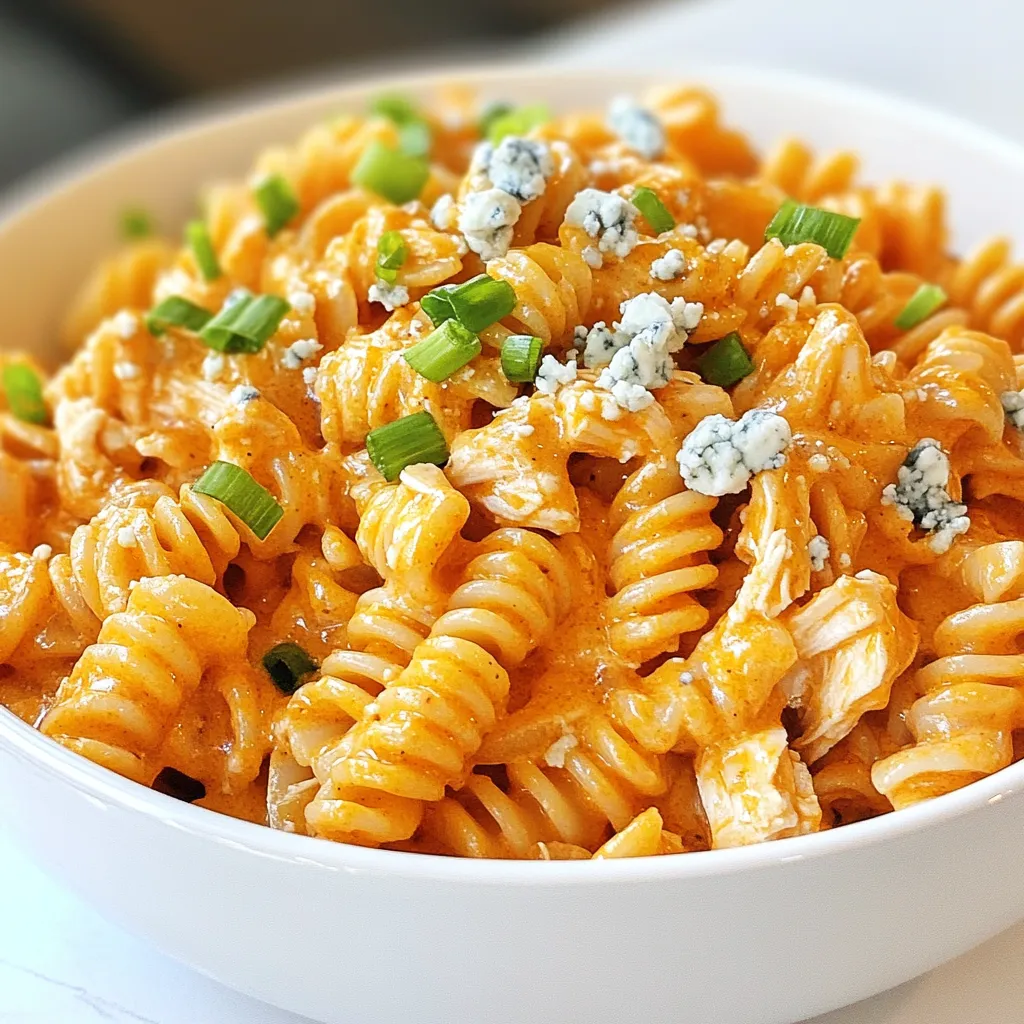
- Optional Toppings: Chopped green onions, crumbled blue cheese
These ingredients create a rich, flavorful dish. The pasta gives a perfect base, while the chicken adds protein. Aromatics like onion and garlic bring depth to the sauce. Buffalo sauce adds heat and tang. Heavy cream and sour cream create a smooth texture, making every bite creamy. Finally, Parmesan cheese gives a salty kick. Optional toppings like green onions and blue cheese add a fresh finish. Collect these items, and you’re ready to dive into a delicious cooking adventure!

Step-by-Step Instructions
Cooking the Pasta
1. Start by boiling a large pot of salted water.
2. Once the water boils, add 2 cups of rotini or penne pasta.
3. Cook for 8-10 minutes or until al dente.
4. Next, drain the pasta in a colander and set it aside.
Sautéing the Aromatics
1. In a large skillet, heat 2 tablespoons of olive oil over medium heat.
2. Add 1 small chopped onion and sauté for 3-4 minutes.
3. Stir until the onion is soft and clear.
4. Add 3 minced garlic cloves and sauté for another minute.
Combining Chicken and Buffalo Sauce
1. Mix in 2 cups of shredded cooked chicken with the aromatics.
2. Pour in 1 cup of buffalo sauce and stir well.
3. Allow the mixture to simmer for 3-5 minutes to heat through.
Creating the Creamy Base
1. Lower the heat and slowly pour in 1 cup of heavy cream.
2. Add 1/2 cup of sour cream and stir until smooth.
3. Incorporate 1/2 cup of grated Parmesan cheese and mix well.
4. Taste and adjust with salt and black pepper as needed.
Combining Pasta and Sauce
1. Carefully fold the cooked pasta into the creamy buffalo chicken sauce.
2. Use a spatula to gently toss until all pasta is coated evenly.
Serving Suggestions
1. Remove the skillet from heat and serve hot.
2. Garnish each plate with chopped green onions.
3. Sprinkle crumbled blue cheese on top if you like.
Tips & Tricks
Perfecting the Sauce
- Adjusting Spice Levels to Taste
Start with one cup of buffalo sauce. This gives a nice kick. If you like it hotter, add more sauce, a little at a time. Taste as you go. You want to enjoy the heat without overwhelming your palate.
- How to Achieve the Right Creaminess
For a creamy sauce, use both heavy cream and sour cream. The heavy cream gives richness. The sour cream adds tanginess. Stir these in slowly over low heat. This helps create a smooth texture.
Pasta Cooking Tips
- Cooking Pasta Al Dente
Always cook your pasta al dente. This means it should be firm to the bite. Follow the package instructions, usually 8 to 10 minutes. Taste the pasta before draining. It should not be mushy.
- Preventing Pasta from Sticking
To keep your pasta from sticking, stir it well while cooking. Use enough water, so the pasta has room to move. After draining, toss it with a bit of olive oil. This will keep it loose.
Time-Saving Tips
- Using Pre-Cooked Chicken
If you’re short on time, use pre-cooked chicken. This cuts down on cooking time. You can find it in stores or make it in advance. Shred it before adding to your sauce.
- Preparing Ingredients in Advance
Chop your onion and garlic ahead of time. You can also measure out your sauces and creams. This way, when it’s time to cook, you can focus on mixing everything. It makes the process smooth and quick.
Pro Tips
- Adjust the Heat: Feel free to add more or less buffalo sauce based on your spice tolerance. Start with a smaller amount and gradually increase to find your perfect balance.
- Add Veggies: Incorporate your favorite vegetables like bell peppers or spinach during the sautéing process for added nutrition and color.
- Make it Ahead: This dish can be made ahead and stored in the fridge for up to three days. Reheat gently on the stovetop with a splash of cream to revive the sauce.
- Garnish Creatively: Experiment with different toppings like cilantro, diced tomatoes, or jalapeños to customize each serving and enhance flavor.

Variations
Healthier Options
You can make this dish healthier with simple changes.
- Using Whole Wheat or Gluten-Free Pasta: Whole wheat pasta adds fiber. It gives a nutty taste. Gluten-free pasta is a great choice too. It helps those with gluten issues. Both options work well in this recipe.
- Low-Fat Dairy Alternatives: Swap heavy cream with low-fat milk or cashew cream. Sour cream can change to Greek yogurt. These swaps cut calories without losing flavor.
Flavor Variations
Add your twist to this dish for even more fun.
- Adding Vegetables: Bell peppers and spinach are great choices. They boost nutrition and color. You can sauté them with onions. This mix adds a fresh touch to the pasta.
- Alternative Sauces: Mix BBQ sauce with buffalo sauce for a sweet kick. This combo gives a new flavor layer. You can adjust the spice according to your taste.
Serving Size Adjustments
Want to serve more or fewer people? It’s easy!
- Increasing Servings: To double the recipe, simply double all the ingredients. This ensures everyone gets enough creamy goodness.
- Reducing Servings: If you want less, just halve the ingredients. This makes it perfect for a quick lunch or a small dinner.
Storage Info
Storing Leftovers
To keep your creamy buffalo chicken pasta fresh, store it in the fridge. Place the pasta in an airtight container. This helps prevent drying out. Make sure to cool the pasta first. It should be at room temperature before sealing. Store it for up to three days.
Reheating
You can reheat your pasta in two easy ways. Use a microwave or stovetop. If using a microwave, place the pasta in a bowl. Add a splash of water or cream to keep it moist. Heat in short bursts, stirring in between. For the stovetop, use a skillet. Add a little cream to the pan. Heat gently, stirring until warm. This keeps the sauce creamy and delicious.
Freezing Options
You can freeze your creamy buffalo chicken pasta. Freeze it before or after cooking. If freezing before cooking, place the uncooked pasta and sauce in a freezer bag. If freezing after, let it cool first. Store in a freezer-safe container. It stays good for up to three months. To defrost, move it to the fridge overnight. Reheat it as mentioned above. Enjoy your tasty pasta later!
FAQs
Can I use rotisserie chicken for this recipe?
Yes, you can use rotisserie chicken. It saves time and adds great flavor. Simply shred the chicken and add it to the dish as you would with cooked chicken breast. This makes the recipe even easier, especially for busy weeknights.
How can I make this recipe spicier?
To boost the heat, add more buffalo sauce to the dish. You can also mix in a pinch of cayenne pepper or red pepper flakes. For extra kick, try diced jalapeños or hot sauce. Adjust the spice level to suit your taste for the perfect spicy creamy buffalo chicken pasta.
Can I substitute heavy cream with milk?
You can use milk, but the dish will not be as creamy. If you want a rich taste, consider using half-and-half or a mix of milk and cream. This keeps the sauce smooth while still reducing calories a bit.
What can I serve with creamy buffalo chicken pasta?
This dish pairs well with a crisp salad or garlic bread. Roasted veggies like broccoli or carrots also make a great side. You can even serve it with a light soup for a complete meal.
How long does the dish last in the fridge?
Creamy buffalo chicken pasta lasts about three to four days in the fridge. Store it in an airtight container to keep it fresh. Reheat it gently to enjoy leftovers without losing flavor.
This blog post guides you through making creamy buffalo chicken pasta. You learned about the key ingredients, like rotini pasta and shredded chicken. The step-by-step instructions show you how to cook pasta, sauté aromatics, and mix in the sauce. Tips help you perfect your dish, while variations allow for creativity. You can store leftovers safely and reheat them easily.
Making this dish will impress your family and friends. Enjoy every bite, and don’t hesitate to try new flavor

Spicy Creamy Buffalo Chicken Pasta
Ingredients
- 2 cups rotini or penne pasta
- 2 cups cooked chicken breast, shredded
- 2 tablespoons olive oil
- 1 small onion, finely chopped
- 3 cloves garlic, minced
- 1 cup buffalo sauce
- 1 cup heavy cream
- 1 2 sour cream
- 1 2 grated Parmesan cheese
- to taste Salt and black pepper
- for garnish Chopped green onions
- for topping Crumbled blue cheese (optional)
Instructions
- Start by bringing a large pot of salted water to a boil. Once boiling, add the rotini or penne pasta and cook according to the package instructions until al dente, usually 8-10 minutes. Drain the pasta in a colander and set aside.
- In a large skillet, heat the olive oil over medium heat. Once hot, add the finely chopped onion. Sauté for about 3-4 minutes, stirring frequently, until the onion becomes translucent and soft. Next, add the minced garlic and continue to sauté for another minute, just until fragrant.
- Incorporate the shredded cooked chicken into the skillet, followed by the buffalo sauce. Stir everything together until the chicken is evenly coated with the sauce. Allow the mixture to simmer for about 3-5 minutes, just until the chicken is heated through.
- Lower the heat to low and gently pour in the heavy cream and sour cream. Stir constantly for a few minutes until the mixture becomes smooth and creamy. Then, add the grated Parmesan cheese, stirring until it's fully melted and blended into the sauce. Taste and adjust the seasoning with salt and black pepper as needed.
- Carefully fold the cooked pasta into the skillet with the creamy buffalo chicken sauce. Use a spatula to gently toss everything together, ensuring each piece of pasta is well-coated in the rich sauce.
- Remove the skillet from heat. Serve the spicy creamy buffalo chicken pasta hot, garnishing each plate with chopped green onions. If desired, sprinkle crumbled blue cheese over the top for an extra layer of flavor.


![- 2 cans young green jackfruit - 1 tablespoon olive oil - 1 medium onion, finely chopped - 1 teaspoon smoked paprika - 1 teaspoon ground cumin - 1 teaspoon chili powder - 1/2 teaspoon black pepper - 1/2 teaspoon cayenne pepper (adjust to taste) - 4 sturdy sandwich rolls - Coleslaw (optional, for topping) When making BBQ pulled pork sandwiches, the ingredients are key. Young green jackfruit is the star. It has a texture similar to pulled pork and absorbs flavors well. Use two cans for four servings, and don’t forget to rinse and drain them! For the base flavor, olive oil and onion work wonders. The oil helps to sauté the onion, which adds sweetness and depth. A finely chopped onion is best for even cooking and flavor distribution. Spices bring the dish to life. Smoked paprika adds a lovely smokiness, and ground cumin gives it warmth. Chili powder adds a kick, while black and cayenne pepper let you control the heat. For the sandwich, sturdy rolls hold up best. Choose your favorite type. Optional coleslaw adds crunch and creaminess. It’s a nice touch that balances the rich BBQ flavor. For the full recipe, follow the steps to create your BBQ pulled pork sandwiches that are simple and tasty! To start, you need to shred the jackfruit. Grab two cans of young green jackfruit, and drain them well. Rinse the jackfruit under cool water. With clean hands or two forks, pull apart the jackfruit into thin strands. Aim for a texture that mimics pulled pork. Set the shredded jackfruit aside for later use. Now, let’s sauté the onions and garlic. Heat one tablespoon of olive oil in a large skillet over medium heat. Add one finely chopped medium onion. Stir occasionally until the onion turns soft and translucent, about five minutes. Next, add minced garlic. Use four cloves for a nice kick. Sauté for another minute. You want the garlic fragrant, not browned. It’s time to bring it all together! Add the shredded jackfruit to the skillet. Mix well to coat the jackfruit with the onion and garlic. Now, it’s spice time! Incorporate one teaspoon of smoked paprika, one teaspoon of ground cumin, and one teaspoon of chili powder. Add half a teaspoon of black pepper and half a teaspoon of cayenne pepper. Stir everything together for a minute to let the flavors meld. Next, pour in one cup of BBQ sauce. You can use store-bought or homemade, depending on your preference. Mix until all the jackfruit strands are covered in sauce. Lower the heat and cover the skillet. Let it simmer for 20 to 25 minutes. Stir occasionally, adding a splash of water if it looks dry. Taste and season with salt as needed. Now, while the jackfruit simmers, you can toast the sandwich rolls. Preheat your oven or a skillet. Lightly toast the rolls until golden brown. This step adds a nice crunch. Once the jackfruit is ready, it’s time to assemble your sandwiches. Grab a toasted roll, spoon a good amount of BBQ jackfruit onto the bottom half. If you want, add some coleslaw for extra crunch. Top with the other half of the roll, and enjoy your smoky sweet BBQ pulled jackfruit sandwich! For the full recipe details, check [Full Recipe]. To get the best taste, adjust the spices to fit your likes. Start with the base spices: smoked paprika, ground cumin, and chili powder. These give the jackfruit a deep, rich flavor. If you like it spicy, add more cayenne pepper. Remember, you can always add more spice, but you can’t take it away! Toasting the rolls makes a big difference. Use a skillet or an oven. If using a skillet, heat it over medium heat. Place the rolls cut-side down and toast until golden brown. If you choose the oven, set it to 375°F (190°C). Bake the rolls for about 5-7 minutes. This adds a nice crunch that pairs well with the soft jackfruit. When serving BBQ pulled pork sandwiches, make it fun! Use a wooden board for a rustic look. Place the sandwiches on it and add a small bowl of BBQ sauce for dipping. You can also add extra coleslaw on the side for a pop of color and crunch. This makes your meal look inviting and delicious. For the full recipe, check out the recipe section! {{image_4}} Using a slow cooker makes this dish simple and hands-off. Start by shredding the jackfruit as before. Place it in the slow cooker with olive oil, chopped onion, and minced garlic. Stir in the spices: smoked paprika, ground cumin, chili powder, and black pepper. Pour in your BBQ sauce. Cover and cook on low for 6 to 8 hours. The jackfruit will absorb all the flavors and become tender. You’ll love how easy this method is! Different areas have their own special takes on BBQ pulled pork. In the South, you might try adding vinegar-based sauces for a tangy twist. In Texas, a smoky chipotle sauce can add a kick. Up North, you might find a sweeter sauce with apple cider. Feel free to explore these local flavors. Your sandwiches will reflect your own region's tastes! If you want to switch things up, there are other great options. You can use mushrooms or lentils. Both provide a hearty texture. For a lighter option, consider using shredded zucchini or eggplant. They soak up flavors well too. Just remember to adjust your spices to match. Enjoy the creativity in your kitchen! To keep your leftover sandwiches tasty, store them in an airtight container. Make sure to separate the jackfruit mixture from the rolls. This helps prevent sogginess. Leftover jackfruit can last in the fridge for about three to four days. If you plan to eat them soon, add some extra BBQ sauce to keep them moist. If you want to save the jackfruit mixture for later, freezing works well. First, let the jackfruit cool completely. Then, place it in a freezer-safe container or bag. Make sure to remove any air. This helps avoid freezer burn. The mixture can stay fresh for about three months. Just remember to label the container with the date. When you’re ready to enjoy your pulled pork sandwiches, reheating is key. For the best results, use the stovetop. Place the jackfruit in a skillet over low heat. Add a splash of water or BBQ sauce to keep it moist. Stir until heated through. If you prefer the oven, preheat it to 350°F (175°C). Cover the jackfruit in a baking dish with foil. Heat for about 15 minutes. Enjoy your delicious BBQ pulled pork sandwiches! Yes, you can make BBQ pulled pork sandwiches ahead of time. This dish is perfect for meal prep. I suggest cooking the jackfruit and storing it in the fridge. It stays fresh for about 3 to 5 days. When you're ready to eat, just reheat it on the stove. You can also toast the rolls just before serving. This way, the sandwiches taste fresh and warm. The best BBQ sauce is one that fits your taste. If you like sweet, try a honey BBQ sauce. If you prefer spicy, go for a chipotle sauce. There are many great store-bought options, like Sweet Baby Ray's or Stubb's. You can also make your own. A mix of ketchup, vinegar, and spices creates a great flavor. To make jackfruit taste like pulled pork, focus on flavor. Start by shredding the jackfruit into thin strands. Cook it with onions, garlic, and spices like smoked paprika and cumin. These add depth to the dish. The BBQ sauce is key too. It coats the jackfruit and infuses it with rich flavor. Let it simmer for a while to soak up all those tasty notes. This article covered how to make BBQ pulled jackfruit sandwiches. You learned about the main ingredients, spices, and how to prepare each component. I shared step-by-step instructions to help you shred, sauté, and combine ingredients. You also received tips for perfecting flavor, toasting rolls, and creative presentations. Lastly, we explored variations, storage info, and frequently asked questions. Enjoy cooking this tasty dish that’s both fun and simple to make!](https://dishtreats.com/wp-content/uploads/2025/06/394fc23c-fade-4441-b59c-acd30966e9f2-768x768.webp)
. It takes about 20 minutes to cook garlic butter steak bites. You spend 10 minutes prepping the ingredients and another 10 minutes cooking them. This quick cook time makes it easy to enjoy a tasty meal in no time. Yes, you can use other cuts of steak. Ribeye, filet mignon, or flank steak work well. Just remember to adjust the cooking time based on the cut you choose. Each cut has its own flavor and texture, so pick one you like best. You can serve garlic butter steak bites with various sides. Here are some great options: - Creamy mashed potatoes - Sautéed vegetables like green beans or broccoli - Fresh salad with light dressing - Crispy garlic bread These sides add flavor and balance to your meal. You can also use toothpicks for easy serving at parties or gatherings. For more ideas, check out the Full Recipe for garlic butter steak bites. It offers tips on presentation and other serving suggestions. In this post, we covered how to make garlic butter steak bites using simple ingredients. You learned about the key steps, from preparing the steak to combining it with garlic butter. We also shared tips for cooking and presented flavor variations to try. Finally, we discussed storage tricks and answered common questions. Keep this recipe handy for a quick and tasty meal. Enjoy your cooking and the delicious bites you create!](https://dishtreats.com/wp-content/uploads/2025/06/daf37226-e56f-491f-87e9-6665894a306e-768x768.webp)


![To make Honey Mustard Chicken Thighs, you need simple, fresh ingredients. Here’s what you will need: - 4 bone-in chicken thighs, skin-on - 1/4 cup honey - 1/4 cup Dijon mustard - 2 tablespoons olive oil - 3 cloves garlic, minced - 1 teaspoon dried thyme - 1 teaspoon paprika - Salt and black pepper to taste - Fresh parsley for garnish These ingredients bring great flavor to your meal. The honey adds sweetness, while the Dijon mustard gives it a nice tang. Olive oil keeps the chicken juicy, and garlic boosts the taste. Dried thyme and paprika add depth, making every bite delicious. Don’t forget the parsley! It makes your dish look pretty and fresh. This recipe is quick and easy, perfect for any night. For the full instructions, check the Full Recipe. First, preheat your oven to 400°F (200°C). This heat will cook your chicken just right. In a small bowl, whisk together these ingredients: - 1/4 cup honey - 1/4 cup Dijon mustard - 2 tablespoons olive oil - 3 cloves garlic, minced - 1 teaspoon dried thyme - 1 teaspoon paprika - Salt and black pepper to taste Make sure to mix well. This creates a smooth and tasty marinade. Next, take your chicken thighs and place them in a large bowl or a resealable bag. Pour the marinade over the chicken. Ensure each piece is coated well. For the best flavor, let it marinate for at least 30 minutes. If you have more time, refrigerating it overnight works wonders. Now, heat a large oven-safe skillet over medium-high heat. Once hot, add the marinated chicken thighs, skin-side down. Sear them for about 5-7 minutes until the skin is golden brown. This step gives the chicken a nice crisp. After that, flip the thighs using tongs. Transfer the skillet to your preheated oven. Bake for 25-30 minutes. Check that the internal temperature reaches 165°F (75°C). If the juices run clear, the chicken is done. Once cooked, take the skillet from the oven and let the chicken rest for 5 minutes. This helps keep it juicy. Before serving, sprinkle some fresh parsley on top for a lovely finish. For the complete recipe, don't forget to check the [Full Recipe]. To get the best flavor, marinate the chicken thighs well. Use a large bowl or a resealable plastic bag for this. After mixing the marinade, pour it over the chicken. Make sure each piece is coated. For great results, let the chicken sit in the marinade for at least 30 minutes. You can also refrigerate it overnight. This extra time helps the flavors soak in deep. Cooking chicken thighs at the right temperature is key. Preheat your oven to 400°F (200°C). This hot oven cooks the chicken evenly and keeps it juicy. After searing the chicken for 5-7 minutes on the stovetop, transfer it to the oven. Bake for 25-30 minutes. Check the chicken's internal temperature. It should reach 165°F (75°C) for safe eating. Let it rest for 5 minutes before serving, which helps keep it moist. When serving, presentation matters. Place the chicken thighs on a white platter or a wooden board. Drizzle any leftover marinade over the top for added flavor. Garnish with fresh parsley for a pop of color. This simple touch makes the dish look more inviting. You can pair the chicken with roasted veggies or a fresh salad. These sides complement the sweet and tangy flavors of the honey mustard. For the full recipe, check out the details above. {{image_4}} You can change the sauce to fit your taste. Try using maple syrup instead of honey. This gives a unique sweetness. You can also mix in some soy sauce for a savory twist. If you like heat, add a dash of hot sauce or cayenne pepper. For a tangy flavor, consider apple cider vinegar. Each option adds a new layer to the dish. While chicken thighs are great, you can also use chicken breasts. They cook faster but stay moist if cooked right. Drumsticks are another option. They have lots of flavor and a nice crisp skin. You can even use a whole chicken, just adjust cooking time. Each cut brings its own charm to the recipe. For a full meal, add vegetables. Root veggies like carrots and potatoes roast well. Toss them in the marinade for extra flavor. You can also use green beans or broccoli. Place them in the skillet with the chicken. They will soak up the sauce and cook perfectly. This way, you have a tasty one-pan meal that's easy to serve. For the full recipe, check out the previous section. After cooking, let the chicken cool down. Place the chicken thighs in an airtight container. Store them in the fridge for up to three days. Make sure the temperature stays below 40°F (4°C). This keeps your chicken safe and tasty. If you want to store the chicken longer, freezing is a great option. Wrap each thigh tightly in plastic wrap. Then put them in a freezer-safe bag. You can freeze them for up to three months. Remember to label the bag with the date. When you are ready to enjoy leftovers, preheat your oven to 350°F (175°C). Place the chicken in a baking dish. Cover it with foil to keep it moist. Heat for about 20-25 minutes. You can also use a microwave, but it may dry the chicken out. For the best taste, the oven is the way to go. Enjoy your meal again! You should marinate honey mustard chicken thighs for at least 30 minutes. This allows the flavors to soak into the meat. If you have time, marinating overnight works even better. It deepens the taste and makes the chicken more tender. Yes, you can use boneless chicken thighs. They cook faster than bone-in thighs. Adjust the cooking time to about 20-25 minutes in the oven. Always check that the internal temperature reaches 165°F (75°C) for safety. Honey mustard chicken thighs pair well with many sides. Here are some ideas: - Steamed vegetables: Broccoli or green beans add color. - Rice or quinoa: Both soak up the sauce nicely. - Salad: A fresh green salad balances the meal. - Mashed potatoes: Creamy potatoes are a great comfort food option. You can find the full recipe to help you create this delicious meal. In this post, I shared ingredients and steps for making honey mustard chicken thighs. I provided tips for marinating and cooking this dish to enhance its flavor. You learned about variations and how to store leftovers properly. Remember, simple changes can make a big impact on taste. I encourage you to try these ideas for yourself. Enjoy cooking and delight in every bite!](https://dishtreats.com/wp-content/uploads/2025/06/0b4fb8df-5400-4b6b-9acb-490ad2d6fca7-768x768.webp)