Cranberry Almond Energy Bites Healthy Snack Option

Looking for a quick, healthy snack? Cranberry Almond Energy Bites are the perfect choice! Packed with oats, almond butter, and cranberries, these tasty bites provide energy without the guilt. Plus, they’re super easy to make! Whether you need a pick-me-up for your workout or a treat for your kids after school, this recipe checks all the boxes. Dive in to discover how to make them and enjoy delicious goodness anytime!
Why I Love This Recipe
- Nutritious Snack: These energy bites are packed with wholesome ingredients like oats, almond butter, and chia seeds, making them a great source of fiber and protein.
- Easy to Make: With just a few simple steps, you can whip up a batch of these delicious bites in no time, perfect for busy lifestyles.
- Customizable: You can easily swap out the nuts or dried fruit to suit your taste preferences, making this recipe versatile for everyone.
- Perfect for Meal Prep: These energy bites store well in the fridge, allowing you to prepare healthy snacks for the week ahead.
Ingredients
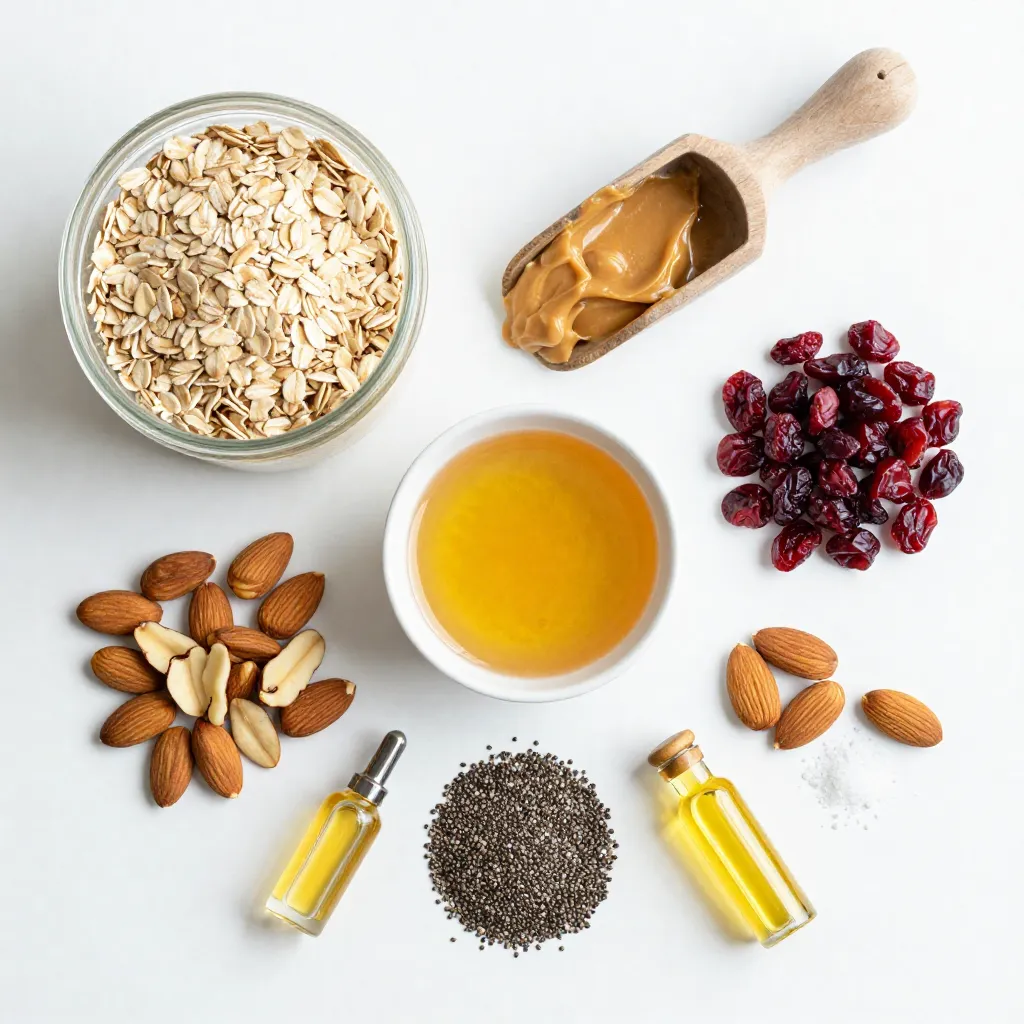
To make the Cranberry Almond Energy Bites, you will need a few simple items. Here’s the list:
- 1 cup rolled oats
- ½ cup almond butter
- ⅓ cup honey or maple syrup
- ½ cup dried cranberries, chopped
- ½ cup slivered almonds
- 2 tablespoons chia seeds
- 1 teaspoon vanilla extract
- A pinch of salt
Each ingredient adds its own flavor and benefits. Rolled oats provide fiber. Almond butter gives healthy fats and protein. Honey or maple syrup adds natural sweetness. Dried cranberries bring a tart flavor. Slivered almonds add crunch. Chia seeds offer omega-3s. Vanilla extract enhances the taste. A pinch of salt balances all these flavors.
You can easily find these ingredients at your local grocery store. Make sure to choose high-quality products for the best taste. For example, opt for natural almond butter without added sugar. This simple recipe brings together these wholesome ingredients for a tasty, easy snack.

Step-by-Step Instructions
Preparation of the Mixture
To start, grab a medium mixing bowl. Add 1 cup of rolled oats. Next, scoop in ½ cup of almond butter. Then, pour in ⅓ cup of honey or maple syrup. Finally, add 1 teaspoon of vanilla extract. Mix these ingredients together well. You want a sticky paste-like consistency for the next steps.
Adding Additional Ingredients
Now it’s time to make your mixture even more exciting. Chop ½ cup of dried cranberries and add them to your bowl. Then, sprinkle in ½ cup of slivered almonds. Don’t forget to add 2 tablespoons of chia seeds and a pinch of salt. Stir everything thoroughly. This ensures every bite has a great mix of flavors and textures.
Forming the Energy Bites
With clean hands, take about a tablespoon of the mixture. Shape it into a round ball. Place each energy bite onto a parchment-lined baking sheet. Keep going until all the mixture is rolled into bites. This step is fun! You can make them as big or small as you like.
Chilling and Storing
After forming the bites, transfer them to the refrigerator. Let them chill for at least 30 minutes. This helps them firm up nicely. Once chilled, store your energy bites in an airtight container. They will stay fresh in the fridge for up to one week. Enjoy these tasty snacks anytime you need a boost!
Tips & Tricks
Perfecting Texture
To get the best texture for your energy bites, mix well. Combine rolled oats, almond butter, honey, and vanilla extract. You want a thick paste that holds together. If it feels too dry, add a bit more almond butter. If too wet, add more oats. The right consistency helps shape perfect bites.
Presentation Ideas
Make your energy bites look great! Roll them in extra chia seeds or chopped nuts. This adds a nice crunch and makes them more appealing. Serve them in a colorful bowl. A bright bowl makes the bites look inviting and fun.
Serving Suggestions
Pair your energy bites with yogurt or fresh fruit. They taste great with a cup of tea or coffee. You can also enjoy them as a quick breakfast or snack on the go. These bites are flexible and fit many meal times.
Pro Tips
- Use Fresh Ingredients: Always opt for fresh, high-quality dried cranberries and almonds for the best flavor and texture in your energy bites.
- Customize Your Mix-Ins: Feel free to experiment with different nuts, seeds, or dried fruits to suit your taste preferences and nutritional needs.
- Perfect Portioning: Use a cookie scoop for uniform energy bites, ensuring that each one is the same size for consistent nutrition and easy snacking.
- Storage Tips: For longer shelf life, you can freeze the energy bites. Just layer them in an airtight container with parchment paper in between each layer.
Variations
Ingredient Substitutions
You can easily swap out the almond butter for other nut butters. Try peanut butter, cashew butter, or sunflower seed butter for a nut-free option. Each choice gives a unique flavor to your energy bites. For sweeteners, use agave syrup or coconut nectar instead of honey or maple syrup. These alternatives keep the bites tasty and sweet.
Flavor Additions
Want to spice up your energy bites? Add seeds like pumpkin or sunflower seeds for a crunch. You can also mix in other dried fruits, like apricots or raisins. These options bring different flavors and textures. Experimenting with spices, like cinnamon or nutmeg, can add warmth and depth to the bites.
Dietary Adaptations
Making your energy bites gluten-free is simple. Just ensure your oats are certified gluten-free. For vegan bites, swap the honey for maple syrup. This change keeps your snacks plant-based. You can also use vegan chocolate chips for an extra treat. These adjustments help everyone enjoy these energy bites.
Storage Info
Best Storage Practices
Store your Cranberry Almond Energy Bites in an airtight container. This keeps them fresh and prevents them from drying out. I recommend using glass or BPA-free plastic containers. These materials help maintain the taste and texture of the bites.
Shelf Life
These energy bites stay fresh for up to one week in the fridge. If you keep them sealed well, you will enjoy their chewy texture and sweet taste. After a week, they might lose some flavor but will still be safe to eat.
Freezing Tips
For long-term storage, you can freeze your energy bites. Place them in a single layer on a baking sheet. Freeze them for about two hours until firm, then transfer them to a freezer bag. They can last up to three months in the freezer. When you’re ready to eat, just thaw them in the fridge overnight. Enjoy your healthy snack anytime!
FAQs
Can I use rolled oats instead of quick oats?
Yes, you can use rolled oats. Rolled oats are thicker and provide a chewy texture. Quick oats are finer and blend faster. The energy bites will still hold together well with rolled oats. If you prefer a softer bite, use quick oats.
How long can I store Cranberry Almond Energy Bites?
You can store these bites for up to one week. Keep them in an airtight container in the fridge. They will stay fresh and tasty this way. For longer freshness, consider freezing them. Just thaw them before eating.
Are these energy bites suitable for children?
Yes, these energy bites are great for kids. They contain healthy fats, fiber, and natural sugars. The dried cranberries add sweetness and vitamins. These bites can provide energy for playtime or school. Just watch for any nut allergies.
Can I make this recipe nut-free?
Absolutely! You can swap almond butter for sun butter or soy nut butter. These alternatives keep the texture creamy. You can also use pumpkin seeds instead of slivered almonds. Make sure to check for any allergies with these options.
These energy bites are simple to make and delicious. You mix oats, almond butter, and honey. Then, you add cranberries, almonds, chia seeds, and salt. Form the mixture into balls and chill them.
Remember, you can switch ingredients to fit your tastes or diets. Store them in an airtight container for freshness. Enjoy them as snacks for kids or yourself. These bites are packed with nutrients and energy. Try making them today for a quick and tasty trea

Cranberry Almond Energy Bites
Ingredients
- 1 cup rolled oats
- 0.5 cup almond butter
- 0.33 cup honey or maple syrup
- 0.5 cup dried cranberries, chopped
- 0.5 cup slivered almonds
- 2 tablespoons chia seeds
- 1 teaspoon vanilla extract
- a pinch salt
Instructions
- In a medium mixing bowl, add the rolled oats, almond butter, honey (or maple syrup), and vanilla extract. Mix these ingredients together vigorously until they are well combined, resulting in a sticky paste-like consistency.
- Incorporate the chopped dried cranberries, slivered almonds, chia seeds, and a pinch of salt into the bowl with the oat mixture. Stir thoroughly to ensure every ingredient is evenly dispersed throughout the mixture.
- With clean hands, take about a tablespoon of the mixture and shape it into a round ball. Place each formed energy bite onto a parchment-lined baking sheet. Continue this process until all of the mixture has been rolled into bites.
- Once all the bites are on the baking sheet, transfer them to the refrigerator. Let them chill for a minimum of 30 minutes; this will help them firm up and hold their shape.
- After chilling, store your energy bites in an airtight container. They can be kept in the refrigerator for up to one week, making them perfect for healthy snacking throughout the week.


. - Ensure even space on the baking sheet for optimal roasting. - Toss halfway through cooking for uniform caramelization. Roasting carrots and chickpeas makes them sweet and crunchy. When you spread them out, they cook evenly. If they touch, they steam instead of roast. This can make them soggy and less tasty. Tossing the mixture halfway is key. It helps to brown all sides well. This step adds more flavor and a lovely texture. - Experiment with different citrus juices like lime or orange. - Substitute tahini with Greek yogurt for a creamy dressing. The dressing can change the whole dish. Use lime juice for a zesty twist. Orange juice gives a sweet touch. Both add freshness and brightness. If you want a creamy option, use Greek yogurt instead of tahini. It makes the dressing rich and smooth. This swap gives a fun flavor change too. - Serve in individual bowls for a refined presentation. - Add a lemon wedge for guests to use. Presenting this salad in bowls looks nice. It makes each serving feel special. Guests can enjoy their own portion. Adding a lemon wedge on the side is a great idea. It lets everyone add a splash of fresh juice. This brightens the salad even more. For the full recipe, check the details above. Enjoy your cooking! {{image_4}} You can make this salad even better. Try adding other roasted veggies. Bell peppers bring sweetness. Sweet potatoes add creaminess. Both enhance flavor and texture. You can also toss in nuts or seeds. Almonds or sunflower seeds add a nice crunch. They make the salad more filling and fun. If you want more protein, try grilled chicken or tofu. Both options work well with roasted carrots and chickpeas. Grilled chicken adds a savory touch, while tofu keeps it plant-based. You can also use canned tuna. It gives the salad a different flavor and makes it heartier. Want to boost flavor? Experiment with fresh herbs. Cilantro or mint can brighten the taste. They add freshness that complements the roasted veggies. You can also spice it up with hot sauce. Just a dash gives the salad a nice kick. It’s a fun way to change the flavor profile. For the complete recipe, check out the Full Recipe section above. Store leftovers in an airtight container in the fridge. They are best consumed within 2-3 days. After that, the carrots may lose their crunch, and the flavors fade. Freezing this salad is not recommended. The dressing may separate when frozen. This can change the texture and taste of your salad. You can enjoy this salad cold or at room temperature. If you prefer, reheat in the oven. This helps retain the texture of the roasted carrots and chickpeas. Yes, use maple syrup instead of honey and omit the feta cheese. This keeps the flavors rich and plant-based. You won’t miss the cheese, trust me. The roasted carrots and chickpeas bring enough taste and texture to satisfy everyone. You can use black beans or white beans as alternatives. Both options provide protein and fiber. They also add a nice twist to the taste. Black beans bring a bit of earthiness, while white beans offer a creamier texture. Serve the dressing on the side to keep the greens crisp until serving. This way, they stay fresh and crunchy. Drizzle the dressing just before you eat for the best taste and texture. Spinach, arugula, or chopped kale work well for base greens. Each option adds a different flavor. Spinach is mild, arugula is peppery, and kale adds a hearty bite. Choose what you like best! This blog post shares a tasty recipe featuring roasted carrots and chickpeas on fresh greens. It walks through each step, from prep to assembly, and includes tips for perfect results. You can even tweak the dressing and add your favorite proteins. Don’t hesitate to make this salad your own. Experimenting with flavors makes cooking fun! Enjoy your healthy, vibrant salad that brings flavor and nutrition to your table.](https://dishtreats.com/wp-content/uploads/2025/07/15b40619-46f3-4baf-96e6-94c974b2a42a-768x768.webp)

![For these herb crusted zucchini sticks, you need a few simple yet tasty ingredients. Each one plays a key role in creating the perfect crunch and flavor. - Zucchini and Bread Crumb Base - 2 medium zucchinis, cut into uniform sticks - 1 cup whole wheat breadcrumbs - Seasonings and Cheese - 1/2 cup finely grated Parmesan cheese - 2 tablespoons fresh parsley, finely chopped - 1 tablespoon fresh basil, finely chopped - 1 teaspoon garlic powder - 1/2 teaspoon onion powder - Salt and black pepper, to taste - Egg Wash - 2 large eggs, beaten - Olive oil spray or 2 tablespoons extra virgin olive oil Each ingredient adds a layer of flavor. The zucchini brings a fresh crunch, while the breadcrumbs create that satisfying crisp. The herbs and cheese elevate the taste, making these sticks hard to resist. Don't forget the egg wash! It helps the coating stick, ensuring every bite is packed with flavor. For the full recipe, check out the detailed instructions. Prepping the Oven and Baking Sheet First, preheat your oven to 425°F (220°C). This step ensures the zucchini sticks cook evenly. Next, line a baking sheet with parchment paper. This helps prevent sticking and makes cleanup easy. Making the Breadcrumb Mixture In a shallow dish, combine the following: - 1 cup whole wheat breadcrumbs - 1/2 cup finely grated Parmesan cheese - 2 tablespoons fresh parsley, finely chopped - 1 tablespoon fresh basil, finely chopped - 1 teaspoon garlic powder - 1/2 teaspoon onion powder - Salt and black pepper, to taste Stir these ingredients together until they mix well. This mixture adds flavor and crunch to your zucchini sticks. Coating the Zucchini Sticks In a separate bowl, beat 2 large eggs until they are well mixed. This egg wash helps the coating stick. Take each zucchini stick and dip it in the egg wash. Let any excess egg drip off. Then, roll the stick in the breadcrumb mixture. Press gently to coat all sides evenly. Baking Process Place the coated zucchini sticks on your prepared baking sheet. Make sure to leave space between them. This allows them to cook and crisp up nicely. For extra crunch, spray the tops with olive oil or drizzle some over them. Bake the sticks in the oven for 20-25 minutes. Flip them halfway through to ensure even browning. When they are golden brown and crispy, take them out and let them cool for a few moments before serving. Enjoy your crunchy and flavorful snack! For detailed instructions, check the Full Recipe. To get that perfect crunch, the egg wash is key. The egg helps the coating stick well. Without it, the crumbs may fall off. Dip each zucchini stick fully in the egg, then let the extra drip off. This step makes a big difference. Choosing the right olive oil can also help. You can use extra virgin olive oil or an olive oil spray. Both options add flavor and help the zucchini crisp up in the oven. If you use a spray, make sure to coat the sticks lightly. Baking tips are important for even browning. Make sure to leave space between each zucchini stick on the baking sheet. This allows hot air to circulate. Halfway through baking, flip the sticks for a nice, even brown on both sides. For the full recipe, check out the detailed instructions above. Enjoy your crispy zucchini sticks! {{image_4}} You can switch up the recipe to fit your needs. Here are some ideas: - Alternative Breadcrumbs: If you want a gluten-free option, use crushed cornflakes or almond flour. Both give a nice crunch. Try panko breadcrumbs for a lighter, airier texture. - Vegan Option: Replace eggs with a flaxseed mixture. Mix 1 tablespoon of flaxseed meal with 3 tablespoons of water. Let it sit for five minutes until it thickens. This works well to stick the coating. - Additional Seasoning Ideas: You can add a kick with spices like paprika or cayenne. A sprinkle of Italian seasoning can give it a nice herby flavor. Crushed red pepper flakes can add some heat, too. These substitutes keep your herb crusted zucchini sticks tasty and fun. You can play with flavors to make them your own! If you’re looking for the full recipe, check the detailed instructions. Refrigeration Instructions After enjoying the herb-crusted zucchini sticks, let them cool. Place any leftovers in an airtight container. Store them in the fridge for up to three days. This keeps them fresh and tasty for later snacking. Reheating Tips To get that crunch back, reheat the zucchini sticks in the oven. Set your oven to 375°F (190°C). Bake them for about 10 minutes. This will warm them up and restore their crispiness. Avoid using the microwave, as it can make them soggy. Freezing Zucchini Sticks You can freeze the zucchini sticks for longer storage. First, bake them as directed in the Full Recipe. Let them cool completely. Then, place them in a single layer on a baking sheet and freeze for a few hours until firm. After that, transfer them to a freezer bag. They will keep well for up to two months. When ready to eat, bake from frozen, adding a few extra minutes to the cooking time. To keep your zucchini sticks crispy, follow a few key steps. First, cut the zucchini into even sticks. This helps them cook at the same rate. Second, make sure to pat the zucchini dry before coating. Removing excess moisture is very important. Lastly, use the egg wash to help the crumbs stick well. This will create a nice crispy layer while baking. Yes, you can use other vegetables! Carrots, eggplant, and sweet potatoes work great. Just remember to cut them into similar shapes and sizes. This helps them cook evenly. You might need to adjust the cooking time based on the vegetable you choose. Herb-crusted zucchini sticks taste great with many dips. Marinara sauce gives a nice tangy flavor. You can also try ranch dressing for a cool, creamy taste. If you want something lighter, a yogurt dip with herbs is a good choice. It adds freshness and complements the zucchini well. For the full recipe, check out the [Full Recipe]. You learned how to make crispy zucchini sticks using simple ingredients. I shared tips for perfecting your baking process and variations to suit your taste. Storing leftovers or substituting ingredients can keep things fresh. Remember, the right egg wash and oil play key roles in crispiness. Enjoy experimenting with your flavors. Try new dips and veggies next time to keep things exciting. Now, you have the tools to make this dish your own!](https://dishtreats.com/wp-content/uploads/2025/07/e6e4c2e6-85fe-4d28-829b-ce9ad5e19088-768x768.webp)
![- Firm tofu (14 oz, pressed and cubed) - Panko breadcrumbs (1 cup) - Cornstarch (1/4 cup) - Soy sauce (1 tablespoon) - Nutritional yeast (optional, 1 tablespoon) - Garlic powder (1 teaspoon) - Onion powder (1 teaspoon) - Dried oregano (1 teaspoon) - Salt and freshly ground black pepper - Air fryer - Mixing bowls - Cooking spray When making crispy air fryer tofu nuggets, the right ingredients matter. Start with firm tofu. Firm tofu holds its shape well and gives a satisfying bite. Press it to remove extra moisture. This step is crucial. It helps the tofu absorb sauces and seasonings better. Next, panko breadcrumbs add crunch. They are lighter than regular breadcrumbs. This texture makes your nuggets crispy and fun to eat. The cornstarch helps create a crispy coating. For seasonings, soy sauce gives a rich flavor. Nutritional yeast adds a cheesy taste, but it is optional. Garlic powder and onion powder enhance the savory notes. Dried oregano adds a nice herbal touch. Always season with salt and pepper to taste. Gather your cooking supplies. An air fryer is key for even cooking and crispiness. Mixing bowls help combine ingredients well. Don't forget cooking spray! It ensures a golden crust on your tofu nuggets. For the full recipe, check the detailed instructions above. Happy cooking! - Preheat air fryer to 400°F (200°C). This helps the nuggets get crispy. - Toss cubed tofu in soy sauce. Make sure every piece is well-coated. - Combine dry ingredients in a bowl. Use panko, cornstarch, and spices. - Coat each tofu cube in the breadcrumb mixture. Press gently to stick well. - Arrange nuggets in a single layer in the air fryer. Space is key for even cooking. - Mist with cooking spray and cook for 12-15 minutes. Shake the basket halfway for best results. Enjoy your crispy air fryer tofu nuggets! Check out the Full Recipe for more tips. To get crispy tofu nuggets, preheat your air fryer to 400°F (200°C). This helps the nuggets cook evenly and become perfectly crunchy. While cooking, use cooking spray. A light mist on the nuggets before frying ensures they get that golden finish. You can change the taste of your tofu nuggets easily. Swap the seasonings for different flavors. Try adding chili powder for heat or smoked paprika for a rich flavor. You can also use other types of breadcrumbs. Regular breadcrumbs or crushed cornflakes can work well. Pair your crispy nuggets with tasty dipping sauces. Sweet chili sauce or spicy mayo works great. For a fun presentation, garnish your dish with fresh cilantro or thinly sliced green onions. This adds color and makes your meal look appealing. Try these tips, and your tofu nuggets will impress everyone! {{image_4}} You can easily make this recipe vegan. If you want to skip the nutritional yeast, that’s fine. The tofu will still taste great. You can also change the seasonings to fit your taste. Try using paprika, cumin, or even curry powder for a unique twist. If you need a gluten-free snack, swap the regular breadcrumbs for gluten-free ones. You should also check the soy sauce. Some brands add gluten, so look for a gluten-free option. This way, everyone can enjoy your crispy tofu nuggets. Feel free to mix in some veggies or spices. Chopped bell peppers or green onions can add a nice crunch. You could also use cheese alternatives. Adding these can create an extra layer of flavor and keep things exciting. To store your crispy air fryer tofu nuggets, let them cool down first. Place them in an airtight container. This keeps them fresh and tasty. They can last in the fridge for 3 to 4 days. Make sure to check for any signs of spoilage before eating. You can freeze cooked tofu nuggets if you want to save some for later. Arrange them in a single layer on a baking sheet. Freeze them for about 1 hour until solid. Then, transfer them to a freezer bag or container. They can stay in the freezer for up to 3 months. When you want to eat them, thaw them in the fridge overnight. To keep your nuggets crispy, use an air fryer or an oven to reheat them. Preheat the air fryer to 350°F (175°C) and cook for about 5 to 7 minutes. If using an oven, place them on a baking sheet and heat at 350°F (175°C) for 10 to 15 minutes. Avoid using a microwave, as it can make them soggy. Enjoy your crispy air fryer tofu nuggets again! To make sure your air fryer tofu nuggets are crispy, follow these tips: - Press your tofu: Remove excess moisture by pressing your tofu. This helps it soak up flavors and become crispier. - Use panko breadcrumbs: Panko gives a better crunch than regular breadcrumbs. - Preheat the air fryer: Always preheat your air fryer to 400°F (200°C) before cooking. This step is key for crispiness. - Don't overcrowd the basket: Place nuggets in a single layer, leaving space between them. This ensures hot air can circulate. - Mist with cooking spray: A light spray helps create a golden, crispy surface. - Shake halfway through: Give the basket a shake halfway through cooking for even crispiness. Yes, you can use different types of tofu for this recipe: - Firm tofu: This works best for nuggets. It holds its shape and crisps well. - Extra firm tofu: This is also a great choice. It will be very crispy and satisfying. - Silken tofu: I do not recommend this type for nuggets. It will crumble and not hold its shape during cooking. To add some heat to your tofu nuggets, try these suggestions: - Add cayenne pepper: Mix cayenne pepper into your breadcrumb mixture for a kick. - Use spicy sauce: Toss the tofu in a spicy sauce before coating with breadcrumbs. - Include chili powder: Mix chili powder into your dry ingredients for a warm flavor. - Serve with hot sauce: Pair your nuggets with a spicy dipping sauce like sriracha or hot chili sauce. For the full recipe and more details on making crispy air fryer tofu nuggets, check out the [Full Recipe]. These tofu nuggets are easy and fun to make. You prep the tofu, coat it, and air fry it for a tasty snack. You can adjust the seasonings and even use different breadcrumbs for variety. Store leftovers well for later enjoyment. In the end, these nuggets are a great meal or snack choice. Explore different flavors and share them with friends. Enjoy your cooking adventures!](https://dishtreats.com/wp-content/uploads/2025/06/79817f14-b7a2-45e9-a748-387ee13ee939-768x768.webp)