Coconut Curry Chickpeas Simple and Flavorful Recipe

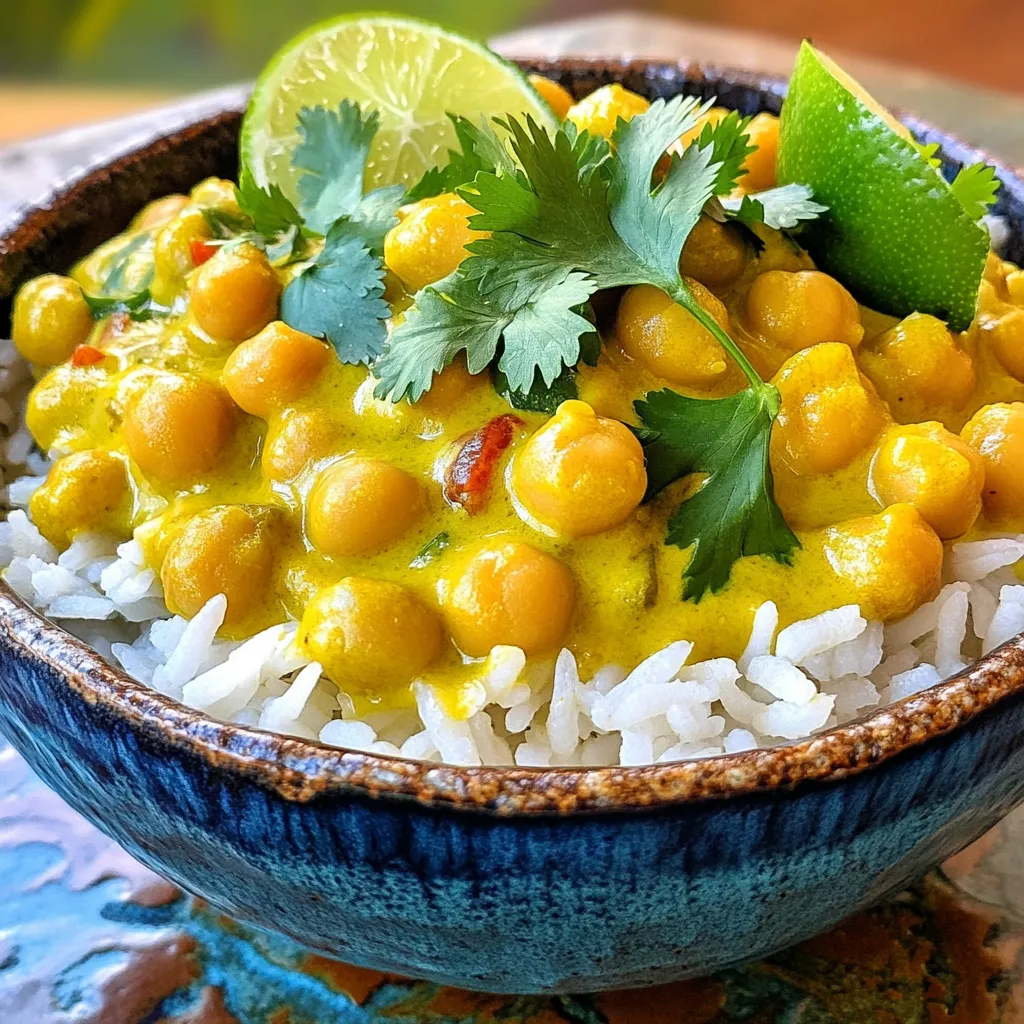
Love bold flavors but want something simple? My Coconut Curry Chickpeas recipe is the answer. This dish combines creamy coconut milk, hearty chickpeas, and a blend of spices that will make your taste buds dance. It’s quick to make, yet packed with warmth and flavor. Let’s dive into this delicious, easy recipe that’s perfect for any meal. Trust me; you’ll want to make this again and again!
Why I Love This Recipe
- Quick and Easy: This recipe comes together in just 30 minutes, making it perfect for a weeknight dinner.
- Flavorful and Satisfying: The combination of coconut milk and red curry paste creates a rich and delicious sauce that pairs beautifully with chickpeas.
- Nutritious: Chickpeas are packed with protein and fiber, making this dish a healthy choice that will keep you full.
- Customizable: You can easily adjust the spice level or add your favorite veggies to make this dish your own.
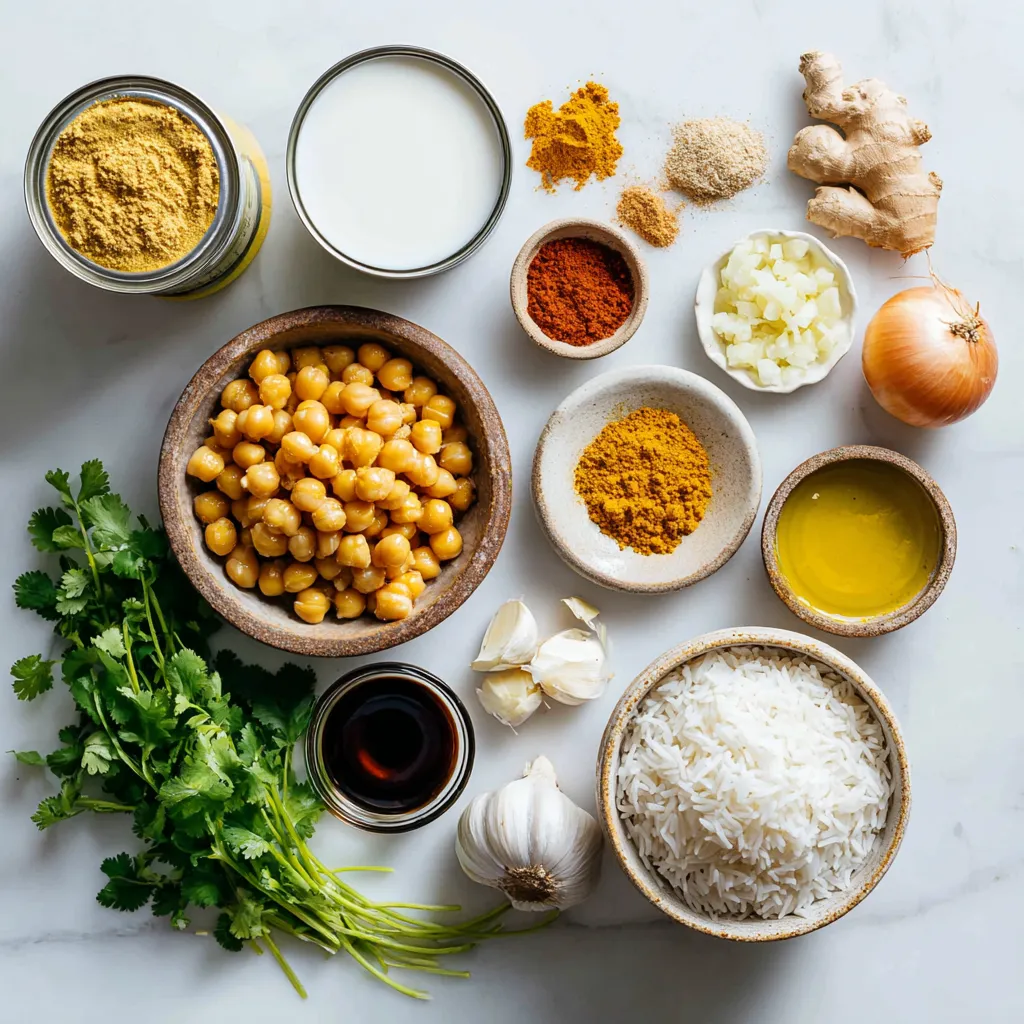
Ingredients
Main Ingredients
- 2 cups canned chickpeas, drained and rinsed
- 1 can (13.5 oz) coconut milk
- 1 medium onion, finely chopped
- 3 cloves garlic, minced
- 1-inch piece ginger, freshly grated
Chickpeas are the star of this dish. They offer protein and fiber. Coconut milk adds creaminess and richness. Onion, garlic, and ginger form a flavorful base.
Spices and Seasoning
- 2 tablespoons red curry paste
- 1 tablespoon extra virgin olive oil
- 1 tablespoon soy sauce
- 1 teaspoon turmeric powder
- 1 teaspoon ground cumin
- Salt, to taste
Red curry paste gives a spicy kick. Soy sauce adds depth. Turmeric and cumin bring warm flavors. Adjust salt for your taste.
Garnish and Serving
- Fresh cilantro, roughly chopped, for garnish
- Cooked basmati rice, for serving
Cilantro adds freshness. Serve the chickpeas over fluffy basmati rice. It balances the rich curry.

Step-by-Step Instructions
Sautéing the Base
Heat 1 tablespoon of olive oil in a large skillet over medium heat. Once the oil is hot, add 1 finely chopped medium onion. Cook the onion for about 4-5 minutes. Stir occasionally until it becomes soft and clear.
Adding Aromatics
Now, stir in 3 minced garlic cloves and 1-inch freshly grated ginger. Cook this mixture for 1-2 minutes. You want to smell the great aroma. Just be careful not to let the garlic burn.
Incorporating the Curry Paste
Next, add 2 tablespoons of red curry paste to the skillet. Mix it well with the sautéed onions. Let it cook for another minute. This step brings out all the fragrant spices.
Creating the Sauce
Pour in 1 can of coconut milk, 1 tablespoon of soy sauce, 1 teaspoon of turmeric powder, and 1 teaspoon of ground cumin. Stir everything together until it is smooth. Bring it to a gentle simmer. This will create a rich sauce.
Adding Chickpeas and Simmering
Gently add 2 cups of canned chickpeas that you’ve drained and rinsed. Stir to coat the chickpeas in the sauce. Let the curry simmer for about 15 minutes. This allows the flavors to blend together. Taste it and add salt as needed.
Finishing Touches
When you finish cooking, take the skillet off the heat. Garnish with fresh chopped cilantro before serving. This adds a nice pop of color and flavor. Serve the curry over fluffy basmati rice for a complete meal.
Tips & Tricks
Perfecting Texture and Flavor
To make your coconut curry chickpeas just right, focus on the sauce. You want it creamy, not too watery. If it seems too thick, add a splash of water or more coconut milk. Let it simmer slowly. This helps the flavors mix well and gives you a rich taste.
Enhancing the Dish
Want to make your dish pop? Try adding a few spices. A dash of cayenne pepper can give it a kick. You can also mix in some fresh lime juice for brightness. Other tasty options include bell peppers, spinach, or even sweet potatoes. They add color and nutrition.
Common Mistakes to Avoid
Watch out for overcooking. If you cook the chickpeas too long, they can get mushy. Also, don’t skimp on seasoning. Taste as you go, and add salt slowly. This will help ensure a balanced flavor in your dish. Enjoying your meal should be easy and fun!
Pro Tips
- Freshness Matters: Use fresh garlic and ginger for optimal flavor; their aromatic oils can elevate the dish significantly.
- Adjust the Heat: If you prefer a spicier curry, feel free to add extra red curry paste or even a pinch of chili flakes to taste.
- Veggie Boost: Enhance nutrition and color by adding vegetables like spinach, bell peppers, or carrots during the simmering stage.
- Rice Alternatives: Serve with quinoa or cauliflower rice for a low-carb option while maintaining the dish’s deliciousness.

Variations
Adding Vegetables
You can make coconut curry chickpeas even better by adding more veggies. Try these ideas:
- Spinach: Add fresh spinach for a burst of color and nutrients.
- Bell Peppers: Slice red or yellow bell peppers to bring sweetness.
- Carrots: Dice or shred carrots for some crunch and sweetness.
- Zucchini: Chop zucchini into small pieces for a tender bite.
- Broccoli: Add florets for a nice texture and nutrition boost.
Each vegetable adds its own unique flavor and texture. Mix and match based on what you love!
Alternative Proteins
If you want more protein, try these options:
- Tofu: Use firm tofu for a great meat alternative. Cube it and sauté before adding to the curry.
- Tempeh: This adds a nutty flavor. Crumble or cube it for a different texture.
- Lentils: Cooked lentils are a good protein source. Add them to the curry for a heartier dish.
These alternatives let you customize your meal while keeping it delicious!
Spice Level Adjustments
Spice level is important in curry. Here’s how to adjust it:
- Milder: Use less red curry paste. You can also add more coconut milk for a creamier taste.
- Spicier: Add more red curry paste or include fresh chili peppers. You can also sprinkle in cayenne pepper.
Adjusting spice lets everyone enjoy the dish just how they like it!
Storage Info
Refrigeration Tips
After making coconut curry chickpeas, let them cool. Store them in an airtight container. They will stay fresh in the fridge for about 3 to 4 days. When you store leftovers, make sure to keep them covered. This helps prevent them from drying out. You can also store them in smaller portions. This makes it easy to grab a quick meal later.
Freezing the Dish
To freeze coconut curry chickpeas, first let them cool completely. Then, scoop them into freezer-safe bags or containers. Remove as much air as possible before sealing. This helps prevent freezer burn. You can freeze the curry for up to 3 months. When you’re ready to enjoy it again, just thaw it overnight in the fridge.
Reheating Instructions
To reheat, you have a few options. The best method is to use a skillet. Heat it over medium heat, adding a splash of water or coconut milk to keep it moist. Stir often until it’s heated through. If you prefer the microwave, place the curry in a bowl. Cover it and heat for 1 to 2 minutes, stirring halfway. Always check that it’s piping hot before serving. Enjoy your meal!
FAQs
What can I serve with coconut curry chickpeas?
You can serve coconut curry chickpeas with many tasty sides. Here are some great options:
- Basmati rice: This fluffy rice soaks up the curry sauce well.
- Quinoa: A healthy grain that adds protein and texture.
- Naan or flatbread: Perfect for scooping up the curry.
- Steamed vegetables: Broccoli or green beans add color and nutrition.
- Salad: A light cucumber or tomato salad can balance the meal.
Can I make this recipe vegan?
Yes, this recipe is already vegan! It uses coconut milk and chickpeas, which are plant-based. If you want to add more flavor, you can try these options:
- Substitute soy sauce with tamari for a gluten-free option.
- Use vegetable broth in place of water for more depth.
- Add extra veggies like spinach or bell peppers for added nutrition.
How do I thicken coconut curry?
To thicken your coconut curry, try these simple methods:
- Simmer longer: Let the curry cook longer to reduce the liquid.
- Add a thickener: Mix cornstarch with water and stir it in slowly.
- Use coconut cream: Swap out some coconut milk for coconut cream for a richer texture.
- Blend some chickpeas: Mash a few chickpeas and stir them in for added thickness.
This blog post covered a delicious coconut curry chickpeas recipe. We explored key ingredients, like canned chickpeas, coconut milk, and spices. You learned how to sauté the base, blend aromatics, and create a rich sauce. Also, we shared tips for texture, common mistakes, and possible variations.
In the end, cooking this dish is simple and satisfying. You can adapt it with fresh veggies or different proteins. Enjoy the process and make it your ow

Coconut Curry Chickpeas
Ingredients
- 2 cups canned chickpeas, drained and rinsed
- 1 can coconut milk (13.5 oz)
- 1 medium onion, finely chopped
- 3 cloves garlic, minced
- 1 inch piece ginger, freshly grated
- 2 tablespoons red curry paste
- 1 tablespoon extra virgin olive oil
- 1 tablespoon soy sauce
- 1 teaspoon turmeric powder
- 1 teaspoon ground cumin
- to taste salt
- for garnish fresh cilantro, roughly chopped
- for serving cooked basmati rice
Instructions
- In a large skillet, heat the extra virgin olive oil over medium heat. Once hot, add the finely chopped onion. Sauté for about 4-5 minutes, stirring occasionally, until the onion is softened and translucent.
- Stir in the minced garlic and freshly grated ginger. Cook for an additional 1-2 minutes until the mixture becomes fragrant, ensuring the garlic doesn’t burn.
- Add the red curry paste to the skillet, stirring thoroughly to coat the onions and release the spices. Cook for another minute to enhance the flavor profile of the dish.
- Pour in the rich coconut milk along with the soy sauce, turmeric powder, and ground cumin. Mix well to combine all the ingredients, then bring the mixture to a gentle simmer.
- Carefully add the drained chickpeas to the skillet, stirring gently to ensure they are well coated with the vibrant curry sauce.
- Allow the curry to simmer for approximately 15 minutes. This will give time for the flavors to meld beautifully and for the sauce to thicken slightly. Taste and season with salt as necessary.
- Once finished, remove the skillet from the heat. Garnish the dish generously with fresh chopped cilantro just before serving.


![- 1 lb beef sirloin, thinly sliced against the grain - 1 medium onion, finely chopped - 2 cloves garlic, minced - 8 oz mushrooms, sliced (cremini or button) - 1 cup beef broth (preferably low-sodium) - 1 cup sour cream (or Greek yogurt for a lighter option) - 2 tablespoons all-purpose flour - 2 tablespoons olive oil - 1 teaspoon Dijon mustard - Salt and freshly ground black pepper to taste - 12 oz egg noodles (or your favorite pasta) The beef sirloin is the star of the dish. It should be tender and flavorful. Use fresh onions and garlic to build a tasty base. The mushrooms add a nice earthiness. A good beef broth gives depth to the sauce. The sour cream adds creaminess and tang. If you want a lighter dish, Greek yogurt works well too. - Greek yogurt instead of sour cream - Alternative pasta types If you do not have sour cream, Greek yogurt is a great swap. It gives a similar creamy texture while being a bit healthier. You can also try different pasta types, like fettuccine or penne, based on your preference. - 1 teaspoon Dijon mustard - Salt and freshly ground black pepper - Fresh parsley, finely chopped for garnish Dijon mustard adds a subtle kick and depth of flavor. Salt and pepper are key for bringing out the taste in all the ingredients. A sprinkle of fresh parsley on top makes the dish look bright and fresh. It is a simple way to enhance the visual appeal. - Start by boiling salted water in a large pot. - Once boiling, add 12 oz of egg noodles. - Cook them until al dente, following package instructions. - When ready, drain the noodles and set them aside. - Toss the noodles with a drop of olive oil to keep them from sticking. - Heat 2 tablespoons of olive oil in a large skillet over medium-high heat. - Add 1 lb of thinly sliced beef sirloin to the hot pan. - Season the beef with salt and freshly ground black pepper. - Cook for about 3 to 4 minutes until the beef is browned. - Use a slotted spoon to remove the beef and place it on a plate. - In the same skillet, add the remaining olive oil. - Once hot, stir in 1 medium chopped onion and 2 minced garlic cloves. - Sauté for 2 to 3 minutes until the onion is soft and clear. - Next, add 8 oz of sliced mushrooms, cooking for another 4 to 5 minutes. - When the mushrooms are golden, sprinkle 2 tablespoons of flour over the mix. - Slowly pour in 1 cup of beef broth, whisking constantly. - Keep stirring until the mixture thickens, about 3 to 4 minutes. - Lower the heat to medium-low, then stir in 1 cup of sour cream. - Add 1 teaspoon of Dijon mustard for extra flavor. - Return the beef to the skillet, mixing well in the sauce. - Warm it through for 2 to 3 minutes without boiling. - Taste and adjust the seasoning as needed. - For plating, place a generous portion of noodles on each plate. - Ladle the creamy beef stroganoff over the noodles. - Finish by garnishing with finely chopped fresh parsley. - This adds a pop of color and freshness to your dish. For the full recipe, check out the [Full Recipe]. Enjoy this comforting meal! To make a smooth sauce, avoid lumps. When you add flour, stir it well before adding beef broth. This will help mix everything perfectly. Keep the heat low. You want to see gentle bubbles, not a rolling boil. A simmer will thicken your sauce without breaking it down. Slice your beef against the grain. This makes it tender and easy to chew. If you cut with the grain, the beef will be tough. Pay attention to the mushrooms too. Cook them until they are golden brown. This brings out their flavor and gives a nice texture. About 4-5 minutes should do the trick. Serve your beef stroganoff in shallow bowls. This allows the sauce to spread out and look rich. Add a sprinkle of fresh parsley on top for color. A bit of greenery makes the dish pop. It also adds a fresh taste to each bite. {{image_4}} You can make a tasty vegetarian beef stroganoff. Simply swap the beef for mushrooms or tofu. Mushrooms give a great, meaty flavor. Tofu adds protein and absorbs the sauce well. For a creamy mushroom stroganoff, follow these steps: - Use 16 oz of sliced mushrooms instead of beef. - Cook the mushrooms until they are soft and browned. - Add 1 cup of vegetable broth instead of beef broth. - Stir in the same sour cream for creaminess. If you want a lighter option, try using chicken or turkey. Both cook quickly and taste great in stroganoff. Use diced chicken breast or turkey breast instead of beef. Adjust the cooking time to about 5-7 minutes. Ensure the chicken or turkey is cooked through before adding the sauce. To elevate the flavor, consider adding Worcestershire sauce or a splash of red wine. These ingredients add depth and richness. You can also include fresh herbs like thyme or rosemary. They bring a nice aroma and complement the creamy sauce. A teaspoon of Worcestershire sauce or a ¼ cup of red wine can make a big difference. After enjoying your beef stroganoff, you may have some leftovers. Store them in an airtight container. Refrigerate the stroganoff within two hours of cooking. It will stay fresh for about three to four days. When you reheat, warm it gently over low heat. This keeps the sauce creamy. Stir often to avoid burning. You can also use a microwave. Heat it in short bursts, stirring in between. This method helps the dish heat evenly. If you want to keep beef stroganoff longer, freezing is a great option. To freeze, let the dish cool completely. Then, transfer it to a freezer-safe container. Leave some space at the top for expansion. Seal it tightly to prevent freezer burn. For thawing, the best method is overnight in the fridge. This keeps the flavor and texture nice. If you need it fast, you can use the microwave. Set it to defrost and check every few minutes. After thawing, reheat as I mentioned before, ensuring it warms evenly. You can find the full recipe for this comforting dish above. Enjoy every bite! You can enjoy Classic Beef Stroganoff with several tasty sides. Here are some great options: - Steamed green beans - Roasted broccoli - Mashed potatoes - A fresh garden salad - Garlic bread Each side adds a nice touch. Steamed veggies give color and crunch. Mashed potatoes soak up the sauce well. A salad offers a refreshing contrast. Classic Beef Stroganoff lasts about 3 to 4 days in the fridge. Store it in an airtight container. Always cool the dish before sealing it up. Check for any signs of spoilage before eating. If it smells off or looks strange, throw it away. Yes, you can prepare parts of Classic Beef Stroganoff ahead of time. Cook the beef and sauce, then store them separately from the noodles. When you’re ready to eat, heat the beef and sauce. Cook the noodles fresh for best results. This way, you keep everything tasty and warm. Classic Beef Stroganoff is not gluten-free due to the flour in the sauce. You can make it gluten-free by using cornstarch or gluten-free flour. Be sure to check that your beef broth and noodles are also gluten-free. This way, everyone can enjoy this delicious meal. For the full recipe, check my earlier section. You learned about the key ingredients for Classic Beef Stroganoff, including beef sirloin and egg noodles. We discussed how to cook the noodles, sauté the beef, and prepare a rich sauce. You also saw tips for perfecting the dish and its various options for customization, like vegetarian alternatives. In summary, you can make a delicious meal everyone will enjoy. Remember, cooking is about creativity. Feel free to experiment with flavors and ingredients until it’s just right for you. Enjoy your cooking journey!](https://dishtreats.com/wp-content/uploads/2025/06/f14c56cb-cc13-4cc3-a3ff-e0f76ee8bdb9-768x768.webp)


