Coconut Caramel Magic Bars Delightful Sweet Treat

If you love sweet treats, you’re in for a real delight with Coconut Caramel Magic Bars! These bars combine layers of rich coconut, creamy caramel, and a buttery crust for a taste like no other. Easy to make and fun to share, they’re perfect for any occasion. Let’s dive into the magic of these bars, explore the ingredients you need, and get started on your new favorite dessert!
Why I Love This Recipe
- Decadent Flavor: The combination of chocolate, butterscotch, and coconut creates a rich and indulgent taste that is hard to resist.
- Easy to Make: This recipe comes together quickly with minimal prep work, making it perfect for both novice and experienced bakers.
- Versatile Toppings: You can customize these bars with your favorite nuts or even additional chocolate for an extra layer of flavor.
- Perfect for Sharing: These magic bars are great for gatherings, parties, or simply as a sweet treat to share with friends and family.
Ingredients
Comprehensive Ingredients List
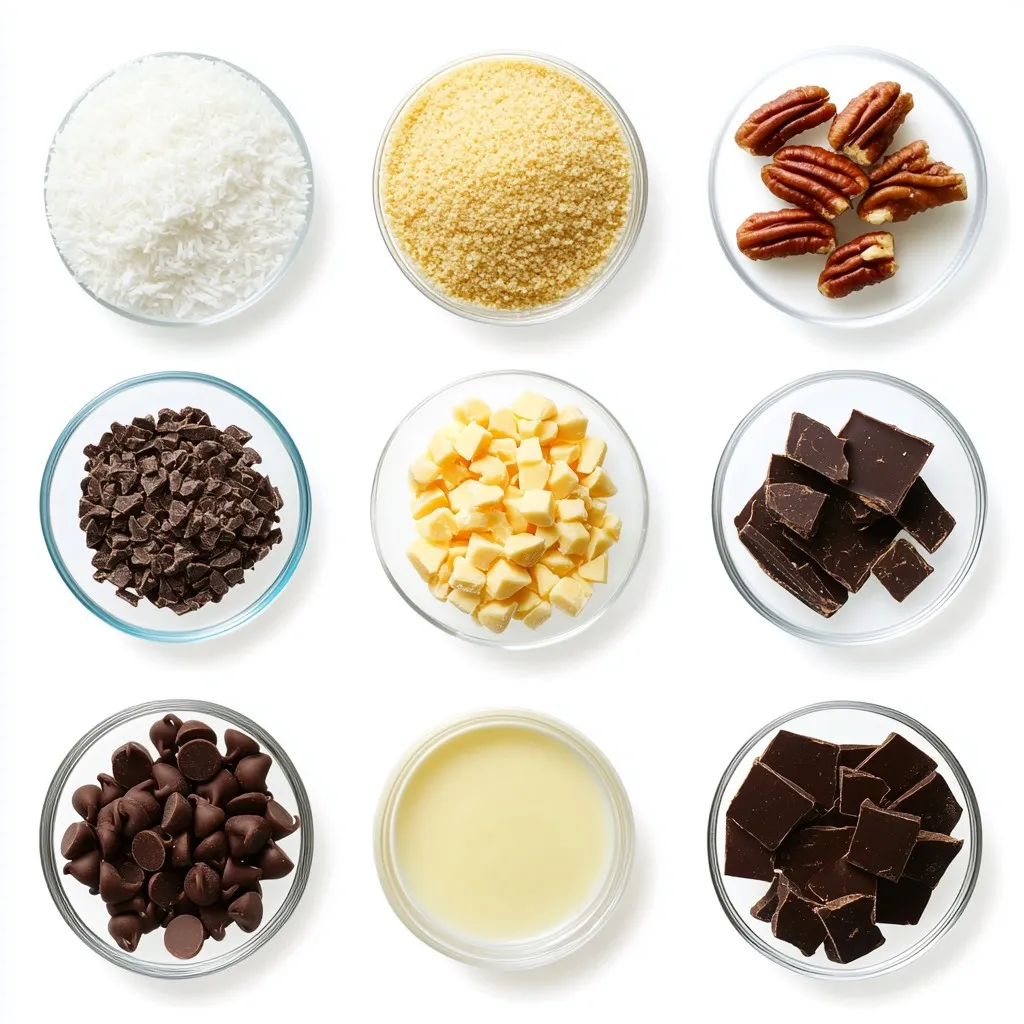
To make Coconut Caramel Magic Bars, gather these ingredients:
- 1 cup graham cracker crumbs
- 1/2 cup unsweetened shredded coconut
- 1/2 cup unsalted butter, melted
- 1 tablespoon brown sugar
- 1 cup sweetened condensed milk
- 1 cup semisweet chocolate chips
- 1 cup butterscotch chips
- 1/2 cup chopped pecans or walnuts (optional)
- 1 teaspoon vanilla extract
- Pinch of sea salt
These ingredients create a sweet and rich flavor that everyone loves.
Substitutions and Alternatives
You can swap some ingredients for variations or dietary needs. Here are a few ideas:
- Graham cracker crumbs can be replaced with crushed cookies like Digestives or Oreos.
- Unsweetened shredded coconut can be replaced with sweetened if you like more sweetness.
- Unsalted butter can be substituted with coconut oil for a dairy-free option.
- Sweetened condensed milk can be replaced with coconut cream for a vegan treat.
- Chocolate chips can be dark chocolate or even white chocolate based on your preference.
These swaps let you customize the bars to your taste.
Optimal Ingredient Quality
Using high-quality ingredients makes a big difference. Here are my tips:
- Choose fresh graham crackers for the best texture.
- Use good-quality chocolate chips for rich flavor.
- Fresh nuts add crunch and taste. If you can, toast them for extra flavor.
- Look for organic or fair-trade coconut to support better farming practices.
Great ingredients lead to great results in your Coconut Caramel Magic Bars!

Step-by-Step Instructions
Prepping the Oven and Baking Dish
Start by preheating your oven to 350°F (175°C). This step is key for even baking. While the oven warms up, prepare your baking dish. Use a 9×13 inch dish and grease it lightly. You can also line it with parchment paper. This makes it easy to remove the bars later.
Making and Pressing the Crust
In a medium bowl, mix graham cracker crumbs, shredded coconut, melted butter, and brown sugar. Stir until everything is combined well. The mixture should feel like wet sand. This is your crust. Next, press the mixture firmly into the bottom of the baking dish. Use the back of a measuring cup or your fingers. Ensure it is packed tightly and evenly. This will give you a sturdy base for your magic bars.
Preparing the Filling and Layering
In another bowl, whisk together sweetened condensed milk, vanilla extract, and a pinch of sea salt until smooth. This filling is creamy and sweet. Carefully pour this mixture over the crust. Spread it evenly with a spatula. Now, it’s time for the toppings! Sprinkle semisweet chocolate chips and butterscotch chips over the filling. If you want nuts, add chopped pecans or walnuts on top. This adds a great crunch.
Tips & Tricks
Perfecting the Baking Time
Baking Coconut Caramel Magic Bars requires attention. Preheat your oven to 350°F (175°C). Bake the bars for 25 to 30 minutes. Watch for golden edges and a set center. If you overbake, they can become dry. If they look too soft, give them a few more minutes. Every oven is different, so keep an eye on yours.
Slicing Techniques for Neat Bars
To slice your bars neatly, let them cool completely. I recommend chilling them in the fridge for an hour. This makes cutting much easier. Use a sharp knife for clean edges. Wipe the knife with a damp cloth between cuts. This helps prevent sticking. You can cut them into squares or rectangles, depending on your preference.
Enhancing Flavor with Additional Ingredients
Want to boost the flavor? Try adding a pinch of cinnamon to the crust mix. For a nutty twist, use chopped pecans or walnuts. You can even toss in some dried fruit like cranberries or cherries. Get creative! Each addition can make these bars unique. Just remember to keep the balance of flavors in mind.
Pro Tips
- Chill for Clean Cuts: Allow the bars to chill in the refrigerator for at least an hour before slicing. This will help achieve cleaner, more uniform cuts.
- Customize Your Toppings: Feel free to mix and match your favorite toppings! Consider adding dried fruits, different nuts, or even a layer of caramel for extra flavor.
- Watch the Baking Time: Keep an eye on the bars as they bake. Ovens can vary, so check for a golden brown edge and a set center to avoid overbaking.
- Store Properly: Store any leftovers in an airtight container at room temperature for up to a week or in the fridge for longer freshness.

Variations
Ingredient Swaps for Custom Flavors
You can change the flavors in your Coconut Caramel Magic Bars easily. For the graham cracker crumbs, use vanilla wafers for a sweeter taste. Want a nutty flavor? Swap in almond flour instead. You can also try using different types of chocolate. Dark chocolate adds a rich taste, while white chocolate gives a sweet twist.
Vegan or Gluten-Free Options
If you want to make these bars vegan, use coconut oil instead of butter. Replace the sweetened condensed milk with coconut cream and maple syrup for a sweet touch. For gluten-free bars, choose gluten-free graham crackers. This way, everyone can enjoy these tasty treats.
Seasonal Twists and Add-Ins
You can add special ingredients based on the season. In the fall, add pumpkin spice for a cozy flavor. In summer, fresh berries like raspberries or strawberries will brighten the bars. You can also sprinkle in some orange zest for a fresh burst of citrus. These small changes make your bars unique and fun!
Storage Info
Best Practices for Storing Bars
To keep your Coconut Caramel Magic Bars fresh, store them in an airtight container. Place a piece of parchment paper between layers to prevent sticking. This helps maintain their texture and flavor. Keep the container in a cool, dry place. They can last up to five days at room temperature.
Freezing Instructions for Longevity
If you want to save some bars for later, freezing is a great option. Cut the bars into squares first. Wrap each piece in plastic wrap and then place them in a freezer-friendly bag. This keeps them fresh and prevents freezer burn. They can last up to three months in the freezer. When ready to enjoy, thaw them in the fridge overnight.
Reheating Tips for Optimal Enjoyment
If you prefer warm bars, reheat them in the oven. Preheat your oven to 350°F (175°C). Place the bars on a baking sheet and cover with foil to prevent over-browning. Heat them for about 10 minutes. This will make the chocolate and butterscotch chips nice and gooey again. Enjoy them warm for a delightful treat!
FAQs
Can I make Coconut Caramel Magic Bars ahead of time?
Yes, you can make Coconut Caramel Magic Bars ahead of time. These bars taste great after a day or two. Just store them in an airtight container. This keeps them fresh and chewy.
What can I substitute for sweetened condensed milk?
If you need a substitute for sweetened condensed milk, try coconut cream. Mix it with sugar to get the right sweetness. Another option is evaporated milk with sugar added. Both choices work well in this recipe.
How long do these bars last at room temperature?
These bars can last about five days at room temperature. Keep them in an airtight container to stay fresh. If it’s very warm, store them in the fridge to prevent melting.
Can I use other types of nuts or add fruits?
Absolutely! You can use other nuts like almonds or macadamia nuts. You can also add dried fruits like cherries or cranberries. These changes give your bars a unique flavor and texture.
We’ve covered a lot about making delicious Coconut Caramel Magic Bars. You learned about key ingredients and how to choose the best ones. We also went through easy steps for baking and tips to make them perfect. Don’t forget the fun variations you can try out. Lastly, I shared smart ways to store your bars for later.
Enjoy experimenting and making these treats your own! You’ll love how simple and tasty they can b

Coconut Caramel Magic Bars
Ingredients
- 1 cup graham cracker crumbs
- 1/2 cup unsweetened shredded coconut
- 1/2 cup unsalted butter, melted
- 1 tablespoon brown sugar
- 1 cup sweetened condensed milk
- 1 cup semisweet chocolate chips
- 1 cup butterscotch chips
- 1/2 cup chopped pecans or walnuts (optional)
- 1 teaspoon vanilla extract
- 1 pinch sea salt
Instructions
- Preheat your oven to 350°F (175°C) and prepare a 9x13 inch baking dish by greasing it lightly or lining it with parchment paper.
- In a medium mixing bowl, combine the graham cracker crumbs, shredded coconut, melted butter, and brown sugar. Stir until the mixture resembles wet sand.
- Press the crust mixture firmly and evenly into the bottom of the prepared baking dish.
- In another bowl, whisk together the sweetened condensed milk, vanilla extract, and a pinch of sea salt until smooth.
- Carefully pour the sweetened condensed milk mixture over the graham cracker crust, spreading it evenly.
- Sprinkle the semisweet chocolate chips and butterscotch chips over the condensed milk layer. If using nuts, scatter them on top.
- Bake for 25-30 minutes, or until the edges are golden brown and the center appears set.
- Allow the bars to cool completely at room temperature, then refrigerate for at least 1 hour before slicing.
- Lift the bars out of the pan using the edges of the parchment paper and cut into squares or rectangles.


![To make classic chocolate brownies, you need the following ingredients: - 1 cup (2 sticks) unsalted butter - 2 cups granulated sugar - 4 large eggs, at room temperature - 1 teaspoon pure vanilla extract - 1 cup all-purpose flour - 1 cup unsweetened cocoa powder - ½ teaspoon baking powder - ½ teaspoon sea salt - 1 cup semi-sweet chocolate chips - Optional: ½ cup chopped walnuts or pecans for added crunch You can use margarine if you need a butter alternative. For a deeper flavor, try using dark cocoa powder instead of regular cocoa. If you want to make this recipe gluten-free, swap the all-purpose flour with a gluten-free blend. Feel free to customize your brownies with these fun ideas: - Nuts: Consider using walnuts or pecans for extra texture. Almonds also work great. - Chocolate types: Mix semi-sweet and dark chocolate chips for rich flavor. - Flavor variations: Add a teaspoon of mint extract or some orange zest for a twist. These add-ins can enhance the taste and make your brownies unique. Mixing flavors can lead to exciting new experiences in every bite. To make the brownie batter, follow these steps: 1. Melt the butter: Start by melting 1 cup of unsalted butter in a medium saucepan over low heat. Stir often until it’s fully melted. 2. Add sugar: Once the butter is melted, remove it from the heat. Stir in 2 cups of granulated sugar until it looks smooth. 3. Add eggs: Crack 4 large eggs into the butter-sugar mix. Add them one at a time. Mix well after each egg, so the batter combines nicely. 4. Mix in vanilla: Add 1 teaspoon of pure vanilla extract. This gives the brownies a nice flavor. 5. Combine dry ingredients: In another bowl, sift together 1 cup of all-purpose flour, 1 cup of unsweetened cocoa powder, ½ teaspoon of baking powder, and ½ teaspoon of sea salt. This helps mix the dry ingredients well. 6. Fold dry into wet: Gently fold the dry mix into the wet mix. Use a spatula to combine until just mixed. Do not overmix, or the brownies won’t be fudgy. 7. Add chocolate chips: Toss in 1 cup of semi-sweet chocolate chips. If you like, add ½ cup of chopped walnuts or pecans for crunch. Mix until they are spread evenly in the batter. 8. Prepare the pan: Grease a 9x13-inch baking pan or line it with parchment paper. This makes it easy to remove the brownies later. 9. Pour batter: Pour the brownie batter into the pan. Use a spatula to spread it evenly. Now, it’s time to bake! 1. Preheat oven: Set your oven to 350°F (175°C). This ensures even baking. 2. Bake brownies: Place the pan in the oven. Bake for 30 to 35 minutes. 3. Check for doneness: To check, insert a toothpick into the center. It should come out with a few moist crumbs. If it’s wet, bake a little longer. Avoid overbaking for that perfect fudgy texture. After baking, let’s cool and cut the brownies. 1. Cool in the pan: Allow the brownies to cool in the pan for at least 15 minutes. This helps them firm up. 2. Transfer to wire rack: After 15 minutes, move the brownies to a wire rack. Let them cool completely before cutting. 3. Cutting tips: Use a sharp knife for clean cuts. Wipe the knife after each cut for neat squares. 4. Serving size: Cut into generous squares. Each piece should be a lovely bite of fudgy goodness. For a special touch, dust the brownies with powdered sugar before serving. Enjoy these delightful treats with a scoop of vanilla ice cream for extra indulgence. For the complete recipe, refer to the Full Recipe. To make the best fudgy brownies, focus on mixing. After melting the butter, stir in the sugar until smooth. Add eggs one at a time. Mix well after each egg. This helps create a rich texture. Don't overmix the dry and wet ingredients. Fold them gently just until combined. Common mistakes include overbaking and using too much flour. Overbaking leads to dry brownies. Aim for a toothpick with few moist crumbs. If you use too much flour, your brownies will be cake-like. Measure carefully for the best results. Brownies keep well at room temperature. Store them in an airtight container for up to five days. If you want to keep them longer, the fridge is a good option. Just remember, cold brownies can lose some flavor. To revive leftovers, warm them in the microwave for 10-15 seconds. This restores their fudgy goodness. You can also serve them with a scoop of ice cream for a tasty treat. For the full recipe, check out the [Full Recipe]. {{image_4}} For a gluten-free treat, try flourless brownies. You can use almond flour or ground oats instead of regular flour. These options add a nice texture and flavor. You should also reduce baking time. Check them after 25 minutes to avoid dryness. If you want a lighter version, use less sugar. You can swap half of the sugar with unsweetened applesauce. This keeps the brownies moist. For fats, use avocado or coconut oil. These substitutes make the brownies healthier but still tasty. To spice things up, add a dash of coffee or a pinch of sea salt. These flavors enhance the chocolate taste. You can also use extracts like almond or orange for a lovely twist. Just a little goes a long way in changing the flavor profile. Serving classic chocolate brownies is easy and fun. You can serve them warm with a scoop of ice cream. Vanilla ice cream works great, but try mint or coffee flavors for a twist. You can also top brownies with whipped cream. A sprinkle of chocolate shavings adds a nice touch. For a beautiful presentation, cut the brownies into squares. Place them on a decorative plate. Dust with powdered sugar for a fancy look. Add fresh berries or a sprig of mint beside each brownie. These details make the dish more appealing. Brownies are versatile and can be served in many ways. One fun idea is a brownie sundae. Start with a warm brownie, add a scoop of ice cream, and drizzle chocolate sauce on top. Finish with whipped cream and a cherry for a delightful treat. You can pair brownies with drinks too. A strong cup of coffee complements the rich chocolate flavor. Hot cocoa or milk also works well. For a unique twist, serve brownies with a side of fresh fruit. The sweetness of the fruit balances the rich brownies. For more ideas, check out the Full Recipe to explore all the delicious details! To check if your brownies are done, look for a few signs. The top should look set and slightly shiny. When you insert a toothpick in the center, it should come out with a few moist crumbs. This means your brownies are fudgy and perfect. If the toothpick comes out with wet batter, they need more time. Keep a close watch in the last few minutes of baking to avoid overbaking. Yes, you can freeze brownies! To freeze them, let them cool completely first. Cut your brownies into squares, then wrap each piece in plastic wrap. Place them in a freezer bag or container. They can last up to three months in the freezer. When you're ready to eat them, thaw them in the fridge overnight or at room temperature for a few hours. For neat cuts, use a sharp knife. First, let the brownies cool completely in the pan. For even cleaner cuts, wipe the knife with a damp cloth after each cut. This way, you have smooth edges. You can also use a pizza cutter for quick slicing. If you want, line your baking pan with parchment paper. This makes it easy to lift out the brownies for cutting. You’ve learned how to make classic chocolate brownies, from ingredients to serving tips. Whether you prefer fudgy or flourless, options abound to suit your taste. Remember, small changes can create big flavors. Experiment with add-ins or healthier swaps to make them your own. With these steps, you can enjoy delicious brownies any time. Happy baking!](https://dishtreats.com/wp-content/uploads/2025/07/8475203d-ada8-4920-a61c-065e4c50bd3f-768x768.webp)


![- 2 cups Greek yogurt (plain or flavored) - 1 cup granola (your favorite flavor) - 1 cup mixed berries (strawberries, blueberries, raspberries, or a mix) - 2 tablespoons honey or maple syrup (for sweetness) - A sprinkle of cinnamon (for warmth) - Fresh mint leaves (for garnish) Greek yogurt parfait jars are fun and easy to make. You can choose between plain or flavored Greek yogurt. I love plain yogurt for its creamy texture. Granola adds crunch, so pick a flavor you enjoy. Mixed berries bring sweetness and color. You can use strawberries, blueberries, raspberries, or a mix. If you like your parfait sweet, add honey or maple syrup. A sprinkle of cinnamon can add a warm flavor. Fresh mint leaves make a lovely garnish that also adds freshness. You can find all the details in the Full Recipe. Enjoy making your parfaits! To make Greek yogurt parfait jars, start with the fruits. Wash your mixed berries under cold water. If you choose strawberries, slice them into small pieces. This way, they fit nicely in the jars. Next, grab your jars for assembly. I like to use clear glass jars. They show off the layers well. Make sure they are clean and dry before you start. Now, let’s build our parfait. Start with the first layer: Greek yogurt. Use about 1/4 cup for each jar. This creamy layer makes a great base. For the second layer, add granola. Use around 2-3 tablespoons. Press it down gently. This adds a nice crunch to your parfait. Then, for the third layer, add mixed berries. Aim for 1/3 cup in each jar. Spread them out for a colorful look. You can mix different types for extra flavor. If you want a bit of sweetness, add optional sweeteners. A drizzle of honey or maple syrup works well. Just use 1/2 tablespoon per jar. It enhances the taste without overpowering it. For a pretty finish, garnish with mint leaves. Just a few on top will do. They add a fresh touch and make your parfait look fancy. Once done, seal the jars and refrigerate for at least 30 minutes. This waiting time helps the flavors blend. You can find the [Full Recipe] for more details. To make the best parfaits, layering is key. Start with yogurt at the bottom. Add granola next, then berries. Repeat these layers until your jar is full. This adds flavor and makes it pretty. When choosing a jar, go for a size that suits your meal. Small jars work for snacks, while larger ones fit breakfast. Clear jars show off the layers nicely. Mix flavors to keep it exciting. Try different yogurt flavors like vanilla or coconut. Use various berries or add chopped nuts for crunch. You can also swap granola for oats for a twist. Enjoy your parfaits at any time. They’re perfect for breakfast or a midday snack. Serve them cold for a refreshing treat. Pair parfaits with smoothies for a filling breakfast. They also go well with coffee or tea. Add a side of toast or fruit for a complete meal. {{image_4}} You can change up the fruit in your parfaits. Seasonal fruit combinations add color and taste. In summer, try peaches and cherries. In fall, apples and pears work well. These fruits keep your parfait fresh and fun. If you want alternatives to mixed berries, consider bananas or mangoes. Both add sweetness and creaminess. You can also mix in some citrus for a zesty twist. Try adding orange segments or grapefruit for a bright flavor. Granola can change the whole vibe of your parfait. You can use homemade or store-bought granola. Homemade granola lets you control the flavors and crunch. Store-bought granola is quick and easy. Different granola types have unique flavor profiles. For example, honey granola tastes sweet and rich. Chocolate granola adds a treat-like feel. Nutty granola brings a hearty crunch. Choose the one that excites your taste buds the most. If you want a dairy-free option, plant-based yogurt works great. Almond, coconut, or soy yogurt can all be used. They add a creamy texture without dairy. You can also find non-dairy granola options. Look for granolas that use oats, nuts, and seeds. These are often gluten-free as well. You can enjoy a delicious parfait without any dairy! For a full recipe and more tips, check out the Greek Yogurt Parfait Jars recipe. To keep your Greek yogurt parfait jars fresh, follow these tips: - Store parfaits in airtight containers. This helps keep them moist and tasty. - Use glass jars or plastic containers with lids. They work well for storage. - Keep parfaits in the fridge. This ensures they stay cool and safe to eat. How long do parfaits last in the fridge? Well, they stay good for about 3 to 5 days. Watch for signs of spoilage, like: - An off smell that’s different from fresh yogurt. - A change in color or texture. If it looks strange, it’s best to toss it. - Mold or any fuzzy spots on the surface. Stay safe and enjoy your parfaits while they are fresh! How do I make Greek yogurt parfaits dairy-free? You can swap Greek yogurt for a dairy-free yogurt. Look for almond, coconut, or soy yogurt. These options work well and still taste great. You may need to adjust the sweetness, too. Can I prepare parfaits in advance? Yes, you can make parfaits ahead of time. Just layer your ingredients in jars and store them in the fridge. They stay fresh for about two days. This is great for busy mornings. How can I customize my parfait for dietary needs? You can change the fruit, yogurt, and sweeteners based on your needs. For low sugar, skip sweeteners. If you need gluten-free, choose gluten-free granola. There are many ways to make it your own. What is the best layering technique for visuals? Start with yogurt at the bottom, then add granola and berries. Repeat the layers. Make sure to end with berries on top for a colorful look. This makes your parfait more appealing. How do I prevent granola from getting soggy? To keep granola crunchy, layer it between yogurt and fruit. Avoid letting it sit in yogurt for too long. You can also serve granola on the side for an added crunch. You now have all the tools to make delicious Greek yogurt parfaits. Start with quality ingredients like Greek yogurt, granola, and mixed berries. Follow the steps to layer them perfectly. Remember to add optional sweeteners and garnishes for extra flavor. Explore variations to keep it exciting, and store your parfaits properly to enjoy them later. These simple yet tasty treats make for great snacks or breakfasts. Dive in and enjoy creating your own parfaits!](https://dishtreats.com/wp-content/uploads/2025/07/bf6daff0-e6c8-4bf9-921b-b5aa65a2a3fb-768x768.webp)