Classic Wedge Salad Flavorful and Refreshing Choice
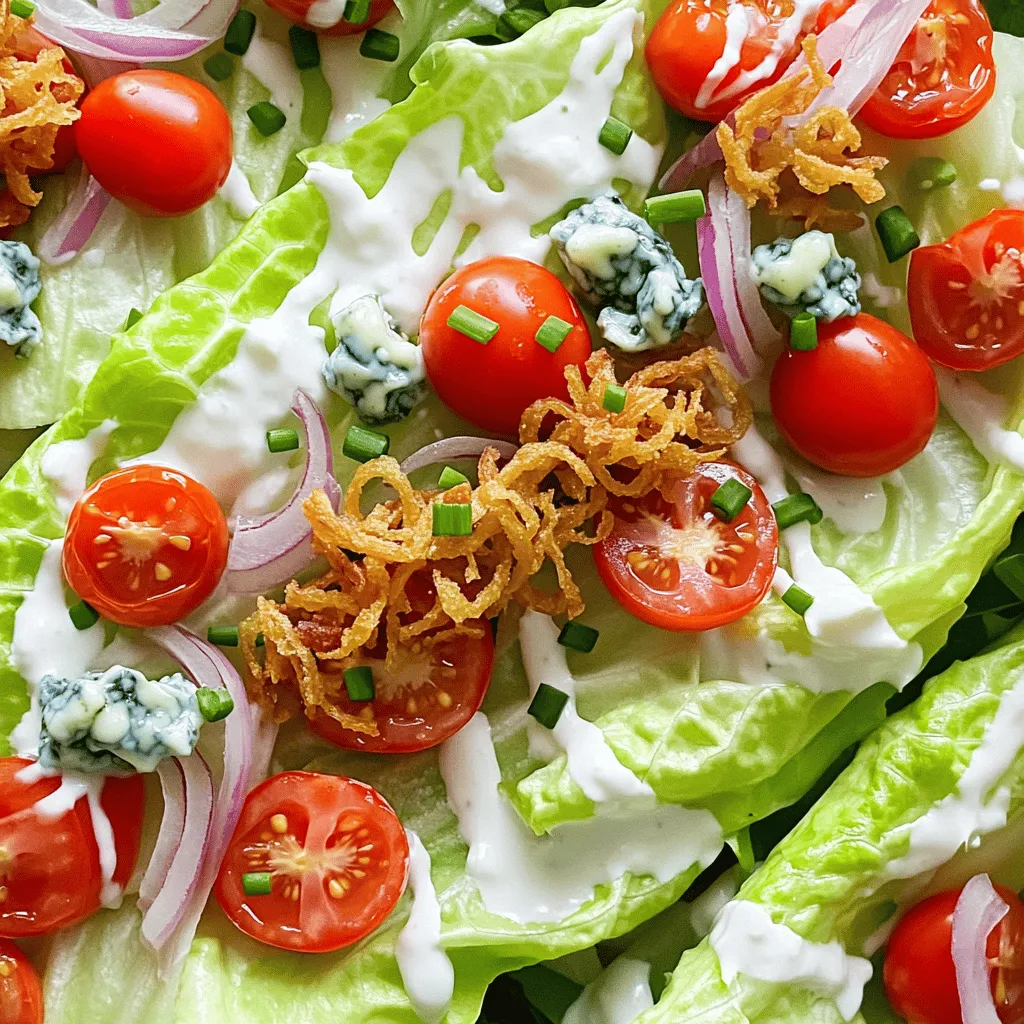
Looking for a salad that’s both tasty and refreshing? The Classic Wedge Salad is your answer! With crisp lettuce, vibrant tomatoes, and rich blue cheese, it’s a delightful choice for any meal. In this post, I’ll show you how to make this iconic dish, along with helpful tips for customizing it. Get ready to impress your guests with a colorful and flavorful salad that’s sure to please!
Ingredients
List of Ingredients
- 1 large head of iceberg lettuce
- 1 cup cherry tomatoes
- ½ cup red onion
- ½ cup blue cheese crumbles
- ½ cup buttermilk dressing
- ¼ cup crispy fried onions
- Salt and pepper
- Fresh chives
The classic wedge salad brings a crisp texture and fresh taste. To make it, you need a few key ingredients that work together to create a delightful dish. You start with crunchy iceberg lettuce, which forms the base of your salad. The tomatoes add a sweet burst, while the red onion gives a sharp crunch. Blue cheese crumbles bring a rich flavor, and buttermilk dressing adds creaminess. The crispy fried onions add a fun crunch on top, and fresh chives finish it off with a pop of color.
Ingredient Substitutions
If you want to switch things up, there are many options. You can try ranch or Caesar dressing instead of buttermilk dressing for a different taste. Feta or goat cheese can replace blue cheese for a milder flavor. For a lighter salad, use Greek yogurt instead of buttermilk dressing. You can also skip the crispy fried onions if you prefer something lighter. Use toasted nuts for crunch instead.
Nutritional Information
This salad is light and tasty. Each serving has about 150 calories. It’s a great choice for gluten-free and vegetarian diets. The fresh veggies provide vitamins and minerals, making this dish not only delicious but also healthy. You can enjoy it as a side dish or a light meal.
Step-by-Step Instructions
Preparing the Lettuce
To start, wash the head of iceberg lettuce. Rinse it under cool running water. This step removes dirt and debris. After washing, pat the lettuce dry with a clean kitchen towel. Now, carefully cut the lettuce into four equal wedges. Make sure to slice from the top to the base. Place the wedges on a serving platter with the cut sides facing up. This makes them look nice and fresh.
Preparing the Toppings
Next, let’s prepare the toppings. Take a medium mixing bowl and add the halved cherry tomatoes. Then, add the thinly sliced red onion. Season this mixture with a pinch of salt and some freshly ground black pepper. Toss the ingredients gently to mix them well. Allow the flavors to blend for a few minutes. This will enhance the taste and make them more flavorful.
Assembling the Salad
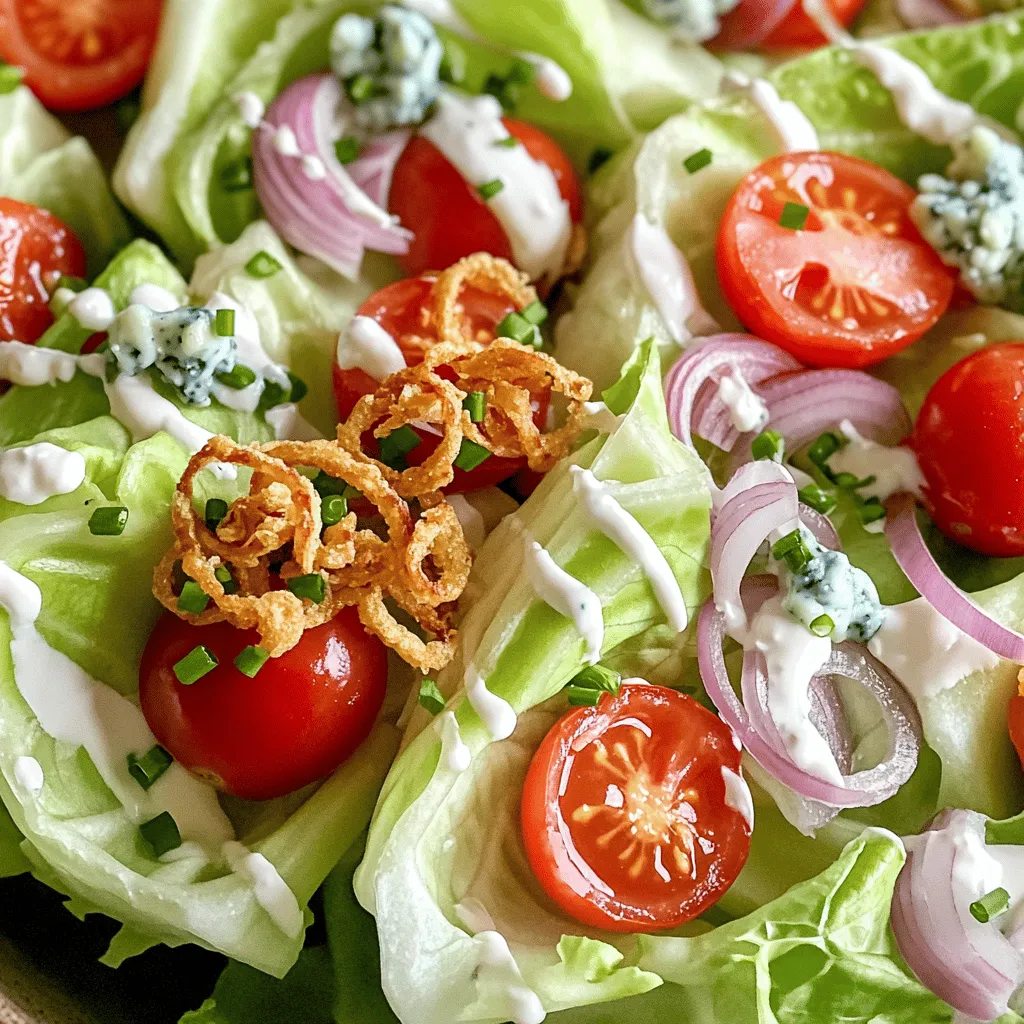
Now, it’s time to assemble the salad. Start with each lettuce wedge and drizzle buttermilk dressing over the top. Make sure some dressing seeps into the layers of the lettuce. This adds a lot of flavor. Next, spoon the cherry tomato and red onion mixture evenly on each wedge. Aim for a colorful topping that looks great. Sprinkle blue cheese crumbles over the top for a rich flavor. Finally, add crispy fried onions for some crunch. For a finishing touch, garnish with finely chopped fresh chives. They add color and flavor.
Tips & Tricks
Presentation Tips
To make your wedge salad pop, focus on color and height. Use a large white plate to let the greens shine. Arrange the wedges so they stand upright, cut side up, for a dramatic look. Top each wedge with a mix of cherry tomatoes and red onions. This adds color and makes it more appealing. For a restaurant-style finish, sprinkle fresh chives on top. You can also add a drizzle of extra dressing around the plate for flair.
Flavor Enhancements
Want to take your salad up a notch? Add crispy bacon bits for a savory crunch. You can also toss in some sliced cucumbers for a refreshing bite. If you like heat, try adding jalapeños or a sprinkle of red pepper flakes. Balancing flavors is key. Use salt and pepper wisely, and taste as you go. The right seasoning will elevate your salad and make it more enjoyable.
Serving Size Adjustments
When hosting a large gathering, you can easily scale the recipe. Just use more heads of lettuce and triple the toppings. Each wedge can be a serving, making it easy to portion. For smaller meals, cut the recipe in half. Serve smaller wedges for a lighter option. This way, everyone can enjoy a taste without filling up too quickly.
Variations
Different Dressings
You can switch up the dressing to change the flavor. A tangy ranch dressing adds zest. For a creamy touch, try a garlic aioli. You can also mix Greek yogurt with herbs for a healthier option. Each dressing brings a unique taste to your classic wedge salad.
- Buttermilk Dressing: Creamy and tangy, perfect for classic flavors.
- Ranch Dressing: Rich and herby, adds a bold kick.
- Greek Yogurt Dressing: Light and fresh, with a hint of tang.
- Garlic Aioli: Creamy with a garlic punch, great for bold flavors.
Seasonal Wedge Salad Ideas
Seasonal ingredients can elevate your wedge salad. In summer, add fresh berries for sweetness. In fall, roasted butternut squash gives warmth and color. Try adding citrus segments in winter for a fresh burst. Each season offers a chance to be creative and celebrate local produce.
- Summer Salad: Add strawberries and a light vinaigrette.
- Fall Salad: Incorporate roasted pumpkin and pecans.
- Winter Salad: Use citrus fruits like oranges and grapefruits.
- Spring Salad: Top with radishes and fresh herbs.
Cuisine Influences
Let your taste buds travel by adding global flavors. A Mediterranean twist may include feta cheese and olives. For a Mexican flair, sprinkle some chili powder and add avocado. Each culture offers spices and flavors to enhance your salad.
- Mediterranean Wedge: Use feta, olives, and a lemon vinaigrette.
- Mexican Wedge: Add avocado, cilantro, and lime.
- Asian Wedge: Use sesame dressing and top with sliced almonds.
- Indian Wedge: Add curry powder to the dressing for warmth.
Storage Info
How to Store Leftovers
To keep your wedge salad fresh, store it in an airtight container. Place the salad in the fridge as soon as possible. This will help lock in flavors and keep it crisp. It’s best to eat leftovers within three days to enjoy the best taste and texture.
Reheating Guidelines
Wedge salad is best served cold, so reheating is not safe or recommended. Instead, get creative with leftovers. You can chop the salad and mix it into a wrap or use it as a topping for grilled chicken. This way, you avoid waste and create a new dish!
Freezing Considerations
Freezing wedge salad isn’t ideal. Lettuce will lose its crispness when thawed. However, you can freeze some components. For example, blue cheese crumbles can freeze well. Just place them in a freezer bag, and they will last up to three months. When ready to use, thaw them in the fridge overnight.
FAQs
What is a classic wedge salad?
A classic wedge salad features crisp iceberg lettuce cut into triangles. It often includes bright red cherry tomatoes, crunchy red onions, and creamy blue cheese. The salad is usually topped with a rich buttermilk dressing. This dish is cool, crisp, and very refreshing. It pairs well with many meals.
Can I prepare this salad in advance?
Yes, you can prep parts of the salad ahead. Wash and cut the lettuce a few hours before serving. Keep it in a sealed container in the fridge. You can also mix the cherry tomatoes and onions in advance. Just add the dressing right before serving to keep it fresh.
What can I serve with wedge salad?
Wedge salad goes well with many dishes. You can serve it with grilled chicken or steak for a filling meal. It also pairs nicely with a warm soup, like tomato or potato leek. For a lighter option, serve it with a side of roasted vegetables. Enjoy your wedge salad with these tasty pairings!
In this blog post, we covered the classic wedge salad, focusing on its simple ingredients and assembly. From fresh lettuce to tasty toppings, every part creates a delightful dish. I shared tips for presentation, flavor, and variations to elevate your salad game. Remember, you can adjust ingredients to fit your needs and experiment with seasonal flavors. With these details, you can enjoy a delicious wedge salad at any gathering. Embrace creativity and have fun making it your own!



![To make loaded Greek fries, you need fresh and tasty ingredients. Here’s what you need: - 4 large Russet potatoes - 1/4 cup olive oil - 1 teaspoon garlic powder - 1 teaspoon paprika - Salt and pepper to taste - 1 cup crumbled feta cheese - 1 cup cherry tomatoes, halved - 1/2 cup Kalamata olives, pitted and sliced - 1/2 cucumber, diced - 1/4 red onion, finely chopped - Fresh parsley, chopped for garnish - 1/2 cup tzatziki sauce You can get creative with your fries! Here are some tasty toppings to try: - Sliced jalapeños for heat - Chopped bell peppers for crunch - Grilled chicken or lamb for protein - Avocado for creaminess Season your fries to boost flavor! Here are some ideas: - Oregano adds a nice herbal flavor. - Lemon zest gives a fresh, zesty touch. - Red pepper flakes can spice things up. - Dill pairs well with tzatziki and adds brightness. These ingredients and toppings make loaded Greek fries a fun and easy dish. You can mix and match to fit your taste. Enjoy cooking with this Full Recipe! To start, wash four large Russet potatoes. Make sure to scrub them well. Next, cut the potatoes into thin fries, about 1/4 inch thick. This size helps them cook evenly. Place the cut fries in a large bowl. Drizzle 1/4 cup of olive oil over them. Add 1 teaspoon of garlic powder and 1 teaspoon of paprika. Sprinkle salt and pepper to taste. Toss the fries. Make sure every fry gets coated well. Now it's time to bake. Preheat your oven to 425°F (220°C). Spread the seasoned fries on a baking sheet lined with parchment paper. Try to keep them in one layer. This helps them get crispy. Bake for 25 to 30 minutes. Remember to flip them halfway through. Look for a golden brown color when they are done. While the fries bake, prepare the toppings. In a medium bowl, mix 1 cup of halved cherry tomatoes, 1/2 cup of sliced Kalamata olives, 1/2 diced cucumber, and 1/4 cup of finely chopped red onion. Drizzle a bit of olive oil over this mix. Add salt and pepper to taste, then gently combine. When the fries are ready, pull them out of the oven. Immediately sprinkle 1 cup of crumbled feta cheese on top. Next, add your prepared veggie mix. Finally, add a generous dollop of tzatziki sauce on top. For a nice finish, sprinkle chopped fresh parsley for color. Enjoy your Loaded Greek Fries! You can find the full recipe [here]. To make the best fries, start with the right potatoes. I prefer Russet potatoes for their starchiness. Cut your fries thin, around 1/4 inch thick. This helps them cook evenly and get crispy. Soak the cut fries in cold water for at least 30 minutes. This removes extra starch and aids crispiness. After soaking, dry them well with a towel. Coat the fries with olive oil and seasonings. Bake at 425°F (220°C) for 25-30 minutes. Remember to flip them halfway through for an even crunch. Great flavor makes all the difference. I love using garlic powder and paprika for a warm, savory taste. Add salt and pepper to taste. You can also try adding dried oregano or thyme for a Greek touch. Don't be afraid to experiment! Mix your favorite spices into the oil before coating the fries. This will infuse flavor right into the fries. For an extra kick, add some chili powder or cayenne pepper. Presentation matters when serving Loaded Greek Fries. Serve them on a large platter for a fun look. Drizzle extra Tzatziki sauce over the top for a creamy touch. Use fresh parsley to add color and freshness. You can also add slices of lemon for a pop of brightness. For easy serving, provide toothpicks or small forks. This makes it fun for guests to enjoy! For the full recipe, check out the detailed instructions above. {{image_4}} You can make Loaded Greek Fries vegetarian by skipping the meat toppings. The base is already rich with flavor. Use extra toppings like roasted red peppers or artichoke hearts. You can also add a variety of cheeses, like goat cheese or mozzarella, for a creamy twist. These options keep the dish hearty and satisfying. If you want to add protein, consider grilled chicken or shrimp. Both pair well with the Greek flavors. Gyro meat is another great choice. Cook it until it's crispy and flavorful. You can also try chickpeas for a plant-based protein. They add a nice crunch and boost the nutrition. Different regions of Greece offer unique flavors. From the island of Crete, you can add capers and mint for a fresh taste. In the north, try adding smoked paprika for depth. From the Peloponnese, olives and citrus zest can give a bright flavor. Mix and match these ingredients for your own twist on Loaded Greek Fries. For the full recipe, check out the complete guide on Loaded Greek Fries. To keep your loaded Greek fries fresh, let them cool first. Place them in an airtight container. If you have toppings like tomatoes or cucumbers, store them separately. This keeps everything crisp. When you want to enjoy your leftovers, preheat your oven to 375°F (190°C). Spread the fries on a baking sheet. Heat for about 10-15 minutes until hot and crispy. Avoid microwaving them, as this can make them soggy. These loaded Greek fries last about 2-3 days in the fridge. Make sure they are in an airtight container. If you notice any change in smell or texture, it’s best to toss them. Enjoy them fresh for the best taste! I recommend using Russet potatoes for Loaded Greek Fries. They are starchy and fluffy, which gives you that nice, crispy texture when baked. Their skin adds a great crunch, too. Yukon Gold potatoes also work well. They are creamier, which can add a different taste. Yes, you can prepare the fries ahead of time! Cut the potatoes and soak them in water to keep them fresh. This step removes some starch and helps them crisp up better. When you are ready to cook, just dry them off and season them. Bake them fresh for the best taste. Loaded Greek Fries go well with many dishes. They are great alongside grilled meats like chicken or lamb. You can serve them with a fresh Greek salad for a light meal. They also pair nicely with tzatziki, which adds a cool contrast to the warm fries. Enjoy them as a fun snack at gatherings or parties! For a complete experience, check out the Full Recipe to guide you through making these tasty fries. Loaded Greek fries are a fun dish packed with flavors. We explored key ingredients, optional toppings, and tasty seasonings. I shared step-by-step instructions to prepare and bake your fries, then assemble them perfectly. I offered tips for crispy fries and smart presentation ideas. You can even customize your dish with vegetarian options or protein toppings from various Greek regions. Finally, I outlined storage tips to keep leftovers fresh. Enjoy making these fries; they are sure to impress everyone!](https://dishtreats.com/wp-content/uploads/2025/06/9c6541bd-b31d-423a-b196-3f6ab3dd7c20-768x768.webp)
![- 2 cups canned chickpeas - Fresh herbs: parsley and cilantro - Key spices: cumin and coriander To make crispy baked falafel, start with the main ingredients. The base is 2 cups of canned chickpeas. They give falafel a wonderful texture. Fresh herbs like parsley and cilantro add bright flavors. Using both gives a fresh taste. Spices are key too. Ground cumin and coriander bring warmth and depth. They create a balance that makes falafel special. - Aromatics: onion and garlic - Binding ingredients: tahini and breadcrumbs - Optional: olive oil for drizzling Next, we have additional ingredients. Aromatics like onion and garlic make the falafel smell great. They add a savory note that enhances the dish. Binding ingredients are also important. Tahini helps hold everything together. Breadcrumbs add crunch and structure. If you want a golden and crispy finish, drizzle olive oil on top. It helps the falafel bake evenly and get that perfect crunch. For the full recipe, check out the detailed instructions provided. 1. Preheat your oven to 400°F (200°C). 2. Line a baking sheet with parchment paper. This helps prevent sticking and ensures even cooking. 3. In a food processor, add the drained chickpeas, chopped onion, minced garlic, parsley, cilantro, cumin, coriander, baking powder, salt, black pepper, lemon juice, and tahini. 4. Pulse the mixture. You want it well combined but still chunky, like a paste. 1. Transfer the mixture to a mixing bowl. 2. Fold in the breadcrumbs. If it feels wet, add more breadcrumbs until it holds together. 3. Use your hands to shape the mixture into small balls or patties, about the size of golf balls. 4. Place them evenly on the prepared baking sheet. 1. Drizzle a good amount of olive oil over the falafel balls. This helps them get crispy. 2. Bake in the oven for about 20 minutes. Flip them halfway through for even browning. 3. Look for a golden brown color and a crispy outside. 4. Let the falafel cool for a few minutes before serving. This enhances their flavor and texture. For the full recipe, check the detailed instructions provided earlier. To make your falafel crispy, olive oil plays a key role. It adds flavor and helps create a golden crust. I suggest drizzling olive oil on top of your falafel before baking. This not only enhances the taste but also promotes even cooking. Baking techniques matter too. Preheat your oven to 400°F (200°C) for the best results. Use parchment paper on your baking sheet to prevent sticking. This will help the falafel stay intact and crisp up nicely. Adjusting the breadcrumbs is also important. If your mixture feels too wet, add more breadcrumbs until it holds together. If you want extra crunch, consider using panko breadcrumbs. They give a delightful texture that enhances the overall experience. For a beautiful presentation, arrange your crispy baked falafel on a colorful platter. Pair it with a creamy tahini sauce and a fresh cucumber-tomato salad. This adds both flavor and visual appeal. You might also want to serve it with warm pita bread. Add a side of hummus or tzatziki for a fun dip. These flavors complement the falafel well and make for a tasty meal. One common mistake is not achieving the right consistency. If your falafel falls apart during baking, it may be too wet. Always ensure your mixture holds together well. Adjust breadcrumbs as needed to fix this. Another mistake is overcrowding the baking sheet. Give each falafel space to bake evenly. This helps them crisp up nicely. Flip them halfway through baking for even browning. Finally, don’t skip the cooling step. Let the falafel cool for a few minutes after baking. This enhances their flavor and texture, making your dish even more delightful. For the full recipe, you can refer to the detailed guide above. {{image_4}} You can make falafel even more exciting by adding spices. Try mixing in smoked paprika for a warm, smoky flavor. If you want a brighter taste, add some zest from a lemon. You might also enjoy using fresh herbs like mint or dill for a fresh twist. Each region has its own spin, so feel free to experiment! For those who need gluten-free options, you can swap breadcrumbs with ground oats or almond flour. Both work well and keep the falafel together. If you want to make it vegan, just skip the tahini or use sunflower seed butter instead. This way, everyone can enjoy these tasty bites! While baking gives falafel a nice crunch, you can try air frying them for a quicker option. Air-frying uses less oil and cooks them evenly. You can also pan-fry them in a little oil for golden-brown goodness. Just make sure to keep an eye on them so they don’t burn. For the full recipe, check out the detailed steps above to make your crispy baked falafel! To store leftover falafel, place them in an airtight container. This helps keep them fresh. If you have sauce, store it separately. Leftover falafel stays tasty for about three to four days in the fridge. For freezing, let the falafel cool completely first. Then, space them on a baking sheet and freeze until solid. Once frozen, transfer them to a freezer bag. This way, they won’t stick together. To reheat, bake them directly from the freezer. Heat at 375°F (190°C) for about 15-20 minutes until warm and crispy. In the fridge, your leftover falafel will last about three to four days. If frozen, they can last up to three months. Just remember to seal them well to avoid freezer burn. Enjoy your crispy baked falafel whenever you want with these easy storage tips. For the full recipe, check back to create these delicious bites! Crispy baked falafel pairs well with many sides. You can serve it with: - Hummus for a creamy dip - Tahini sauce for added flavor - Tzatziki sauce for a cool touch - Fresh salads like cucumber-tomato salad - Pita bread for a classic wrap These options enhance the meal and add fresh tastes. To achieve extra crispy falafel, follow these tips: - Use panko breadcrumbs instead of regular ones. They add more crunch. - Drizzle olive oil generously over the falafel before baking. This helps with browning. - Bake at 400°F (200°C) for the best crispiness. Flip them halfway for even cooking. These small changes can make a big difference in texture. Yes, you can use dried chickpeas! Here’s how: - Soak 1 cup of dried chickpeas overnight in water. This softens them. - Drain and rinse the chickpeas before using them in the recipe. - Cook them in boiling water for about 1 hour until tender. Using dried chickpeas gives a fresher taste but takes more time. For the complete details on making crispy baked falafel, check out the [Full Recipe]. Baked falafel is easy and fun to make. By using canned chickpeas, fresh herbs, and key spices like cumin, you create a tasty dish. Follow the steps for perfect shapes, timing, and crunch. Remember to use olive oil and adjust breadcrumbs for crispiness. Play with flavors and storage tips to maximize your enjoyment. With this guide, you can make falafel that delights and satisfies. Now, you're ready to impress friends and family with your delicious creation!](https://dishtreats.com/wp-content/uploads/2025/06/049364cc-9d10-4f08-b8d2-88a9c6614eda-768x768.webp)
![- 1 lb boneless, skinless chicken breasts, cut into bite-sized pieces - 1 cup dill pickle juice - 1 cup all-purpose flour - 1 teaspoon onion powder - 1 teaspoon garlic powder - 1 teaspoon paprika - 1 teaspoon black pepper - 1/2 teaspoon salt - 2 large eggs, beaten - 1 cup breadcrumbs (use panko for added crunch) - 1/2 cup ranch dressing - Fresh dill, for garnish (optional) These ingredients create a tasty flavor mix. The chicken gets a nice tang from the dill pickle juice. The spices add warmth and depth. The ranch dressing gives a creamy finish. You will need some basic tools for the best results. Here’s what I suggest: - Mixing bowls for marinating and breading - A whisk for beating the eggs - A baking sheet lined with parchment paper or greased - Measuring cups and spoons for accuracy These tools help streamline your cooking process. They ensure that each step flows smoothly and efficiently. If you want to change things up, here are some easy swaps: - Use chicken thighs instead of breasts for more flavor. - Swap out ranch dressing for blue cheese dressing for a bolder taste. - Try gluten-free flour if you need a gluten-free option. - Use crushed cornflakes instead of breadcrumbs for extra crunch. These substitutions can make the recipe your own. You can keep it fun and exciting while still enjoying the core flavors. For the complete recipe, check the [Full Recipe]. To start, grab a mixing bowl. Place the bite-sized chicken pieces into it. Pour in the dill pickle juice, making sure the chicken is fully submerged. Cover the bowl with plastic wrap or a lid. Now, let it chill in the fridge. For best results, marinate for at least one hour. If you have time, overnight is even better. This step adds so much flavor to the chicken! Next, let’s set up a breading station. You will need three bowls. In the first bowl, mix the all-purpose flour with onion powder, garlic powder, paprika, black pepper, and salt. Stir well until everything is combined. In the second bowl, pour in the beaten eggs. Whisk them until they are smooth. In the third bowl, fill it with breadcrumbs, preferably panko. Panko gives a nice crunch to the bites. After marinating, take the chicken out of the fridge. Gently pat the chicken pieces dry with paper towels. Start by dredging each piece in the flour mix. Make sure to shake off any extra flour. Next, dip the chicken into the beaten eggs. Finally, coat the chicken well with the breadcrumbs. Now, preheat your oven to 400°F (200°C). Prepare a baking sheet by lining it with parchment paper or greasing it lightly. Arrange the breaded chicken bites in a single layer. Bake for 15-20 minutes. They should turn golden brown and crispy. Check that the internal temperature reaches 165°F (75°C). Once cooked, move the chicken bites to a serving platter. Drizzle ranch dressing on top and sprinkle with fresh dill if you like. This adds a lovely touch! For the full recipe, be sure to check the details. To get crispy chicken bites, follow a few key steps. First, make sure to marinate the chicken in dill pickle juice. This adds flavor and helps keep the meat moist. Next, dry the chicken pieces well before breading. Excess moisture can lead to soggy bites. When coating, use seasoned flour first, then dip in egg, and finally cover with breadcrumbs. I recommend using panko breadcrumbs for extra crunch. Bake at 400°F (200°C) until golden brown and fully cooked. Avoid common mistakes for the best results. Do not rush the marination process; it is crucial for flavor. Skipping the drying step can lead to less crispy bites. Also, ensure you do not overcrowd the baking sheet. Leave space between each piece to allow hot air to circulate. Lastly, check the internal temperature. Chicken should reach 165°F (75°C) to be safely eaten. For tailgating or parties, serve these bites with extra ranch dressing for dipping. This adds a nice creamy touch. You can also pair them with fresh pickle slices for added crunch. For a fun twist, consider setting up a dipping station. Include various sauces, like buffalo sauce or honey mustard. This lets guests customize their bites. {{image_4}} Want some heat? Add hot sauce to the marinade. This gives your chicken bites a spicy kick. You can also mix cayenne pepper into the flour. Adjust the amount to your taste. This adds flavor without overwhelming the pickle taste. If you enjoy heat, this variation is for you! Looking for a lighter option? Use an air fryer to cook your chicken bites. This method cuts down on oil and keeps them crisp. Preheat your air fryer to 400°F (200°C). Place the breaded chicken in a single layer. Cook for about 12-15 minutes. Check that they reach an internal temperature of 165°F (75°C). You get a crunchy texture without deep frying! Want a veggie twist? Try using cauliflower instead of chicken. Cut cauliflower into bite-sized florets. Marinate them in the dill pickle juice for the same time. Follow the same breading and cooking steps. Bake or air fry until golden and crispy. This gives you a tasty, plant-based snack that everyone will love. You can find the full recipe for Pickle Ranch Chicken Bites and try these fun variations! To keep your leftover chicken bites fresh, place them in an airtight container. Make sure they cool down to room temperature before sealing. This method helps prevent moisture, which can make them soggy. Store the container in the fridge for up to three days. When you're ready to enjoy your chicken bites again, reheating properly is key. I recommend using an oven or an air fryer for the best results. Preheat the oven to 375°F (190°C). Place the chicken bites on a baking sheet and heat for about 10-15 minutes. This method helps restore their crispy texture. If using an air fryer, set it to 350°F (175°C) and heat for about 5-7 minutes. If you want to save some chicken bites for later, freezing is a great option. First, let them cool completely. Then, arrange the bites in a single layer on a baking sheet and freeze for about an hour. Once frozen, transfer them to a freezer-safe bag or container. They can last up to three months in the freezer. When you're ready to eat, just reheat them from frozen, following the tips above for that perfect crunch. For the full recipe, check out the details above. The best way to marinate chicken is to use a flavorful liquid. For Pickle Ranch Chicken Bites, you will soak the chicken in dill pickle juice. This juice adds a zesty kick and keeps the meat juicy. Place the cut chicken in a bowl and cover it with the pickle juice. Make sure all pieces are fully submerged. Cover the bowl and refrigerate for at least an hour. For even better flavor, let it marinate overnight. This method works well for any chicken dish. Yes, you can use frozen chicken for this recipe. However, it is best to thaw the chicken first. Place it in the fridge overnight or submerge it in cold water for quicker thawing. Once thawed, cut the chicken into bite-sized pieces. After that, follow the marination steps as usual. Using frozen chicken may change the texture slightly, but it will still taste great. To make a low-carb version of Pickle Ranch Chicken Bites, you can skip the breadcrumbs. Instead, coat the chicken pieces in crushed pork rinds or almond flour. Both options give a nice crunch without the carbs. You can also use a low-carb ranch dressing for dipping. This way, you keep the flavor and texture while making it suitable for a low-carb diet. Enjoy your tasty bites without the guilt! In this post, we explored how to make Pickle Ranch Chicken Bites. We discussed key ingredients, cooking essentials, and helpful substitutions. I shared step-by-step instructions for marinating, breading, and baking. You learned tips for crispy bites and common mistakes to avoid. We covered variations like spicy bites and vegetarian options. Finally, I provided storage tips and answered FAQs. Try these bites for your next gathering. They’re fun, easy, and full of flavor! Enjoy your cooking adventure!](https://dishtreats.com/wp-content/uploads/2025/07/7f7f749c-ecc1-4920-b674-4460a511463b-768x768.webp)