Cilantro Lime Quinoa Salad Fresh and Flavorful Meal

Are you ready for a fresh and tasty meal that bursts with flavor? My Cilantro Lime Quinoa Salad is just what you need! This vibrant dish combines healthy ingredients like quinoa, veggies, and a zesty dressing. Perfect for lunch or dinner, it’s simple to make and packed with nutrients. Dive in as I guide you through the steps to create this delightful salad that will brighten any meal. Enjoy the freshness and let’s get started!
Why I Love This Recipe
- Fresh and Vibrant: This salad bursts with fresh flavors from the cilantro and lime, making it a refreshing dish for any occasion.
- Nutritious and Wholesome: Quinoa is packed with protein and fiber, while the variety of vegetables adds essential vitamins and minerals.
- Easy to Make: With simple ingredients and straightforward instructions, this salad comes together quickly, perfect for busy weeknights.
- Perfect for Meal Prep: This salad stores well in the fridge, making it an ideal option for meal prepping for the week ahead.
Ingredients
Main Ingredients
- 1 cup quinoa
- 2 cups water
- 1 cup cherry tomatoes
- 1 medium cucumber
- 1 bell pepper (red or yellow)
- 1/4 red onion
- 1 ripe avocado
- 1/2 cup fresh cilantro
Dressing Ingredients
- 1/4 cup freshly squeezed lime juice
- 2 tablespoons extra-virgin olive oil
- 1 teaspoon honey or agave syrup (optional)
- 1 teaspoon ground cumin
- Salt and freshly ground black pepper
The first part of this recipe focuses on fresh and vibrant ingredients. Quinoa serves as the base, bringing protein and texture. It’s easy to cook and very versatile. Rinse it well to remove any bitterness.
For the veggies, I love using cherry tomatoes, cucumber, and bell pepper. They add color and crunch. The red onion gives a nice bite, while the avocado adds creaminess. Lastly, cilantro brings that refreshing taste. It’s full of flavor!
For the dressing, I use lime juice and olive oil for a zesty touch. Honey or agave syrup can add a sweet note if you like. Ground cumin gives a warm, earthy flavor. Salt and pepper are key for balancing everything out.
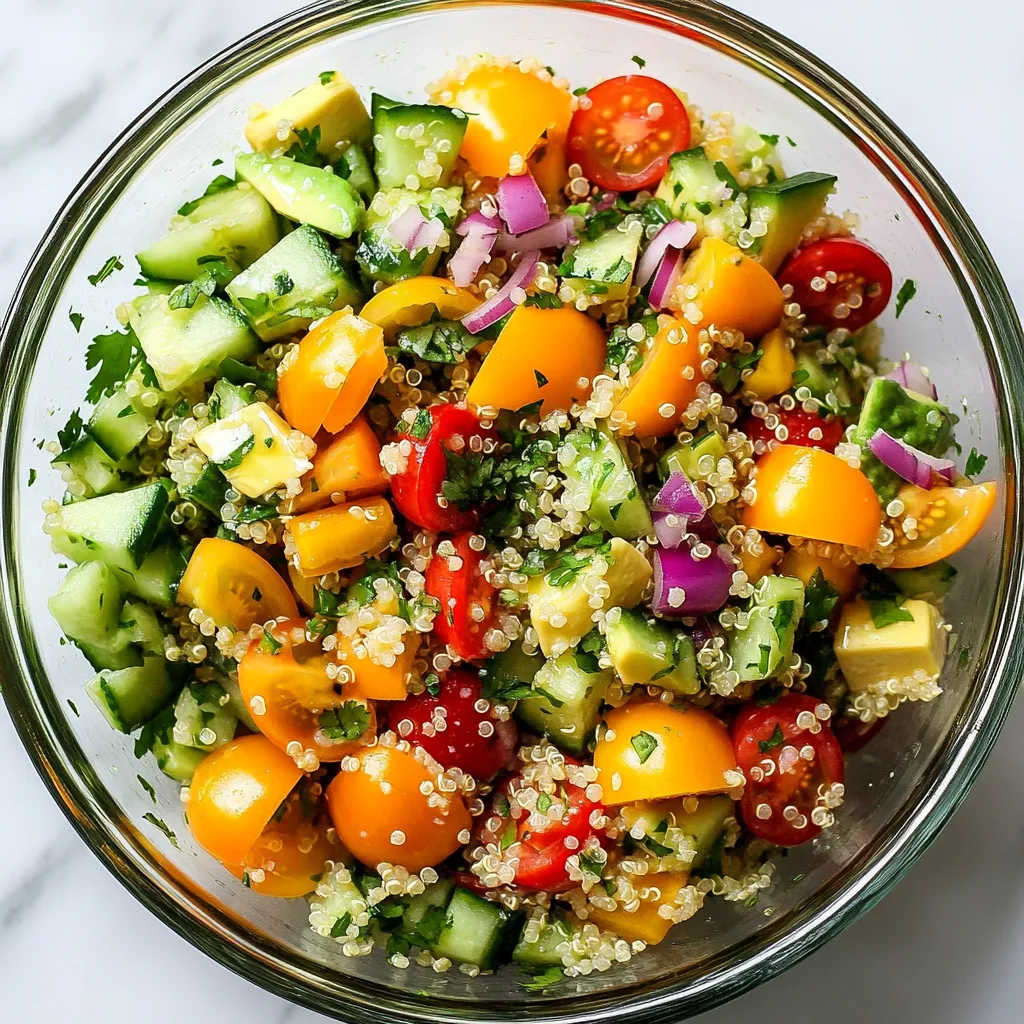
This combination of ingredients creates a salad that is not just good to eat but also pleasing to the eye. With each bite, you get a mix of textures and flavors. It’s a salad you will want to make again!

Step-by-Step Instructions
Cooking the Quinoa
To start, combine 1 cup of quinoa and 2 cups of water in a medium saucepan. This ratio ensures the quinoa cooks well. Bring the mixture to a boil over medium-high heat. Once it reaches a boil, reduce the heat to low. Cover the pan with a lid and let it simmer for 15 minutes. The quinoa will become fluffy and absorb all the water. When done, remove it from heat and let it cool for a few minutes.
Preparing the Dressing
While the quinoa cools, prepare the dressing. In a bowl, whisk together 1/4 cup of freshly squeezed lime juice, 2 tablespoons of extra-virgin olive oil, and 1 teaspoon of honey or agave syrup if you want a hint of sweetness. Add 1 teaspoon of ground cumin, a pinch of salt, and freshly cracked black pepper. Mix until everything is well combined. This dressing will bring a zesty flavor to your salad.
Assembling the Salad
In a large mixing bowl, mix together the halved cherry tomatoes, diced cucumber, diced bell pepper, finely chopped red onion, and diced avocado. Once you have your vegetable mix ready, add the cooled quinoa to the bowl. Pour the dressing over the top and gently toss the salad. Be careful not to mash the avocado. Finally, fold in 1/2 cup of finely chopped fresh cilantro. This adds a burst of fresh flavor. For the best taste, refrigerate the salad for about 30 minutes. This allows all the flavors to meld beautifully.
Tips & Tricks
Cooking Tips
- Rinse quinoa thoroughly to remove bitterness. This step makes your salad taste fresh.
- Let quinoa cool before mixing. This prevents wilting the veggies and keeps them crisp.
Serving Suggestions
- Serve in a clear glass bowl for presentation. This highlights the vibrant colors of the ingredients.
- Garnish with cilantro and lime wedges. This adds a bright touch and extra flavor.
Flavor Enhancements
- Consider adding black beans or corn. These ingredients add texture and boost nutrition.
- For spice, add diced jalapeños. This will make the salad exciting for those who love heat.
Pro Tips
- Rinse the Quinoa: Always rinse quinoa before cooking to remove its natural coating, called saponin, which can give it a bitter taste.
- Cool the Quinoa: Let the quinoa cool completely before mixing it with the vegetables to prevent wilting and ensure a fresher taste.
- Customize Your Veggies: Feel free to swap in your favorite vegetables or whatever is in season to keep the salad fresh and exciting.
- Make Ahead: This salad can be made a day in advance; just add the avocado just before serving to keep it from browning.

Variations
Vegan Options
If you want a vegan dish, just swap honey for agave syrup. Agave gives a sweet touch while keeping the salad plant-based. This small change helps everyone enjoy the flavors.
Protein Additions
You can add protein to make this salad heartier. Grilled chicken or shrimp works well. Chickpeas are a great choice for a vegan option. These ingredients boost nutrition and flavor, making it filling.
Seasonal Additions
Feel free to mix in seasonal fruits or vegetables. In summer, add fresh corn or diced mango for sweetness. In winter, try roasted butternut squash or pomegranate seeds. These additions keep the salad fresh and exciting all year long.
Storage Info
Storing the Salad
To keep your cilantro lime quinoa salad fresh, store it in an airtight container. This will help keep moisture out and flavors in. Place the container in the fridge right after you prepare the salad.
Shelf Life
For the best taste, eat the salad within 2-3 days. The flavors will be bright and fresh during this time. After a few days, the veggies may lose crunch and flavor.
Freezing Recommendations
I do not recommend freezing this salad. Freezing can change the texture of the veggies and the quinoa. Enjoy this salad fresh for the best taste experience.
FAQs
How do I make quinoa fluffy?
To make quinoa fluffy, rinse it well before cooking. This step removes bitterness and helps the grains separate. Use a fine mesh strainer and run cold water over the quinoa for a couple of minutes. After rinsing, cook it in a pot with water. Bring it to a boil, then lower the heat. Cover the pot and let it simmer for about 15 minutes. This method absorbs all the water and makes the quinoa light and fluffy.
Can I use other greens instead of cilantro?
Yes, you can use other greens if you don’t like cilantro. Parsley is a great substitute that gives a fresh taste. Basil also works well for a different flavor twist. Each herb adds its own unique taste, so feel free to experiment.
How can I make this salad gluten-free?
Quinoa is naturally gluten-free, making this salad a safe choice for those with gluten issues. Just ensure you check that all other ingredients, like the dressing, are gluten-free as well. This way, you can enjoy a tasty and safe meal.
Can this salad be made ahead of time?
Absolutely! You can prepare the salad a day in advance. Just keep the dressing separate until you are ready to serve. This keeps the salad fresh and crunchy. Store it in the fridge in an airtight container. When ready to eat, mix in the dressing and enjoy.
In this blog post, we explored a fresh quinoa salad with bright veggies and a zesty dressing. You learned how to cook quinoa and mix it with cherry tomatoes, cucumber, and more. I shared tips for adding protein and making it vegan. This salad is best fresh, but you can store it for a few days. Remember to rinse your quinoa for fluffiness. Enjoy creating this vibrant dish that can always be changed to fit your taste

Cilantro Lime Quinoa Salad
Ingredients
- 1 cup quinoa, thoroughly rinsed and drained
- 2 cups water
- 1 cup cherry tomatoes, halved
- 1 medium cucumber, diced into bite-sized pieces
- 1 bell pepper red or yellow, diced
- 0.25 cup red onion, finely chopped
- 1 ripe avocado, diced
- 0.5 cup fresh cilantro, finely chopped
- 0.25 cup freshly squeezed lime juice
- 2 tablespoons extra-virgin olive oil
- 1 teaspoon honey or agave syrup (optional)
- 1 teaspoon ground cumin
- to taste salt and freshly ground black pepper
Instructions
- In a medium saucepan, combine the rinsed quinoa and the 2 cups of water. Bring this mixture to a rolling boil over medium-high heat.
- Once the quinoa is boiling, reduce the heat to low, cover the pan with a lid, and let it simmer for approximately 15 minutes, or until the quinoa becomes fluffy and all the water has been absorbed. Once cooked, remove from heat and let it cool for a moment.
- While the quinoa is cooling, prepare the dressing: in a bowl, whisk together the lime juice, olive oil, honey (or agave syrup), ground cumin, a pinch of salt, and freshly cracked pepper until well combined.
- In a large mixing bowl, add the halved cherry tomatoes, diced cucumber, bell pepper, finely chopped red onion, and diced avocado. Gently mix these ingredients together.
- Once the quinoa has cooled to room temperature, add it to the bowl with the chopped vegetables. Pour the prepared dressing over the top and gently toss the salad until everything is well coated, taking care not to mash the avocado.
- Fold in the chopped fresh cilantro, distributing it evenly throughout the salad. Taste and adjust seasoning with additional salt or pepper if desired.
- For the best flavor, refrigerate the salad for about 30 minutes to allow all the ingredients to meld together beautifully.


![To make crispy sweet and sour chicken, you need some key ingredients. Here’s what to gather: - 1 lb (450g) chicken breast, cut into bite-sized pieces - 1 cup cornstarch - 2 large eggs, beaten - Oil for frying - Salt and black pepper to taste These ingredients form the base of your dish. The chicken gives protein, while cornstarch creates that crispy texture. Eggs help the cornstarch stick to the chicken. Adding vibrant colors and fresh flavors is easy with the right vegetables and fruits. Here’s what you’ll need: - 1 cup bell peppers, chopped (mix of colors for visual appeal) - 1 cup pineapple chunks (fresh or canned) - 1 cup onion, chopped - 3 cloves garlic, minced The bell peppers and onions add crunch and sweetness. Pineapple brings a juicy burst of flavor. Garlic adds depth to the dish. The sweet and sour sauce makes this dish memorable. Gather these components: - 1/2 cup ketchup - 1/4 cup apple cider vinegar - 1/4 cup brown sugar - 2 tablespoons soy sauce - 1 tablespoon cornstarch mixed with 2 tablespoons water (for slurry) This sauce balances sweetness and tang. Ketchup gives a rich base, while apple cider vinegar adds a zesty kick. Brown sugar enhances the sweetness, and soy sauce adds umami. The cornstarch slurry thickens the sauce perfectly. For the full recipe, check out the complete list of steps to follow. Happy cooking! Start by seasoning the chicken pieces with salt and pepper. This simple step adds great flavor. Next, dredge each piece in cornstarch. Make sure to shake off any extra cornstarch. This helps create a nice, crispy crust. After that, dip the chicken pieces into the beaten eggs. This coating will help the cornstarch stick well. In a large skillet, heat oil over medium-high heat. You want the oil to shimmer before adding the chicken. Fry the chicken in batches. Avoid crowding the pan to keep the chicken crispy. Cook each piece for about 4-5 minutes per side. When golden brown, use a slotted spoon to remove the chicken. Place it on paper towels to drain any excess oil. Lower the heat to medium. In the same pan, add chopped onions and bell peppers. Sauté them for about 3-4 minutes or until soft. This brings out their sweetness. Then, add minced garlic and cook for another minute. The aroma will fill your kitchen and make your mouth water. In a bowl, whisk together the sauce ingredients: ketchup, apple cider vinegar, brown sugar, and soy sauce. Combine these until smooth. Pour this sweet and tangy sauce over the sautéed vegetables. Stir gently to mix everything together. The colors and smells will be inviting. Raise the heat slightly and bring the sauce to a gentle simmer. This helps blend the flavors. Once it simmers, add pineapple chunks for sweetness. Then, mix the cornstarch slurry and pour it in. Stir continuously until the sauce thickens, which takes about 2-3 minutes. You want it to coat the chicken well. Add the crispy chicken back into the pan. Carefully fold it into the thickening sauce. Toss everything gently to coat each piece of chicken. Once warmed through, the dish is ready to serve. For a great presentation, plate it over fluffy rice or steamed quinoa. You can also garnish it with sesame seeds and green onions for extra flair. To get that perfect crispy texture, start with your oil. Heat it well, around 350°F (175°C) is ideal. If the oil isn't hot enough, your chicken will soak up oil and get soggy. Fry the chicken in batches to avoid crowding. This keeps the oil temperature steady. Once fried, place the chicken on paper towels. This helps drain off any extra oil. For a twist on the classic sauce, try adding a splash of orange juice. It brightens the flavor. You can also swap brown sugar with honey for a different sweetness. Using fresh ginger in your sauce will give an extra kick. Remember to taste as you mix. Adjust salt and pepper to suit your taste buds. Presentation makes your dish look more appealing. Serve your crispy sweet and sour chicken over fluffy white rice or quinoa. Sprinkle sesame seeds on top for crunch. Finely chopped green onions add a pop of color. You can even add a few slices of fresh pineapple on the side for a tropical touch. This will make your meal look vibrant and inviting. {{image_4}} You can switch up the protein in this dish. Shrimp works great and cooks fast. Just sauté it until it turns pink. Tofu is another good option. Use firm tofu for the best texture. Cut it into cubes and fry until golden. Pork also fits well. Use pork tenderloin or chops, cut into bite-sized pieces. Each protein adds its own flavor, keeping things exciting. You can mix in different veggies for added nutrition. Broccoli is a great choice. It adds a nice crunch and color. Carrots give a sweet flavor and vibrant look. Snap peas are another fun option. They stay crisp and add a pop of freshness. Feel free to combine any of these for a colorful plate. It makes your meal more appealing and nutritious. You can easily tweak the sauce to match your taste. If you like heat, add some red pepper flakes or sriracha. This will spice up the dish nicely. For sweetener options, you can swap brown sugar for honey or maple syrup. This change adds a different flavor twist. Adjust the acidity by adding more vinegar or a squeeze of lime juice. Each change can create a new experience with this classic dish. For the full recipe, check out the detailed instructions earlier. After enjoying your crispy sweet and sour chicken, store any leftovers in an airtight container. This keeps the dish fresh for up to three days. Before storing, let the chicken cool down to room temperature. This prevents condensation, which can make the chicken soggy. If you have sauce left over, store it separately to keep the chicken crispy. To freeze your crispy sweet and sour chicken, place it in a freezer-safe container or bag. Make sure to remove as much air as possible. This helps avoid freezer burn. It can stay good for about one month. When you're ready to eat, thaw it overnight in the fridge. For the best taste and texture, reheat your chicken in an oven. Preheat the oven to 350°F (175°C). Spread the chicken on a baking sheet and cover with foil. Heat for about 15-20 minutes or until warm. This method helps keep the chicken crispy. You can also reheat it in a skillet over medium heat. Just add a splash of water to the pan to create steam, which helps warm it without drying out. Enjoy your leftovers just as much as the first time! To make crispy sweet and sour chicken, start with these steps: 1. Prep Chicken: Cut chicken breast into bite-sized pieces. Season with salt and pepper. Dredge in cornstarch, then coat in beaten eggs. 2. Fry Chicken: Heat oil in a skillet over medium-high heat. Fry chicken pieces until golden brown, about 4-5 minutes per side. Drain on paper towels. 3. Sauté Vegetables: Lower heat and add chopped onion and bell peppers to the same pan. Cook for 3-4 minutes. Add minced garlic and cook for another minute. 4. Prepare Sauce: Mix ketchup, apple cider vinegar, brown sugar, and soy sauce in a bowl. Pour this mixture over the vegetables in the pan. 5. Thicken Sauce: Bring the sauce to a gentle simmer. Add pineapple chunks and cornstarch slurry. Stir until the sauce thickens, about 2-3 minutes. 6. Combine Chicken and Sauce: Add the fried chicken back into the pan. Toss gently to coat the chicken in the sauce. 7. Serve: Let the dish rest for a minute. Serve it over rice or quinoa for a complete meal. Yes, you can prepare some parts in advance. Cook the chicken and the sauce ahead of time. Store them separately in airtight containers in the fridge. You can keep the chicken for up to three days. The sauce will last about a week. When ready to serve, reheat the chicken and sauce together in a pan. This keeps the chicken crispy and the sauce fresh. Yes, you can make a vegetarian version! Use tofu instead of chicken. Press the tofu to remove excess moisture, then cut it into cubes. Coat and fry the tofu pieces just like you would with chicken. You can also use seitan or tempeh for a similar texture. The sauce remains the same, giving you that sweet and sour flavor. I love serving crispy sweet and sour chicken with steamed rice or quinoa. You can also pair it with: - Fried rice - Noodles - Steamed broccoli - A fresh cucumber salad These sides complement the dish well and add color to your plate. Enjoy your meal! For the complete recipe, check the [Full Recipe]. Crispy sweet and sour chicken is a delightful dish. We explored key ingredients, cooking methods, and tips for perfecting it. You learned how to achieve that crispy texture and enhance flavors. Remember, try different proteins and veggies for variety. Proper storage keeps leftovers fresh. This dish is not only tasty but also versatile. Enjoy making and sharing it with friends and family. Let your kitchen creativity shine with this classic recipe!](https://dishtreats.com/wp-content/uploads/2025/05/ffc138cc-1bdb-4282-b515-13f85bd5dbd6-768x768.webp)


![- 2 medium zucchinis, grated - 1 can (15 oz) black beans, drained and rinsed - 1 cup corn kernels (fresh or frozen) - 1 small red onion, finely chopped - 2 cloves garlic, minced - 1 teaspoon ground cumin - 1 teaspoon smoked paprika - 1 cup enchilada sauce (store-bought or homemade) - 8 whole wheat tortillas - 1 cup shredded cheese (cheddar or a vegan alternative) - 2 tablespoons olive oil - Salt and pepper, to taste - Fresh cilantro, chopped, for garnish - Cooking timeline (Prep time: 15 mins, Total time: 40 mins) - Serving Size information (Servings: 4) When I gather ingredients for zucchini and black bean enchiladas, I love how simple it is. Fresh zucchinis are key for flavor and texture. Black beans add protein and fiber. You can use frozen corn or fresh, depending on what you have. A small red onion gives a sweet taste, while garlic adds a nice kick. Spices like cumin and smoked paprika bring warmth and depth to the dish. I like using enchilada sauce from the store to save time, but homemade is always a treat. Whole wheat tortillas provide a hearty base, and shredded cheese ties everything together. Olive oil helps cook the veggies and adds richness. Adding salt and pepper to taste is important. Finally, a sprinkle of fresh cilantro on top makes the dish pop with color and flavor. For the full recipe, check out the details above. - Step 1: Preheat your oven to 375°F (190°C). This helps your enchiladas cook evenly. - Step 2: Heat 2 tablespoons of olive oil in a skillet over medium heat. Add 1 small red onion, finely chopped. Sauté for about 3-4 minutes, until the onion turns soft and clear. - Step 3: Add 2 cloves of minced garlic to the skillet. Cook for 1 minute, stirring often. The garlic should smell strong but not brown. - Step 4: Mix in 2 medium zucchinis, grated, 1 can of black beans (drained and rinsed), and 1 cup of corn. Sprinkle in 1 teaspoon of ground cumin, 1 teaspoon of smoked paprika, salt, and pepper. Cook this mix for 5-7 minutes. The zucchini should be tender and well mixed. - Step 5: Remove the skillet from heat. Stir in half of the 1 cup of enchilada sauce, making sure everything is coated well. - Step 6: Take a whole wheat tortilla and place it flat. Spoon some of the zucchini mixture down the center. Roll it tightly, then place it seam-side down in a baking dish. Repeat this for all tortillas. - Step 7: Once all tortillas are rolled, pour the remaining enchilada sauce evenly over the top. - Step 8: Sprinkle 1 cup of shredded cheese over the enchiladas. Make sure to cover them well. - Step 9: Cover the baking dish with foil. Bake for 20 minutes to let the flavors blend. - Step 10: Remove the foil and bake for another 10 minutes. The cheese should be melted and slightly golden. Feel free to check the Full Recipe for more details and tips! To keep your zucchini filling just right, follow these tips. First, grate your zucchini and then salt it lightly. Let it sit for about ten minutes. This step helps draw out excess moisture. After that, squeeze the zucchini to remove the water. This way, your filling stays firm, not soggy. Next, adjust the seasoning to match your taste. Start with the suggested spices, but feel free to add more cumin or paprika if you want a stronger flavor. A dash of lime juice can also brighten up the dish. When serving these enchiladas, presentation is key. Use a colorful plate to make the dish pop. A sprinkle of fresh cilantro on top adds a nice touch. You can also add a wedge of lime for extra flair. Pair these enchiladas with a simple salad or some fluffy rice. Both options complement the flavors well. Try a side of avocado or a dollop of sour cream to make it even better. Avoid overstuffing the tortillas. If you pack too much filling in, they may tear. Just a good spoonful is enough. Also, let the enchiladas cool for a few minutes after baking. This step helps them set up nicely. If you serve them too hot, the filling may spill out. Trust me, waiting a bit is worth it! If you want the full recipe, remember to check out the [Full Recipe]. {{image_4}} You can change the beans in this dish. Pinto or kidney beans work great too. They add a different taste while keeping it healthy. You can also add other veggies. Bell peppers or spinach can give your enchiladas a new twist. Just chop them up and mix them in with the other filling. If you need gluten-free options, you can use corn tortillas instead of wheat ones. They taste great and work well with the filling. For a dairy-free version, try vegan cheese. It melts nicely and keeps the dish creamy without the dairy. Want more kick? Add spices or hot sauce to the filling. A bit of chili powder or cayenne can spice things up. You can also try different types of enchilada sauce. Green sauce or mole sauce can change the whole flavor profile. Experiment to find what you love best! To keep your zucchini and black bean enchiladas fresh, store them in the fridge. Place them in an airtight container. This will help seal in flavors and moisture. If you have a lot of leftovers, you can freeze them too. Wrap each enchilada tightly in plastic wrap, then place them in a freezer-safe bag. This method prevents freezer burn and keeps them tasty. When it comes to reheating, I recommend using the oven. Preheat it to 350°F (175°C). Place the enchiladas in a baking dish. Cover them with foil to keep the moisture in. Heat for about 20 minutes. This way, they won’t dry out. You can also use a microwave, but they might lose some texture. If you use the microwave, heat in short bursts to check the warmth. In the fridge, these enchiladas last for about 3 to 4 days. Make sure to eat them before then for the best taste. If you freeze them, they can last for up to 3 months. Just remember to label your bags with dates. This helps you keep track of how long they’ve been there. For the best flavor, try to eat frozen enchiladas within that time frame. You can prep the filling in advance. Just cook the zucchini, black beans, and spices as described in the recipe. Allow it to cool, then store it in the fridge for up to two days. When you’re ready to eat, just assemble the enchiladas with the tortillas and sauce. You can also roll the enchiladas and place them in the baking dish. Cover them tightly and refrigerate. Bake them when you're ready to serve. This method saves time and keeps flavors fresh. Yes, you can. To make cheese-free enchiladas, simply skip the cheese or use a plant-based option. You can add extra veggies or a sprinkle of nutritional yeast for a cheesy flavor. Another option is to serve guacamole or a creamy avocado sauce on top after baking. This adds richness and pairs well with the enchiladas. There are several great options! For a low-carb choice, use large lettuce leaves like romaine or kale. You can also use thinly sliced zucchini or eggplant as a gluten-free alternative. If you want something heartier, try using corn tortillas or even large portobello mushrooms. Each option gives a unique flavor and texture to the dish. Yes, you can use frozen zucchini. Just remember to thaw it first and drain any excess water. This helps keep your filling from becoming too watery. Frozen zucchini is convenient and still delivers great taste in the enchiladas. Just follow the same cooking steps as fresh zucchini. It’s an easy way to enjoy this dish anytime. For the full recipe, refer to the earlier section. In this post, we explored how to make tasty zucchini and black bean enchiladas. I shared a simple recipe, with clear steps and helpful tips. You learned about ingredient choices, cooking methods, and ways to store leftovers. Always remember to check the filling, so it stays moist but not soggy. These enchiladas are not just easy to make; they also fit various diets. Enjoy creating your own version and delight in the flavors! Your kitchen adventure starts here.](https://dishtreats.com/wp-content/uploads/2025/07/2cd92dac-f668-457e-8990-b41595643bf1-768x768.webp)