Cilantro Lime Chicken Tacos Flavorful and Fresh Meal

Looking for a fresh and tasty meal? These Cilantro Lime Chicken Tacos are the answer! They burst with flavor and are simple to make. In this blog post, I’ll share easy steps, helpful tips, and tasty variations. Whether you want classic tacos or a vegetarian twist, I’ve got you covered. Get ready to impress your friends and family with a dish that’s sure to satisfy!
Why I Love This Recipe
- Fresh Flavors: The combination of cilantro and lime creates a vibrant and refreshing taste that perfectly complements the tender chicken.
- Quick and Easy: This recipe comes together in under an hour, making it perfect for a weeknight dinner or a last-minute gathering.
- Customizable: You can easily modify the toppings to suit your preferences, whether you prefer a little heat with jalapeños or a creamy touch with sour cream.
- Healthy and Wholesome: With lean chicken and fresh veggies, these tacos are not only delicious but also packed with nutrients.
Ingredients
Main Ingredients for Cilantro Lime Chicken Tacos
To make these tasty tacos, gather these main ingredients:
- 1 lb boneless, skinless chicken thighs
- 1/4 cup fresh cilantro, finely chopped
- Zest and juice of 2 limes
- 2 cloves garlic, minced
- 1 teaspoon ground cumin
- 1 teaspoon chili powder
- 1/2 teaspoon salt
- 1/4 teaspoon freshly ground black pepper
- 1 tablespoon olive oil
- 8 small corn or flour tortillas
The chicken thighs are juicy and tender. They soak up the bright flavors from the marinade. Fresh cilantro adds a nice herbal note, while lime provides zesty brightness. The garlic, cumin, and chili powder add depth and warmth.
Optional Toppings and Sides
You can enhance your tacos with these tasty optional toppings and sides:
- 1 ripe avocado, sliced
- 1 cup red cabbage, finely shredded
- Your favorite salsa, for topping
Avocado brings creaminess. Red cabbage adds a nice crunch. Salsa gives an extra kick, perfect for those who love heat.
Suggested Cooking Equipment
To make this dish, you’ll need:
- A mixing bowl
- A large skillet
- Two forks for shredding chicken
- Aluminum foil (if warming tortillas in the oven)
Using the right tools makes cooking easier and more fun. A good skillet ensures even cooking, while forks help you shred the chicken quickly.

Step-by-Step Instructions
Marinating the Chicken
Start by making the marinade. In a bowl, mix 1/4 cup of chopped cilantro, the zest of 2 limes, and the juice of those limes. Add 2 minced garlic cloves, 1 teaspoon of cumin, 1 teaspoon of chili powder, 1/2 teaspoon of salt, and 1/4 teaspoon of black pepper. Lastly, pour in 1 tablespoon of olive oil. Whisk until it blends well. Add 1 pound of boneless chicken thighs to the bowl. Make sure the chicken is fully coated with the marinade. Cover the bowl with plastic wrap and place it in the fridge. Let it marinate for at least 30 minutes, or up to 2 hours for more flavor.
Cooking the Chicken
Next, heat a large skillet over medium-high heat. Once it’s hot, add the marinated chicken thighs to the skillet. Sear the chicken for about 5 to 6 minutes on each side. You want a nice brown on the outside. Use a meat thermometer to check the internal temperature. It should reach 165°F. Once cooked, take the chicken out and let it rest for a few minutes.
Preparing and Warming Tortillas
While the chicken rests, it’s time to warm the tortillas. Use the same skillet, and add the tortillas one by one. Toast each tortilla for around 30 seconds on each side. They should be warm and soft. If you prefer, you can wrap the tortillas in aluminum foil and heat them in a preheated oven at 350°F for about 10 minutes.
Assembling the Tacos
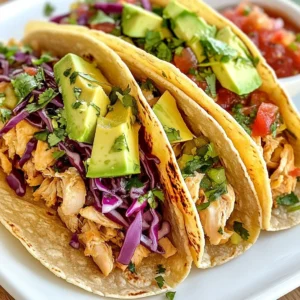
Now comes the fun part! Take a warm tortilla and place it on a plate. Add a generous amount of shredded chicken in the center. Next, layer on some slices of avocado and a handful of finely shredded red cabbage. Top it all with your favorite salsa for extra flavor.
Garnishing and Serving
For a fresh finish, sprinkle some cilantro on top of each taco. Serve them hot with lime wedges on the side. The lime adds a zesty kick that enhances the dish. Enjoy your flavorful and fresh meal!
Tips & Tricks
Best Practices for Marinating Chicken
Marinating chicken is key for great flavor. Start with fresh ingredients. Use a mix of lime juice, cilantro, garlic, and spices. This blend packs a punch. Let the chicken sit in the marinade for at least 30 minutes. For a deep flavor, marinate for up to 2 hours. Always cover the bowl with plastic wrap to keep it fresh.
How to Shred Chicken Efficiently
Shredding chicken should be quick and easy. After cooking, let the chicken rest. This helps keep the juices inside. Use two forks to pull the chicken apart. Hold one fork steady while using the other to shred. Aim for bite-sized pieces to fit nicely in your tacos. This method ensures even flavor throughout.
Additional Flavor Enhancements
Want to boost the flavor? Consider adding extra toppings. Fresh avocado slices add creaminess. Shredded cabbage gives a nice crunch. You can also add hot salsa for spice. A sprinkle of cheese can enrich the dish. Lime wedges on the side will add a zesty kick. These small touches make your tacos truly special.
Pro Tips
- Marinate Longer for More Flavor: If you have time, marinating the chicken for up to 2 hours will enhance the flavor and tenderness of the meat.
- Use Fresh Ingredients: Fresh cilantro and limes make a significant difference in taste, so opt for fresh rather than dried or bottled alternatives.
- Adjust Spice Levels: Feel free to modify the amount of chili powder in the marinade to suit your spice tolerance; add more for heat or less for a milder flavor.
- Warm Tortillas Properly: Ensure tortillas are warmed just until pliable to prevent them from cracking when you fill them; a quick toast in the skillet is ideal.

Variations
Alternative Proteins for the Tacos
You can switch the chicken for other meats. Try shrimp, beef, or pork. Each protein brings its own flavor. For example, shrimp cooks fast and pairs well with lime. Beef can add a rich taste. Just season it like the chicken.
Vegetarian Options
If you want a meatless meal, use veggies or beans. Grilled peppers or zucchini work great. Black beans or chickpeas add protein and fiber. You can also use tofu for a hearty option. Marinate it just like the chicken for extra taste.
Different Tortilla Choices
Tortillas are key for great tacos. You can use corn or flour. Corn tortillas are gluten-free and have a nice bite. Flour tortillas are soft and chewy. You can even try lettuce wraps for a low-carb choice. Each type adds a unique twist to your meal.
Storage Info
Storing Leftover Chicken
Store leftover chicken in an airtight container. It helps keep the chicken fresh. Refrigerate it for up to four days. For longer storage, freeze it. Place it in a freezer bag and remove as much air as possible. Label the bag with the date. You can freeze chicken for up to three months.
Best Practices for Storing Tacos
Tacos are best enjoyed fresh. If you have leftovers, store components separately. Place the shredded chicken in one container. Keep the tortillas in another. Store toppings like avocado and cabbage in small containers. This keeps them crisp and tasty. Use them within two days for the best flavor.
Reheating Instructions
To reheat chicken, use a skillet over low heat. Add a splash of water for moisture. Cook until heated through, about 5 minutes. For tortillas, warm them in the skillet too. Heat for 30 seconds on each side. You can also wrap tortillas in foil and warm them in the oven. Heat at 350°F for about 10 minutes. Enjoy your meal again!
FAQs
Can I use chicken breasts instead of thighs?
Yes, you can use chicken breasts. They are leaner than thighs. They may dry out more quickly. To keep them juicy, cook them for less time. Use the same marinade for flavor.
How long can I store the leftover tacos?
You can store leftover tacos in the fridge for three days. Keep the chicken and toppings separate. This helps keep the tortillas from getting soggy. Use airtight containers for best results.
What can I serve with cilantro lime chicken tacos?
Serve your tacos with rice, beans, or a fresh salad. You can also add corn salsa or guacamole. These sides add more flavor and make a great meal.
Is it possible to grill the chicken instead?
Yes, grilling the chicken is a great option. It adds a nice smoky flavor. Just marinate as usual and grill for about 6-7 minutes per side. Make sure the chicken reaches 165°F before serving.
Cilantro lime chicken tacos are a delicious choice. We covered easy steps to marinate, cook, and serve. I shared tips for best results, tasty variations, and smart storage ideas. Remember, you can swap chicken for other proteins or make it vegetarian. Enjoy customizing your tacos with fresh toppings. With these tips, you’re set for a fun meal. Dive in, and savor every bite. Happy cookin
Cilantro Lime Chicken Tacos
Ingredients
- 1 lb boneless, skinless chicken thighs
- 1/4 cup fresh cilantro, finely chopped
- 2 units limes, zest and juice
- 2 cloves garlic, minced
- 1 teaspoon ground cumin
- 1 teaspoon chili powder
- 1/2 teaspoon salt
- 1/4 teaspoon freshly ground black pepper
- 1 tablespoon olive oil
- 8 small corn or flour tortillas
- 1 ripe avocado, sliced
- 1 cup red cabbage, finely shredded
- to taste your favorite salsa, for topping
Instructions
- In a mixing bowl, whisk together the chopped cilantro, lime zest, and lime juice with the minced garlic, cumin, chili powder, salt, pepper, and olive oil until well combined. Add the chicken thighs to the bowl and coat them evenly with the marinade. Cover the bowl with plastic wrap and refrigerate for at least 30 minutes, allowing the flavors to meld (or up to 2 hours for a richer taste).
- Heat a large skillet over medium-high heat. Once the skillet is hot, add the marinated chicken thighs. Sear the chicken for 5-6 minutes on each side, or until the outside is nicely browned and the internal temperature reaches 165°F. Remove the chicken from the skillet and set it aside to rest for a few minutes.
- After resting, use two forks to shred the chicken into bite-sized pieces. This will help distribute the marinade flavor throughout the meat.
- In the same skillet, add the tortillas one at a time and lightly toast them for about 30 seconds on each side until they are warm and pliable. Alternatively, stack the tortillas, wrap them in aluminum foil, and warm them in a preheated oven at 350°F for about 10 minutes.
- Take one warm tortilla and add a generous portion of shredded chicken in the center. Top with slices of avocado, a handful of shredded red cabbage, and a dollop of your preferred salsa.
- For an extra touch, sprinkle some fresh cilantro on top of the assembled tacos if desired. Serve immediately with lime wedges on the side for a burst of zesty flavor.


![To make Classic Chicken Marsala, you will need: - 4 boneless, skinless chicken breasts - Sea salt and freshly cracked black pepper, to taste - 1/2 cup all-purpose flour, for dredging - 4 tablespoons extra virgin olive oil - 2 tablespoons unsalted butter - 8 ounces cremini mushrooms, thinly sliced - 1 cup low-sodium chicken broth - 2 tablespoons freshly squeezed lemon juice - 1/4 cup fresh parsley, finely chopped, for garnish Using fresh ingredients makes all the difference in your dish. Fresh chicken tastes better and has better texture. Fresh mushrooms add depth and flavor. Fresh herbs, like parsley, bring vibrant notes to your plate. Fresh ingredients enhance the overall taste and make your meal more enjoyable. They can transform a simple dish into something special. If you can't find certain items, don't worry! Here are some easy swaps: - Chicken breasts: You can use chicken thighs for a richer flavor. - Cremini mushrooms: Use button mushrooms if cremini are not available. - Olive oil: Use canola or vegetable oil if you're out of olive oil. - Chicken broth: Vegetable broth works well for a lighter taste. - Lemon juice: You can use vinegar as a tangy alternative if you lack lemons. These substitutes will keep your Chicken Marsala flavorful and delicious, even with changes. 1. First, season the chicken breasts with salt and pepper. 2. Dredge each breast in flour. Shake off any extra flour. 3. Heat 2 tablespoons of olive oil in a skillet over medium heat. 4. Place the chicken in the skillet. Cook for 5-6 minutes on each side. 5. Remove the chicken from the skillet and keep it warm on a plate. 6. Add the remaining olive oil and butter to the same skillet. 7. Once the butter melts, add the sliced mushrooms. Sauté for 5 minutes. 8. Pour in the chicken broth and lemon juice. Scrape the skillet's bottom. 9. Simmer the sauce for 5 minutes until it thickens. 10. Return the chicken to the skillet. Spoon sauce over the top. 11. Simmer everything together for 2-3 minutes. 12. Finish with parsley before serving. To get the best Chicken Marsala, focus on these techniques: - Dredging: Flour helps create a crust. It locks in moisture and adds flavor. - Searing: Cooking the chicken on medium heat gives a golden crust. - Deglazing: Scraping the skillet adds depth to the sauce. - Simmering: Letting the sauce thicken enhances the flavor. Here are some tips to avoid issues while cooking: - Skipping seasoning: Always season the chicken well. It makes a big difference. - Overcrowding the skillet: Cook in batches if needed. This keeps the heat high. - Not checking doneness: Use a meat thermometer. Chicken should reach 165°F. - Rushing the sauce: Let it simmer. This builds the best flavor. For the complete cooking process, check the Full Recipe. Serve Chicken Marsala on a large plate. Spoon the rich mushroom sauce over the chicken. Pair it with creamy mashed potatoes or steamed vegetables. These sides add color and balance to the dish. I love adding a bright green salad too. It makes the meal complete and fresh. To boost flavor, season the chicken well with sea salt and pepper. Dredging it in flour gives it a nice crust. Be sure to use fresh mushrooms for the best taste. Cremini mushrooms add a deep, earthy flavor. Deglazing the skillet with chicken broth is key. It helps pick up all the tasty bits left behind. A splash of lemon juice brightens the dish. It cuts through the richness and makes every bite pop. When it comes to drinks, I suggest a dry white wine. A good Sauvignon Blanc or Chardonnay works well. These wines complement the chicken and sauce without overpowering them. If you prefer something non-alcoholic, try sparkling water with lemon. It refreshes your palate between bites. Enjoy your meal with a suitable drink for a perfect dining experience. Check out the Full Recipe for more details. {{image_4}} You can add herbs and spices to give Chicken Marsala a fun twist. Try adding fresh thyme or rosemary for a fragrant touch. Paprika can add a bit of heat and color. You can also use garlic powder or onion powder to deepen the flavor. Mix these into the flour before dredging the chicken. This small change can make a big difference in taste. If you want a vegetarian or vegan version, replace the chicken with hearty mushrooms or eggplant. Both options soak up the sauce well. Use vegetable broth instead of chicken broth for a rich flavor. You may also try tofu for a protein boost. Dredge the tofu in flour like the chicken for a satisfying crunch. You can play with the sauce to change the flavor profile. For a creamier version, add heavy cream to the broth. This will give you a rich, luscious sauce that coats the chicken well. You can also use Marsala wine for a sweeter touch. If you want a tangy flavor, use balsamic vinegar instead of lemon juice. Each of these swaps can help you create a unique dish. For the full recipe, check the [Full Recipe]. To store your Classic Chicken Marsala, let it cool first. Place the chicken and sauce in an airtight container. Make sure to separate the sauce from the chicken if you can. This helps keep the chicken moist. Place the container in the fridge. It’s best to use the leftovers within three days for the best taste. When reheating Classic Chicken Marsala, use a skillet for the best results. Warm it over medium heat. Add a splash of chicken broth or water to keep it moist. Stir gently until heated through. You can also microwave it, but be careful not to overheat. This can dry out the chicken. Classic Chicken Marsala lasts about three days in the fridge. If you want to keep it longer, freeze it. In the freezer, it will last up to three months. Just remember to store it in a freezer-safe container. To enjoy it later, thaw it in the fridge overnight before reheating. For more details on making this dish, check out the Full Recipe. Chicken Marsala is made of simple, tasty ingredients. You need chicken breasts, mushrooms, and Marsala wine. The sauce gets its flavor from chicken broth and lemon juice. You also use flour to coat the chicken. Olive oil and butter add richness. Fresh parsley gives a nice touch at the end. Yes, you can prepare Chicken Marsala ahead of time. Cook the chicken and store it in the fridge. Keep the sauce separate to avoid sogginess. When you are ready to serve, just reheat both. This keeps the chicken juicy and the sauce fresh. The best wine for Chicken Marsala is a dry Marsala wine. This wine adds depth and sweetness to the dish. If you can't find Marsala, you can use dry sherry or white wine. These alternatives work well but may change the flavor slightly. Always choose a wine you enjoy drinking! In this article, we covered the crucial ingredients for Chicken Marsala and why freshness matters. I shared step-by-step instructions to help you cook it perfectly. We explored tips for serving and pairing drinks, as well as variations for every taste. Finally, I explained how to store leftovers safely. Cooking Chicken Marsala can be easy and fun. With the right tips and knowledge, you can enjoy a delicious meal every time.](https://dishtreats.com/wp-content/uploads/2025/06/e9aedbd7-71f4-4133-b36d-4fb1a0e8152d-768x768.webp)

