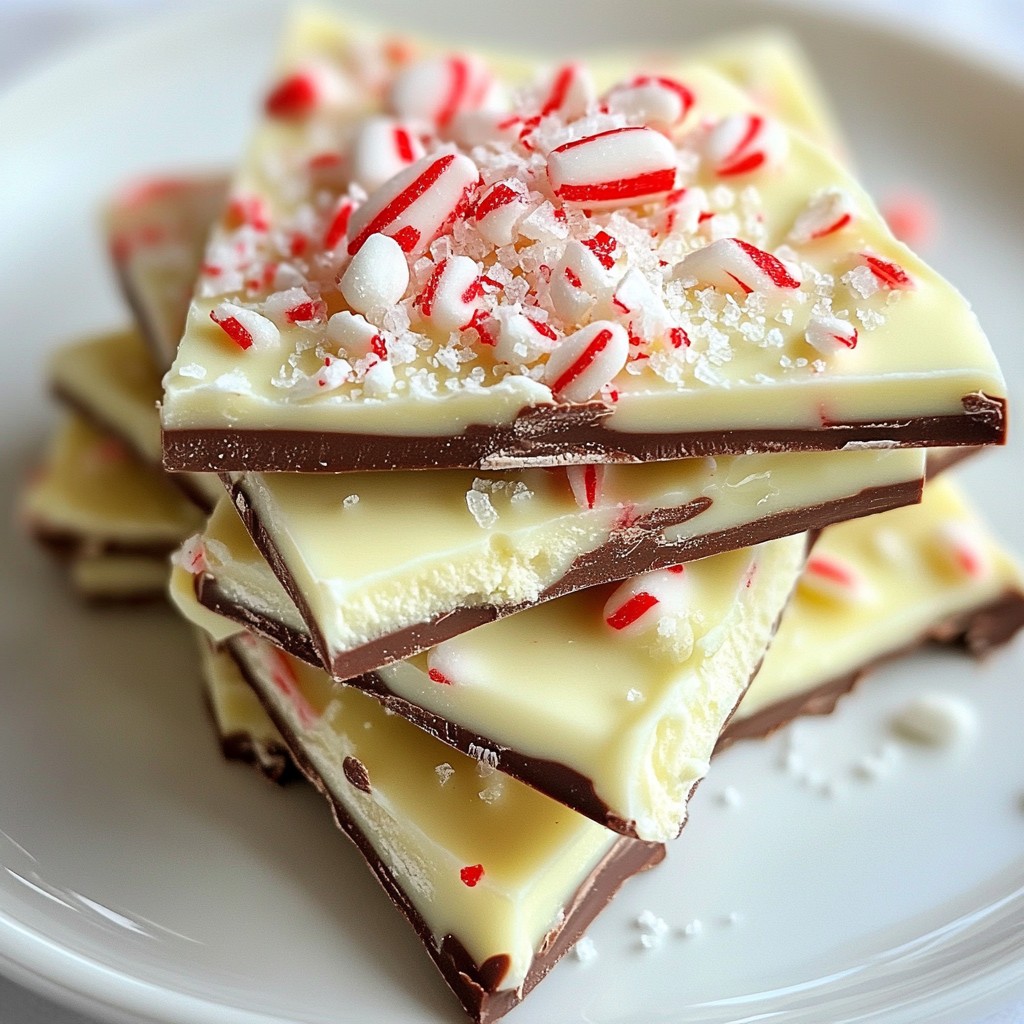
Looking for a festive treat that will wow your friends and family? Chocolate peppermint bark fits the bill! With its luscious layers of rich chocolate and refreshing peppermint, this simple recipe is an instant holiday classic. I’ll guide you step-by-step to create this delightful candy, sharing tips, tricks, and fun variations to make it uniquely yours. Ready to spread some holiday joy? Let’s dive in!
Why I Love This Recipe
- Irresistible Flavor Combination: The blend of rich semi-sweet chocolate and creamy white chocolate, paired with refreshing peppermint, creates a deliciously festive treat that’s hard to resist.
- Easy to Make: This recipe requires minimal ingredients and straightforward steps, making it an accessible treat for both novice and experienced bakers.
- Perfect for Gifting: Chocolate peppermint bark makes for a beautiful and thoughtful homemade gift during the holiday season, ideal for sharing with friends and family.
- Customizable: You can easily adjust the toppings or even the type of chocolate to suit your personal taste, allowing for endless variations!
Ingredients
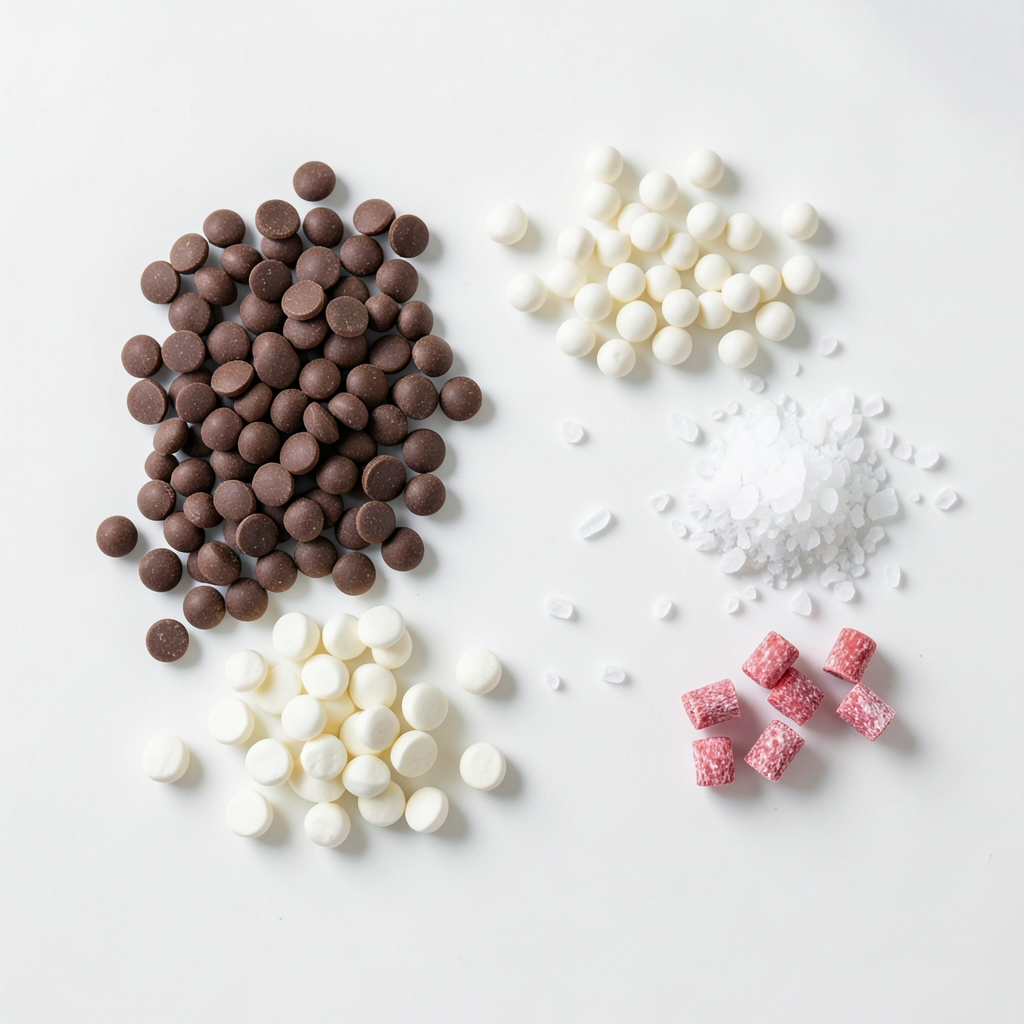
Main Ingredients Needed
- 12 oz semi-sweet chocolate chips
- 12 oz white chocolate chips
- 1 teaspoon peppermint extract
- 1/2 cup crushed peppermint candies (reserve extra for topping)
- A pinch of sea salt
I love using semi-sweet chocolate chips. They add a rich flavor to the bark. White chocolate chips balance this with a sweet, creamy layer. Peppermint extract gives it that fresh holiday taste. Crushed peppermint candies bring crunch and color. A pinch of sea salt enhances all these flavors beautifully.
Optional Ingredients
- Additional toppings (e.g., crushed nuts, festive sprinkles)
- Flavor variations (e.g., orange zest, vanilla extract)
You can get creative with optional toppings. Crushed nuts add a nice crunch. Festive sprinkles bring a pop of color. You might also try orange zest for a citrus twist. Vanilla extract can add warmth and depth. These extras let you customize your bark to your liking.
Step-by-Step Instructions
Preparing Your Workspace
First, line a baking sheet with parchment paper. This makes it easy to lift off the bark later. A 9x13-inch sheet works best. The parchment paper gives you a non-stick surface. This step is key for a smooth and clean finish.
Melting and Mixing the Chocolate
To melt the semi-sweet chocolate, place the chips in a microwave-safe bowl. Heat them in 30-second bursts. Stir after each interval. This method helps avoid burning the chocolate. It should take about 1-2 minutes total to melt.
After melting, add half a teaspoon of peppermint extract. Stir well to mix in the mint flavor evenly. Next, prepare the white chocolate layer. Use another bowl for the white chocolate chips. Repeat the same heating method. Once melted, mix in the remaining peppermint extract. This adds a nice minty taste to the white chocolate.
Layering the Bark
Now, it’s time to layer the bark. Pour the semi-sweet chocolate onto the lined baking sheet. Use a spatula to spread it into an even layer. After that, chill it in the fridge for 15-20 minutes to set.
Once it’s firm, take it out and pour the melted white chocolate on top. Spread it evenly across the semi-sweet layer. Next, sprinkle the crushed peppermint candies on top. Press them down slightly to stick. To finish, lightly sprinkle a pinch of sea salt over the entire surface. This adds a nice flavor contrast.
Finally, return the baking sheet to the fridge for 30 minutes. This allows the bark to set completely. Once set, lift it off the parchment paper. Use a sharp knife to cut it into pieces or break it into chunks. Enjoy your delicious chocolate peppermint bark!
Tips & Tricks
Ensuring Smooth Chocolate
To melt chocolate evenly, use a microwave-safe bowl. I prefer to heat chocolate in 30-second bursts. Each time, I stir well. This helps prevent burning and keeps the chocolate smooth. Common mistakes include overheating and not stirring often. If chocolate becomes grainy, it has likely seized. Avoid adding water, as this can cause it to clump.
Achieving the Perfect Layered Look
When spreading melted chocolate, use a spatula. This tool helps create an even layer. Start from the center and push outward. Aim for a thin, uniform layer to help it set well. To keep your layers separate, let each layer cool. Make sure the first layer is firm before adding the second. Otherwise, they may mix together.
Storage and Shelf Life
Store chocolate bark in an airtight container. This keeps it fresh and flavorful. You can put it in the fridge, but let it sit at room temp for a few minutes before serving. To prevent melting, avoid placing it near heat sources. Check for any signs of change in texture or smell. If it looks good, it's still good to eat!
Pro Tips
- Use High-Quality Chocolate: The flavor of your bark relies heavily on the quality of the chocolate. Opt for premium brands for a richer taste.
- Chill Between Layers: Make sure each layer is fully chilled before adding the next. This ensures clean lines and prevents mixing of the chocolates.
- Customize Your Toppings: Get creative! You can use nuts, dried fruits, or different candies for a personal twist on your bark.
- Store Properly: Keep your peppermint bark in an airtight container at room temperature for up to two weeks for the best texture and flavor.
Variations
Flavor Variations
You can have fun by changing the flavors in your chocolate peppermint bark. Try adding a splash of vanilla or almond extract. Just 1/2 teaspoon will add a nice twist. Mixing in different types of chocolate also adds variety. Use dark chocolate for a rich taste or milk chocolate for a sweeter treat.
Topping Variations
The toppings can make your bark unique. Consider using different candies like M&Ms or crushed Oreos. Each candy adds a new flavor and color. You can also mix in dried fruits like cranberries or nuts for extra texture. They give a nice crunch and make each bite interesting.
Seasonal Themes
You can customize your bark for different holidays. For Easter, use pastel-colored candies. For Halloween, add orange and black sprinkles. Present your bark on fun platters to match the season. A themed presentation makes your treats even more special and fun to share.
Storage Info
Proper Storage Techniques
To keep your chocolate peppermint bark fresh, use airtight containers. Glass or plastic containers work well. Make sure to layer parchment paper between pieces. This prevents sticking and keeps the bark intact.
You can store the bark at room temperature if your home is cool. However, if it's warm, refrigerate it. This keeps the chocolate firm and prevents melting.
How Long It Lasts
Chocolate peppermint bark can last for about two weeks when stored properly. To check its freshness, look for any signs of white spots. These spots are called bloom and happen when chocolate gets warm. While it’s safe to eat, the texture may change. If it smells off or has an unusual taste, it’s best to toss it.
Freezing Chocolate Bark
If you want to keep your bark longer, you can freeze it. Wrap the pieces tightly in plastic wrap. Then place them in a freezer bag or container. This helps avoid freezer burn.
When you're ready to enjoy it again, take it out of the freezer. Let it thaw in the fridge for a few hours. This helps keep the texture nice. Enjoy your bark as a treat or use it for baking!
FAQs
Can I use different types of chocolate?
Yes, you can use dark, milk, or white chocolate for your bark. Each type brings a unique taste. Dark chocolate adds richness, while milk chocolate offers sweetness. White chocolate is creamy and pairs well with peppermint. You can mix types for a fun twist. Just remember that melting times may vary, so keep an eye on your chocolate.
How do I prevent the chocolate from seizing?
To stop chocolate from seizing, avoid water contact. Even a drop can cause issues. Use a dry bowl and utensils. When melting, heat in short bursts. Stir often to keep it smooth. If chocolate does seize, add a small amount of vegetable oil. This can help restore the texture.
Can I make this recipe vegan?
Yes, you can make vegan chocolate bark. Use dairy-free chocolate chips instead of regular ones. For the peppermint candies, check labels for dairy-free options. You can find many brands that cater to vegan diets. This way, everyone can enjoy this festive treat!
What is the best way to cut the bark?
To cut chocolate bark, let it cool completely. Use a sharp knife for clean cuts. Score the bark gently before cutting all the way through. Alternatively, you can break it into chunks for a rustic look. Just make sure to keep the pieces uniform for easy serving.
You learned how to make delicious chocolate bark with a mix of flavors and textures. We covered key ingredients like chocolate chips and peppermint candies, along with optional toppings and variations. I shared tips for melting the chocolate and layering it to get a perfect look. Proper storage details help keep your bark fresh longer.
In the end, this recipe is fun, festive, and easy to customize. Enjoy creating tasty treats for any occasion!