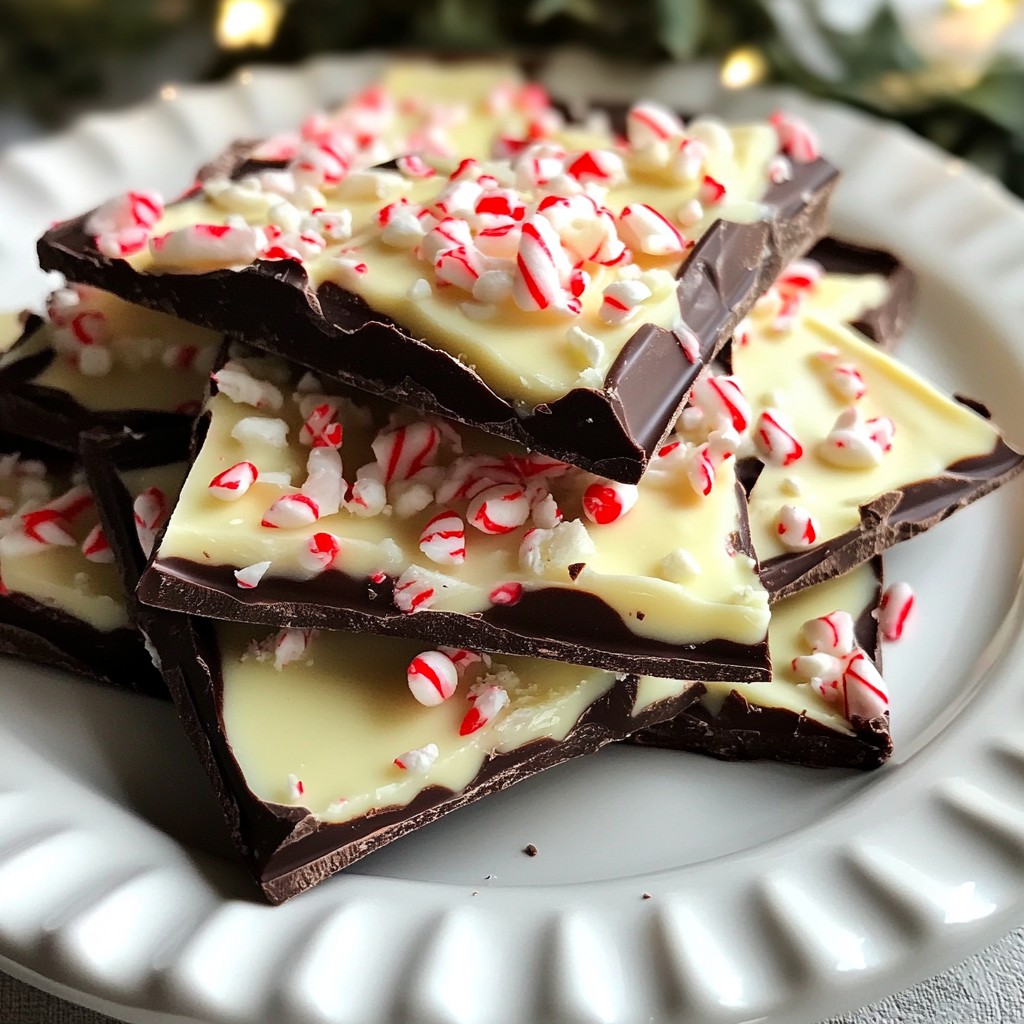
Looking to make your holidays extra special? You can’t go wrong with Chocolate Peppermint Bark! This treat combines rich dark chocolate, creamy white chocolate, and the refreshing zing of peppermint. It's simple to make and perfect for sharing or gifting. In this guide, I’ll walk you through the ingredients and steps for making this irresistible holiday treat. Let’s dive into this sweet delight that will please everyone!
Why I Love This Recipe
- Deliciously Festive: This chocolate peppermint bark combines rich dark chocolate and sweet white chocolate, making it a delightful treat for the holiday season.
- Easy to Make: The step-by-step instructions make this recipe accessible for bakers of all skill levels, ensuring a fun kitchen experience.
- Perfect for Gifting: Packaged beautifully, this bark makes for an excellent homemade gift that is sure to impress friends and family.
- Customizable Toppings: You can easily add your favorite nuts, dried fruits, or different flavored extracts to personalize this bark to your taste.
Ingredients
Main Ingredients
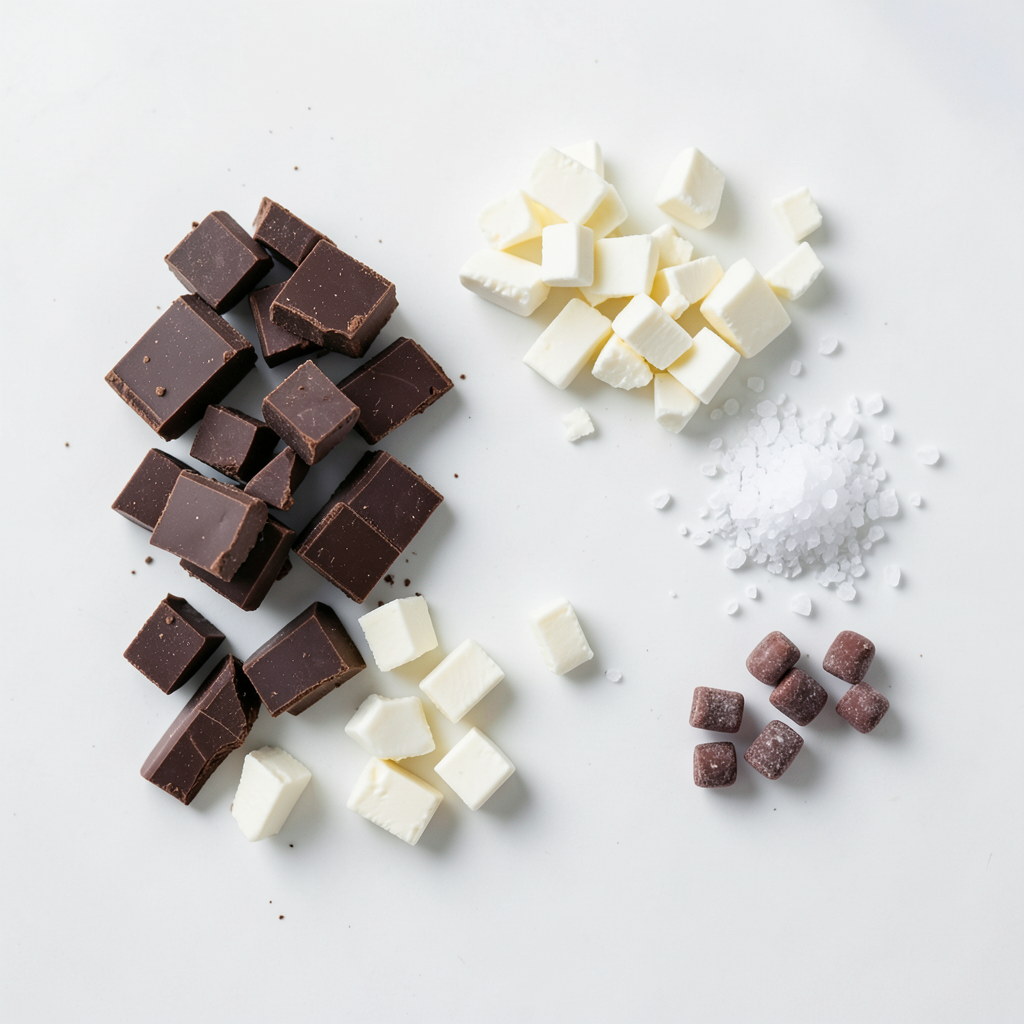
- 12 ounces dark chocolate (60-70% cacao), finely chopped
- 12 ounces white chocolate, finely chopped
- 1 teaspoon peppermint extract
- 1/2 teaspoon sea salt
- 1/2 cup crushed peppermint candies (or crushed candy canes)
These ingredients create the perfect balance of rich dark chocolate and sweet white chocolate. The dark chocolate gives a deep flavor, while the white chocolate adds creaminess. Peppermint extract brings a fresh kick, and sea salt enhances all the flavors. Crushed peppermint candies add a crunchy texture and festive look.
Optional Ingredients
- Ingredients for drizzling chocolate
- Additional toppings or flavor enhancers
You can drizzle melted chocolate over the bark for a fancy touch. You might also try adding toppings like nuts or other candies. These optional ingredients let you get creative with your bark. You can adjust flavors and textures based on your taste.
Step-by-Step Instructions
Melting the Dark Chocolate
To melt dark chocolate, start by chopping it into small pieces. This helps it melt evenly. Place the chopped chocolate in a microwave-safe bowl. Heat it in the microwave in 30-second bursts. Stir the chocolate after each burst. Keep heating and stirring until the chocolate is smooth. If it seems thick, just give it a good stir. If you want a silky texture, remove it from the microwave while some small lumps remain. The heat will finish melting them.
Preparing the Baking Dish
Next, grab a 9x13-inch baking dish. Line it with parchment paper. Make sure the paper hangs over the sides. This will help you lift the bark out later. It’s very important for easy removal. Spread the parchment flat, so there are no bumps. This will keep the bark looking nice and neat.
Final Assembly
Now it’s time to put everything together. Pour the melted dark chocolate into the lined dish. Use a spatula to spread it evenly. Make sure it reaches all the corners. While it’s still warm, sprinkle sea salt over the top. This adds a nice flavor contrast. Place the dish in the fridge for about 15-20 minutes until it sets.
After it sets, melt the white chocolate. Use the same method: heat it in the microwave in 30-second intervals. Stir well until it’s smooth. Once melted, add the peppermint extract and mix well. This gives the white chocolate a fresh flavor. Carefully pour this white chocolate over the dark layer. Spread it evenly using the spatula.
Before the white chocolate sets, sprinkle crushed peppermint candies on top. Press them lightly into the white chocolate. This helps them stick as it firms up. Finally, put the dish back in the fridge for 30 minutes. This will set both layers completely. When done, lift the bark out using the parchment paper. Transfer it to a cutting board and slice it into pieces. Enjoy your festive treat!
Tips & Tricks
Achieving the Perfect Texture
To make great chocolate peppermint bark, know how to melt chocolate right. Dark chocolate melts best at about 120°F to 130°F. Use short bursts of heat in the microwave. Heat for 30 seconds, then stir. Repeat until it is smooth. This method helps avoid burning.
Chocolate can seize when it mixes with water or steam. To prevent this, keep bowls and tools dry. Always use dry utensils when handling chocolate. If it does seize, you can save it. Add a small amount of vegetable oil or cocoa butter. This can help restore its texture.
Flavor Enhancement Suggestions
Choose good quality chocolate for the best taste. Look for chocolate with at least 60% cacao. A richer chocolate adds depth. For the white chocolate, use a brand that melts well.
Adjusting the peppermint flavor is easy. Start with one teaspoon of peppermint extract. Taste the white chocolate before pouring it over the dark layer. If you want more mint, add a few drops at a time. Remember, it’s easy to add more but hard to take it away!
Presentation and Serving Ideas
To impress, arrange your bark on a festive platter. Use a colorful plate to make the treat pop. For a fun touch, drizzle melted chocolate over the top. You can also add a sprinkle of crushed peppermint candies for extra flair.
If you plan to gift the bark, get creative with your wrapping. Use clear cellophane bags tied with ribbon. You can also use decorative boxes. This makes your treat look special and personal.
Pro Tips
- Use High-Quality Chocolate: The flavor of your peppermint bark heavily relies on the quality of chocolate you use. Opt for a good quality dark and white chocolate to enhance the overall taste.
- Chill Between Layers: Allowing the dark chocolate to set before adding the white chocolate layer ensures that they don't mix and keeps the layers distinct for a more appealing look.
- Customize Your Toppings: Feel free to experiment with different toppings such as crushed nuts, holiday sprinkles, or even a drizzle of caramel for a unique twist on traditional peppermint bark.
- Storage Tips: Store the peppermint bark in an airtight container at room temperature for up to two weeks. For longer storage, keep it in the refrigerator, but let it come to room temperature before serving for the best texture.
Variations
Different Types of Chocolate
You can change the type of chocolate in your bark. If you like milk chocolate, use that instead of dark chocolate. It will give you a sweeter treat. Milk chocolate has a creamy taste that many enjoy.
For a bolder flavor, use dark chocolate with a higher cacao percentage. Dark chocolate has a rich taste that pairs well with peppermint. It adds depth and makes the bark feel more gourmet.
Flavor Infusions
You can add different flavors to your bark. Try vanilla or almond extract for a twist. Both add a warm and sweet taste that blends well with chocolate. Just remember to keep the amount similar to the peppermint extract.
Spices can also spice up your bark! Adding a little cinnamon or nutmeg brings warmth and complexity. Just a pinch can change the whole flavor. Experiment to find what you like best.
Topping Variations
The toppings on your bark can vary too! Instead of just crushed peppermint, try other candies like M&Ms or nuts. These add color and texture, making your bark unique.
You can also decorate it with colored chocolate. Drizzle melted chocolate on top for a fun look. Use white, dark, or even colored chocolate for a festive touch. This adds a nice pop and makes your bark eye-catching.
Storage Info
Best Storage Practices
To keep your chocolate peppermint bark fresh, use airtight containers. Glass or plastic containers work well. If you want extra protection, wrap the bark in plastic wrap before placing it in the container. This helps keep out moisture. Store the bark in a cool, dark place. Avoid areas with high humidity, as this can cause the chocolate to become soft.
Shelf Life of Chocolate Peppermint Bark
Chocolate peppermint bark can stay fresh for about two weeks when stored correctly. After that, it may lose its flavor and crunch. Look out for signs of spoilage. If you see white spots or a dull surface, the chocolate might have bloomed. This happens when the fat in the chocolate separates. Though it may still taste okay, the texture will change.
Freezing Guidelines
If you want to keep your bark longer, you can freeze it. First, wrap each piece in plastic wrap. Then, place the wrapped pieces in a freezer-safe bag. Remove as much air as possible to prevent freezer burn. When you want to enjoy some, take it out and let it defrost in the fridge. This helps keep the texture smooth and tasty.
FAQs
How to make Chocolate Peppermint Bark from scratch?
To make Chocolate Peppermint Bark, follow these steps:
1. Melt the Dark Chocolate: Put 12 ounces of chopped dark chocolate in a bowl. Heat it in the microwave in 30-second bursts. Stir after each burst until it melts.
2. Prepare the Base: Line a 9x13-inch dish with parchment paper. Pour the melted dark chocolate in and spread it evenly.
3. Add Sea Salt: Sprinkle 1/2 teaspoon of sea salt on the warm chocolate. Refrigerate for 15-20 minutes to set.
4. Melt the White Chocolate: In another bowl, melt 12 ounces of white chocolate like the dark chocolate.
5. Flavor the White Chocolate: Stir in 1 teaspoon of peppermint extract into the melted white chocolate.
6. Layer the White Chocolate: Pour the white chocolate over the dark chocolate. Spread it evenly.
7. Sprinkle Peppermint Candies: Add 1/2 cup of crushed peppermint candies on top. Press them in lightly.
8. Chill to Set: Refrigerate for 30 minutes until both layers are firm.
9. Cut and Serve: Lift the bark out using the parchment paper. Cut it into pieces.
How long does it take for Chocolate Peppermint Bark to set?
The dark chocolate needs about 15-20 minutes to set. After adding the white chocolate, chill for another 30 minutes. So, total setting time is around 45-50 minutes.
Can I use other types of chocolate for this recipe?
Yes, you can use different chocolates. You can swap dark chocolate for milk chocolate for a sweeter taste. For a richer flavor, try using bittersweet chocolate. Adjust the sweetness of the white chocolate if using a different type.
What is the best way to crush peppermint candies?
To crush peppermint candies, put them in a sealed plastic bag. Use a rolling pin to gently crush them. Aim for small chunks, not powder. This gives a nice crunch in the bark.
Is Chocolate Peppermint Bark gluten-free?
Yes, Chocolate Peppermint Bark is gluten-free. All the ingredients listed are safe. Just check your candy packaging to ensure they are gluten-free too. Enjoy this treat without worry!
This post covered how to create tasty Chocolate Peppermint Bark from scratch. You learned about key ingredients, step-by-step instructions, and helpful tips. Feel free to get creative with flavors and toppings.
Storing correctly keeps your treat fresh, while offering ideas for gifting adds fun. Enjoy your chocolate treats, and don't hesitate to experiment with flavors! Make your next batch unique and special.