Chocolate Peanut Butter Mug Cake Simple and Quick Treat

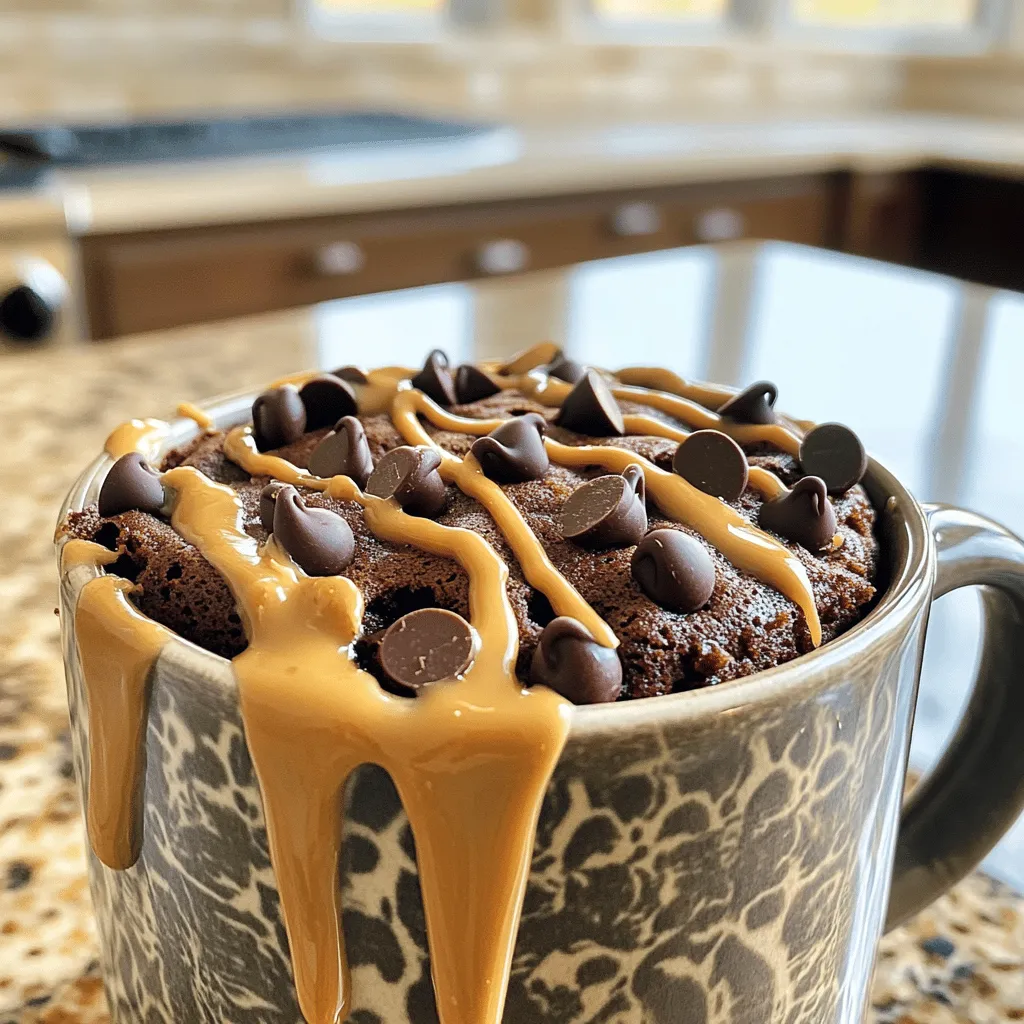
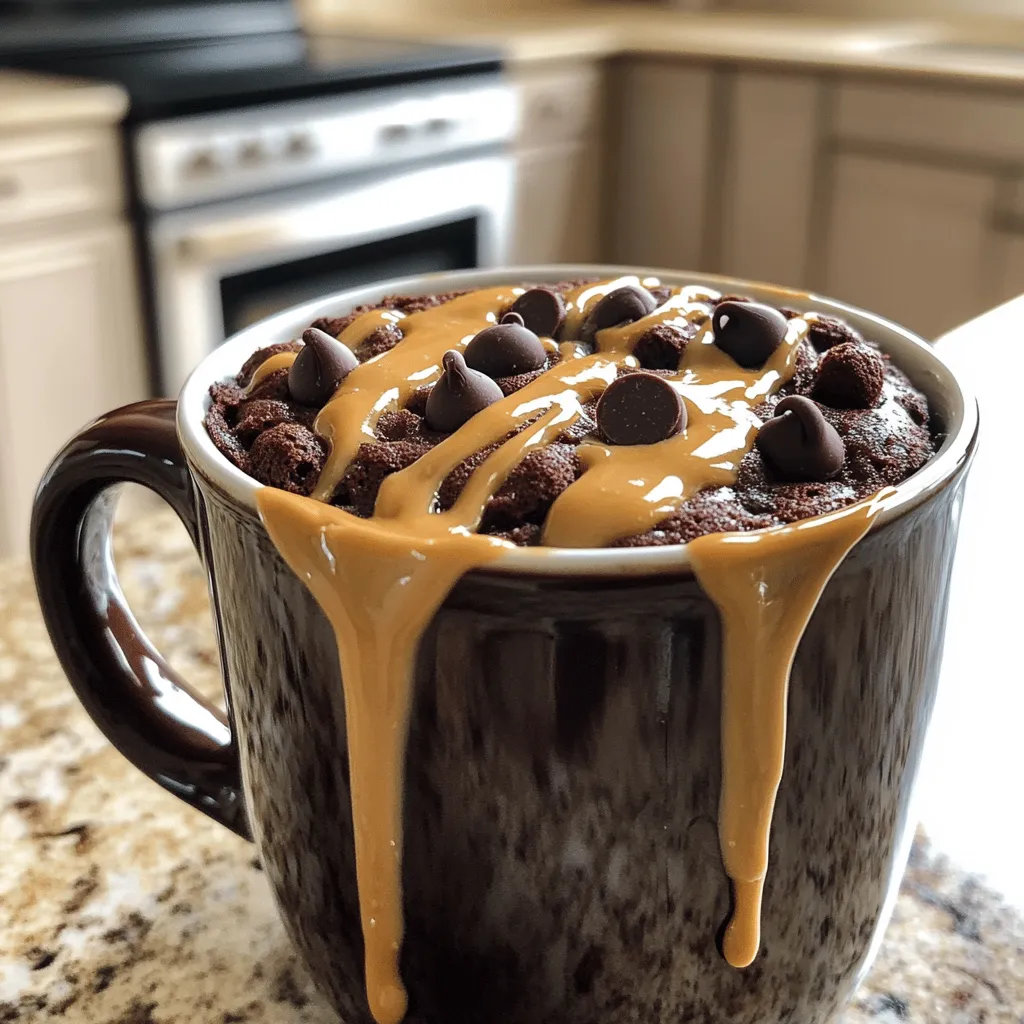
Craving something sweet but short on time? This Chocolate Peanut Butter Mug Cake is the answer! In just a few minutes, you can whip up a warm, gooey treat that satisfies your chocolate cravings. Forget long baking times; this recipe is simple, quick, and packed with flavor. Let’s dive right into the easy steps and ingredients you need to enjoy this delightful mug cake perfect for any time of day!
Ingredients
To make a tasty chocolate peanut butter mug cake, you need the right ingredients. Here’s a list of what you’ll need:
- 4 tablespoons all-purpose flour
- 4 tablespoons granulated sugar
- 2 tablespoons unsweetened cocoa powder
- 1/8 teaspoon baking powder
- 1/8 teaspoon salt
- 3 tablespoons milk (whole or plant-based)
- 2 tablespoons creamy peanut butter
- 1 tablespoon vegetable oil (or melted coconut oil)
- 1/4 teaspoon vanilla extract
- Optional: chocolate chips for topping
These ingredients create a soft and rich cake. Each one plays a key role in flavor and texture. The flour gives structure. The sugar adds sweetness. Cocoa powder brings deep chocolate flavor. Baking powder helps the cake rise. Salt enhances the taste. Milk makes it moist. Peanut butter gives a creamy, nutty flavor. Oil keeps it tender. Vanilla adds warmth. If you love chocolate, adding chocolate chips is a great choice!
With these ingredients ready, you can make your mug cake in just a few minutes. This recipe is not just quick; it’s also a fun way to satisfy your sweet tooth.
Step-by-Step Instructions
Preparation Steps
- Step 1: Combine dry ingredients
Start by choosing a microwave-safe mug that holds about 12 oz. In this mug, mix the dry ingredients. Use 4 tablespoons of all-purpose flour, 4 tablespoons of granulated sugar, 2 tablespoons of unsweetened cocoa powder, 1/8 teaspoon of baking powder, and 1/8 teaspoon of salt. Stir with a fork until no lumps remain.
- Step 2: Add wet ingredients and mix
Next, add the wet ingredients. Pour in 3 tablespoons of milk, 2 tablespoons of creamy peanut butter, 1 tablespoon of vegetable oil, and 1/4 teaspoon of vanilla extract. Mix these together well until you have a smooth batter.
- Step 3: Optional: Fold in chocolate chips
If you want extra chocolate goodness, fold in chocolate chips at this stage. This step is optional, but I highly recommend it for chocolate lovers!
- Step 4: Microwave cooking time
Carefully place your mug in the microwave. Cook on high for about 1 minute and 30 seconds. Keep an eye on the mug cake as it cooks. Since microwave wattages vary, start with 1 minute and adjust the time if needed to avoid overflow.
- Step 5: Cooling time
Once the mug cake is done, let it cool for a few minutes. It will be very hot straight out of the microwave, so be careful!
- Step 6: Serving suggestions
To make your treat even better, add a dollop of peanut butter on top. You can also sprinkle extra chocolate chips or add a scoop of ice cream for a delightful finish!Enjoy your quick and simple treat!
Tips & Tricks
Tips for Perfecting Your Mug Cake
- Adjust microwave times based on wattage: Every microwave is different. If yours is lower wattage, start with 1 minute. Check for doneness and add more time only if needed.
- Avoiding overflow in the microwave: Use a large mug, about 12 oz. As the cake rises, this helps prevent spills. Keep an eye on it while it cooks.
- Serving ideas to enhance flavor: Try adding a scoop of ice cream or a dollop of peanut butter on top. A sprinkle of chocolate chips makes it even better!
Common Mistakes to Avoid
- Not mixing dry ingredients thoroughly: Mix flour, sugar, cocoa powder, and baking powder well. This step prevents lumps and ensures even flavor.
- Overcooking the mug cake: Watch the time closely! Overcooking makes the cake dry. Start with 1 minute and check often.
- Skipping optional ingredients: Optional chocolate chips can add a delightful surprise. Don’t skip them if you love chocolate!
Enjoy making your Chocolate Peanut Butter Mug Cake with these tips!

Variations
Flavor Variations
You can make this mug cake your own with simple changes. Here are some ideas:
- Adding different types of nut butter: Try almond or cashew butter instead of peanut butter. Each nut butter adds a unique flavor.
- Incorporating fruits like banana or raspberry: Mash half a banana or add a few raspberries to the batter. This adds natural sweetness and freshness.
- Swapping cocoa powder for carob powder: If you want a different taste, use carob powder. It has a mild sweetness and is naturally caffeine-free.
Ingredient Substitutions
You might need to swap some ingredients. Here are a few options:
- Gluten-free flour options: Use almond flour or coconut flour. Both work well and keep the cake moist.
- Dairy-free milk alternatives: Almond milk or oat milk are great choices. They blend well with the other ingredients.
- Sweetener substitutions: Instead of granulated sugar, try coconut sugar or honey. These give a different sweetness and flavor.
Storage Info
Storing Leftovers
To store any leftover mug cake, let it cool first. Then, cover it tightly with plastic wrap or put it in an airtight container. Keep it in the fridge for up to two days. For reheating, microwave it for about 10 to 15 seconds. Check often to avoid overheating. To prevent sogginess, do not cover it while reheating.
Freezing Guidelines
If you want to freeze the mug cake, you can do that too! Just let it cool completely. Then, cut it into slices or keep it whole. Wrap it well in plastic wrap and place it in a freezer bag. It can last up to three months. To defrost, take it out the night before and let it sit in the fridge. When ready, reheat it in the microwave for about 20 seconds or until warm. This keeps the mug cake tasty and fresh!
FAQs
Common Questions
Can I make this recipe in advance?
You can prepare the dry mix ahead of time. Just store it in an airtight container. When you’re ready, add the wet ingredients and microwave. This way, you save time when the sweet tooth hits!
How do I make a larger batch?
To make more mug cakes, simply multiply the ingredients by the number of servings you want. You can cook them one at a time or use multiple mugs. Just remember to adjust the cooking time based on how many you’re making!
Is it safe to microwave metal mugs?
No, never microwave metal mugs. Metal can spark and cause a fire. Always use a microwave-safe mug made of glass or ceramic. Safety first in the kitchen!
What can I use instead of peanut butter?
If you want a nut-free option, try sunflower seed butter or tahini. You can also use any other nut butter you like, such as almond or cashew butter. Each will give a unique twist to your cake!
Can I make a vegan version of this mug cake?
Yes, you can make it vegan! Use plant-based milk and swap the creamy peanut butter for a vegan nut butter. Ensure all ingredients are dairy-free. This way, everyone can enjoy a delicious treat!Enjoy your mug cake adventure!
This blog post shared a simple mug cake recipe with essential ingredients and easy steps. You learned how to mix dry and wet ingredients and microwave them to create a delicious treat. I also provided tips to avoid common mistakes and offered flavor variations.
Mug cakes are delightful snacks you can customize. With just a few ingredients, you can enjoy a unique dessert anytime. I hope you feel inspired to try this recipe and make it your own. Enjoy your baking!


![To make this delightful chilled peach soup, gather these main ingredients: - 4 ripe peaches, peeled and pitted - 1 cup plain Greek yogurt - 1 cup almond milk - 2 tablespoons honey (or maple syrup for a vegan option) - Juice of 1 lemon - 1 teaspoon vanilla extract - A pinch of salt These ingredients create a creamy and fruity flavor. The ripe peaches give sweetness and vibrancy. Greek yogurt adds creaminess and protein. Almond milk keeps it light and smooth. Honey or maple syrup sweetens it naturally. Lemon juice brightens the taste, while vanilla adds warmth. For an extra touch, consider these garnishes: - Fresh mint leaves for garnish - Crushed pistachios for topping (optional) Mint leaves add a fresh burst of flavor and color. Crushed pistachios give a nice crunch and a nutty taste. You can easily swap out some ingredients if needed: - Use coconut yogurt instead of Greek yogurt for a dairy-free version. - Substitute regular milk for almond milk if you prefer. - Adjust the sweetener; agave nectar works well too. - Try adding a splash of orange juice for a different citrus note. These substitutions help you customize the soup to your taste or dietary needs. You still get a refreshing and delicious chilled peach soup with any of these changes. For the full recipe, visit the [Full Recipe]. Start by washing the peaches well. Peeling them is next. Use a sharp knife to cut the peaches into small, even chunks. This helps them blend smoothly. Remove the pits and add the chopped peaches to your blender. Now, it’s time to mix everything. Add the Greek yogurt, almond milk, honey, lemon juice, vanilla extract, and a pinch of salt to the blender with the peaches. Each ingredient enhances the flavor and texture of the soup. Blend the mixture on high speed. You want it to be smooth and creamy. If you like a little texture, pulse the blender a few times instead of blending non-stop. This gives you control over the final consistency. Taste the soup. If it needs more sweetness or tang, add more honey or lemon juice. Once blended, pour the soup into a bowl or pitcher. Cover it tightly and place it in the fridge for at least two hours. This chilling time allows flavors to mix well. When ready to serve, stir the soup again. Pour it into bowls and garnish with fresh mint leaves and crushed pistachios. For a fancy touch, use chilled bowls. This chilled peach soup is perfect for a light dessert or starter. For the full recipe, check out the details above! To select the best peaches, look for ripe, fragrant fruit. They should have a slight give when you gently press them. Avoid peaches with bruises or soft spots. Choosing freestone peaches makes your prep easier. These peaches separate cleanly from the pit. You can tweak the flavor of your chilled peach soup. If you want it sweeter, add more honey or maple syrup. For more tartness, squeeze in more lemon juice. Always taste as you go. This way, you find the perfect balance for your palate. When blending, start on low speed, then increase. This helps break down the peaches evenly. If you like some texture, pulse the blender a few times instead of blending fully. For a creamier soup, blend longer. Always check the consistency before serving. You want it smooth but not too thin. For more detailed steps, check the Full Recipe. {{image_4}} You can easily make this soup vegan. Just swap Greek yogurt for coconut yogurt. It adds a nice creaminess. Use maple syrup instead of honey for sweetness. You can also try different plant-based milk. Almond, oat, or soy milk work well too. This way, everyone can enjoy a tasty bowl of chilled peach soup. Want to spice it up? Add a pinch of cinnamon or ginger for warmth. These spices can add depth to the sweet peaches. Fresh herbs can make it even better. Try basil or rosemary for a unique twist. Just a small amount can change the flavor profile completely. To change the texture, consider using different fruits. Add diced mango or berries for a fruity crunch. You can also mix in some chia seeds for a fun texture. Blending in some silken tofu can make the soup creamier. Each variation brings a new taste and feel to your chilled peach soup. For the full recipe, check out the details above. Store leftover chilled peach soup in an airtight container. This keeps the soup fresh. Make sure to cool it first before sealing. If you don’t have a container, you can use plastic wrap. Just cover the bowl tightly. Chilled peach soup lasts about 3 to 5 days in the fridge. After that, it may lose its flavor and freshness. Always check for signs of spoilage before eating. If it smells sour or changes color, it's best to toss it. You can freeze chilled peach soup for up to 3 months. Pour it into freezer-safe containers, leaving some space at the top. This allows for expansion when frozen. To enjoy later, thaw it in the fridge overnight. Stir well before serving to restore its smooth texture. For the full recipe, see the section above. Serve chilled peach soup in a bowl or a small glass. I love using chilled bowls for that extra touch. You can drizzle a bit of almond milk on top. A mint leaf adds a great pop of color. This soup works well as a light starter or a refreshing dessert. Yes, you can use frozen peaches. Just make sure they are thawed first. This keeps the soup smooth and creamy. Frozen peaches may change the taste slightly, but they still taste great. Chilled peach soup is quite healthy. It has ripe peaches, Greek yogurt, and almond milk. These ingredients offer vitamins, protein, and healthy fats. The honey adds natural sweetness, making it a tasty and nutritious choice. Enjoy it without guilt! You can mix in other fruits like berries or mangoes. Simply chop them up and blend them with peaches. Adjust the sweetness to match the fruit you choose. This gives you a unique flavor every time. Enjoy experimenting with seasonal fruits for variety! Chilled peach soup is a refreshing treat. We covered the main ingredients, like fresh peaches, and how to blend them for the best flavor. I shared tips on choosing, storing, and even varying the recipe for vegan options. Remember, this soup is easy to make and fun to try. Enjoy exploring different flavors or garnishes to suit your taste. Now, it’s time to make your own chilled peach soup and savor each bite!](https://dishtreats.com/wp-content/uploads/2025/07/cde2237f-ab80-4fd7-9ae6-23109d9f52c0-768x768.webp)
![To make the best pumpkin spice muffins, you need the following key ingredients: - 1 cup pumpkin puree - 1/2 cup brown sugar - 1/2 cup granulated sugar - 1/3 cup vegetable oil - 2 large eggs - 1 teaspoon vanilla extract - 1 1/2 cups all-purpose flour - 1 teaspoon baking soda - 1 teaspoon baking powder - 2 teaspoons pumpkin pie spice - 1/2 teaspoon salt These ingredients create a fluffy, moist muffin that bursts with autumn flavor. The pumpkin puree adds natural sweetness and moisture. Brown sugar gives a rich, caramel taste, while the spices bring warmth and comfort to each bite. You can make your muffins even better with these optional ingredients: - 1/2 cup chopped walnuts or pecans - 1/2 cup chocolate chips Adding nuts gives a nice crunch, while chocolate chips add sweetness. Feel free to mix and match based on your taste. You can even leave them out for a classic muffin. Accurate measurement is key to great baking. Here’s how to measure your ingredients correctly: - Flour: Use a spoon to fill your measuring cup, then level it off with a knife. - Brown Sugar: Pack it firmly into the cup for proper measurement. - Liquid Ingredients: Use a liquid measuring cup and check at eye level for accuracy. Following these tips ensures your muffins turn out perfectly every time. For the full recipe, check out the details above and get ready to bake your delicious pumpkin spice muffins! Start by preheating your oven to 350°F (175°C). This step is key for even baking. Next, prepare a standard muffin tin. You can use paper liners or spray each cup with non-stick spray. This will make it easy to remove the muffins later. In a large bowl, combine the pumpkin puree, brown sugar, granulated sugar, and vegetable oil. Add in the eggs and vanilla extract. Whisk these together until smooth. Make sure there are no lumps. This mix gives your muffins their rich flavor. In another bowl, sift together the all-purpose flour, baking soda, baking powder, pumpkin pie spice, and salt. Sifting helps to mix and aerate the flour. It makes for a lighter muffin. This mix is important for texture. If you want to add some extra texture, gently fold in chopped walnuts or pecans. You can also add chocolate chips for a sweet touch. Be careful not to overmix; just combine until they’re evenly spread in the batter. Now, spoon the muffin batter into the prepared tin. Fill each cup about 3/4 full. This allows room for the muffins to rise. Bake for 18-20 minutes. Check if they’re ready by inserting a toothpick in the center. If it comes out clean, they’re done! Let them cool in the tin for 5 minutes before moving them to a wire rack. This cooling step is essential for the best texture. For the complete recipe, check out the [Full Recipe]. To keep muffins light and fluffy, don’t overmix the batter. When you combine wet and dry ingredients, mix just until you see no dry flour. A few lumps are okay. Overmixing makes muffins tough. Also, ensure your baking powder and baking soda are fresh. Old leavening agents won't help the muffins rise. Store your pumpkin spice muffins in an airtight container. This keeps them soft and moist. You can keep them at room temperature for up to three days. For longer storage, place them in the fridge for a week. If you want to save them for later, freeze them. Wrap each muffin in plastic wrap before placing them in a freezer-safe bag. They can last for up to three months in the freezer. Presentation makes any dish more inviting. For a lovely touch, sprinkle powdered sugar on top of each muffin. Serve them on a pretty platter. You can also add a small bowl of softened butter for easy spreading. This makes your muffins look even more delicious and inviting. {{image_4}} You can make gluten-free pumpkin spice muffins easily. To do this, swap regular flour with gluten-free flour. Look for blends that work well in baking. These blends often include almond flour or coconut flour. Check the package to ensure it has a good flavor. The muffins will still taste great! The texture may vary slightly, but they will remain soft and delicious. If you want vegan muffins, you can make some simple changes. Replace eggs with flax eggs. To make a flax egg, mix 1 tablespoon of ground flaxseed with 2.5 tablespoons of water. Let it sit for about 5 minutes until it thickens. Use plant-based oil instead of vegetable oil. You can also use almond milk or another plant-based milk instead of regular milk. These muffins will be light and fluffy, just like the classic recipe. You can jazz up your pumpkin spice muffins with extra flavors. Try adding maple syrup for a sweet twist. Just reduce the sugar a little to balance it out. You can also add orange zest for a fresh, bright taste. A teaspoon of orange zest will give the muffins a nice citrus kick. Feel free to get creative! You can mix and match these flavors to find your favorite combination. These variations can make your pumpkin spice muffins even more special. Check out the full recipe to get started! To keep your pumpkin spice muffins fresh, store them in an airtight container. Place a paper towel in the container to absorb moisture. This helps prevent sogginess. Store them at room temperature for up to three days. If you want to keep them longer, consider freezing. Freezing is a great way to save your muffins. Start by letting them cool completely. Then, wrap each muffin in plastic wrap. Place the wrapped muffins in a freezer-safe bag. Label the bag with the date. You can freeze them for up to three months. To enjoy your muffins warm, reheat them in the oven. Preheat your oven to 350°F (175°C). Place the muffins on a baking sheet. Heat for 10 to 15 minutes. You can also use a microwave for quick reheating. Just warm them for 15 to 20 seconds. Enjoy your pumpkin spice muffins fresh! Yes, you can use canned pumpkin. It saves time and gives great flavor. Make sure to choose 100% pure pumpkin, not pumpkin pie filling. This keeps the taste just right. Canned pumpkin is often smoother, which helps in mixing. It also has a longer shelf life. So, if you have a can, use it! For eggs, you can use several substitutes. Common options include: - 1/4 cup unsweetened applesauce - 1/4 cup mashed banana - 1 tablespoon ground flaxseed mixed with 2.5 tablespoons water These options keep your muffins moist and fluffy. They also add a hint of flavor. Choose what fits your taste best! Check your muffins after 18 minutes. Insert a toothpick into the center. If it comes out clean or with a few crumbs, they are done. If the toothpick is wet, bake for 1-2 more minutes. Keep an eye on them to avoid overbaking. Perfect muffins should be soft and lightly golden. Absolutely! To make mini muffins, use a mini muffin tin. Fill each cup about halfway. Bake them for 10-12 minutes. Keep checking with a toothpick until they are done. Mini muffins are great for snacks and sharing. They are just as tasty and fun! For the full recipe, check out the details above. In this post, we explored how to make delicious pumpkin spice muffins. I covered the essential and optional ingredients, along with measuring them for great results. The step-by-step instructions guide you through prepping, mixing, and baking. I also shared tips for light muffins and ways to store them well. Finally, I offered tasty variations like gluten-free and vegan options. Now you’re ready to enjoy these warm, flavorful treats any time! Your perfect pumpkin spice muffin awaits.](https://dishtreats.com/wp-content/uploads/2025/06/e45c4b1d-a4d2-42b5-b442-a33a757785ba-768x768.webp)
