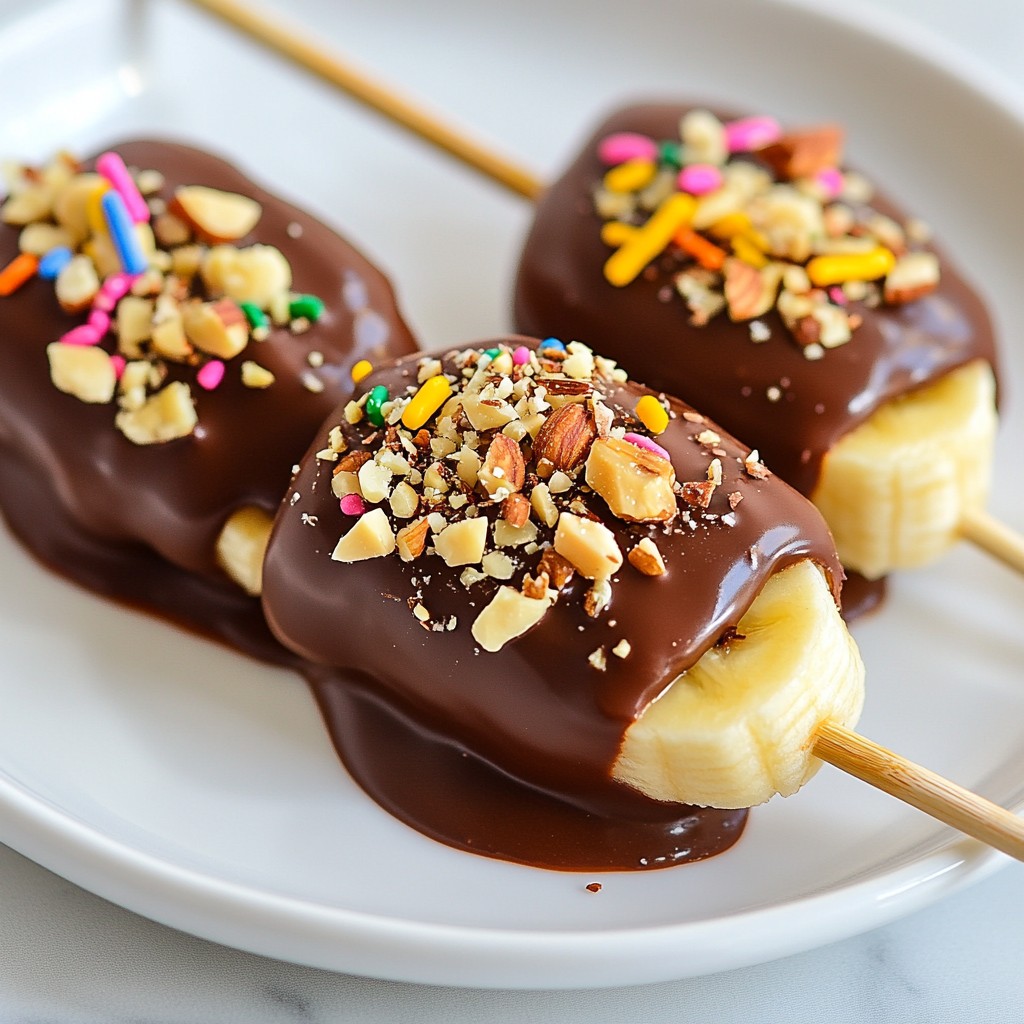
If you're looking for a fun and tasty treat, you've come to the right place! Chocolate covered banana pops are simple to make and perfect for all ages. With just a few ripe bananas and dark chocolate, you can create a delicious snack that pleases everyone. Follow my step-by-step guide and impress your friends and family with this delightful dessert. Let's dive into this sweet adventure together!
Why I Love This Recipe
- Healthy Twist: These banana pops are a guilt-free treat, combining the sweetness of ripe bananas with rich chocolate.
- Customizable: You can easily switch up the toppings to suit your taste, whether you prefer nuts, sprinkles, or coconut flakes.
- Fun for All Ages: Perfect for kids and adults alike, these pops make for a fun dessert or snack that everyone will enjoy.
- Easy to Make: With just a few simple steps, you can whip up these delightful treats in no time, making them ideal for any occasion.
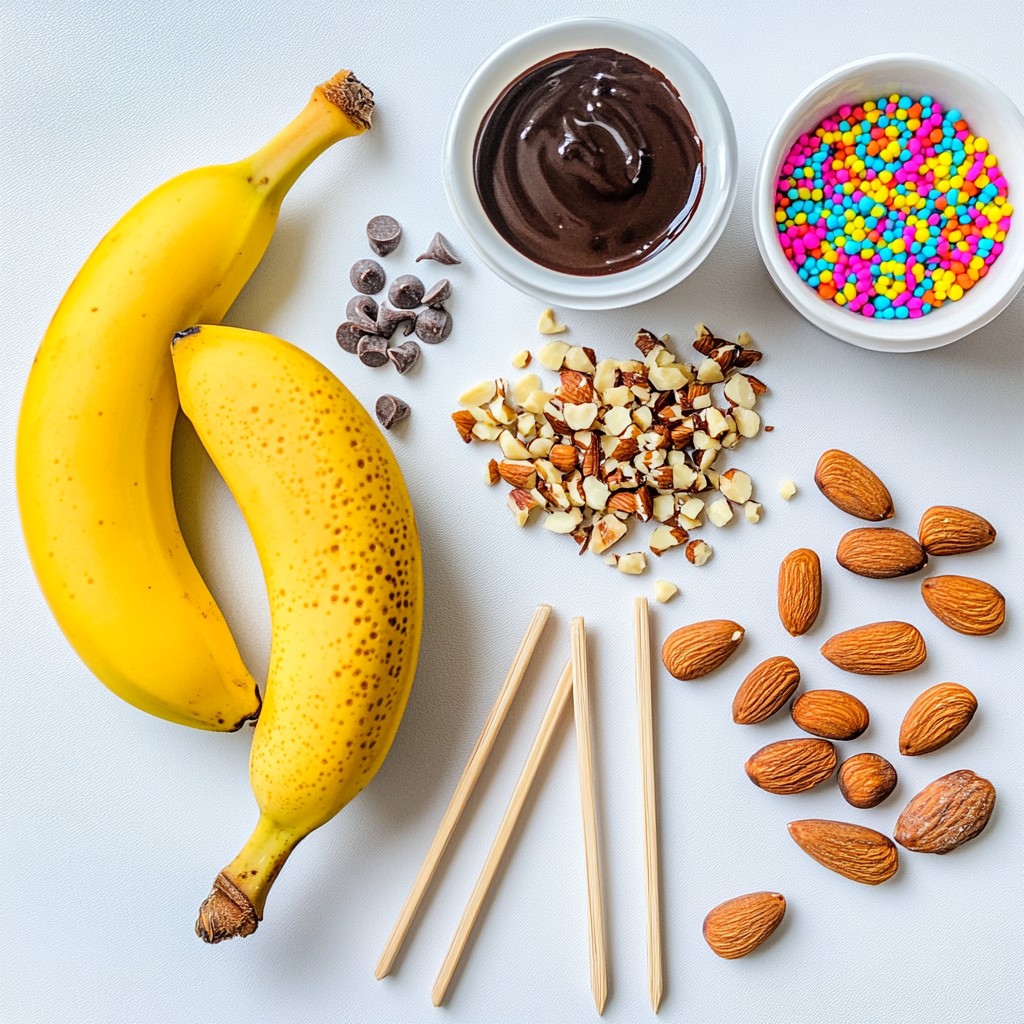
Ingredients
List of Main Ingredients
- 2 ripe bananas
- 1 cup dark chocolate chips
- 1 tablespoon coconut oil (optional)
Toppings and Add-ons
- 1/2 cup crushed nuts (almonds, walnuts, peanuts)
- 1/4 cup colorful sprinkles (optional)
Equipment Needed
- Lollipop sticks or wooden skewers
- Microwave-safe bowl
- Baking sheet and parchment paper
When making chocolate covered banana pops, you need simple ingredients. Ripe bananas work best because they are sweet and soft. Dark chocolate chips melt nicely and give a rich taste. You can add coconut oil to make the chocolate smoother, but it’s not a must.
For toppings, crushed nuts add crunch and flavor. You can choose almonds, walnuts, or peanuts. Colorful sprinkles bring extra fun and joy to your treats. They are great for kids or parties.
You will also need a few tools. Lollipop sticks or wooden skewers help you hold the banana pops. A microwave-safe bowl is key for melting the chocolate. Lastly, a baking sheet lined with parchment paper makes cleanup easy and keeps the pops from sticking.
Gather these ingredients and tools to create a fun and delicious snack!
Step-by-Step Instructions
Preparing the Bananas
Start by peeling each banana. Then, slice them into thirds. Each banana gives you three fun pieces. Take a lollipop stick and insert it into the cut end of each banana piece. Make sure the stick goes in deep enough to hold the banana well.
Freezing the Bananas
Now, grab a baking sheet and line it with parchment paper. Arrange the banana pops on the sheet, leaving space between each one. This step is key! Place the baking sheet in the freezer for about 1 hour. You want them firm and nice to touch.
Melting the Chocolate
In a microwave-safe bowl, combine the dark chocolate chips with coconut oil, if you’re using it. The oil helps the chocolate melt smoothly. Microwave the mix in 30-second bursts. Stir well after each round. Keep going until the chocolate is melted and silky.
Coating the Bananas
Take the banana pops from the freezer. Dip each pop into the melted chocolate. Make sure to coat them fully. After dipping, gently shake off any extra chocolate. This helps to get an even layer on each pop.
Adding Toppings
While the chocolate is still wet, you can get creative! Roll each pop in crushed nuts or sprinkle colorful sprinkles over the chocolate. Do this quickly so the toppings stick well before the chocolate sets.
Final Chill and Serving
Return the banana pops back to the baking sheet. Place them in the refrigerator for about 30 minutes. This helps the chocolate harden fully. Once set, your chocolate-covered banana pops are ready! Enjoy them as a tasty treat. Store any extras in an airtight container in the freezer for later.
Tips & Tricks
Choosing the Right Chocolate
When making chocolate-covered banana pops, you can choose between dark and milk chocolate. Dark chocolate has a rich flavor and offers health benefits, like antioxidants. Milk chocolate is sweeter and loved by kids. For a vegan option, use dairy-free chocolate chips. These still melt well and taste great.
Achieving the Perfect Chocolate Coat
To coat your banana pops without clumps, make sure your chocolate is smooth. Adding a tablespoon of coconut oil can help. Melt the chocolate in short bursts in the microwave. Stir it well after each burst. This keeps the chocolate from burning and helps it melt evenly.
Best Practices for Freezing
To keep your bananas from browning, freeze them right after you cut and stick them. Use parchment paper on your baking sheet. This makes it easy to lift the pops off later. Store the banana pops in an airtight container in the freezer. This keeps them fresh and tasty for days.
Pro Tips
- Choose the Right Bananas: Make sure your bananas are ripe but not overly soft. This ensures they hold their shape when frozen and dipped in chocolate.
- Experiment with Chocolate: Feel free to mix different types of chocolate or add flavor extracts like vanilla or almond to the melting chocolate for a unique taste.
- Customize Your Toppings: Get creative with toppings! Try adding shredded coconut, mini chocolate chips, or even crushed cereal for added texture and flavor.
- Storage Tips: Store any leftover banana pops in an airtight container in the freezer. They make a great snack on hot days!
Variations
Flavor Variations
You can make chocolate-covered banana pops even better with extra flavor. Try adding a splash of vanilla extract or a pinch of sea salt to your melted chocolate. This small change can make a big difference in taste. You can also explore using different fruits. Strawberries work great, and so do pineapple chunks. Each fruit brings a new twist to your treats.
Alternative Toppings
Toppings can add fun and crunch. You can use a mix of crushed nuts like almonds, walnuts, or peanuts. Each nut gives a unique flavor and texture. If you want something sweeter, try mini chocolate chips or shredded coconut. These toppings make your pops more exciting. You can also experiment with colorful sprinkles for a festive look.
Seasonal and Themed Pops
Make your banana pops fit any occasion! For Halloween, dip them in orange chocolate and add spooky eyes. For Valentine's Day, use pink chocolate and heart-shaped sprinkles. You can also customize them for parties. Use team colors or favorite themes. These fun ideas make your treats special and memorable for everyone.
Storage Info
Proper Storage Techniques
To keep your chocolate-covered banana pops fresh, use an airtight container. This prevents freezer burn and protects the pops from other smells in the freezer. Place parchment paper between layers if stacking them. It helps keep the pops from sticking together. For long-term storage, wrap each pop in plastic wrap before placing them in the container.
How Long Do They Last?
Chocolate-covered banana pops can last about 1 to 2 months in the freezer. For the best taste and texture, enjoy them within the first month. After this time, the bananas may start to lose their flavor. Signs of spoilage include discoloration or an off smell. If you see these signs, it's best to toss them.
Reheating Tips
You don't need to reheat these pops. They are frozen treats that taste best cold. If they seem too hard, let them sit at room temperature for a few minutes before serving. For a fun twist, serve them with a drizzle of warm chocolate sauce right before eating. This adds a nice touch and makes them even more delightful!
FAQs
Can I use other fruits for this recipe?
Yes, you can use other fruits! Strawberries taste great dipped in chocolate. Pineapples add a tropical twist. Apples and pears work well too. Just cut them into bite-sized pieces and insert sticks. Make sure each piece is sturdy enough to hold the stick. This way, they will be easy to dip and eat.
Is it possible to make these vegan?
Absolutely! To make these vegan, use dairy-free chocolate chips. Many brands offer great options. You can skip the coconut oil if you want. If you like crunch, try nuts like almonds or walnuts. You can also use seeds such as pumpkin seeds. For toppings, look for vegan sprinkles or coconut flakes.
Can I make these in advance?
Yes, you can prep these ahead of time. Make the banana pops and freeze them. They stay fresh for several days. Just wrap them in plastic wrap or place them in an airtight container. When you are ready to enjoy, dip them in chocolate and add toppings. This will keep them fresh and tasty.
How do I keep the chocolate from cracking?
To prevent cracks, let the chocolate cool slightly before dipping. A smooth, even coat helps too. Make sure the banana pops are cold when you dip them. After dipping, chill them again in the fridge. This helps the chocolate set well. If you follow these tips, your pops will look great and taste even better!
Making chocolate-covered banana pops is simple and fun. We covered the main ingredients, including ripe bananas and dark chocolate chips. You learned how to prepare, freeze, coat, and add toppings to your pops. I shared tips on achieving the perfect chocolate coat and explored various flavor and topping options. Remember to store your treats properly for the best taste. Enjoy creating your tasty treats, and feel free to get creative with flavors and themes. Happy popping!