Chimichurri Chicken Thighs Flavorful and Easy Recipe

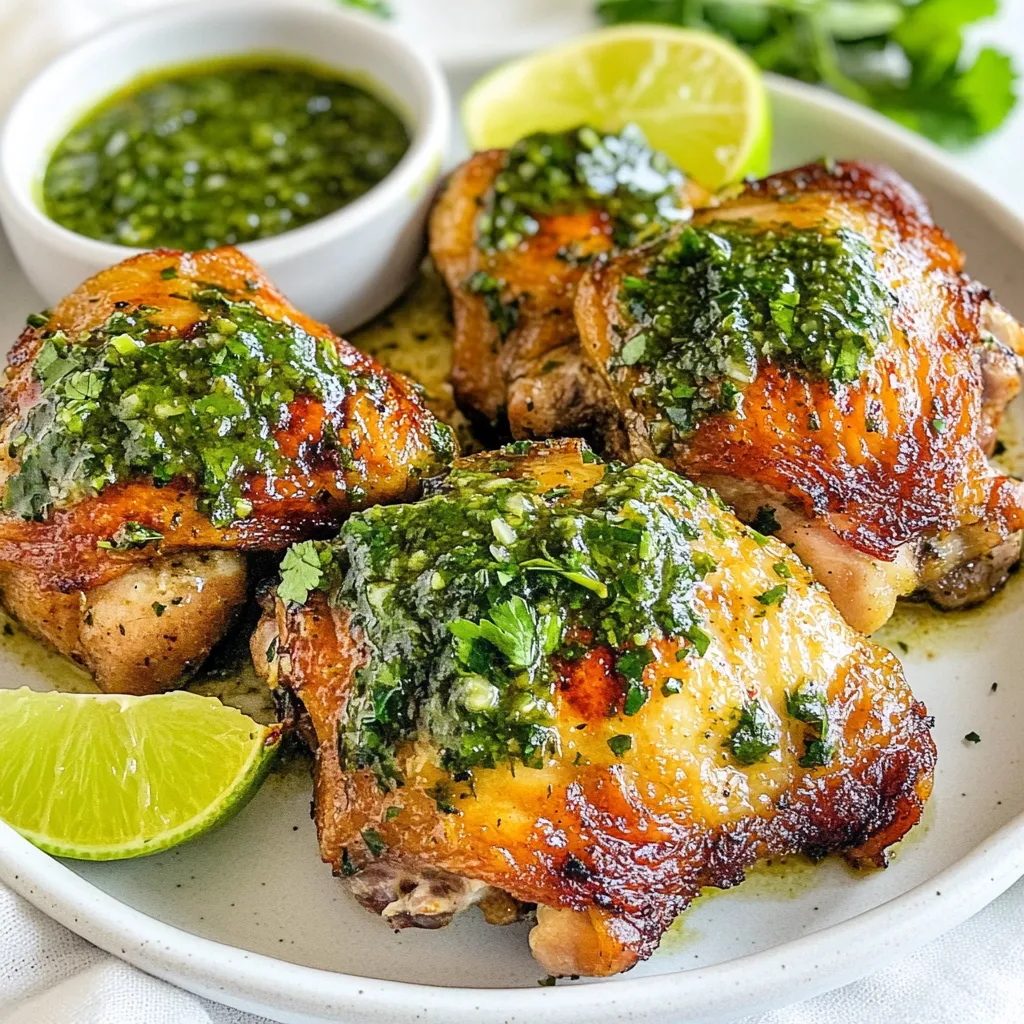
Looking for a delicious and easy chicken recipe? You’re in the right spot! My Chimichurri Chicken Thighs are packed with flavor and perfect for any meal. This dish combines juicy chicken thighs with a fresh, zesty chimichurri sauce that will impress your family and friends. Stick around, and I’ll walk you through every step, from crafting the perfect sauce to cooking methods. Let’s dive into this tasty adventure!
Why I Love This Recipe
- Fresh and Flavorful: This recipe brings together vibrant herbs and spices that create a refreshing and zesty chimichurri, enhancing the chicken’s natural flavor.
- Easy to Prepare: With simple ingredients and straightforward steps, this dish is perfect for both beginner and experienced cooks.
- Versatile Cooking Methods: Whether you choose to roast it in the oven or grill it outdoors, the chicken turns out deliciously juicy and tender every time.
- Impressive Presentation: This dish not only tastes amazing but also looks stunning on the table, making it ideal for family gatherings or special occasions.
Ingredients
List of Ingredients Required
To make chimichurri chicken thighs, you need the following ingredients:
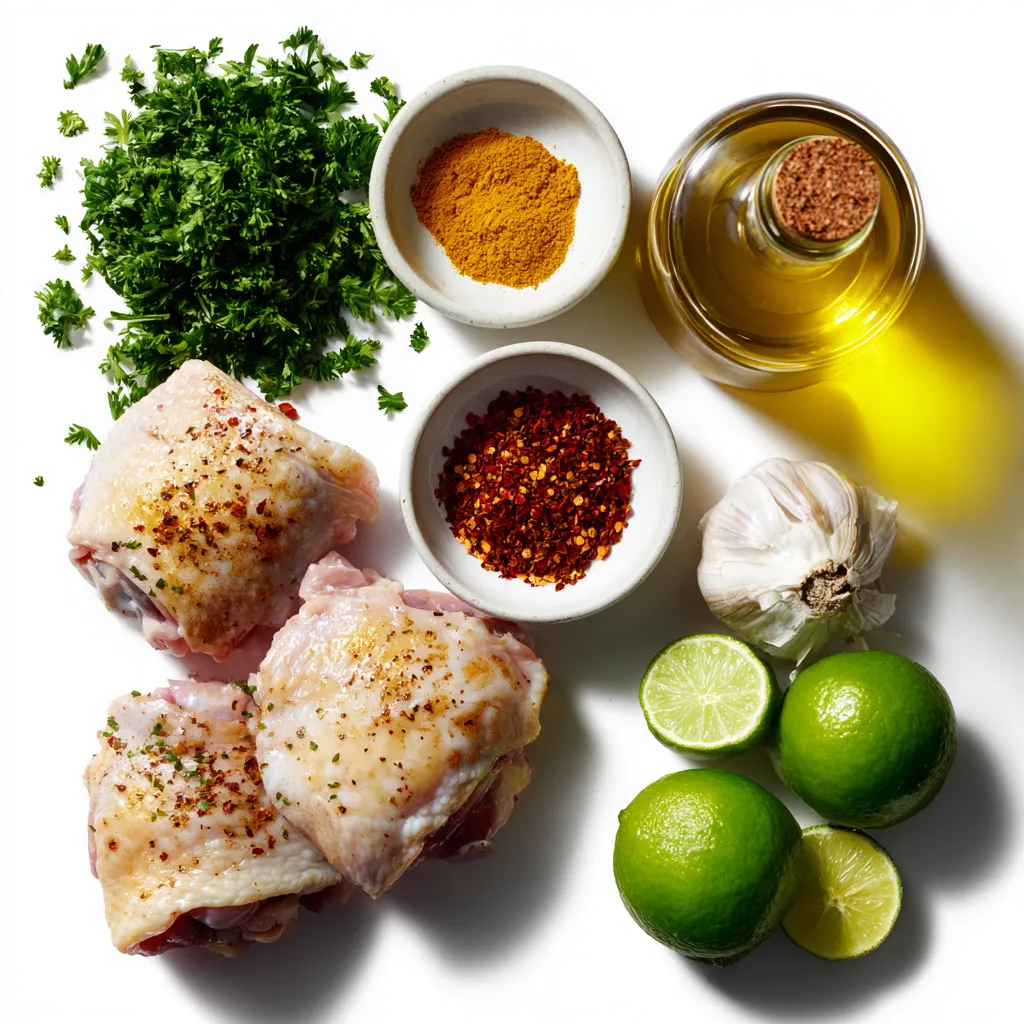
- 4 bone-in, skin-on chicken thighs
- 1 cup fresh parsley, meticulously chopped
- ½ cup fresh cilantro, finely chopped
- 4 cloves of garlic, minced finely
- 1 teaspoon red pepper flakes (adjust for spice preference)
- ½ teaspoon smoked paprika
- ½ teaspoon salt (or to taste)
- ½ teaspoon black pepper (or to taste)
- ½ cup extra virgin olive oil
- 2 tablespoons red wine vinegar (or substitute with lemon juice for a non-alcoholic version)
- 1 lime, juiced
Optional Ingredient Substitutions
You can swap ingredients based on your taste. Try these options:
- Use fresh basil instead of parsley for a different flavor.
- Replace cilantro with mint for a fresh twist.
- Lemon juice can replace red wine vinegar for a brighter taste.
- Adjust red pepper flakes to control heat.
- For a smoky taste, use chipotle powder instead of smoked paprika.
Recommended Quality of Ingredients
When cooking, quality matters. Here’s what to look for:
- Choose fresh herbs. Look for vibrant colors and strong scents.
- Use high-quality extra virgin olive oil. It enhances flavor and adds richness.
- Select chicken thighs with firm skin and no discoloration.
- Fresh garlic adds zest. Avoid garlic that is dried out or sprouted.
- If possible, use organic ingredients. This choice supports better taste and health.

Step-by-Step Instructions
Crafting the Chimichurri Sauce
Start by gathering your ingredients. You need fresh parsley, cilantro, garlic, red pepper flakes, smoked paprika, salt, and black pepper. Chop the parsley and cilantro finely. Mince the garlic well. In a bowl, combine these dry ingredients. Mix them thoroughly to blend the flavors. Next, add the olive oil and red wine vinegar. You can use lemon juice instead if you prefer. Finally, squeeze in the fresh lime juice. Whisk everything together until it turns into a vibrant sauce. This chimichurri will add bright flavors to your chicken.
Marinating the Chicken Thighs
Take your chicken thighs and put them in a large zip-top bag or a shallow dish. Pour half of the chimichurri sauce over the chicken. Make sure each piece is coated evenly. Seal the bag tightly or cover the dish with plastic wrap. Place it in the fridge and let it marinate. The chicken should sit for at least 1 hour. If you have time, marinate it for up to 4 hours. This step makes the chicken flavorful and juicy.
Cooking Methods (Oven vs. Grill)
When ready to cook, preheat your oven to 425°F (220°C). If grilling, heat the grill to medium-high. For oven cooking, line a baking sheet with parchment paper. Take the marinated chicken out of the fridge. Place the thighs on the sheet or grill. Bake for 30-35 minutes or until the skin is crispy and the internal temperature reaches 165°F (75°C). For grilling, cook about 6-8 minutes per side. Keep an eye on it to ensure even cooking.
Basting Techniques for Flavor
In the last 5 minutes of cooking, take the remaining chimichurri sauce. Use a brush to apply it over the chicken thighs. This adds extra flavor and moisture. Basting helps keep the chicken juicy and enhances the overall taste. After cooking, let the chicken rest for 5 minutes before serving. This allows the juices to settle and makes each bite tender and tasty. Enjoy your flavorful chimichurri chicken thighs!
Tips & Tricks
Best Marination Practices for Maximum Flavor
To get the best flavor from your chimichurri chicken thighs, marination is key. First, always use fresh herbs for the chimichurri sauce. Fresh parsley and cilantro add a punch. I recommend marinating the chicken for at least one hour. For a bolder taste, let it sit for up to four hours. Make sure to coat all parts of the chicken well with the sauce. This helps the flavors seep in deeply.
Cooking Time Adjustments for Different Ovens/Grills
Cooking times can change based on your oven or grill type. For a conventional oven set at 425°F, plan for 30 to 35 minutes. If you use a convection oven, check the chicken at 25 minutes. For grilling, the thighs need about 6 to 8 minutes per side. Always check the internal temperature. It should reach 165°F for safe eating.
How to Achieve Crispy Skin
Crispy skin makes any chicken dish special. To achieve this, start with skin-on chicken thighs. Pat the skin dry with paper towels before marinating. A dry surface helps it crisp up better. When cooking, place the thighs skin-side up. If grilling, avoid moving them around too much. Let them sear to form a nice crust. Lastly, baste with chimichurri sauce in the last 5 minutes to keep it moist and flavorful.
Pro Tips
- Quality Ingredients: Using fresh, high-quality herbs and spices will significantly enhance the flavor of your chimichurri sauce, making your chicken thighs even more delicious.
- Marinating Time: For the best flavor, allow the chicken to marinate for at least 4 hours, or even overnight if possible. This gives the meat time to absorb all the flavors of the chimichurri.
- Grill Marks: If grilling, ensure your grill is hot enough before placing the chicken on it. This helps achieve beautiful grill marks and prevents sticking.
- Resting Time: Always let the chicken rest for a few minutes after cooking. This allows the juices to redistribute, making the chicken more tender and juicy when served.

Variations
Alternative Proteins for Chimichurri Sauce
Chimichurri sauce is not just for chicken. You can use it with many proteins. Try it with steak, pork, or fish. Shrimp also works well with this sauce. Each protein absorbs the flavors in its own way, making it a versatile choice. You can even use tofu or tempeh for a plant-based option. Just remember to marinate them like you would the chicken.
Creative Uses for Leftover Chimichurri Sauce
If you have leftover chimichurri sauce, don’t throw it away! Use it in many ways. It makes a great salad dressing. Just mix it with some greens for a fresh taste. You can also drizzle it on roasted vegetables. It adds a zingy touch. Another idea is to use it as a sandwich spread. It gives your meals an extra kick. Pair it with grilled meats or even as a dip for bread.
Different Spice Levels: Adjusting Heat
You can easily change the spice level of your chimichurri sauce. If you like it mild, use fewer red pepper flakes. For a bolder flavor, add more flakes or even some fresh chili. You can also try adding jalapeños for a fresh heat. Adjust the spice to fit your taste. Remember, everyone has a different preference, so make it your own!
Storage Info
Proper Ways to Store Leftover Chicken
To keep your leftover chimichurri chicken thighs fresh, store them in an airtight container. Place the chicken in the fridge. Use it within three days for the best taste. If you want to keep it longer, freezing is a great option.
Freezing Chimichurri Sauce
Chimichurri sauce can freeze well too! Pour it into an ice cube tray. Once frozen, pop the cubes into a zip-top bag. You can use them later by thawing the amount you need. This method keeps the sauce fresh for up to three months.
Reheating Tips for Best Flavor
When you reheat the chicken, do it gently. Use the oven or microwave. If you use the oven, set it to 350°F (175°C). Heat until warm, about 15-20 minutes. In the microwave, cover the chicken and heat in short bursts. This keeps it juicy! If you have extra chimichurri, drizzle some on top for added flavor.
FAQs
How Long Should I Marinate the Chicken?
You should marinate the chicken for at least 1 hour. This helps the flavors soak in deeply. If you have time, let it marinate for up to 4 hours. This gives the chicken a bold and tasty flavor. Just remember to keep it in the fridge while marinating.
Can I Use Boneless Chicken Thighs?
Yes, you can use boneless chicken thighs. They cook faster than bone-in thighs. Adjust the cooking time to about 20-25 minutes. Check the internal temperature to ensure it reaches 165°F (75°C). Boneless thighs still soak up the chimichurri flavor well.
What to Serve with Chimichurri Chicken Thighs?
Chimichurri chicken thighs pair well with many sides. Here are some great options:
- Roasted vegetables
- Rice or quinoa
- A fresh salad
- Grilled corn on the cob
These sides balance the chicken’s rich flavor and add color to your meal.
How to Tell if Chicken is Fully Cooked?
To check if chicken is fully cooked, use a meat thermometer. Insert it into the thickest part of the thigh. It should read 165°F (75°C). If you don’t have a thermometer, cut into the chicken. The juices should run clear, not pink. Always be safe to ensure your meal is delicious and safe to eat.
This blog post showed you how to make delicious chimichurri chicken thighs. We covered key ingredients, cooking methods, and tips for maximum flavor. Remember, marinate your chicken well and choose the right cooking method for your grill or oven. You can get creative with ingredient swaps and spice levels too. Lastly, store your leftovers properly for the best taste. With this guide, you can enjoy tasty meals every time. Happy cookin

Chimichurri Chicken Thighs
Ingredients
- 4 pieces bone-in, skin-on chicken thighs
- 1 cup fresh parsley, meticulously chopped
- 0.5 cup fresh cilantro, finely chopped
- 4 cloves garlic, minced finely
- 1 teaspoon red pepper flakes
- 0.5 teaspoon smoked paprika
- 0.5 teaspoon salt
- 0.5 teaspoon black pepper
- 0.5 cup extra virgin olive oil
- 2 tablespoons red wine vinegar
- 1 piece lime, juiced
Instructions
- Craft the Chimichurri Sauce: In a medium mixing bowl, combine the finely chopped parsley, cilantro, minced garlic, red pepper flakes, smoked paprika, salt, and black pepper. Stir all the ingredients together until well-mixed.
- Incorporate the Liquids: Gradually add the olive oil and red wine vinegar into the bowl. Squeeze in the fresh lime juice. Whisk the mixture continuously until all components are fully integrated and a vibrant sauce forms.
- Marinate the Chicken: Place the chicken thighs in a large zip-top plastic bag or a shallow dish. Pour half of the prepared chimichurri sauce over the chicken pieces, making sure they are evenly coated. Seal the bag or cover the dish with plastic wrap, and let marinate in the refrigerator for at least 1 hour (and up to 4 hours for a bolder flavor).
- Preheat for Cooking: When you’re ready to cook, preheat your oven to 425°F (220°C). If you prefer grilling, start preheating the grill to a medium-high heat.
- Cook the Chicken: Remove the marinated chicken from the refrigerator. Place the thighs on a baking sheet lined with parchment paper, or directly on the grill. Roast in the oven for 30-35 minutes until the skin crisps up and the internal temperature reaches 165°F (75°C). On the grill, cook the chicken for about 6-8 minutes per side, watching closely for even cooking.
- Baste for Extra Flavor: In the last 5 minutes of cooking, use a brush to apply the remaining chimichurri sauce over the chicken thighs, enhancing the flavor profile and moisture.
- Rest & Present: Once fully cooked, allow the chicken to rest for about 5 minutes before serving to let the juices redistribute. Drizzle with additional chimichurri sauce if desired for an extra flavor burst.


![- 1 cup green or brown lentils - 1 tablespoon olive oil - 1 medium onion, finely chopped - 2 cloves garlic, minced - 2 medium carrots, diced into bite-size pieces - 2 stalks celery, diced - 1 red bell pepper, diced - Ground cumin - Smoked paprika - Turmeric - Salt - Black pepper - 6 cups vegetable broth (preferably low-sodium) - 1 (14-ounce) can diced tomatoes, including their juices - 2 tablespoons fresh lemon juice In this vegan lentil soup, I love using green or brown lentils. They add a hearty feel. The olive oil helps to sauté the veggies, making them soft and full of flavor. The mix of vegetables is key. You need an onion for sweetness. Garlic adds a nice kick. Carrots and celery give texture. The red bell pepper adds color and sweetness. For spices, I use ground cumin and smoked paprika. They bring warmth and depth. A bit of turmeric adds a lovely golden hue. Salt and black pepper round out the flavors. Liquid ingredients are vital too. I use vegetable broth for a rich base. Diced tomatoes add acidity and sweetness. Lastly, fresh lemon juice brightens the dish. You can find the full recipe above for all the details! - Rinse the lentils and chop the vegetables. - Heat olive oil and sauté onion and garlic. Start by rinsing one cup of green or brown lentils under cold water. This helps remove any dirt or debris. While the lentils drain, chop your vegetables. You will need one medium onion, two cloves of garlic, two medium carrots, two stalks of celery, and one red bell pepper. Next, in a large pot, heat one tablespoon of olive oil over medium heat. Add the chopped onion and cook for about five minutes. Stir until it becomes soft and clear. Then, add the minced garlic. Cook for one more minute to release its wonderful aroma. - Incorporate remaining vegetables and spices. - Add lentils, broth, and tomatoes, bring to a boil. Now, add the diced carrots, celery, and red bell pepper to the pot. Cook for another five to seven minutes. Stir often until the vegetables become tender. To build flavor, sprinkle in one teaspoon of ground cumin, one teaspoon of smoked paprika, and half a teaspoon of turmeric. Mix well and cook for one more minute. After the spices bloom, add the rinsed lentils, six cups of vegetable broth, and one can of diced tomatoes with their juices. Increase the heat and bring this mixture to a boil. Once it boils, reduce the heat and cover the pot. Let it simmer for 25 to 30 minutes, or until the lentils are soft but not mushy. - Simmer and add kale. - Season and serve. Once the lentils are cooked, stir in two cups of chopped kale. Let it simmer for an additional five to seven minutes. The kale should turn bright green and wilted. Now, season your soup with salt, freshly ground black pepper, and two tablespoons of fresh lemon juice. The lemon juice adds a nice zing. Taste it and adjust the seasoning as needed. Serve the soup hot, garnished with fresh parsley for a hint of color and flavor. For a full recipe, please see the [Full Recipe]. Enjoy your warm and nourishing vegan lentil soup! To boost the taste of your vegan lentil soup, consider these tips: - Add spices: Try bay leaf for depth or chili flakes for heat. - Sauté longer: Cook your vegetables a bit more. This gives a richer, deeper flavor. This soup shines when paired with the right sides. Here are my favorite ways: - Bread: Serve it with homemade bread for a warm, cozy meal. - Garnishes: Top it with nutritional yeast for a cheesy flavor or creamy avocado for richness. Lentils are packed with nutrients. Here’s why they are great: - Nutritional benefits: They provide protein, fiber, and iron, making them a healthy choice. - Leafy greens: Adding kale boosts vitamins and minerals. It also adds color and texture. For the full experience, check out the Full Recipe. These tips will help you create a dish that's not just tasty but also nourishing! {{image_4}} You can switch lentils for other beans or pulses. Black beans or chickpeas work well. Each bean adds a unique taste and texture to the soup. You can also use seasonal vegetables. Try zucchini in summer or butternut squash in fall. These swaps keep your soup fresh and exciting. To make your soup creamier, add coconut milk. It gives a rich texture and a hint of sweetness. You can also use fresh herbs like basil or cilantro. They add bright flavors and an herbal kick. A sprinkle of fresh herbs before serving makes a big difference. If you want a faster option, try an Instant Pot. Cook the soup on high pressure for about 15 minutes. You can also use a slow cooker. Simply set it on low for 6-8 hours. For a creamy version, use a blender. Blend half the soup and mix it back in. This makes the soup thick and smooth. Explore the [Full Recipe] for more ideas on making this soup your own! After enjoying your vegan lentil soup, you can store leftovers easily. Let the soup cool down first. Then, transfer it to airtight containers. Glass or plastic containers work well for this. Store it in the fridge for up to five days. For longer storage, freeze the soup. Use freezer-safe containers or bags to prevent freezer burn. The soup can last up to three months in the freezer. When it’s time to enjoy the soup again, reheat it gently. You can use a pot on the stove or a microwave. If using a pot, heat it over medium-low until warm. Stir occasionally to prevent sticking. In the microwave, use a microwave-safe bowl. Heat in short bursts, stirring in between. This helps heat evenly. Avoid overcooking, as the lentils may become mushy. Preparing for future meals is smart and easy with this soup. Chop your vegetables ahead of time, like onion, garlic, and carrots. Store them in the fridge for quick use. You can also rinse your lentils in advance and keep them in a container. Making larger batches is a great idea too. This way, you always have a warm, nourishing meal ready. Just follow the full recipe and freeze extra portions for busy days. Green and brown lentils are great for soup. They hold their shape well. Green lentils have a slightly peppery taste. Brown lentils are milder and cook faster. Both work well in this vegan lentil soup. Yes, you can adapt this recipe. If you prefer meat, try adding cooked chicken or sausage. For dairy, a splash of cream or some cheese can add richness. Just remember, this makes it less vegan. To thicken your soup, you have a few options. You can mash some lentils against the pot. Adding a spoonful of tomato paste also helps. If you want a creamier feel, blend a portion of the soup. These techniques will help you achieve the perfect consistency. For more details, check the full recipe. This blog post covers the key aspects of making a hearty lentil soup. We discussed the essential ingredients, including lentils, vegetables, and spices. I shared step-by-step instructions for preparing and cooking the soup. We explored tips for enhancing flavors and serving suggestions. You can create variations with different ingredients and learn best practices for storing and reheating leftovers. Lentil soup is a healthy, versatile meal that is easy to make. Enjoy experimenting with your own flavors and keep discovering new ways to make it.](https://dishtreats.com/wp-content/uploads/2025/06/c46bc7f1-46e5-4579-b786-1848127316df-768x768.webp)


![- 1 lb boneless, skinless chicken thighs, diced into bite-sized pieces - 1 tablespoon olive oil - 1 teaspoon chili powder - 1 teaspoon ground cumin - 1 teaspoon smoked paprika - Salt and pepper, to taste - 1 cup brown rice (or 1 cup cauliflower rice) - 2 cups chicken broth (or vegetable broth) - 1 can black beans, drained and rinsed - 1 cup corn kernels - Juice of 1 lime - 1 ripe avocado, diced - 1 cup cherry tomatoes, halved - 1 cup shredded cheese (such as cheddar) - ½ cup sour cream (or Greek yogurt) - Fresh cilantro, chopped - Sliced jalapeños (optional) - Large skillet - Medium-sized pot - Cooking utensils (spoon, spatula) - Measuring cups and spoons - Serving bowls These ingredients come together to create a tasty meal. The chicken thighs give great flavor. You can use brown rice for a healthy base or cauliflower rice for a low-carb choice. Black beans and corn add fiber and sweetness. For toppings, fresh veggies like avocado and tomatoes brighten the dish. Cheese and sour cream bring richness. You will love how customizable these bowls are! The kitchen tools are simple, making this fun and easy to prepare. Check out the Full Recipe for all the delicious details! To make brown rice, start with a medium pot. Bring chicken broth to a boil. Once boiling, add the rice. Lower the heat, cover, and let it simmer for 30-35 minutes. This method ensures the rice becomes fluffy and tender. If you prefer a low-carb option, use cauliflower rice. Heat a skillet with a splash of water. Sauté the cauliflower rice for 5 minutes until it’s tender. This quick cook keeps it fresh and light. For the chicken, heat olive oil in a large skillet over medium heat. Add diced chicken thighs once the oil is hot. Season the chicken with chili powder, cumin, smoked paprika, salt, and pepper. Cook for 8-10 minutes, stirring often. This helps the chicken cook evenly and become golden brown. The spices create a warm flavor that elevates the dish. After the chicken is cooked, add the rinsed black beans and corn to the skillet. Mix everything well and cook for another 3-4 minutes. This step ensures all ingredients are heated through and flavors blend nicely. Stir gently to keep the chicken tender. Once done, you can move on to building your loaded chicken burrito bowls. Enjoy creating a meal that looks as good as it tastes! Achieving the Perfect Texture To get juicy chicken, use boneless, skinless thighs. They stay moist and tender. Cut them into bite-sized pieces for even cooking. Heat a skillet over medium heat before adding the chicken. This helps lock in the juices and gives a nice sear. Preventing Dry Chicken Don’t overcook the chicken. Cook it until it's no longer pink, about 8-10 minutes. Keep stirring to avoid burning. If you find your chicken is dry, try adding a splash of broth or water. This will help rehydrate the meat. Suggested Toppings You can personalize your burrito bowls with fun toppings. Try adding diced avocados, cherry tomatoes, or shredded cheese. Fresh herbs like cilantro add a burst of flavor. For a kick, use sliced jalapeños or a drizzle of hot sauce. Dietary Modifications Make your burrito bowls fit your diet. If you're vegetarian, swap chicken for black beans or grilled veggies. For a low-carb option, use cauliflower rice instead of brown rice. You can also replace sour cream with Greek yogurt for a healthier choice. Spice Variations Want to spice things up? Add cayenne pepper or crushed red pepper flakes to the chicken. You can also try different spices like oregano or taco seasoning to change the flavor profile. Marinades for Chicken A good marinade can add great taste. Use lime juice, garlic, and cumin for a zesty kick. Marinate the chicken for at least 30 minutes before cooking. This will infuse the chicken with flavor and keep it tender. For the full recipe, check out the section above. {{image_4}} You can easily swap out the chicken. Use firm tofu or tempeh instead. These alternatives add great texture and protein. For a heartier option, try chickpeas or lentils. Both are tasty and filling. If you want a low-carb option, use cauliflower rice. It has fewer carbs and packs in nutrients. Cauliflower rice has a mild taste and absorbs flavors well. You can also add more veggies, like zucchini or bell peppers, for added crunch. You can adjust the spice level for your taste. For a spicy kick, add more chili powder or diced jalapeños. If you prefer mild flavors, skip the spicy ingredients. You can also play with international flavors. Try adding curry powder for an Indian twist or chipotle for a smoky flavor. Explore these variations to make the loaded chicken burrito bowls your own! For the complete recipe, check the [Full Recipe]. To keep your loaded chicken burrito bowls fresh, follow these tips: - Let the bowls cool down before storing. - Use airtight containers for storage. - Separate the toppings from the base for best flavor. For refrigeration: - Store leftovers in the fridge. - They last for up to 3 days. For freezing: - Portion out the chicken and rice mixture. - Use freezer-safe bags or containers. - They can last for up to 3 months. To reheat, you want to keep the flavors fresh. Here are some methods: - Use a microwave for quick heating. - Heat on medium for 2-3 minutes. - Stir halfway through to heat evenly. You can also use a skillet: - Warm it on medium heat. - Add a splash of broth for moisture. - Heat for about 5-7 minutes. Each component has its own shelf life: - Cooked chicken lasts 3 days in the fridge. - Cooked rice stays good for 4 days. - Black beans last up to 5 days. Watch for spoilage signs: - Look for any strange smells. - Check for mold or discoloration. - If it looks or smells off, throw it out. For more details, refer to the Full Recipe for loaded chicken burrito bowls. Yes, you can use different rice types. Here are some great substitutes for brown rice: - White rice: Cooks faster and has a different texture. - Quinoa: Adds protein and a nutty flavor. - Jasmine rice: Offers a fragrant touch to your bowls. - Cauliflower rice: A low-carb option that is light and healthy. If you crave heat, here are some tips to spice up your dish: - Add diced jalapeños to the chicken when cooking. - Use a spicy salsa or hot sauce as a topping. - Sprinkle crushed red pepper flakes into the chicken mix. - Swap chili powder for a hotter variety, like cayenne. If you need alternatives for sour cream, consider these options: - Greek yogurt: Creamy and packed with protein. - Cottage cheese: A lighter option that adds creaminess. - Avocado: Mash it for a rich and creamy topping. - Hummus: Adds flavor and creaminess with a unique twist. Yes, you can prep this dish in advance. Here’s how: - Cook the rice and chicken ahead of time. Store them separately in the fridge. - Prepare toppings like diced avocado and cheese. Keep them fresh in airtight containers. - Assemble the bowls just before serving for the best flavors and textures. - Reheat the chicken and rice gently to avoid drying them out. This article covered how to make delicious loaded chicken burrito bowls. We explored main ingredients, toppings, and kitchen tools needed. I shared step-by-step cooking tips for rice and chicken, followed by customization options to suit your taste. Storage info ensures you keep your leftovers fresh and safe. In closing, this dish is versatile and easy to make. Remember, you can adapt it to fit any diet. Enjoy creating your perfect burrito bowl!](https://dishtreats.com/wp-content/uploads/2025/06/cee601c9-6b34-4063-8b37-4b14688d7edb-768x768.webp)

![To make this dish, you need some key items. Gather the following ingredients: - 3 cups cooked rotini pasta - 2 cups cooked chicken, shredded - 1 cup fresh mushrooms, sliced (white or cremini) - 2 cups heavy cream - 1 cup grated Parmesan cheese - 1 cup shredded mozzarella cheese - 2 cloves garlic, minced - 1 tablespoon olive oil - 1 teaspoon dried Italian herbs (such as oregano, basil, and thyme) - Salt and freshly ground black pepper, to taste - Fresh parsley, chopped (for garnish) These ingredients come together to create a creamy, rich dish that warms the soul. You can add more fun to your Chicken and Mushroom Alfredo Bake. Here are some optional items to consider: - Sun-dried tomatoes for a tangy twist - Spinach or kale for added greens - Cooked bacon for extra flavor - More cheese for a cheesier bake These add-ins make the dish your own and can enhance its taste and texture. Seasonings can elevate the dish. Here are some suggestions: - Fresh thyme or rosemary for bright flavor - Crushed red pepper flakes for heat - Extra Parmesan or mozzarella on top for a golden crust - A drizzle of truffle oil for a gourmet touch These toppings can take your Chicken and Mushroom Alfredo Bake to the next level. For the full recipe, follow the steps closely, and enjoy this creamy delight! Start by preheating your oven to 375°F (190°C). This step is key for even cooking. While the oven warms up, take a 9x13-inch baking dish. Grease it lightly with cooking spray or a bit of olive oil. This will help the pasta bake not stick to the dish. Next, grab a large skillet and heat 1 tablespoon of olive oil over medium heat. Once hot, add 2 cloves of minced garlic. Sauté this for about 1 minute. You want it fragrant but not brown. Now, toss in 1 cup of sliced mushrooms. Cook these for around 5 minutes, stirring often. They should become tender and release their juices. Add salt and black pepper to boost their flavor. In a big mixing bowl, combine 3 cups of cooked rotini pasta and 2 cups of shredded chicken. Next, add the sautéed mushrooms and 2 cups of heavy cream. Sprinkle in half of the 1 cup of grated Parmesan cheese and 1 teaspoon of dried Italian herbs. Mix everything well until it’s all coated in that creamy goodness. Pour the mixture into the greased baking dish. Spread it out evenly. Top it with the rest of the Parmesan and 1 cup of shredded mozzarella cheese for a cheesy finish. Now you are ready for the next steps in your Chicken and Mushroom Alfredo Bake journey! For the full recipe, make sure to check the details provided earlier. To get the best flavor, use fresh mushrooms. They add a rich taste to the dish. I recommend cremini or white mushrooms for this recipe. Make sure you shred the chicken finely. This helps mix it well with the pasta and sauce. For a truly creamy bake, let your pasta cool slightly before mixing it with the sauce. This prevents the cheese from clumping. Use heavy cream for the richest texture. It helps create a smooth, velvety sauce that coats the pasta perfectly. Stir the sauce gently to keep it creamy. If you want to lighten it up a bit, you can mix in some milk, but it may not be as thick. Adding a bit of reserved pasta water can also help if the sauce seems too thick. Baking at 375°F (190°C) is ideal for even cooking. Cover the dish with foil for the first part of baking. This ensures the pasta heats through without drying out. After 25 minutes, remove the foil for the last 15 minutes. This allows the cheese to brown nicely and become bubbly. Always let the dish sit for a few minutes before serving. This helps everything set and makes for easier serving. For the full recipe, check the earlier sections! {{image_4}} You can boost your Chicken and Mushroom Alfredo Bake by adding veggies. Try spinach, broccoli, or bell peppers. These veggies add color and nutrition. You can also use different proteins. Swap chicken for shrimp or cooked sausage for a new twist. Each protein brings its own flavor, making this dish more exciting. If you need gluten-free options, use gluten-free pasta. Many brands offer great choices that taste good. For a low-carb version, replace pasta with zucchini noodles or cauliflower rice. This change keeps the dish light and healthy while still being creamy and satisfying. To change the flavor, add herbs and spices to your bake. Fresh basil or parsley adds a nice touch. You can also try crushed red pepper for heat or smoked paprika for a deeper flavor. Experiment with these options to find your perfect taste. Each adjustment can make your Chicken and Mushroom Alfredo Bake feel new and fun. Check [Full Recipe] for more ideas. After enjoying your Chicken and Mushroom Alfredo Bake, store leftovers properly for the best taste. Let the dish cool down first. Then, transfer it to an airtight container. You can keep it in the fridge for up to three days. Be sure to label the container with the date. To reheat, place the leftovers in a baking dish. Cover it with foil to keep moisture in. Preheat your oven to 350°F (175°C) and bake for about 20 minutes. Stir halfway through to heat evenly. You can also microwave individual portions for a quick meal. Just add a splash of cream or milk to keep it creamy. If you want to freeze your Chicken and Mushroom Alfredo Bake, it’s easy! Use a freezer-safe container or wrap it tightly in plastic wrap and foil. You can freeze it for up to three months. When you’re ready to eat, thaw it in the fridge overnight. Bake it at 350°F (175°C) until heated through, about 30 minutes. Enjoy every creamy bite from the Full Recipe! You can prepare Chicken and Mushroom Alfredo Bake ahead of time by following these steps. First, make the dish up to the point of baking. Once you mix the pasta, chicken, and sauce, place it in your greased baking dish. Cover it tightly with plastic wrap or aluminum foil. Store it in the fridge for up to 24 hours. When ready to bake, preheat your oven to 375°F (190°C). Remove the covering and bake as directed in the Full Recipe. You may need to add a few extra minutes to the baking time. Yes, you can use different cheese in your Chicken and Mushroom Alfredo Bake. If you want a sharper flavor, try using aged cheddar or gouda. For a creamier texture, consider using cream cheese or ricotta. Blend different cheeses for a unique taste. Just ensure that the total amount of cheese stays the same for best results. Your bake will still come out tasty and creamy. You can serve many tasty sides with Chicken and Mushroom Alfredo Bake. Garlic bread is a classic choice and adds a nice crunch. A fresh green salad with a light vinaigrette pairs well too. You can add steamed vegetables like broccoli or green beans for a healthy touch. These sides balance the richness of the bake and round out your meal nicely. This blog post covered how to make a delicious Chicken and Mushroom Alfredo Bake. You learned about the main ingredients, steps to prepare, and tips for the best results. I shared ways to adapt the recipe to your liking and how to store leftovers. With these tools, you can make a creamy dish that satisfies every time. Cooking can be fun and easy when you follow simple steps. Enjoy experimenting and making this recipe your own!](https://dishtreats.com/wp-content/uploads/2025/06/8d8b4d23-05f5-46f0-9917-116c769775c3-768x768.webp)