Chicken and Cheese Quesadilla Skillet Delight Recipe
![- 2 cups cooked chicken, shredded - 1 cup shredded cheddar cheese - 1 cup shredded Monterey Jack cheese - 4 large flour tortillas - 1 small onion, diced - 1 bell pepper, diced - 2 tablespoons olive oil - 1 teaspoon ground cumin - 1 teaspoon smoked paprika - ½ teaspoon garlic powder - Salt and black pepper to taste - Fresh cilantro, chopped - Sour cream - Salsa To make the Chicken and Cheese Quesadilla Skillet, gather these simple ingredients. The chicken gives it a hearty base. Cheese adds that melty goodness we all love. Using flour tortillas helps hold everything together. You can pick your favorite bell pepper color to add a pop of brightness. The spices elevate the flavor. Ground cumin offers a warm, earthy taste. Smoked paprika adds a hint of smokiness. Garlic powder gives a nice kick. Don’t forget the salt and black pepper to enhance all the flavors. Finally, for garnishes, fresh cilantro provides a burst of freshness. Serving it with sour cream and salsa makes each bite even better. You can find the full recipe at the beginning of this article. Enjoy your cooking! - Heat the skillet with olive oil - Add diced onion and bell pepper First, grab a large skillet and set it over medium heat. Pour in two tablespoons of olive oil and let it warm up. You want the oil to shimmer, which shows it's ready. Next, toss in the diced onion and bell pepper. Sauté them for about five minutes. Stir occasionally until they are soft and fragrant. This step builds a great flavor base for your quesadilla. - Mix in shredded chicken - Season with spices and cook until heated Now it's time to add the star of our dish: shredded chicken. Stir it in with the veggies. Sprinkle in one teaspoon of ground cumin, one teaspoon of smoked paprika, and half a teaspoon of garlic powder. Add salt and black pepper to taste. This mix brings out all the flavors. Cook everything for another three to five minutes. You want the chicken to heat up and soak in those tasty spices. - Distribute cheese and layer tortillas - Cover and cook until golden brown, flipping carefully Next, lower the heat to a gentle simmer. Grab half of your shredded cheddar and Monterey Jack cheese. Spread it evenly over the chicken and veggies. Place two tortillas on top, pushing them down gently. Now, add the rest of the cheese, followed by the other two tortillas. Cover the skillet with a lid and let it cook for four to five minutes. This will make the bottom crispy and let the cheese melt. When the bottom turns golden brown, carefully flip the quesadilla with a spatula. Cook for another four to five minutes until the second side is also golden and the cheese is gooey. For the complete recipe, check out the Full Recipe section! To get crispy tortillas, heat your skillet well. Use medium heat and add enough olive oil. Let the oil shimmer before adding your tortillas. Cook until golden brown on each side, about 4-5 minutes. For gooey cheese, use a mix of cheddar and Monterey Jack. These cheeses melt nicely together. Layer the cheese between tortillas and cover the skillet. This helps the cheese melt evenly and creates a delicious pull when you slice. To boost flavors, add spices like chili powder or cayenne pepper. These spices add a nice kick. You can also mix in fresh herbs, such as cilantro or parsley, for freshness. Pair your quesadilla with sides like guacamole or pico de gallo. These add extra flavor and texture. A squeeze of lime juice brightens up the dish too. For the best results, use a non-stick skillet. This helps avoid sticking and makes flipping easier. Cast iron skillets are also great for even heat. Use a wide spatula for flipping the quesadilla. This helps keep it intact. A pizza cutter is perfect for slicing your quesadilla into wedges. For the full recipe, check out the detailed instructions above. {{image_4}} You can easily change up the protein in your quesadilla. If you want beef, use ground beef or steak strips. For a seafood twist, shrimp works great too. If you're feeling vegetarian, try black beans or mushrooms. These options keep the dish fresh and fun. Want more heat? Add sliced jalapeños or diced green chilies to bring spice. You can also change the cheese for different flavors. Try pepper jack for a kick or gouda for a smokier taste. Mixing cheeses adds depth and makes every bite exciting. You can serve quesadillas in stacks or as traditional wedges. Stacking them makes a fun dinner party dish. For dips, consider guacamole, ranch, or a zesty salsa. These enhance the meal and let everyone personalize their bites. Enjoy exploring these variations while making your own Chicken and Cheese Quesadilla Skillet Delight! For the full recipe, check out the [Full Recipe]. To store leftovers, let your quesadilla cool first. Then, wrap each piece tightly in plastic wrap. This keeps them fresh. Place the wrapped quesadillas in an airtight container. I recommend using glass or BPA-free plastic containers for safety. They can last in the fridge for about three days. For reheating quesadillas, the best method is using a skillet. Heat your skillet over medium heat. Place the quesadilla in the skillet and cover it with a lid. This will help the cheese melt evenly. You can also use an oven at 350°F (175°C) for about 10 minutes. This keeps the tortilla crispy. Avoid using a microwave, as it can make the quesadilla soggy. To freeze leftovers, wrap each quesadilla in plastic wrap. Then, place them in a freezer-safe bag or container. Make sure to remove as much air as possible. They can stay frozen for up to three months. When you are ready to eat, thaw them in the fridge overnight. Reheat as mentioned before to enjoy a tasty meal again. Making a Chicken and Cheese Quesadilla Skillet is quick and easy. It takes about 10 minutes to prep and around 20 minutes to cook. In total, you can enjoy this dish in about 30 minutes. Yes, you can make this dish gluten-free. Simply swap the flour tortillas for corn tortillas or gluten-free tortillas. Both options work well and keep the flavors intact. For sides, I suggest fresh guacamole, a light salad, or refried beans. These add a nice touch to your meal. For drinks, a cold lemonade or a light beer works well with the flavors. You could also try a refreshing iced tea. This blog post covered everything you need for a tasty Chicken and Cheese Quesadilla Skillet. I shared the key ingredients, step-by-step cooking tips, and even fun variations. Remember to store leftovers well and try reheating them for that crunch. With these tips, you can enjoy a delicious meal anytime. Experiment and make it your own! Make cooking fun and tasty with these simple ideas. Enjoy your next quesadilla adventure!](https://dishtreats.com/wp-content/uploads/2025/06/644c33a7-6eb8-49b0-b6be-df01f2332de8.webp)
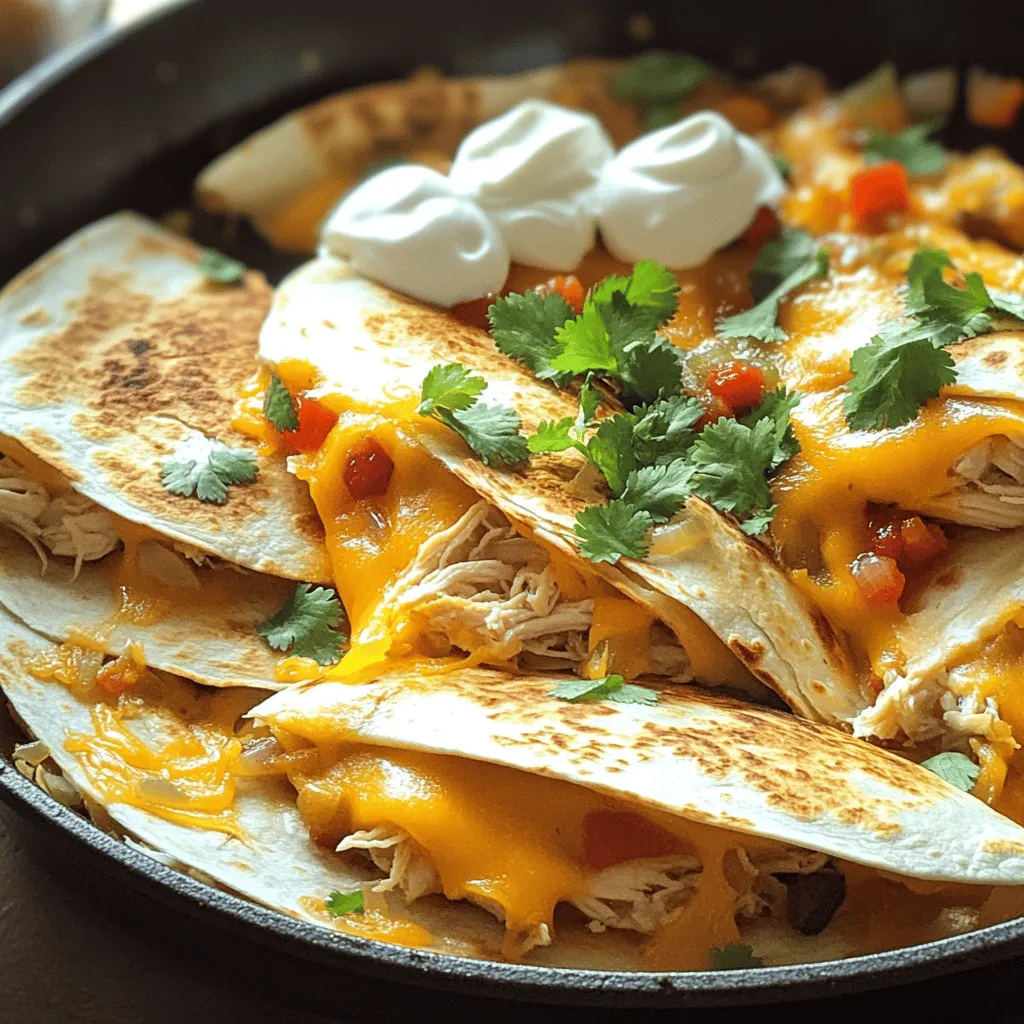
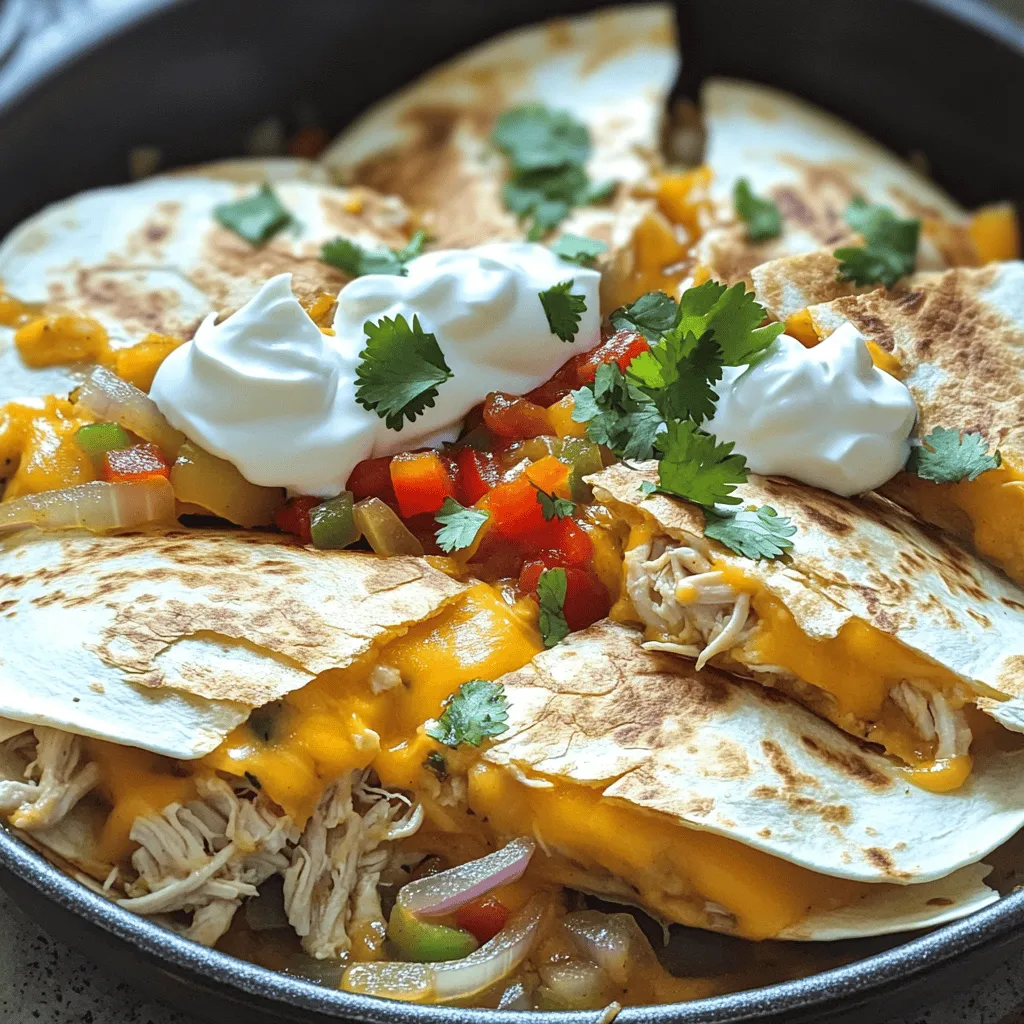
Looking for a quick and tasty meal? This Chicken and Cheese Quesadilla Skillet is your answer! With just a few simple ingredients, I’ll guide you through making a delicious dish that satisfies every craving. Imagine layers of melted cheese and shredded chicken, all served in crispy tortillas. Plus, you’ll find tips to customize it to your taste. Let’s dive into this fun cooking adventure together!
Ingredients
Main Ingredients
- 2 cups cooked chicken, shredded
- 1 cup shredded cheddar cheese
- 1 cup shredded Monterey Jack cheese
- 4 large flour tortillas
Vegetables and Seasonings
- 1 small onion, diced
- 1 bell pepper, diced
- 2 tablespoons olive oil
- 1 teaspoon ground cumin
- 1 teaspoon smoked paprika
- ½ teaspoon garlic powder
- Salt and black pepper to taste
Garnishes and Serving Suggestions
- Fresh cilantro, chopped
- Sour cream
- Salsa
To make the Chicken and Cheese Quesadilla Skillet, gather these simple ingredients. The chicken gives it a hearty base. Cheese adds that melty goodness we all love. Using flour tortillas helps hold everything together. You can pick your favorite bell pepper color to add a pop of brightness.
The spices elevate the flavor. Ground cumin offers a warm, earthy taste. Smoked paprika adds a hint of smokiness. Garlic powder gives a nice kick. Don’t forget the salt and black pepper to enhance all the flavors.
Finally, for garnishes, fresh cilantro provides a burst of freshness. Serving it with sour cream and salsa makes each bite even better.Enjoy your cooking!
Step-by-Step Instructions
Preparing the Skillet
- Heat the skillet with olive oil
- Add diced onion and bell pepper
First, grab a large skillet and set it over medium heat. Pour in two tablespoons of olive oil and let it warm up. You want the oil to shimmer, which shows it’s ready. Next, toss in the diced onion and bell pepper. Sauté them for about five minutes. Stir occasionally until they are soft and fragrant. This step builds a great flavor base for your quesadilla.
Incorporating Chicken and Spices
- Mix in shredded chicken
- Season with spices and cook until heated
Now it’s time to add the star of our dish: shredded chicken. Stir it in with the veggies. Sprinkle in one teaspoon of ground cumin, one teaspoon of smoked paprika, and half a teaspoon of garlic powder. Add salt and black pepper to taste. This mix brings out all the flavors. Cook everything for another three to five minutes. You want the chicken to heat up and soak in those tasty spices.
Layering and Cooking the Quesadilla
- Distribute cheese and layer tortillas
- Cover and cook until golden brown, flipping carefully
Next, lower the heat to a gentle simmer. Grab half of your shredded cheddar and Monterey Jack cheese. Spread it evenly over the chicken and veggies. Place two tortillas on top, pushing them down gently. Now, add the rest of the cheese, followed by the other two tortillas. Cover the skillet with a lid and let it cook for four to five minutes. This will make the bottom crispy and let the cheese melt. When the bottom turns golden brown, carefully flip the quesadilla with a spatula. Cook for another four to five minutes until the second side is also golden and the cheese is gooey.
Tips & Tricks
Ensuring Perfect Texture
To get crispy tortillas, heat your skillet well. Use medium heat and add enough olive oil. Let the oil shimmer before adding your tortillas. Cook until golden brown on each side, about 4-5 minutes.
For gooey cheese, use a mix of cheddar and Monterey Jack. These cheeses melt nicely together. Layer the cheese between tortillas and cover the skillet. This helps the cheese melt evenly and creates a delicious pull when you slice.
Flavor Enhancement
To boost flavors, add spices like chili powder or cayenne pepper. These spices add a nice kick. You can also mix in fresh herbs, such as cilantro or parsley, for freshness.
Pair your quesadilla with sides like guacamole or pico de gallo. These add extra flavor and texture. A squeeze of lime juice brightens up the dish too.
Cooking Equipment Recommendations
For the best results, use a non-stick skillet. This helps avoid sticking and makes flipping easier. Cast iron skillets are also great for even heat.
Use a wide spatula for flipping the quesadilla. This helps keep it intact. A pizza cutter is perfect for slicing your quesadilla into wedges.

Variations
Ingredient Substitutions
You can easily change up the protein in your quesadilla. If you want beef, use ground beef or steak strips. For a seafood twist, shrimp works great too. If you’re feeling vegetarian, try black beans or mushrooms. These options keep the dish fresh and fun.
Flavor Variations
Want more heat? Add sliced jalapeños or diced green chilies to bring spice. You can also change the cheese for different flavors. Try pepper jack for a kick or gouda for a smokier taste. Mixing cheeses adds depth and makes every bite exciting.
Serving Style Options
You can serve quesadillas in stacks or as traditional wedges. Stacking them makes a fun dinner party dish. For dips, consider guacamole, ranch, or a zesty salsa. These enhance the meal and let everyone personalize their bites. Enjoy exploring these variations while making your own Chicken and Cheese Quesadilla Skillet Delight!
Storage Info
Refrigeration Guidelines
To store leftovers, let your quesadilla cool first. Then, wrap each piece tightly in plastic wrap. This keeps them fresh. Place the wrapped quesadillas in an airtight container. I recommend using glass or BPA-free plastic containers for safety. They can last in the fridge for about three days.
Reheating Tips
For reheating quesadillas, the best method is using a skillet. Heat your skillet over medium heat. Place the quesadilla in the skillet and cover it with a lid. This will help the cheese melt evenly. You can also use an oven at 350°F (175°C) for about 10 minutes. This keeps the tortilla crispy. Avoid using a microwave, as it can make the quesadilla soggy.
Freezing Instructions
To freeze leftovers, wrap each quesadilla in plastic wrap. Then, place them in a freezer-safe bag or container. Make sure to remove as much air as possible. They can stay frozen for up to three months. When you are ready to eat, thaw them in the fridge overnight. Reheat as mentioned before to enjoy a tasty meal again.
FAQs
How long does it take to make a Chicken and Cheese Quesadilla Skillet?
Making a Chicken and Cheese Quesadilla Skillet is quick and easy. It takes about 10 minutes to prep and around 20 minutes to cook. In total, you can enjoy this dish in about 30 minutes.
Can I make this dish gluten-free?
Yes, you can make this dish gluten-free. Simply swap the flour tortillas for corn tortillas or gluten-free tortillas. Both options work well and keep the flavors intact.
What sides pair well with Chicken and Cheese Quesadilla Skillet?
For sides, I suggest fresh guacamole, a light salad, or refried beans. These add a nice touch to your meal. For drinks, a cold lemonade or a light beer works well with the flavors. You could also try a refreshing iced tea.
This blog post covered everything you need for a tasty Chicken and Cheese Quesadilla Skillet. I shared the key ingredients, step-by-step cooking tips, and even fun variations. Remember to store leftovers well and try reheating them for that crunch. With these tips, you can enjoy a delicious meal anytime. Experiment and make it your own! Make cooking fun and tasty with these simple ideas. Enjoy your next quesadilla adventure!
![- 2 cups cooked chicken, shredded - 1 cup shredded cheddar cheese - 1 cup shredded Monterey Jack cheese - 4 large flour tortillas - 1 small onion, diced - 1 bell pepper, diced - 2 tablespoons olive oil - 1 teaspoon ground cumin - 1 teaspoon smoked paprika - ½ teaspoon garlic powder - Salt and black pepper to taste - Fresh cilantro, chopped - Sour cream - Salsa To make the Chicken and Cheese Quesadilla Skillet, gather these simple ingredients. The chicken gives it a hearty base. Cheese adds that melty goodness we all love. Using flour tortillas helps hold everything together. You can pick your favorite bell pepper color to add a pop of brightness. The spices elevate the flavor. Ground cumin offers a warm, earthy taste. Smoked paprika adds a hint of smokiness. Garlic powder gives a nice kick. Don’t forget the salt and black pepper to enhance all the flavors. Finally, for garnishes, fresh cilantro provides a burst of freshness. Serving it with sour cream and salsa makes each bite even better. You can find the full recipe at the beginning of this article. Enjoy your cooking! - Heat the skillet with olive oil - Add diced onion and bell pepper First, grab a large skillet and set it over medium heat. Pour in two tablespoons of olive oil and let it warm up. You want the oil to shimmer, which shows it's ready. Next, toss in the diced onion and bell pepper. Sauté them for about five minutes. Stir occasionally until they are soft and fragrant. This step builds a great flavor base for your quesadilla. - Mix in shredded chicken - Season with spices and cook until heated Now it's time to add the star of our dish: shredded chicken. Stir it in with the veggies. Sprinkle in one teaspoon of ground cumin, one teaspoon of smoked paprika, and half a teaspoon of garlic powder. Add salt and black pepper to taste. This mix brings out all the flavors. Cook everything for another three to five minutes. You want the chicken to heat up and soak in those tasty spices. - Distribute cheese and layer tortillas - Cover and cook until golden brown, flipping carefully Next, lower the heat to a gentle simmer. Grab half of your shredded cheddar and Monterey Jack cheese. Spread it evenly over the chicken and veggies. Place two tortillas on top, pushing them down gently. Now, add the rest of the cheese, followed by the other two tortillas. Cover the skillet with a lid and let it cook for four to five minutes. This will make the bottom crispy and let the cheese melt. When the bottom turns golden brown, carefully flip the quesadilla with a spatula. Cook for another four to five minutes until the second side is also golden and the cheese is gooey. For the complete recipe, check out the Full Recipe section! To get crispy tortillas, heat your skillet well. Use medium heat and add enough olive oil. Let the oil shimmer before adding your tortillas. Cook until golden brown on each side, about 4-5 minutes. For gooey cheese, use a mix of cheddar and Monterey Jack. These cheeses melt nicely together. Layer the cheese between tortillas and cover the skillet. This helps the cheese melt evenly and creates a delicious pull when you slice. To boost flavors, add spices like chili powder or cayenne pepper. These spices add a nice kick. You can also mix in fresh herbs, such as cilantro or parsley, for freshness. Pair your quesadilla with sides like guacamole or pico de gallo. These add extra flavor and texture. A squeeze of lime juice brightens up the dish too. For the best results, use a non-stick skillet. This helps avoid sticking and makes flipping easier. Cast iron skillets are also great for even heat. Use a wide spatula for flipping the quesadilla. This helps keep it intact. A pizza cutter is perfect for slicing your quesadilla into wedges. For the full recipe, check out the detailed instructions above. {{image_4}} You can easily change up the protein in your quesadilla. If you want beef, use ground beef or steak strips. For a seafood twist, shrimp works great too. If you're feeling vegetarian, try black beans or mushrooms. These options keep the dish fresh and fun. Want more heat? Add sliced jalapeños or diced green chilies to bring spice. You can also change the cheese for different flavors. Try pepper jack for a kick or gouda for a smokier taste. Mixing cheeses adds depth and makes every bite exciting. You can serve quesadillas in stacks or as traditional wedges. Stacking them makes a fun dinner party dish. For dips, consider guacamole, ranch, or a zesty salsa. These enhance the meal and let everyone personalize their bites. Enjoy exploring these variations while making your own Chicken and Cheese Quesadilla Skillet Delight! For the full recipe, check out the [Full Recipe]. To store leftovers, let your quesadilla cool first. Then, wrap each piece tightly in plastic wrap. This keeps them fresh. Place the wrapped quesadillas in an airtight container. I recommend using glass or BPA-free plastic containers for safety. They can last in the fridge for about three days. For reheating quesadillas, the best method is using a skillet. Heat your skillet over medium heat. Place the quesadilla in the skillet and cover it with a lid. This will help the cheese melt evenly. You can also use an oven at 350°F (175°C) for about 10 minutes. This keeps the tortilla crispy. Avoid using a microwave, as it can make the quesadilla soggy. To freeze leftovers, wrap each quesadilla in plastic wrap. Then, place them in a freezer-safe bag or container. Make sure to remove as much air as possible. They can stay frozen for up to three months. When you are ready to eat, thaw them in the fridge overnight. Reheat as mentioned before to enjoy a tasty meal again. Making a Chicken and Cheese Quesadilla Skillet is quick and easy. It takes about 10 minutes to prep and around 20 minutes to cook. In total, you can enjoy this dish in about 30 minutes. Yes, you can make this dish gluten-free. Simply swap the flour tortillas for corn tortillas or gluten-free tortillas. Both options work well and keep the flavors intact. For sides, I suggest fresh guacamole, a light salad, or refried beans. These add a nice touch to your meal. For drinks, a cold lemonade or a light beer works well with the flavors. You could also try a refreshing iced tea. This blog post covered everything you need for a tasty Chicken and Cheese Quesadilla Skillet. I shared the key ingredients, step-by-step cooking tips, and even fun variations. Remember to store leftovers well and try reheating them for that crunch. With these tips, you can enjoy a delicious meal anytime. Experiment and make it your own! Make cooking fun and tasty with these simple ideas. Enjoy your next quesadilla adventure!](https://dishtreats.com/wp-content/uploads/2025/06/644c33a7-6eb8-49b0-b6be-df01f2332de8-300x300.webp)


![To make delicious roasted red pepper hummus, gather these key ingredients: - 1 cup canned chickpeas, drained and thoroughly rinsed - 1 large roasted red pepper (store-bought jarred or homemade) - 2 tablespoons tahini - 2 tablespoons extra virgin olive oil, plus more for drizzling - 2 tablespoons freshly squeezed lemon juice - 1 clove of garlic, finely minced - 1/2 teaspoon ground cumin - Salt, to taste These ingredients create a smooth and creamy dip. Each one plays a vital role. Chickpeas give it body. Roasted red pepper adds sweetness and depth. Tahini brings a nutty flavor, while olive oil adds richness. Lemon juice gives it brightness and balance. Garlic adds a punch, and cumin adds warmth. To make your hummus even better, you can add some garnishes: - Fresh parsley, finely chopped (for garnish, optional) - Paprika, for garnish (optional) These garnishes not only look nice but also enhance the taste. Fresh parsley adds a pop of color and freshness. Paprika gives a hint of smokiness and warmth. You can use these garnishes to personalize your hummus. For the full recipe, check the detailed instructions that guide you through preparation and blending for a perfect dip. Roasting Techniques (Oven & Grill) You can roast red peppers in two main ways. The oven is great for a consistent roast. Start by preheating your oven to 450°F (230°C). Place whole red peppers on a lined baking sheet. Roast them for 20-25 minutes. Turn them every few minutes until the skin is blistered and charred. If you prefer grilling, place the peppers directly on the grill. Turn them often until they are blackened all around. How to Steam and Peel After roasting, steaming helps peel the skin. Place the hot peppers in a heatproof bowl. Cover it tightly with plastic wrap for about 10 minutes. This traps steam, loosening the skin. Once cool enough to handle, peel off the blackened skin. Remove the seeds, and set the peppers aside. Food Processor Tips Using a food processor makes blending easy. Start with the chickpeas and roasted red pepper in the bowl. Add tahini, olive oil, lemon juice, minced garlic, and ground cumin. Blend on low speed first. Gradually increase to high until smooth. Achieving Creamy Consistency To get a creamy texture, you may need to add water. If the hummus is thick, add one tablespoon at a time while blending. Keep processing until it reaches your desired consistency. Importance of Seasoning Seasoning makes a big difference in taste. After blending, taste your hummus. Add salt slowly, mixing well after each addition. This helps to enhance the overall flavor. Customizing Thickness If you want a thinner hummus, keep adding water. Blend in small amounts until you reach the right thickness. Remember, you can always add more, but you can't take it out! - Experimenting with Spices: You can add spices to boost flavor. Try smoked paprika for a smoky taste. Or add a pinch of cayenne pepper for some heat. Each spice adds a unique twist to your hummus. - Using Fresh Ingredients: Fresh ingredients make a big difference. Fresh garlic brings a sharp bite. Choose ripe lemons for the best juice. They add zest and brightness to the dish. - Store-Bought Ingredient Options: If you're short on time, use store-bought roasted red peppers. They save you the hassle of roasting at home. Check the jar for quality; it should have no added sugars. - Quick Prep Hacks: Use canned chickpeas to save time. They are ready to go. Rinse them well to remove excess sodium. This step helps keep your hummus light and tasty. - Best Pairings for Hummus: Roasted red pepper hummus pairs well with fresh veggies. Carrot sticks, cucumber slices, and bell peppers create a colorful plate. You can also serve it with pita chips or crackers. - Creative Serving Ideas: For a fun twist, serve hummus in cute bowls. Drizzle olive oil on top for a glossy finish. Add a sprinkle of paprika and fresh parsley for color. It looks great and tastes even better. For the full recipe, check out the [Full Recipe]. {{image_4}} To make your hummus spicy, add fresh jalapeños or crushed red pepper flakes. Start with a small amount. Blend everything well and taste. Adjust the heat to your liking. For a balanced flavor, add a bit of honey or maple syrup. This sweetness can tone down the heat and enhance the taste. Fresh herbs give hummus a bright twist. Try adding basil, cilantro, or dill. Just chop them finely before blending. These herbs pair well with roasted red pepper. They add freshness and depth. You can also mix in some sun-dried tomatoes for a Mediterranean vibe. It brings a rich flavor that complements the hummus nicely. Want to make your hummus even healthier? Add superfoods like spinach or kale. They blend in well and boost nutrients. If you have dietary needs, this hummus is easy to adjust. It's naturally vegan and gluten-free. You can enjoy it without worry. Check the full recipe for more tips on adding these healthy ingredients. To keep your roasted red pepper hummus fresh, use an airtight container. Glass containers work best to avoid any odors. If you do not have glass, BPA-free plastic containers are also a good choice. This way, your hummus stays tasty and does not absorb other flavors in the fridge. Homemade hummus lasts up to one week in the fridge. Make sure to check for any signs of spoilage before eating. If it looks or smells off, it is best to toss it. You can freeze hummus for longer storage. First, place the hummus in a freezer-safe container. Leave some space at the top for expansion as it freezes. You can also use ice cube trays for smaller portions. To thaw, place the frozen hummus in the fridge overnight. This will help keep its texture smooth. If it seems a bit thick after thawing, simply add a splash of water and stir well. Enjoy your hummus in wraps, sandwiches, or with fresh veggies. - Start by gathering your ingredients. - Roast the red pepper and cool it. - Blend chickpeas, roasted pepper, tahini, olive oil, lemon juice, garlic, and cumin. - Add water for the right texture. - Season with salt and blend again. - Serve it with a drizzle of olive oil. Making roasted red pepper hummus is simple. You can easily prepare it at home. Follow the quick steps above, and you have a fresh dip ready in about 35 minutes. For the full recipe, check out the detailed instructions provided earlier. - Fresh veggie sticks (carrots, cucumbers, bell peppers) - Warm pita bread or pita chips - Crackers or breadsticks - Grilled meats or seafood - Salads as a dressing Roasted red pepper hummus is versatile. It pairs well with many foods. Fresh veggies make a crunchy, healthy option. You can also enjoy it with pita bread for a classic taste. - Local grocery stores often carry it. - Check health food stores for unique brands. - Look in the deli section for fresh options. - Popular brands include Tribe, Sabra, and Hope. If you prefer buying hummus, many stores have pre-made options. Check your local store's shelves or the deli section for fresh varieties. Each brand may offer a unique taste, so explore a few! - High in protein from chickpeas. - Contains healthy fats from olive oil and tahini. - Rich in vitamins from red peppers and garlic. - Low in saturated fat and cholesterol-free. Roasted red pepper hummus is a healthy snack. It offers many nutritional benefits. The chickpeas give protein, while olive oil adds healthy fats. This dip is not just tasty; it's good for you too! Roasted red pepper hummus is easy to make and packed with flavor. We discussed key ingredients like chickpeas, roasted red peppers, and tahini. You learned step-by-step how to prepare and blend, plus tips to enhance taste and texture. Explore variations by adding spices or herbs to fit your taste. Don't forget how to store your hummus for freshness. I hope this guide inspires you to create your own hummus and enjoy it!](https://dishtreats.com/wp-content/uploads/2025/07/4eff3fe8-7a50-4e3c-86ee-c946a92fe799-768x768.webp)
![To make this dish, you will need: - 1 lb Brussels sprouts, trimmed and halved - 3 tablespoons extra virgin olive oil - 1/4 cup pure maple syrup - 1 tablespoon balsamic vinegar - 1 teaspoon garlic powder - Salt and freshly ground black pepper to taste These ingredients come together to create a sweet and savory glaze. The maple syrup adds sweetness, while the balsamic vinegar gives tanginess. The olive oil helps with roasting, making the sprouts tender and tasty. You can add these optional ingredients for extra flavor and texture: - 1/4 cup chopped walnuts - Fresh thyme leaves for garnish Walnuts add a nice crunch, while thyme gives a fresh aroma. Both options enhance the dish without overpowering it. This dish is not just tasty; it’s also good for you. Here’s a quick look at the nutrition per serving: - Calories: About 180 - Protein: 3g - Carbohydrates: 25g - Fat: 8g - Fiber: 4g Brussels sprouts are rich in vitamins C and K. The maple syrup provides natural sugars, making this dish a healthy choice. You get great flavors and health benefits in one meal. For the complete recipe, check the Full Recipe section above! First, we need to preheat the oven to 400°F (200°C). This heat is perfect for roasting. A hot oven ensures crispy edges and tender centers for your Brussels sprouts. Next, gather your ingredients. You will need: - 1 lb Brussels sprouts, trimmed and halved - 3 tablespoons extra virgin olive oil - 1/4 cup pure maple syrup - 1 tablespoon balsamic vinegar - 1 teaspoon garlic powder - Salt and freshly ground black pepper to taste - 1/4 cup chopped walnuts (optional for crunch) - Fresh thyme leaves for garnish (optional for aroma and color) In a large bowl, mix the halved Brussels sprouts with olive oil, maple syrup, balsamic vinegar, garlic powder, salt, and pepper. Toss everything well. Make sure every sprout gets coated in the sweet and savory sauce. This step is key for flavor. Prepare your baking sheet by lining it with parchment paper. This makes cleaning easy and helps prevent sticking. Spread the Brussels sprouts in a single layer on the sheet. Give them space to roast well. Now, place the baking sheet in the hot oven. Roast the sprouts for 25 minutes. Halfway through, stir them to promote even cooking. You want them to get tender and brown. If you add walnuts, toss them on the sheet during the last 5 minutes. This will give them a nice toast and extra crunch. Once done, take the Brussels sprouts out and let them cool for a minute. Transfer them to a serving dish. For a finishing touch, sprinkle fresh thyme leaves on top. This adds a nice pop of color and aroma to your dish. Enjoy this full recipe for a delicious treat! To get that perfect glaze, start with good maple syrup. Use pure maple syrup for the best flavor. Mix it well with olive oil and balsamic vinegar; this combo really shines. Make sure to coat the Brussels sprouts evenly. This helps each piece get that sweet, sticky glaze. Toss them well in the bowl before roasting. Roasting Brussels sprouts needs some care. First, preheat your oven to 400°F (200°C). This hot oven helps them caramelize. Spread the sprouts on a baking sheet in a single layer. If they are crowded, they won't brown well. Stir them halfway through cooking to ensure even roasting. You want them golden brown and tender, about 25 minutes in the oven. When ready to serve, think about how to make them look nice. Place the roasted sprouts on a large platter. You can arrange them in a circle for a pretty look. If you added walnuts, sprinkle them on top for crunch. Fresh thyme leaves also add color and smell great. This makes the dish not just tasty but beautiful too. For the full recipe, check out the details above. {{image_4}} You can switch up the sweetener for a twist. Try honey or agave syrup. These will add their own unique flavors. You can also use coconut sugar for a richer taste. If you like a kick, add some chili flakes for heat. A dash of orange juice can also brighten up the sweetness. This recipe is already vegetarian. To make it vegan, ensure the maple syrup is pure. You can also use almond oil instead of olive oil for a different flavor. For creaminess, add a dollop of vegan sour cream on top before serving. This adds a lovely tang that pairs well with the sweetness. Seasonal swaps can make this dish even better. In spring, add fresh peas for color and sweetness. During fall, toss in some diced apples for a sweet crunch. In winter, try adding roasted chestnuts for a nutty flavor. These changes keep the dish fresh and exciting every time you make it. For the full recipe, you can refer back to the detailed instructions provided. After enjoying your maple glazed Brussels sprouts, store any leftovers in an airtight container. This keeps them fresh and prevents odors. Let them cool first before sealing. Place the container in the fridge. They stay good for about 3 to 5 days. If you want to keep them longer, consider freezing. Reheating your Brussels sprouts can be quick and easy. You can use the oven or stovetop. If you use the oven, preheat it to 350°F (175°C). Spread the sprouts on a baking sheet and heat for about 10-15 minutes. Stir halfway through to ensure even warming. If you prefer the stovetop, heat a pan over medium heat. Add a bit of olive oil and toss the sprouts until warmed through. Freezing Brussels sprouts is a smart way to save them for later. First, blanch them in boiling water for 3 minutes. Then, cool them in ice water. This keeps their bright color and flavor. Drain and dry the sprouts, then place them in a freezer bag. Remove as much air as you can before sealing. They can last up to 6 months in the freezer. When you're ready to use them, just thaw and reheat! Enjoy your deliciously roasted maple glazed Brussels sprouts from [Full Recipe] and savor every bite! Yes, you can prep Brussels sprouts in advance. Trim and halve them a day before. Store them in an airtight container in the fridge. When you're ready, mix them with the other ingredients from the Full Recipe. This helps save time and makes cooking easier. Maple glazed Brussels sprouts pair well with many dishes. Here are some great options: - Roast chicken for a savory touch. - Grilled salmon for a healthy protein. - Quinoa salad for a hearty side. - Mashed potatoes for comfort food lovers. These options balance the sweet and savory flavors of the sprouts. To make this dish vegan, swap out the maple syrup for agave nectar. This keeps the sweetness intact. You can also use vegetable oil instead of olive oil if you prefer. Follow the Full Recipe as is, making those simple swaps. Enjoy the same great taste with a vegan twist! In this blog post, we covered how to make maple glazed Brussels sprouts. We discussed the key ingredients and provided step-by-step instructions. Tips helped you achieve the perfect glaze and roasting method. You also learned about variations, storage, and common questions. Now, you have all the tools to enjoy this dish. Experiment with flavors and enjoy your cooking!](https://dishtreats.com/wp-content/uploads/2025/06/8ccc11bb-56ad-4722-8e0d-cbebb28a9ca5-768x768.webp)

![To make these Air Fryer Parmesan Zucchini Fries, you need just a few simple items. Gather these ingredients: - 2 medium zucchinis, sliced into thin fries - 1 cup breadcrumbs (recommended: panko) - 1/2 cup grated Parmesan cheese - 1 teaspoon garlic powder - 1 teaspoon Italian seasoning - 1/2 teaspoon salt - 1/4 teaspoon black pepper - 2 large eggs, beaten - Olive oil spray Each ingredient plays a key role. The zucchinis provide a fresh base. Panko breadcrumbs add great crunch. Parmesan cheese gives a rich, cheesy flavor. Garlic powder and Italian seasoning make your fries tasty. Salt and pepper enhance all the flavors. Eggs act as glue for the coating. The olive oil spray keeps everything crisp. When selecting zucchinis, choose firm ones with smooth skin. They should feel heavy for their size. This tells you they are fresh. The breadcrumbs should be light and airy, perfect for frying. If you're feeling adventurous, try different herbs or cheeses! For the full recipe, check out this [Full Recipe]. 1. Preheat your air fryer to 400°F (200°C). This step is key for a crispy finish. 2. Wash and dry the zucchinis. Clean veggies are a must for great taste. 3. Cut the zucchinis into 1/4 inch thick fries. Make sure they are even for uniform cooking. 1. In a medium bowl, combine breadcrumbs, Parmesan cheese, garlic powder, Italian seasoning, salt, and black pepper. This mix gives the fries a tasty crust. 2. In a separate bowl, beat the eggs until smooth. This egg wash will help the coating stick well. 1. Dip each zucchini fry in the beaten eggs. Let any extra egg drip back into the bowl. 2. Roll the zucchini in the breadcrumb mixture. Press gently to coat all sides evenly. This ensures every bite is full of flavor. 1. Lightly spray the air fryer basket with olive oil. This helps prevent sticking. 2. Arrange the coated zucchini fries in a single layer in the basket. Avoid crowding to keep them crispy. 3. Mist the tops of the fries with olive oil spray. This adds a lovely golden color. 4. Cook for 10-12 minutes, flipping halfway. This makes sure each side cooks evenly. Once you follow these steps, you will have crispy and tasty Air Fryer Parmesan Zucchini Fries. For the complete recipe, refer to the section above. Enjoy! To keep your zucchini fries crispy, avoid overcrowding the air fryer basket. When fries sit too close, they steam instead of crisp. It’s best to cook in batches if needed. Also, mist the tops of fries lightly with olive oil. This simple step helps them brown nicely. Want to spice things up? Consider adding cayenne pepper for heat. A little goes a long way! You can also play around with different herbs or seasonings. Try adding smoked paprika or fresh thyme for a unique twist. Each option can add depth to the flavor. Pair your zucchini fries with great dipping sauces. I love zesty marinara or creamy ranch. They add a fun taste contrast. For serving, arrange the fries in a single layer on a platter. Garnish with fresh herbs or a sprinkle of more Parmesan cheese for a lovely touch. Add a small bowl of sauce in the center for a delightful display. For the complete recipe, check out the Full Recipe section. {{image_4}} You can switch up the coating for your zucchini fries. Using gluten-free breadcrumbs works great if you need a gluten-free option. They still get nice and crispy. You can also try different cheeses like mozzarella or cheddar. Each cheese brings a unique flavor that can enhance your fries. Don't stop at zucchini! You can add other veggies like eggplant or carrots. Cut them into fries, just like the zucchini. This makes your dish colorful and fun. You might also mix in spices like paprika or cumin. These spices bring extra warmth and flavor to your fries. You can cook zucchini fries in different ways. The air fryer gives you crispy results in less time. Baking in the oven is another option. It takes longer but still tastes great. Stovetop frying is also a choice. You’ll need more oil, but the flavor is rich and satisfying. Each method has its perks, so feel free to experiment! To store Air Fryer Parmesan Zucchini Fries in the fridge, let them cool first. Place the fries in an airtight container. This keeps them fresh for up to three days. I recommend using glass containers, as they seal well and prevent moisture. If you want to save your fries for longer, freeze them. Lay the cooked fries on a baking sheet in a single layer. Freeze for about an hour. Once frozen, transfer them to a freezer bag. This method stops them from sticking together. They can last in the freezer for about two months. To reheat, place the frozen fries in the air fryer. Set it to 400°F (200°C) and cook for about 8-10 minutes. This will help keep them crispy. You can also reheat them in an oven for a similar effect. Air Fryer Parmesan Zucchini Fries stay fresh in the fridge for about 3 to 4 days. To store, place them in an airtight container. For longer storage, freeze them. They can last up to 2 months in the freezer. To freeze, lay them flat on a baking sheet first, then transfer them to a freezer bag. This helps keep them from sticking together. Yes, you can prepare these fries ahead of time. Slice the zucchinis and coat them in the breadcrumb mixture. Keep them in the fridge for up to 24 hours. When you're ready, air fry them directly from the fridge. If you freeze them, let them thaw in the fridge overnight before cooking. This helps them cook evenly and stay crispy. These zucchini fries taste great with many dishes. Serve them with a tangy marinara sauce or creamy ranch dressing for dipping. They also pair well with grilled chicken or fish. For a fun twist, try serving them alongside a fresh salad or as a side to tacos. Their crunch adds a nice texture contrast to softer dishes. Absolutely! You can use yellow squash instead of green zucchini. They have a similar taste and texture. If you have gifted zucchinis from friends or family, feel free to use those too. Just make sure they are firm and fresh for the best results. This recipe is very flexible and lets you enjoy various types of squash. In this post, I shared a simple recipe for Air Fryer Parmesan Zucchini Fries. You learned the ingredients, step-by-step instructions, and useful tips for crispiness. Experiment with flavors or make different versions to keep it fresh. Remember to store leftovers properly for later enjoyment. This dish is easy to make and pairs well with various dips. Enjoy your healthy snack, and have fun trying out new ideas!](https://dishtreats.com/wp-content/uploads/2025/06/3cf59b94-4108-4e4b-8eff-d7b1557676e8-768x768.webp)