Cheesy Spinach Stuffed Shells Delicious and Simple Dish

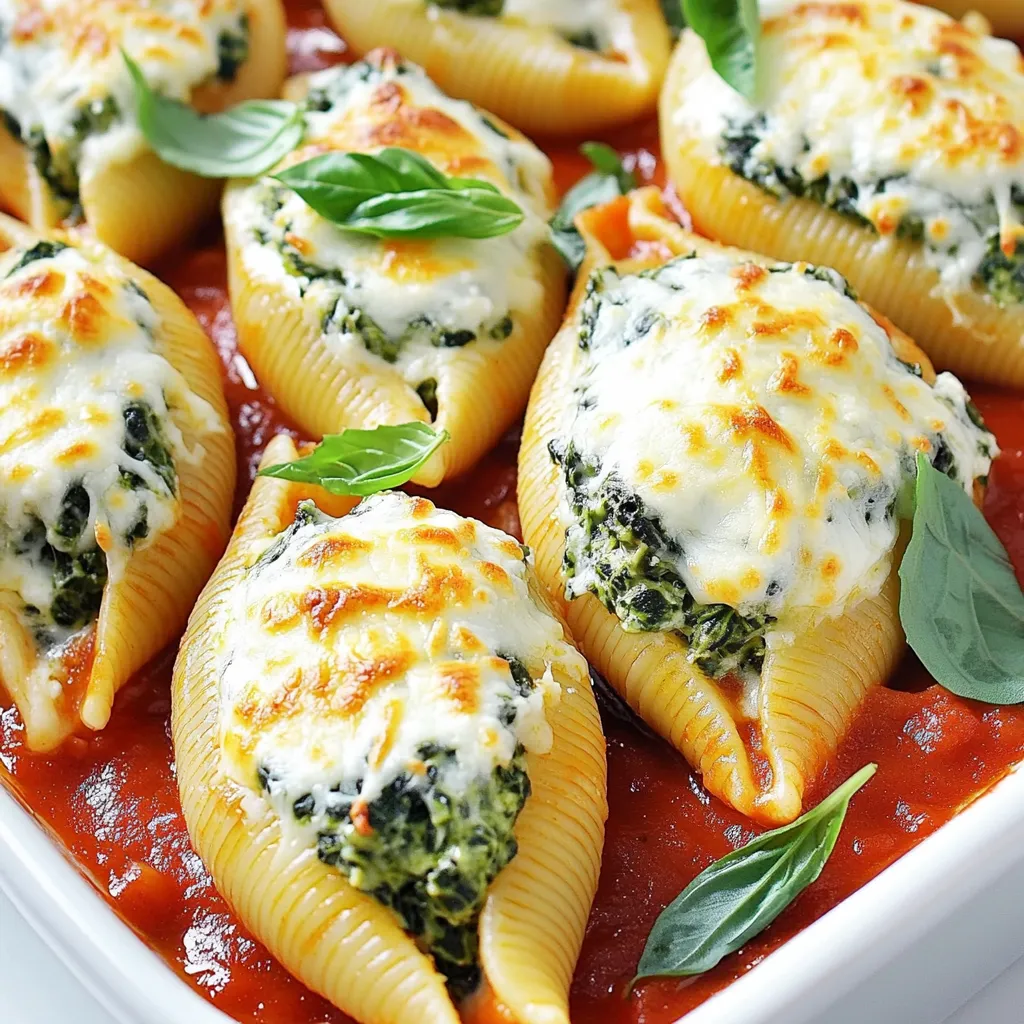
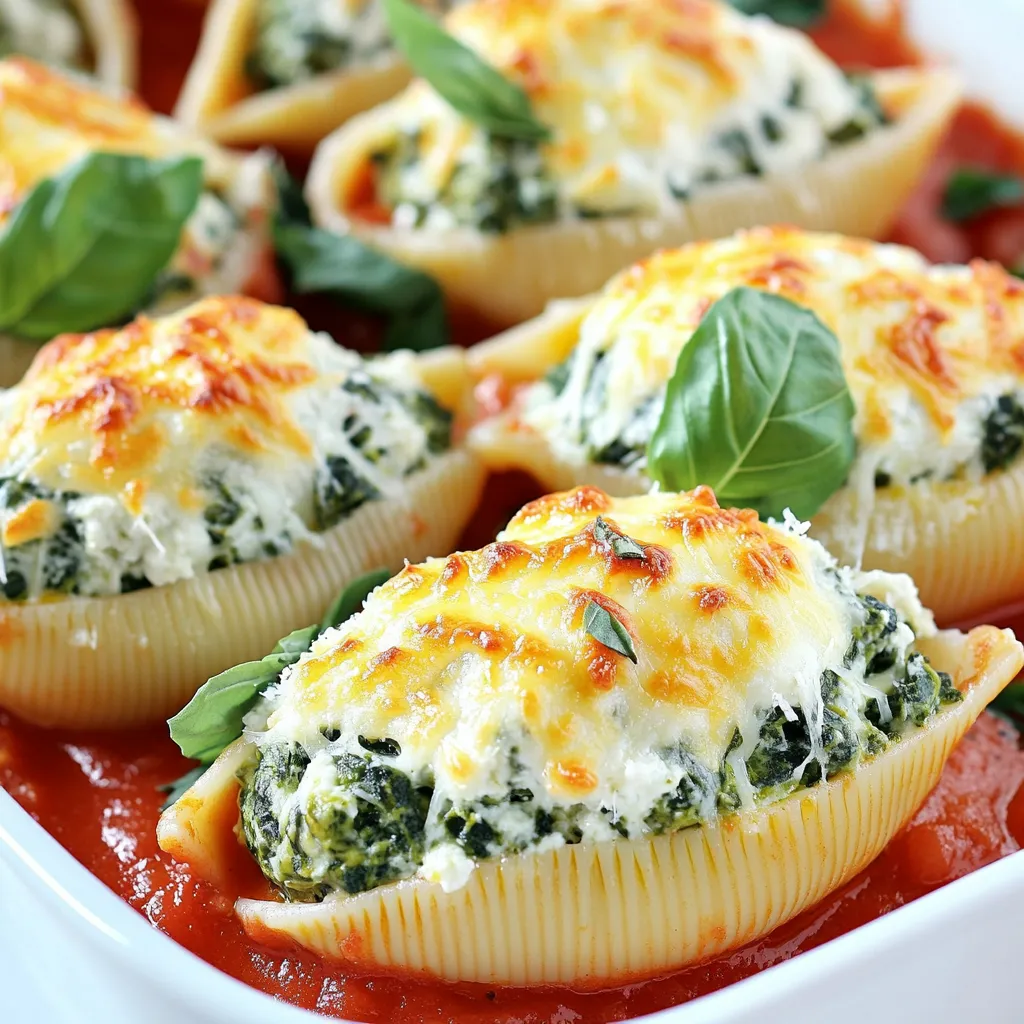
Are you ready to impress your family with a dish that’s both simple and delicious? Cheesy Spinach Stuffed Shells are a perfect choice. This recipe is loaded with creamy cheese and vibrant spinach, packed into jumbo pasta shells. I’ll guide you through every step, from gathering ingredients to baking the perfect shell. Let’s dive in and make a meal that will have everyone coming back for seconds!
Ingredients
List of Ingredients
- 12 jumbo pasta shells
- 2 cups fresh spinach, finely chopped
- 1 cup ricotta cheese
- 1 cup shredded mozzarella cheese
- 1/2 cup grated Parmesan cheese
- 1 large egg, beaten
- 1 teaspoon garlic powder
- 1 teaspoon onion powder
- 1/2 teaspoon salt
- 1/4 teaspoon freshly ground black pepper
- 2 cups marinara sauce
- Fresh basil leaves for garnish
Ingredient Measurements
Each ingredient plays a key role in the dish. The jumbo pasta shells hold the filling well. Fresh spinach adds a nice green color and healthy touch. Ricotta cheese gives a creamy texture. Shredded mozzarella adds gooey goodness. Grated Parmesan brings a salty bite. The beaten egg helps bind the filling together. Garlic and onion powders add flavor, while salt and pepper enhance all these tastes. Marinara sauce gives a rich base. Finally, fresh basil adds a burst of freshness.
Suggested Substitutions
If you cannot find jumbo shells, use manicotti or even cannelloni. For a twist, swap spinach with kale or Swiss chard. Cottage cheese can replace ricotta if needed. You can use any cheese you like instead of mozzarella. Try adding feta for a tangy taste. If you want a vegan dish, use tofu instead of ricotta and skip the egg. Lastly, any pasta sauce will work if you do not have marinara.
Step-by-Step Instructions
Cooking the Pasta
Start by boiling a large pot of water. Add a good amount of salt to the water. Once the water is boiling, add 12 jumbo pasta shells. Cook them according to the package instructions until they are al dente. After cooking, drain the shells and let them cool. Make sure they do not stick together.
Preparing the Spinach Cheese Filling
In a big mixing bowl, combine the spinach, ricotta cheese, half of the shredded mozzarella, and grated Parmesan cheese. Add in the beaten egg, garlic powder, onion powder, salt, and black pepper. Use a fork or spatula to mix everything well. The filling should be creamy and smooth.
Stuffing the Pasta Shells
Preheat your oven to 375°F (190°C). Take a spoon or a piping bag to fill each shell with the spinach and cheese mixture. Be careful to fill them well but do not let the filling overflow.
Assembling the Dish
Take a baking dish and spread 1 cup of marinara sauce on the bottom. Lay the stuffed shells in a single layer over the sauce. Drizzle the remaining marinara sauce on top of the shells. Then, sprinkle the rest of the shredded mozzarella cheese over everything.
Baking the Stuffed Shells
Cover the baking dish with aluminum foil. Place it in the oven and bake for 25 minutes. After this, remove the foil and bake for another 10 minutes. This will make the cheese bubbly and slightly golden.
Garnishing and Serving Suggestions
Once baked, let the dish cool for about 5 minutes. This helps the flavors blend. Garnish with fresh basil leaves before serving. This adds color and a nice touch of flavor. Serve your stuffed shells warm and enjoy!
Tips & Tricks
Perfecting Your Stuffed Shells
To make your stuffed shells stand out, use fresh ingredients. Fresh spinach adds a bright taste. Mix your filling well. Each bite should burst with flavor. Make sure your shells are cooked al dente. This helps them hold their shape. When stuffing, don’t overfill. Leave a little space to avoid spills. Lastly, let the dish rest before serving. This helps the flavors mingle.
Common Mistakes to Avoid
Avoid using old pasta shells. They can break easily. Don’t skip the salt in the pasta water. It adds flavor to the shells. Watch the baking time closely. Overbaking can lead to dry shells. If you use too much sauce, it can make the shells soggy. Keep the filling balanced. Too much cheese can overpower the spinach.
Making Ahead for Meal Prep
You can prepare the stuffed shells in advance. Stuff the shells and place them in the baking dish. Cover with plastic wrap and refrigerate for up to 24 hours. When ready to cook, add a few extra minutes to the baking time. You can also freeze the stuffed shells. Just make sure to wrap them well. Thaw them overnight in the fridge before baking. This makes meal prep easy and quick.

Variations
Adding Protein Options
You can add protein to your cheesy spinach stuffed shells. Ground beef, turkey, or chicken work well. Cook the meat in a pan until brown. Mix it into the spinach and cheese filling. This adds flavor and makes the dish heartier. For a tasty twist, try adding cooked sausage. It adds great spice to each bite.
Vegan and Dairy-Free Options
If you want a vegan version, swap the cheeses. Use a plant-based ricotta or tofu instead. You can blend silken tofu with nutritional yeast and garlic for a creamy texture. For cheese flavor, add vegan mozzarella shreds. Use aquafaba instead of the egg to bind the filling. This keeps the dish creamy and delicious without dairy.
Alternative Sauces
You can change up the sauce for your stuffed shells. Instead of marinara, try a creamy Alfredo sauce. This gives the dish a rich flavor. A pesto sauce also adds a fresh, herby taste. If you like spice, use a spicy arrabbiata sauce. Each sauce change creates a new experience while keeping the filling the same.
Storage Info
How to Store Leftovers
To keep your cheesy spinach stuffed shells fresh, let them cool first. Place any leftovers in an airtight container. Store them in the fridge for up to three days. If you want to enjoy them later, freezing is a great option.
Reheating Instructions
When you’re ready to eat the leftovers, you can reheat them easily. Preheat your oven to 350°F (175°C). Place the stuffed shells in an oven-safe dish. Cover them with foil to keep them moist. Bake for about 20 minutes or until hot. You can also microwave them for a quick option. Just cover them with a microwave-safe lid and heat for 2-3 minutes.
Freezing Tips for Long-Term Storage
If you want to freeze the stuffed shells, prepare them as usual but do not bake them. Place the filled shells in a single layer on a baking sheet. Freeze them for 1-2 hours, then transfer them to a freezer bag. Be sure to label the bag with the date. They will last up to three months in the freezer. When you’re ready to cook, bake them straight from the freezer. Just add an extra 10-15 minutes to the baking time.
FAQs
Can I use regular pasta instead of jumbo shells?
Yes, you can use regular pasta. However, jumbo shells hold the filling better. If you choose regular pasta, try using lasagna sheets or manicotti. They can also work well for stuffing.
How do I prevent stuffed shells from sticking together?
To prevent sticking, add salt to the boiling water. Stir the shells gently while cooking. After draining, spread them out on a baking sheet. You can also drizzle a bit of olive oil over them. This keeps them from clumping.
What to serve with Cheesy Spinach Stuffed Shells?
These shells pair well with a simple green salad. You can also serve garlic bread alongside them. A light drizzle of balsamic vinegar adds nice flavor. For drinks, a crisp white wine nicely complements the dish.
How long can I keep leftovers in the fridge?
You can keep leftovers in the fridge for about three to four days. Store them in an airtight container. If you want to keep them longer, consider freezing them. This way, they can last for up to three months.
You learned how to make cheesy spinach stuffed shells today. We covered ingredients, measurements, and substitutions. You know the steps for cooking and baking the dish. I shared tips for perfecting the shells and avoiding common mistakes. Plus, you explored variations with protein, vegan options, and sauces.
Remember to store and reheat leftovers the right way. Happy cooking, and enjoy your tasty meal!


![- 1 lb beef sirloin, thinly sliced against the grain - 1 medium onion, finely chopped - 2 cloves garlic, minced - 8 oz mushrooms, sliced (cremini or button) - 1 cup beef broth (preferably low-sodium) - 1 cup sour cream (or Greek yogurt for a lighter option) - 2 tablespoons all-purpose flour - 2 tablespoons olive oil - 1 teaspoon Dijon mustard - Salt and freshly ground black pepper to taste - 12 oz egg noodles (or your favorite pasta) The beef sirloin is the star of the dish. It should be tender and flavorful. Use fresh onions and garlic to build a tasty base. The mushrooms add a nice earthiness. A good beef broth gives depth to the sauce. The sour cream adds creaminess and tang. If you want a lighter dish, Greek yogurt works well too. - Greek yogurt instead of sour cream - Alternative pasta types If you do not have sour cream, Greek yogurt is a great swap. It gives a similar creamy texture while being a bit healthier. You can also try different pasta types, like fettuccine or penne, based on your preference. - 1 teaspoon Dijon mustard - Salt and freshly ground black pepper - Fresh parsley, finely chopped for garnish Dijon mustard adds a subtle kick and depth of flavor. Salt and pepper are key for bringing out the taste in all the ingredients. A sprinkle of fresh parsley on top makes the dish look bright and fresh. It is a simple way to enhance the visual appeal. - Start by boiling salted water in a large pot. - Once boiling, add 12 oz of egg noodles. - Cook them until al dente, following package instructions. - When ready, drain the noodles and set them aside. - Toss the noodles with a drop of olive oil to keep them from sticking. - Heat 2 tablespoons of olive oil in a large skillet over medium-high heat. - Add 1 lb of thinly sliced beef sirloin to the hot pan. - Season the beef with salt and freshly ground black pepper. - Cook for about 3 to 4 minutes until the beef is browned. - Use a slotted spoon to remove the beef and place it on a plate. - In the same skillet, add the remaining olive oil. - Once hot, stir in 1 medium chopped onion and 2 minced garlic cloves. - Sauté for 2 to 3 minutes until the onion is soft and clear. - Next, add 8 oz of sliced mushrooms, cooking for another 4 to 5 minutes. - When the mushrooms are golden, sprinkle 2 tablespoons of flour over the mix. - Slowly pour in 1 cup of beef broth, whisking constantly. - Keep stirring until the mixture thickens, about 3 to 4 minutes. - Lower the heat to medium-low, then stir in 1 cup of sour cream. - Add 1 teaspoon of Dijon mustard for extra flavor. - Return the beef to the skillet, mixing well in the sauce. - Warm it through for 2 to 3 minutes without boiling. - Taste and adjust the seasoning as needed. - For plating, place a generous portion of noodles on each plate. - Ladle the creamy beef stroganoff over the noodles. - Finish by garnishing with finely chopped fresh parsley. - This adds a pop of color and freshness to your dish. For the full recipe, check out the [Full Recipe]. Enjoy this comforting meal! To make a smooth sauce, avoid lumps. When you add flour, stir it well before adding beef broth. This will help mix everything perfectly. Keep the heat low. You want to see gentle bubbles, not a rolling boil. A simmer will thicken your sauce without breaking it down. Slice your beef against the grain. This makes it tender and easy to chew. If you cut with the grain, the beef will be tough. Pay attention to the mushrooms too. Cook them until they are golden brown. This brings out their flavor and gives a nice texture. About 4-5 minutes should do the trick. Serve your beef stroganoff in shallow bowls. This allows the sauce to spread out and look rich. Add a sprinkle of fresh parsley on top for color. A bit of greenery makes the dish pop. It also adds a fresh taste to each bite. {{image_4}} You can make a tasty vegetarian beef stroganoff. Simply swap the beef for mushrooms or tofu. Mushrooms give a great, meaty flavor. Tofu adds protein and absorbs the sauce well. For a creamy mushroom stroganoff, follow these steps: - Use 16 oz of sliced mushrooms instead of beef. - Cook the mushrooms until they are soft and browned. - Add 1 cup of vegetable broth instead of beef broth. - Stir in the same sour cream for creaminess. If you want a lighter option, try using chicken or turkey. Both cook quickly and taste great in stroganoff. Use diced chicken breast or turkey breast instead of beef. Adjust the cooking time to about 5-7 minutes. Ensure the chicken or turkey is cooked through before adding the sauce. To elevate the flavor, consider adding Worcestershire sauce or a splash of red wine. These ingredients add depth and richness. You can also include fresh herbs like thyme or rosemary. They bring a nice aroma and complement the creamy sauce. A teaspoon of Worcestershire sauce or a ¼ cup of red wine can make a big difference. After enjoying your beef stroganoff, you may have some leftovers. Store them in an airtight container. Refrigerate the stroganoff within two hours of cooking. It will stay fresh for about three to four days. When you reheat, warm it gently over low heat. This keeps the sauce creamy. Stir often to avoid burning. You can also use a microwave. Heat it in short bursts, stirring in between. This method helps the dish heat evenly. If you want to keep beef stroganoff longer, freezing is a great option. To freeze, let the dish cool completely. Then, transfer it to a freezer-safe container. Leave some space at the top for expansion. Seal it tightly to prevent freezer burn. For thawing, the best method is overnight in the fridge. This keeps the flavor and texture nice. If you need it fast, you can use the microwave. Set it to defrost and check every few minutes. After thawing, reheat as I mentioned before, ensuring it warms evenly. You can find the full recipe for this comforting dish above. Enjoy every bite! You can enjoy Classic Beef Stroganoff with several tasty sides. Here are some great options: - Steamed green beans - Roasted broccoli - Mashed potatoes - A fresh garden salad - Garlic bread Each side adds a nice touch. Steamed veggies give color and crunch. Mashed potatoes soak up the sauce well. A salad offers a refreshing contrast. Classic Beef Stroganoff lasts about 3 to 4 days in the fridge. Store it in an airtight container. Always cool the dish before sealing it up. Check for any signs of spoilage before eating. If it smells off or looks strange, throw it away. Yes, you can prepare parts of Classic Beef Stroganoff ahead of time. Cook the beef and sauce, then store them separately from the noodles. When you’re ready to eat, heat the beef and sauce. Cook the noodles fresh for best results. This way, you keep everything tasty and warm. Classic Beef Stroganoff is not gluten-free due to the flour in the sauce. You can make it gluten-free by using cornstarch or gluten-free flour. Be sure to check that your beef broth and noodles are also gluten-free. This way, everyone can enjoy this delicious meal. For the full recipe, check my earlier section. You learned about the key ingredients for Classic Beef Stroganoff, including beef sirloin and egg noodles. We discussed how to cook the noodles, sauté the beef, and prepare a rich sauce. You also saw tips for perfecting the dish and its various options for customization, like vegetarian alternatives. In summary, you can make a delicious meal everyone will enjoy. Remember, cooking is about creativity. Feel free to experiment with flavors and ingredients until it’s just right for you. Enjoy your cooking journey!](https://dishtreats.com/wp-content/uploads/2025/06/f14c56cb-cc13-4cc3-a3ff-e0f76ee8bdb9-768x768.webp)


![- 8 oz. elbow macaroni - 1 lb. ground beef or ground turkey - 1 packet taco seasoning mix - 1 cup diced tomatoes (fresh or canned) - 1 cup canned black beans, drained and rinsed - 1 cup corn (can be frozen or canned) - 2 cups shredded cheddar cheese (divided) - 1 cup salsa (your choice of spiciness) - 1/2 cup sour cream - 1 tablespoon olive oil - Salt and pepper to taste - Chopped green onions and fresh cilantro for garnish Gather these ingredients before you start cooking. This will make the process smooth and fun! The elbow macaroni is the base of this dish. It holds the cheesy sauce very well. Ground beef or turkey adds a hearty touch. You can use either, depending on your taste. The taco seasoning mix gives the pasta that classic taco flavor. Diced tomatoes bring freshness and moisture, while black beans boost protein and fiber. Corn adds a nice sweetness. Cheddar cheese is key for that melty, gooey goodness. Salsa adds a kick; choose your preferred heat level. Sour cream makes the dish creamy and rich. Olive oil helps cook the meat and adds flavor. Finally, salt, pepper, and garnishes like green onions and cilantro make it all pop. When you have everything ready, the fun part starts! You’ll see how these simple ingredients blend into a delicious dish. For the complete recipe, check out the Full Recipe section. To start, cook the elbow macaroni. Follow the package instructions carefully. Aim for al dente texture, which means the pasta should be firm when bitten. This keeps it from getting mushy later. Once done, drain the pasta in a colander and set it aside in a large bowl. While the pasta cooks, heat the olive oil in a large skillet over medium heat. Add the ground beef or turkey. Cook for about 5-7 minutes, stirring often to break up the meat. Look for a nice brown color. After browning, drain any extra fat from the skillet. Next, add the taco seasoning mix, diced tomatoes, black beans, corn, and salsa. Stir well and let the mixture simmer for about 5 minutes. This helps the flavors come together. After simmering, gently fold the cooked macaroni into the skillet. Make sure the pasta gets well-coated with the tasty mixture. Lower the heat to low, then add 1 1/2 cups of shredded cheddar cheese. Stir until the cheese melts into a creamy coating. Remove the skillet from the heat and add the sour cream. Mix it well until fully blended. Taste your dish and add salt and pepper to your liking. For the full recipe, refer to the instructions above. Enjoy your cheesy taco pasta! To get the best taco flavor, use a high-quality taco seasoning mix. It gives a bold taste. I often mix in extra spices, like garlic powder or cumin, for depth. For a creamy texture, add the cheese slowly. Let it melt fully before adding sour cream. This step ensures a smooth, rich sauce. Garnish your cheesy taco pasta with fresh green onions and cilantro. They add color and freshness. You can also use sliced avocado or jalapeños for extra flair. For a complete meal, pair the pasta with a simple side salad or tortilla chips. The crunch complements the creamy pasta well. You can find the full recipe [here]. {{image_4}} You can change up the protein in this dish. Ground turkey is a lighter choice. Ground chicken also works well. If you prefer plant-based options, try meat substitutes made from soy or lentils. Each option gives a unique flavor, but they all blend well with taco spices. If you need gluten-free pasta, many brands offer great options. Just look for gluten-free elbow macaroni. For those avoiding dairy, you can find dairy-free cheese and sour cream at most stores. These alternatives melt nicely and keep the dish creamy. Don’t be afraid to play with flavors! Different salsas add unique twists. You can also add jalapeños for heat. Hot sauce can give it an extra kick, too. These simple changes can make your cheesy taco pasta even more exciting. For the full recipe, check out the Cheesy Taco Pasta Extravaganza. To store your Cheesy Taco Pasta, let it cool first. Place leftovers in an airtight container. This keeps the dish fresh and tasty. It will last in the fridge for about 3 to 4 days. Always check for smells or mold before eating. When you’re ready to eat, reheat the pasta on the stove. Pour the pasta into a skillet over low heat. Stir it often to ensure even heating. You can also add a splash of water or broth to keep it creamy. Microwave is another option. Use a microwave-safe dish and cover it. Heat in short bursts, stirring every minute until it’s hot. Freezing Cheesy Taco Pasta is a great way to enjoy it later. First, let it cool completely. Then, transfer it to a freezer-safe container. Make sure to leave some space for expansion. You can freeze it for up to 2 months. When you are ready to eat, defrost it overnight in the fridge. Reheat it on the stove, just like before, to keep the flavor and texture. Cheesy Taco Pasta can last for about 3 to 5 days in the fridge. To keep it fresh, store it in an airtight container. Look for signs of spoilage like a sour smell or mold. If you see either, it’s best to toss it out. Yes, you can make Cheesy Taco Pasta ahead of time. Cook it and let it cool. Then, store it in the fridge for up to 2 days before serving. When ready to eat, just reheat it in a pan or microwave. Add a splash of water or broth to keep it moist. If you don’t have elbow macaroni, you can use other pasta shapes. Options include rotini, penne, or even gluten-free pasta. Quinoa or rice can also work if you want a grain instead. Just adjust cooking times as needed. We explored a tasty Cheesy Taco Pasta recipe, packed with flavor and fun. You learned about the key ingredients, easy steps for cooking, and tips to nail that taco taste. We also talked about variations to fit your needs, storage tips, and answers to common questions. This dish is not just simple; it’s a crowd-pleaser. Enjoy cooking and sharing your delicious creation!](https://dishtreats.com/wp-content/uploads/2025/07/060fa6b2-3df9-47e4-b794-a1b6a0be3885-768x768.webp)