Are you craving a delicious, nourishing breakfast that can kickstart your day? Let me introduce you to Carrot Cake Overnight Oats! This tasty treat combines rolled oats with fresh carrots, spices, and optional nuts for added texture. It’s simple to make, packed with nutrients, and will satisfy your sweet tooth without the guilt. Read on to discover how to whip up this easy breakfast and explore tasty variations!
Ingredients
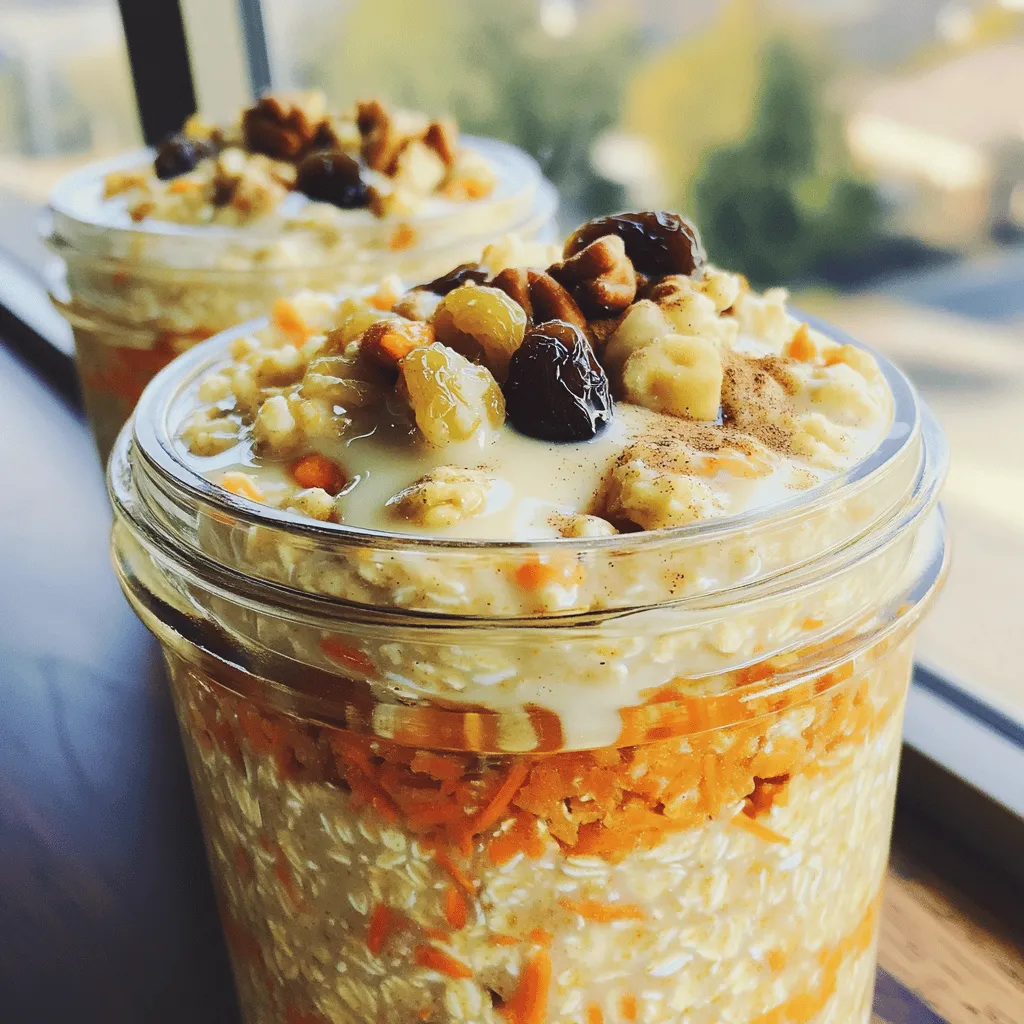
List of Ingredients
– 1 cup rolled oats
– 1 cup unsweetened almond milk
– 1 medium carrot, finely grated
– 1/4 cup Greek yogurt (optional)
– 2 tablespoons maple syrup (or honey)
– 1 teaspoon vanilla extract
– 1/2 teaspoon ground cinnamon
– 1/4 teaspoon ground nutmeg
– 1/4 cup raisins or sultanas
– 2 tablespoons chopped walnuts or pecans
– A pinch of salt
To make carrot cake overnight oats, you need simple ingredients. The rolled oats act as a base. Almond milk adds creaminess. You can use any milk you like. The finely grated carrot gives this dish its signature flavor. Greek yogurt makes it super creamy, but it’s optional. Maple syrup or honey adds sweetness. Vanilla extract, ground cinnamon, and nutmeg bring warmth. Raisins or sultanas add chewiness. Lastly, walnuts or pecans give crunch.
Ingredient Substitutions
– Alternative milks: You can swap almond milk for oat, soy, or coconut milk. Each milk adds a unique flavor.
– Sweetener variations: If maple syrup isn’t available, you can use agave or brown sugar.
– Nut options: If you’re allergic to nuts, try seeds like sunflower or pumpkin seeds.
Tips for Fresh Ingredients
– Choosing quality carrots: Look for firm, bright orange carrots. They should feel heavy and have no soft spots. Fresh carrots make a big difference in taste.
– How to select ripe bananas if using: If you want to add bananas, choose ones that are yellow with a few brown spots. This means they are sweet and ready to use.
Step-by-Step Instructions
Preparing the Oats Base
First, grab a medium-sized bowl. Pour in 1 cup of rolled oats and 1 cup of unsweetened almond milk. Stir the oats and milk together well. Make sure every oat is soaked in the milk. This step is key for soft oats.
Adding Flavorful Components
Next, add in the grated carrot. Use one medium carrot, finely grated for best texture. If you want extra creaminess, add 1/4 cup of Greek yogurt. Then, sprinkle in 2 tablespoons of maple syrup, 1 teaspoon of vanilla extract, 1/2 teaspoon of ground cinnamon, and 1/4 teaspoon of ground nutmeg. Don’t forget a pinch of salt. Mix everything until you have a creamy blend.
Mixing In Fruits and Nuts
Now, gently fold in 1/4 cup of raisins. If you like nuts, add 2 tablespoons of chopped walnuts or pecans. Set aside a few nuts to use later for garnish. This adds nice texture and crunch to your oats.
Chilling the Mixture
Seal the mixture in jars or airtight containers. Refrigerate them for at least 4 hours. If you can, let them chill overnight. This time allows the oats to soak up the milk and flavors, making them soft and tasty.
Serving Suggestions
When you are ready to eat, take the jars out of the fridge. Give the oats a good stir. If they seem too thick, add a splash of almond milk for your desired creaminess. Finally, top with the reserved nuts, a sprinkle of cinnamon, and a dollop of yogurt if you wish. This makes your breakfast look and taste great.Enjoy your delicious carrot cake overnight oats!
Tips & Tricks
Achieving the Perfect Texture
Soaking the oats is key. Oats need time to absorb the liquid. I recommend letting them sit overnight. This helps them get soft and creamy. If you find them too thick, add more almond milk. This balance gives you a smooth base.
Adjusting ingredient ratios can also help. If you want a richer taste, add more Greek yogurt. For a sweeter bite, increase the maple syrup. Each small change can alter the final taste and texture.
Flavor Enhancements
Spices make a big impact in this recipe. Adding ground ginger brings a warm kick. It pairs well with cinnamon and nutmeg. You can also experiment with coconut or chocolate chips. Both add a new layer of flavor. Coconut gives a tropical twist, while chocolate adds sweetness. Try a mix to find your favorite combo.
Meal Prep and Convenience
Making these oats in bulk saves time. You can prepare several jars at once. Store them in the fridge for quick breakfasts. This way, you have a nutritious meal ready to grab.
For easy grab-and-go options, use small jars. They fit in lunch bags and are simple to carry. Plus, you can eat them anywhere. Just remember to give them a good stir before diving in.

Variations
Adding Protein
To boost protein in your carrot cake overnight oats, try adding protein powder. You can use whey protein, which mixes well. If you prefer plant-based options, look for pea or brown rice protein. These are great for vegan diets and still pack a protein punch.
Flavor Combinations
Want to change things up? Add a tropical twist with diced pineapple. This sweet fruit pairs nicely with carrot. You could also try chocolate carrot cake oats. Mix in cocoa powder for a rich flavor. Both options keep breakfast fun and exciting!
Seasonal Variations
Make your oats seasonal! In fall, spice things up with pumpkin puree and pumpkin spice. This gives a cozy flavor perfect for cooler days. In spring, swap in fresh berries like strawberries or blueberries. They add a fresh taste and vibrant color. Each of these variations brings new life to your oats.
Storage Info
Proper Refrigeration
To keep your carrot cake overnight oats fresh, store them in the fridge. Use airtight containers or jars to avoid spills and keep the flavor intact. The oats stay good for about 3 to 5 days. If you want the best taste, eat them within the first two days.
Freezing Options
Yes, you can freeze overnight oats! Freezing works well if you want to make a batch ahead. To freeze, place the oats in a freezer-safe jar. Leave some space at the top, as they will expand. When ready to eat, move them to the fridge overnight to thaw. You can also heat them in the microwave if you prefer warm oats.
Containers Recommendations
Glass jars are my favorite for storing oats. They are sturdy and easy to clean. Look for containers with airtight lids. This helps keep your oats fresh longer and prevents any odors from the fridge from seeping in. Make sure the seals are tight to lock in all the yummy flavors from your carrot cake overnight oats.
FAQs
How long do overnight oats last in the fridge?
Overnight oats can last up to five days in the fridge. Store them in an airtight container. This way, they stay fresh and tasty. I recommend eating them within three days for the best flavor and texture.
Can I make overnight oats without yogurt?
Yes, you can make overnight oats without yogurt. If you want a creamy texture, try using extra almond milk. You can also use mashed banana or applesauce for added creaminess. Both options work well and keep your oats delicious.
What can I use instead of almond milk?
If you need an alternative to almond milk, use any milk you like. Options include oat milk, soy milk, or coconut milk. Each has its own flavor and texture, so feel free to experiment. Just pick one that suits your taste.
Can overnight oats be eaten hot?
Yes, you can enjoy overnight oats warm. To heat them up, simply transfer the mixture to a microwave-safe bowl. Warm it in the microwave for about 30 seconds. Stir well and check the temperature. Add a splash of milk if it gets too thick.
How do I make carrot cake overnight oats vegan?
To make carrot cake overnight oats vegan, swap regular yogurt for a plant-based yogurt. You can also use maple syrup instead of honey. All other ingredients can stay the same. This way, you can still enjoy a tasty and healthy breakfast without any animal products.
This blog post explored making delicious carrot cake overnight oats. We covered the key ingredients, tasty variations, and helpful tips. You can mix and match ingredients to suit your taste. Remember to store them properly to enjoy all week. Overnight oats are easy and fun to prepare. Try new flavors and make it your own. Enjoy this nutritious breakfast that fuels your day!


