Caprese Stuffed Portobellos Flavorful and Easy Recipe

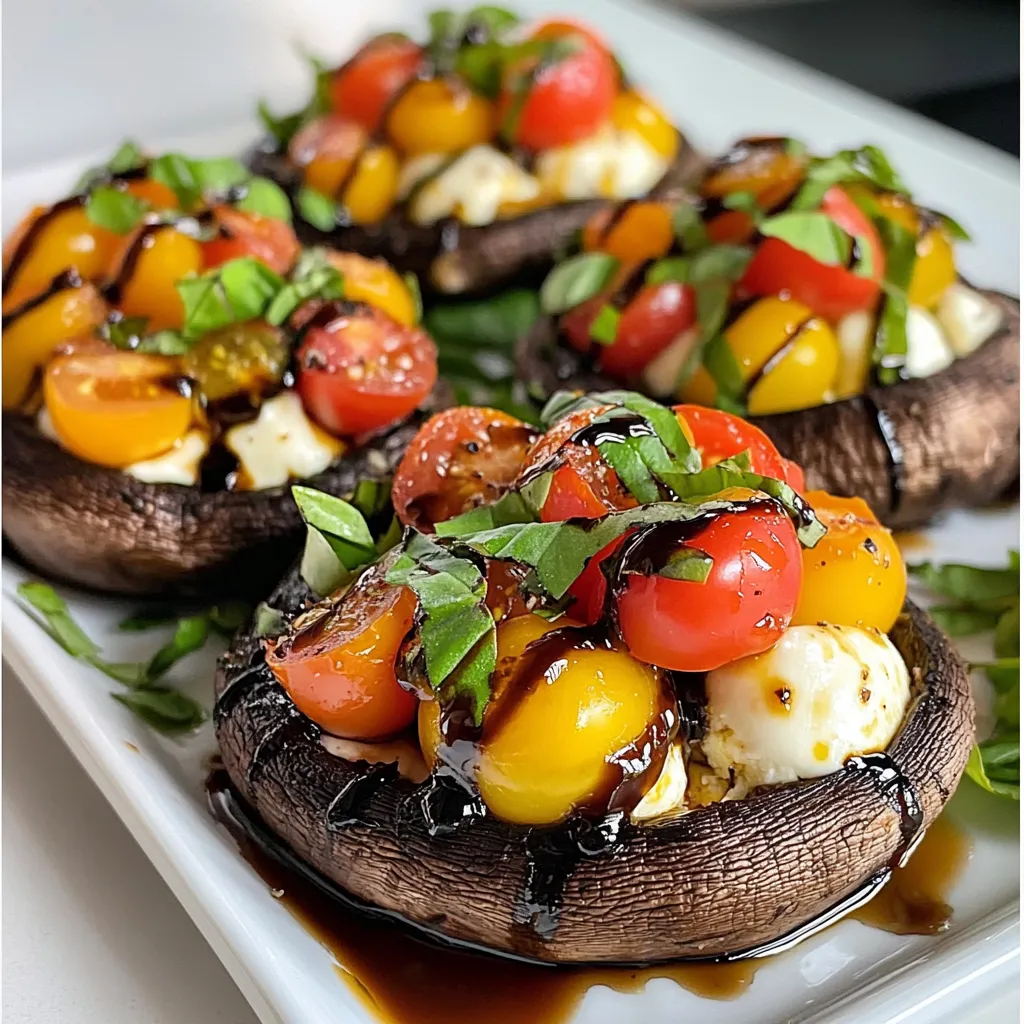
Are you ready to elevate your dinner game? Caprese Stuffed Portobellos are a tasty and simple dish that will impress everyone. With juicy mushrooms filled with fresh mozzarella, tomatoes, and basil, you’ll savor every bite. This recipe is perfect for both weeknight meals and special occasions. Let me show you how to create this delicious dish that will become your new go-to favorite!
Why I Love This Recipe
- Fresh Ingredients: This recipe showcases the vibrant flavors of fresh tomatoes, basil, and mozzarella, making every bite a taste of summer.
- Easy to Prepare: With just a few simple steps, you can have a stunning dish ready in under 30 minutes, perfect for a quick weeknight dinner.
- Versatile Dish: These stuffed portobellos can be served as an appetizer, side dish, or even a main course, catering to various dining occasions.
- Healthy and Satisfying: Packed with nutrients and flavor, this dish is a guilt-free indulgence that satisfies without weighing you down.
Ingredients
Required Ingredients for Caprese Stuffed Portobellos
To make Caprese stuffed portobellos, you need:
- 4 large portobello mushrooms
- 1 cup cherry tomatoes, halved
- 1 cup fresh mozzarella balls, halved or diced
- 1/2 cup fresh basil leaves, chopped
- 2 tablespoons balsamic glaze
- 2 tablespoons extra virgin olive oil
- 2 cloves garlic, minced
- Salt and pepper to taste
These ingredients create a bright, fresh flavor. The portobellos serve as a hearty base. The mozzarella adds creaminess, while the tomatoes bring a sweet burst. Fresh basil gives a nice herbal note.
Optional Ingredients for Customization
You can customize your dish with these options:
- Add cooked chicken or shrimp for protein.
- Use different cheeses like feta or goat cheese.
- Toss in olives or sun-dried tomatoes for unique flavors.
- Try adding spinach or arugula for extra greens.
Feel free to mix and match. This lets you create something special based on your taste.
Ingredient Substitutions and Tips
If you’re missing an ingredient, here are some swaps:
- Replace portobello mushrooms with large bell peppers.
- Use canned tomatoes instead of fresh if needed.
- Swap balsamic glaze with a simple vinaigrette.
Always taste as you go. Adjust salt and pepper to enhance the flavor. Sourcing fresh ingredients helps make every bite delicious.

Step-by-Step Instructions
Prepping the Portobello Mushrooms
To start, preheat your oven to 375°F (190°C). This will ensure even cooking. Next, grab your large portobello mushrooms. Use a damp cloth to clean them. This removes any dirt and keeps them fresh. Then, take a spoon and gently scoop out the stems and gills. This step creates space for your filling. Make sure to be gentle so you don’t break the caps.
Creating the Caprese Filling
In a mixing bowl, combine the halved cherry tomatoes, mozzarella balls, and chopped basil leaves. Add the minced garlic for a burst of flavor. Then, drizzle in the balsamic glaze and extra virgin olive oil. Season your mixture with salt and pepper to taste. Gently toss everything together until well mixed. This filling should be colorful and full of fresh flavors.
Baking the Stuffed Portobellos
Place each portobello cap on a lined baking sheet, gill side up. Generously fill each mushroom with the caprese mixture. Let it mound slightly in the center for a nice look. Bake the stuffed mushrooms in the preheated oven for about 20 minutes. Watch them closely. You want the mushrooms to be tender and the cheese to melt and turn golden. Once done, let them cool for a few minutes. If you like, garnish with extra fresh basil leaves for a pop of color.
Cooking Methods
Oven-Baking vs. Grilling
You can cook Caprese stuffed portobellos in the oven or on the grill. Oven-baking is simple and keeps the mushrooms moist. Grilling adds a nice smoky flavor that many enjoy. If you grill, watch the heat. Too hot can char them. Both methods work well, so choose your favorite!
Cooking Time and Temperature Guidelines
For oven-baking, set your temperature to 375°F (190°C). Bake the mushrooms for about 20 minutes. This time helps the cheese melt and the mushrooms soften nicely. If you grill, keep an eye on them. Cooking times may vary based on your grill’s heat.
Ensuring Even Cooking and Flavor
To ensure even cooking, place the portobellos gill side up. This helps the filling stay in place and cook evenly. Make sure to fill them generously but not too much. Too much filling can spill out and cause uneven cooking. Use fresh ingredients for the best flavor. The blend of tomatoes, cheese, and basil shines when each ingredient is fresh.
Pro Tips
- Fresh Ingredients: Always use the freshest mozzarella and basil for the best flavor. This enhances the overall taste of the dish.
- Preheat the Oven: Ensure your oven is fully preheated to 375°F (190°C) before baking for even cooking and optimal cheese melting.
- Customize the Filling: Feel free to add other ingredients like olives or artichokes to the filling for a unique twist on this classic recipe.
- Serving Suggestions: Pair these stuffed portobellos with a light salad or crusty bread to round out your meal beautifully.

Tips & Tricks
How to Ensure Perfectly Tender Mushrooms
To make sure your mushrooms are tender, choose large portobello caps. Clean them gently with a damp cloth. Remove the stems and gills carefully. This step creates more space for the filling. Bake the mushrooms at 375°F for about 20 minutes. This time allows them to soften and soak up the flavors.
Enhancing Flavor with Seasoning
Seasoning is key to making your dish pop. Use fresh garlic in the filling. It adds a nice depth of flavor. Salt and pepper are must-have ingredients. Don’t be shy; sprinkle enough to taste. Balsamic glaze gives a sweet touch. Olive oil adds richness. Mix all these flavors well for a tasty filling.
Presentation Tips for Serving
To impress your guests, think about how you serve the mushrooms. Use a wooden board or a nice plate. Drizzle extra balsamic glaze around the mushrooms. This adds color and looks fancy. Garnish with fresh basil leaves for a bright touch. A beautiful presentation makes the dish even more appealing.
Variations
Caprese Stuffed Portobellos with Pesto
You can take your Caprese stuffed portobellos to a new level by adding pesto. Pesto brings a rich, herbal flavor that pairs well with the cheese and tomatoes. Just mix a few tablespoons of pesto into your filling before stuffing the mushrooms. This small change adds depth and makes the dish even more exciting. Try using homemade pesto or store-bought for convenience.
Adding Proteins like Chicken or Shrimp
If you want to make this dish heartier, consider adding proteins like chicken or shrimp. For chicken, use cooked, diced chicken breast. Fold it into the filling along with the tomatoes and cheese. For shrimp, sauté them in garlic and olive oil before mixing them in. Both options bring a satisfying protein boost, turning your portobellos into a complete meal.
Vegetarian & Vegan Adaptations
To make this dish vegetarian, use plant-based cheese options. Look for mozzarella-style cheese made from nuts or soy. For a vegan version, swap the balsamic glaze for a vegan-friendly option. You can also use nutritional yeast to add a cheesy flavor without any dairy. These adaptations keep the dish flavorful while meeting different dietary needs.
Storage Info
Best Practices for Refrigerating Leftovers
Store leftover Caprese stuffed portobellos in an airtight container. This keeps them fresh. Place them in the fridge within two hours of cooking. They will last for about three days. Before storing, let them cool at room temperature. This step helps prevent moisture that can make them soggy. Avoid stacking them to keep the filling intact.
Reheating Tips to Maintain Flavor and Texture
To reheat the stuffed portobellos, use the oven for the best results. Preheat your oven to 350°F (175°C). Place the mushrooms on a baking sheet. Cover them lightly with foil to prevent drying out. Heat for about 10-15 minutes, or until warm. You can also use a microwave, but the texture might change. If using a microwave, heat them in short bursts to avoid overcooking.
Freezing Caprese Stuffed Portobellos for Future Meals
You can freeze Caprese stuffed portobellos for later use. First, let them cool completely. Wrap each mushroom tightly in plastic wrap. Then, place them in a freezer-safe bag or container. They can stay frozen for up to three months. When you’re ready to eat, thaw them overnight in the fridge. Reheat them in the oven to restore their texture and flavor.
FAQs
Can I make Caprese Stuffed Portobellos ahead of time?
Yes, you can prep Caprese Stuffed Portobellos ahead of time. You can fill the mushrooms with the caprese mixture and store them in the fridge. Just cover them tightly with plastic wrap. They stay fresh for about 24 hours. When you are ready, bake them directly from the fridge. This saves time on busy nights and keeps your meal stress-free.
What type of cheese can I use instead of mozzarella?
If you don’t have mozzarella, you can use other cheeses. Fresh burrata adds creaminess. Feta cheese gives a tangy flavor. Goat cheese can add a nice twist too. Just remember that each cheese will change the taste a bit. Choose one that you love for the best results.
What sides pair well with Caprese Stuffed Portobellos?
Caprese Stuffed Portobellos are tasty on their own. But they go great with some sides. A simple mixed green salad adds freshness. Garlic bread pairs well for a hearty touch. You can also serve them with roasted veggies for a colorful plate. Choose sides that balance the rich flavors of the mushrooms.
We explored making delicious Caprese Stuffed Portobellos. You learned about key ingredients, with tips on substitutes. I shared step-by-step instructions and compared cooking methods. Key tips helped ensure tender mushrooms and great flavor. You can even customize your dish with variations and storage tips.
In the end, this dish is simple and fun to prepare. Enjoy your cooking and don’t be afraid to get creativ

Caprese Stuffed Portobellos
Ingredients
- 4 large portobello mushrooms
- 1 cup cherry tomatoes, halved
- 1 cup fresh mozzarella balls, halved or diced
- 0.5 cup fresh basil leaves, chopped
- 2 tablespoons balsamic glaze
- 2 tablespoons extra virgin olive oil
- 2 cloves garlic, minced
- Salt and pepper to taste
- Additional fresh basil leaves for garnish (optional)
Instructions
- Preheat your oven to 375°F (190°C). Line a baking sheet with parchment paper to prevent sticking.
- Carefully clean the portobello mushrooms by wiping them with a damp cloth to remove any dirt. Use a spoon to gently remove the stems and the gills from the inside of the mushrooms; this will create more room for the delicious filling.
- In a mixing bowl, combine the halved cherry tomatoes, mozzarella cheese, chopped basil leaves, minced garlic, balsamic glaze, and olive oil. Season with salt and pepper to taste. Gently toss the mixture until all ingredients are well incorporated.
- Place each portobello mushroom cap on the prepared baking sheet, ensuring the gill side is facing up. Generously fill each cap with the caprese mixture, allowing it to mound slightly in the center for an appealing presentation.
- Bake the stuffed mushrooms in the preheated oven for approximately 20 minutes, or until the mushrooms become tender and the cheese is melted and slightly golden.
- Once baked, carefully remove the portobellos from the oven and allow them to cool for a few minutes. Optionally, garnish with additional fresh basil leaves before serving to add a pop of color.


. How to select ripe avocados To choose ripe avocados, look for dark green skin. Gently squeeze without applying too much pressure. A ripe avocado gives slightly. Avoid any that feel too soft or have dark spots. Storing leftover salad To keep leftovers fresh, store them in an airtight container. Place a piece of plastic wrap directly on the salad before sealing. This helps keep the avocados from browning. Additional spices or herbs You can add spices like smoked paprika or cayenne for extra flavor. Fresh herbs like parsley or basil can also brighten the salad. Experiment with what you like to create your perfect mix. Adjusting the heat level If you want more heat, add more jalapeño or a splash of hot sauce. For a milder version, skip the jalapeño or remove the seeds. Adjust to your taste! Presentation ideas For a fun presentation, layer the salad in a clear bowl. This shows off all the bright colors. You can also serve it in individual bowls or mason jars for a neat look. Pairing with other dishes This salad pairs well with grilled chicken, fish, or tacos. You can also serve it as a light lunch or side dish at a barbecue. It adds a fresh touch to any meal. {{image_4}} You can easily change this salad to fit your taste. Adding protein is one great option. Grilled chicken or shrimp works well here. It adds heartiness and flavor. You can also mix in seasonal vegetables. Try diced cucumbers in summer or roasted butternut squash in fall. These add color and texture. You can make this salad vegan by skipping the feta cheese. The other ingredients are already plant-based. It still tastes great without it. If you need a gluten-free version, you’re in luck! This salad is naturally gluten-free. All the ingredients fit a gluten-free diet, so enjoy without worry. For a twist on the dressing, use a yogurt-based option. This adds creaminess without extra fat. It’s a fun change from the classic vinaigrette. You can also try different vinaigrettes. A balsamic or honey mustard vinaigrette can change the flavor. Experiment to find your favorite! For the full recipe, check out the delicious avocado and black bean salad. To keep your avocado and black bean salad fresh, store it in an airtight container. This helps prevent oxidation and keeps flavors intact. Make sure the container is clean and dry before adding the salad. You can also squeeze a little extra lime juice on top. This adds a nice flavor and helps slow browning. I do not recommend freezing this salad. The texture of avocados changes when frozen. You may end up with mushy avocados and watery beans. If you want to save some for later, consider storing the ingredients separately. You can freeze black beans or corn, but mix them fresh with avocado when serving. This salad is best served cold or at room temperature. If you must reheat it, do it gently. Place it in a microwave-safe bowl and heat in short bursts. Stir it often to avoid cooking the avocado. However, reheating is not necessary, as the flavors shine best when fresh. For more details, check the Full Recipe. To keep avocados fresh, use lemon or lime juice. The acid slows browning. Also, store cut avocados in an airtight container. You can cover them with plastic wrap, pressing it against the flesh to limit air exposure. If you leave the pit in the avocado, it helps too. Yes, you can prepare the salad ahead. However, add the avocados and dressing just before serving. This way, they stay fresh. You can chop all the other ingredients earlier. Store them in the fridge to keep them cool. If you want to switch the black beans, try chickpeas or kidney beans. They both add protein and flavor. You could also use grilled chicken or shrimp for a meaty option. If you prefer a vegan choice, lentils are great too. Yes, this salad is gluten-free. All the ingredients are safe for those with gluten issues. If you choose to add any extras, like croutons, check their labels to ensure they are gluten-free. This blog post covered a vibrant salad packed with healthy ingredients. You learned how to prepare fresh avocados, black beans, and various veggies. I shared tips for making the perfect dressing and assembling the salad without mushing the avocados. Remember, customizing the salad allows for everyone’s taste. Keep it fresh, explore new flavors, and enjoy! Healthy eating can be fun and delicious. Take these ideas and make your salad unique.](https://dishtreats.com/wp-content/uploads/2025/06/59c4ae36-0ebd-4eac-932b-d71541cf887d-768x768.webp)


![- 1 cup plain Greek yogurt - 1/4 cup creamy mayonnaise - 1 tablespoon freshly squeezed lemon juice - 1 teaspoon garlic powder - 1 teaspoon onion powder - 1 teaspoon dried dill weed - 1 teaspoon dried parsley - 1/2 teaspoon sea salt - 1/4 teaspoon freshly ground black pepper - 1/4 teaspoon smoked paprika - Assorted fresh vegetables (carrots, celery, bell peppers, cucumber) To make a delicious Creamy Greek Yogurt Ranch Dip, you need a few simple ingredients. Start with the main trio: Greek yogurt, creamy mayonnaise, and lemon juice. The yogurt gives the dip its rich and tangy base. The mayonnaise adds a smooth, creamy texture, while the lemon juice brightens the flavors. Next, you’ll want to gather your seasonings. Garlic powder and onion powder add a savory punch. Dried dill weed and parsley bring in that classic ranch flavor. Salt, black pepper, and smoked paprika round out the taste, adding depth and a hint of spice. Finally, think about what to dip. Fresh veggies like carrots, celery, bell peppers, and cucumber work perfectly. They add crunch and freshness, creating a balanced snack. For the full recipe, check out the details above. First, grab a medium-sized mixing bowl. In this bowl, add 1 cup of plain Greek yogurt and 1/4 cup of creamy mayonnaise. These two ingredients create a rich base for our dip. Use a whisk or spatula to blend them well until smooth. It should look creamy and inviting. Next, squeeze in 1 tablespoon of freshly squeezed lemon juice. This adds a nice tang to the dip. Now, sprinkle in the seasonings: 1 teaspoon each of garlic powder, onion powder, dried dill weed, and dried parsley. Add 1/2 teaspoon of sea salt, 1/4 teaspoon of freshly ground black pepper, and 1/4 teaspoon of smoked paprika. These flavors will come together beautifully. Now it's time to whisk everything together. Vigorously mix the ingredients until the dip is fully combined. It should be smooth and creamy, with a lovely thickness. Take a taste and adjust the seasonings as needed. If you want more flavor, feel free to add a pinch of salt or a few more herbs. Your taste buds will guide you. Once you're happy with the flavor, it's time to chill the dip. Cover the bowl with plastic wrap or transfer the dip to an airtight container. Place it in the refrigerator for at least 30 minutes. This step allows the flavors to meld and deepen. When you're ready to enjoy, take the dip out of the fridge. Serve it chilled with an assortment of fresh vegetables for dipping, like carrots, celery, bell peppers, and cucumber. This adds a vibrant touch and makes for a fun snack! For the complete recipe, check out the [Full Recipe]. To make your Creamy Greek Yogurt Ranch Dip even tastier, try using fresh herbs. Fresh chives, dill, or parsley can add great flavor. You can also adjust the lemon juice for more tanginess. A little extra juice can brighten the dip. If you want a thicker dip, add more Greek yogurt. It will make the dip creamier. You can also cut back on the mayonnaise for a lighter version. This keeps the flavor while reducing calories. This dip is perfect for parties and gatherings. It pairs well with crackers or pita chips. Serve it with an array of fresh veggies, like carrots or cucumbers. They make great dippers, adding crunch to your snack. For the full recipe, check the earlier sections. {{image_4}} You can easily change the herbs in this dip. Fresh herbs like chives or basil work great. They add a nice twist to the flavor. Dried herbs can also give you different tastes. Think about using oregano or thyme for a unique touch. If you love some heat, add a spicy twist. Incorporate hot sauce or cayenne pepper. This will give your dip a zesty kick. You can also add chopped jalapeños for extra spice. Just be careful with the amount; you want to enjoy the heat, not overpower it! For a vegan version, swap the yogurt and mayonnaise. Use a plant-based yogurt and vegan mayo. Make sure all seasonings are plant-based too. This way, you can enjoy the same creamy dip without any animal products. It's delicious and fits many diets! For the full recipe, check out the link above. To keep your creamy Greek yogurt ranch dip fresh, store it in an airtight container. This helps prevent any odors from other foods in your fridge. You can enjoy the dip for up to one week. Just make sure to seal it tightly. Freezing this dip is not recommended. The texture may change after thawing, making it watery. Only freeze if it is necessary. If you must, use a freezer-safe container. If you freeze the dip, place it in the refrigerator to thaw. This method gives you the best results. Once thawed, stir it well before serving again. This helps bring back the creamy texture. Yes, non-fat can be used for a lighter version. This choice keeps the dip creamy while cutting down on fat. The flavor remains rich and satisfying. The dip lasts up to one week in the refrigerator. Store it in an airtight container to keep it fresh. I find it gets even better after a day. Fresh veggies, crackers, pita chips, or pretzels are great options. Carrots, celery, and bell peppers work well. You can get creative with your dippers! Yes, all ingredients are gluten-free; verify brands to be sure. This makes it a perfect snack for anyone with gluten sensitivities. Yes, it’s recommended to make it a few hours ahead to enhance flavors. The longer it sits, the more the flavors blend. I often prepare it the night before. This blog post shared a tasty Greek yogurt dip recipe. We covered the key ingredients, easy steps, and tips to make it even better. You learned how to customize the dip, try vegan options, and store it correctly. Think of this dip for your next party or snack. It’s healthy, easy to make, and perfect with fresh veggies or chips. Enjoy your tasty dip and feel good about sharing it with friends!](https://dishtreats.com/wp-content/uploads/2025/07/4dca82da-d028-43ac-94fd-c211b04a114a-768x768.webp)