
Get ready for a cozy meal with my Butternut Squash Mac and Cheese! This creamy comfort food pairs the sweetness of butternut squash with sharp cheese for a dish that’s rich and satisfying. Whether you’re a cheese lover or just looking for a tasty way to add veggies, this recipe is perfect for you. Join me in exploring how to create this warm, delicious meal step by step!
Why I Love This Recipe
- Comfort Food at its Best: This creamy butternut squash mac and cheese is the ultimate comfort food, combining the nostalgic flavors of mac and cheese with a healthy twist.
- Rich in Flavor: The addition of roasted butternut squash not only gives this dish a vibrant color but also adds a natural sweetness that beautifully complements the sharp cheddar cheese.
- Customizable: You can easily modify this recipe by using different types of cheese or even adding in your favorite vegetables for a personalized touch.
- Perfect for Any Occasion: Whether it’s a cozy family dinner or a festive gathering, this creamy mac and cheese is sure to impress and satisfy everyone at the table.
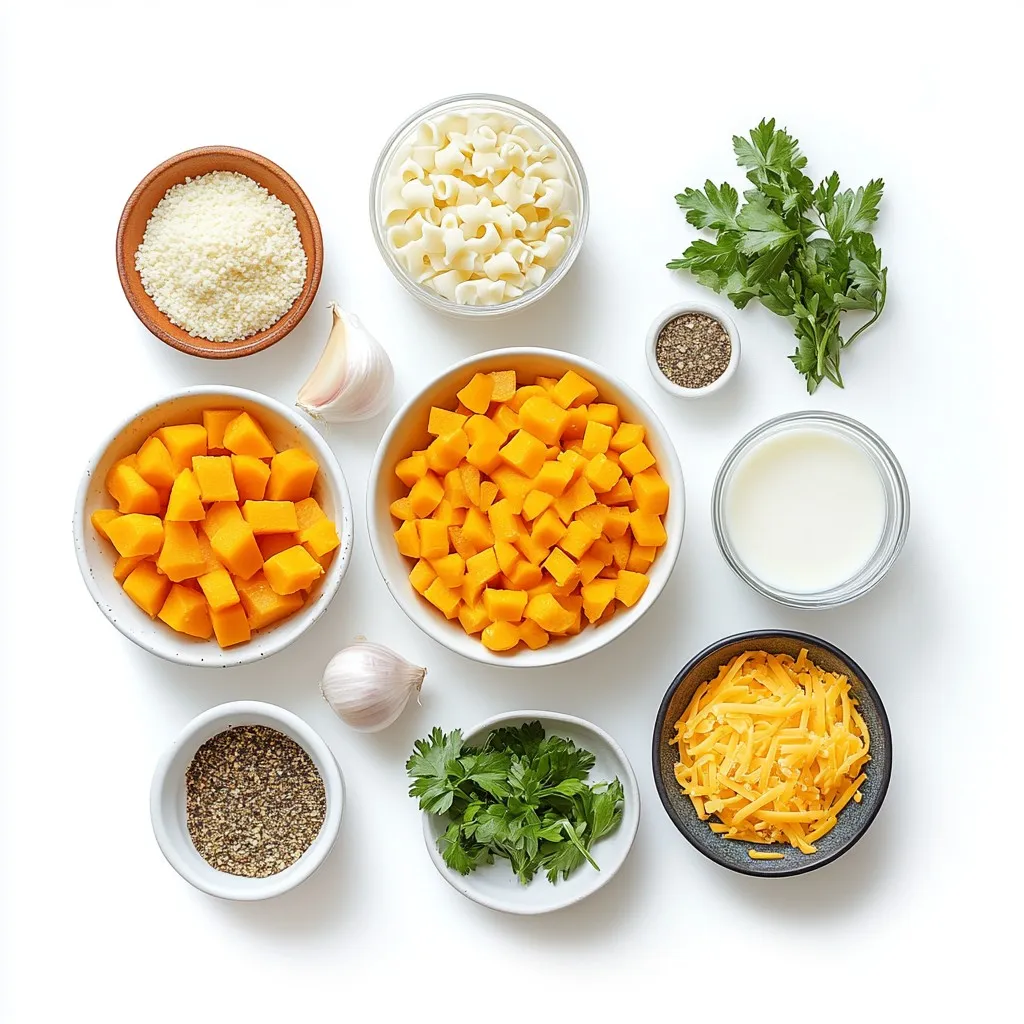
Ingredients
Main Ingredients
– 8 ounces elbow macaroni
– 2 cups butternut squash, peeled and diced
– 2 tablespoons olive oil (divided)
– 1 medium onion, finely chopped
– 2 cloves garlic, minced
Dairy and Broth
– 1 ½ cups vegetable broth
– 1 cup milk (or plant-based milk)
– 1 ½ cups shredded sharp cheddar cheese
– ½ cup grated Parmesan cheese
Seasonings
– 1 teaspoon ground nutmeg
– 1 teaspoon smoked paprika
– Salt and freshly ground pepper, to taste
– Fresh parsley, chopped (for garnish)
Butternut squash mac and cheese is a dish that warms the heart. The main ingredients create a rich base. Elbow macaroni gives a cozy texture. Butternut squash adds a sweet, creamy element. Olive oil helps sauté the onions and garlic, giving a fragrant touch.
In the dairy and broth section, the vegetable broth and milk bring creaminess. Sharp cheddar cheese adds a bold flavor. Parmesan cheese melts perfectly, making the dish extra cheesy.
For seasonings, ground nutmeg enhances the sweetness of the squash. Smoked paprika adds depth and warmth. A pinch of salt and pepper is essential to balance the flavors. Lastly, fresh parsley provides a bright finish to each bowl.
Gather these ingredients, and get ready to create a creamy comfort food that will leave everyone smiling!
Step-by-Step Instructions
Cooking the Pasta
To start, grab a large pot. Fill it with water and add a pinch of salt. This helps season the pasta. Turn the heat on high and bring the water to a rolling boil. Once boiling, add the elbow macaroni. Cook according to the package directions, about 7 to 9 minutes. You want it al dente, firm to the bite. When done, drain the pasta in a colander. Set it aside while you prepare the rest.
Roasting the Butternut Squash
Next, we will roast the butternut squash. Preheat your oven to 400°F (200°C). While it heats, take a large baking sheet. Toss the diced butternut squash with 1 tablespoon of olive oil. Season with salt and pepper for flavor. Spread the squash evenly on the baking sheet. Roast it for 20 to 25 minutes. Stir halfway through so it cooks evenly. The squash should be tender and slightly caramelized.
Sautéing Aromatics and Making the Sauce
Now, let’s get aromatic! In a large skillet, heat the remaining tablespoon of olive oil over medium heat. Add the finely chopped onion and sauté until it’s soft and clear, about 5 minutes. Then, add the minced garlic and cook for 1 more minute. The smell will be amazing! Once the squash is done roasting, add it to the skillet. Then, pour in the vegetable broth and milk. Sprinkle in the ground nutmeg and smoked paprika. Stir everything together and let it simmer gently. Use an immersion blender to puree the mix until it’s smooth and creamy.
Combining Cheeses and Mixing with Pasta
It’s cheese time! Stir in the shredded sharp cheddar and grated Parmesan into the creamy sauce. Mix well until the cheese melts. This makes the sauce extra rich. Taste it and adjust with salt and freshly ground pepper as needed. Add the drained macaroni to the cheese sauce. Gently stir to coat every piece. You want each elbow to be covered in that creamy goodness.
Optional Baking Instructions
If you want a baked version, this step is for you. Transfer the mac and cheese to a greased baking dish. For an extra cheesy crust, sprinkle some more cheddar on top. Bake in the preheated oven at 350°F (175°C) for 15 to 20 minutes. You want it bubbly and golden on top.
Garnishing and Serving
Once baked, remove the dish from the oven. Let it cool for a few minutes. This helps the sauce set a bit. Before serving, garnish each portion with fresh chopped parsley. This adds a nice pop of color and flavor. Enjoy your creamy butternut squash mac and cheese!
Tips & Tricks
Achieving Creamy Consistency
To make your butternut squash mac and cheese creamy, blending is key. Once you roast the squash, use an immersion blender to puree it. This step makes the sauce smooth and rich. If you don’t have one, transfer the squash mix to a regular blender. Blend it until creamy and return it to the skillet. Adjust moisture levels by adding more milk or broth if needed. This keeps your sauce from being too thick or too watery.
Enhancing Flavor Profiles
To enhance the flavors, seasonings are your best friend. I love using ground nutmeg and smoked paprika. Nutmeg adds warmth, while smoked paprika gives a nice depth. Feel free to experiment with other spices, too. A pinch of cayenne or red pepper flakes adds a bit of spice. Just remember to add these gradually. Taste your sauce as you go to find the perfect balance.
Alternatives for Dietary Preferences
If you want a vegan dish, swap the cheese with nut-based options. Nutritional yeast gives a cheesy flavor without dairy. For the milk, use almond, soy, or oat milk. For gluten-free options, choose gluten-free elbow macaroni. You can also look for gluten-free cheese brands. These swaps make the dish friendly for different diets while keeping it tasty.
Pro Tips
- Choose the Right Cheese: For a creamier texture, opt for a combination of cheeses. Mixing sharp cheddar with a milder cheese like Gruyère can add depth and richness to your mac and cheese.
- Perfectly Roasted Squash: Ensure your butternut squash is cut into uniform pieces to promote even roasting. This will enhance the sweetness and flavor in your dish.
- Enhance Flavor with Spices: Don’t hesitate to experiment with spices! Try adding a pinch of cayenne pepper for a little heat or a sprinkle of Italian herbs to elevate the flavor profile.
- Make Ahead: This dish can be made ahead of time and stored in the refrigerator. Just reheat it in the oven for a comforting, quick meal later!
Variations
Vegan Butternut Squash Mac and Cheese
To make this dish vegan, swap out dairy products. Use plant-based milk, like almond or oat milk. For cheese, try vegan cheese shreds. These melt well and add creamy texture. Nutritional yeast is a great choice too. It gives a cheesy flavor without dairy. You can also blend in some soaked cashews for added creaminess. Just remember to keep an eye on the salt. Sometimes, vegan cheese can be saltier.
Gluten-Free Options
For gluten-free mac and cheese, choose alternative pasta types. Brown rice or chickpea pasta works well. They have a nice texture and taste. Make sure to cook them al dente. This keeps them from getting mushy in the sauce. For cheese, look for gluten-free cheese brands. Many have great flavor and melt nicely. Always check the labels to ensure they’re gluten-free.
Adding Extra Vegetables
Boost nutrition by adding extra veggies. Spinach, kale, or broccoli are excellent choices. They add color and flavor. To incorporate greens, sauté them with the onions. This softens them and enhances their taste. You can also stir in cooked peas or roasted bell peppers. This adds a fun twist and makes it more filling. Don’t be afraid to get creative with your veggie choices!
Storage Info
Refrigeration
To store leftovers, let the butternut squash mac and cheese cool completely. Place it in an airtight container. This will keep it fresh and tasty. Use glass or BPA-free plastic containers for best results.
Freezing Instructions
For freezing, scoop the cooled mac and cheese into freezer-safe bags or containers. Press out as much air as possible before sealing. This prevents freezer burn. When ready to use, thaw it in the fridge overnight. Reheat in a pot over low heat or in the microwave until warm.
Shelf Life
You can store the refrigerated mac and cheese for up to 4 days. In the freezer, it lasts about 3 months. Look for signs of spoilage, such as a sour smell or mold. If it looks or smells off, toss it out. Always prioritize food safety!
FAQs
What can I substitute for butternut squash?
You can use sweet potatoes, pumpkin, or acorn squash. Each option adds a sweet, earthy flavor. Sweet potatoes create a similar creamy texture. Pumpkin adds a brighter color and mild taste. Acorn squash has a nutty flavor, making it a great choice too.
Can I make this recipe ahead of time?
Yes, you can prep it ahead. Cook the pasta and squash, then store them in the fridge. Make the cheese sauce and mix it in before baking. This way, you save time on busy days. Just remember to heat it up before serving.
Is butternut squash mac and cheese healthy?
Yes, butternut squash is rich in vitamins A and C. It also has fiber, which aids digestion. Using less cheese makes it lighter. You can also swap milk for plant-based options to boost nutrients. This dish is comfort food that can be good for you!
How to make it spicier?
Add crushed red pepper flakes for heat. You can also mix in diced jalapeños or hot sauce. Smoked paprika has a bit of warmth too. Adjust the spice to fit your taste. It brings a fun twist to this creamy dish!
Can I use other types of cheese?
Absolutely! Try gouda or Monterey Jack for a twist. Cream cheese can make it extra creamy. If you like a stronger taste, go for blue cheese. Mix and match to find your favorite blend. Each cheese adds a unique flavor to your mac and cheese!
You now have a clear guide to making a delicious butternut squash mac and cheese. We covered the key ingredients, step-by-step instructions, and helpful tips for perfection. Don’t forget the variations for different diets and preferences. Remember, you can easily adjust flavors and try new veggies. This dish is comforting and packed with nutrients. Enjoy your cooking, and let it bring warmth to your table! Now go create your creamy masterpiec


