Ready to delight your taste buds? This Brown Sugar Garlic Chicken recipe is easy and oh-so-tasty! With simple ingredients like chicken thighs, brown sugar, and soy sauce, it’s perfect for busy weeknights. You’ll get step-by-step instructions and tips to make this dish shine. Let’s turn your kitchen into a flavor haven! Dive in to learn how to create a dish you’ll crave again and again.
Why I Love This Recipe
- Irresistible Flavor: The combination of sweet brown sugar and savory garlic creates a mouthwatering glaze that elevates the chicken to a whole new level.
- Easy Preparation: With a quick marinade and simple cooking process, this recipe is perfect for busy weeknights or impressing guests.
- Versatile Serving Options: Serve it with rice, vegetables, or even in a wrap; this dish adapts beautifully to any meal setting.
- Family-Friendly: The sweet and sticky sauce appeals to both kids and adults, making it a hit at the dinner table.
Ingredients
Main Ingredients
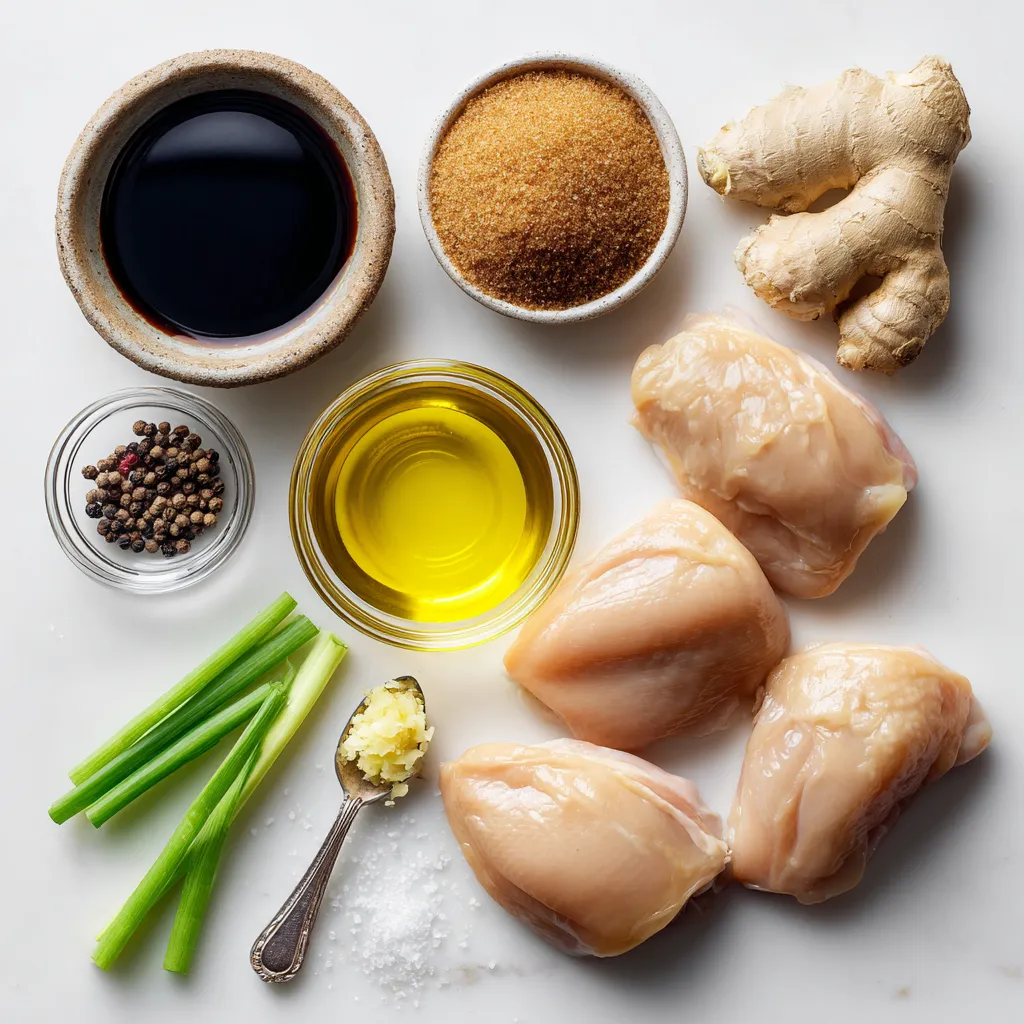
– 4 boneless, skinless chicken thighs
– 1/2 cup brown sugar
– 1/4 cup soy sauce (low sodium recommended)
– 4 cloves garlic, finely minced
– 1 tablespoon fresh ginger, grated
Seasoning and Garnish
– 1 tablespoon olive oil
– 1 tablespoon apple cider vinegar
– Salt and pepper, to taste
– Sliced green onions, for garnish
To make Brown Sugar Garlic Chicken, gather your main ingredients first. Chicken thighs are great for this dish. They stay juicy and tender. Brown sugar adds sweetness. Soy sauce gives it a nice salty kick. Minced garlic and grated ginger bring bold flavors to the mix.
Next, consider your seasoning and garnish. Olive oil helps cook the chicken and adds richness. A splash of apple cider vinegar balances the sweetness. Don’t forget salt and pepper to boost taste. Finally, sliced green onions will make your dish pop with color and freshness. They add a nice crunch.
With these ingredients, you will create a sweet and sticky chicken that everyone will love. Enjoy the process of mixing and cooking with these simple yet tasty items!
Step-by-Step Instructions
Preparing the Marinade
To start, grab a medium bowl. In it, combine these ingredients:
– 1/2 cup brown sugar
– 1/4 cup soy sauce
– 4 cloves garlic, finely minced
– 1 tablespoon fresh ginger, grated
– 1 tablespoon olive oil
– 1 tablespoon apple cider vinegar
Whisk them together well. Make sure the brown sugar is fully dissolved. This step is key for a smooth sauce that coats the chicken evenly.
Marinating the Chicken
Next, take your chicken thighs. Sprinkle salt and pepper on both sides. This adds flavor to the chicken. Place the seasoned chicken in a resealable bag or shallow dish. Pour the marinade over the chicken. Make sure every piece is coated. Seal the bag tightly or cover the dish.
Refrigerate the chicken for at least 30 minutes. For the best flavor, marinate overnight. This allows the chicken to soak up all the yummy flavors.
Cooking the Chicken
Now, let’s cook! First, preheat your oven to 375°F (190°C). This ensures the oven is ready when the chicken is done marinating.
Heat a large skillet over medium-high heat. Remove the chicken from the marinade and set it aside. Sear the chicken thighs in the hot skillet for 3-4 minutes on each side. You want a nice golden-brown crust.
After searing, pour the reserved marinade over the chicken in the skillet. This creates a tasty sauce as it bakes.
Transfer the skillet to the preheated oven. Bake for 25-30 minutes. Check the chicken’s internal temperature. It should reach 165°F (75°C) for safety.
Once done, take the skillet out. Let the chicken rest for a few minutes. This helps keep the meat tender and juicy.
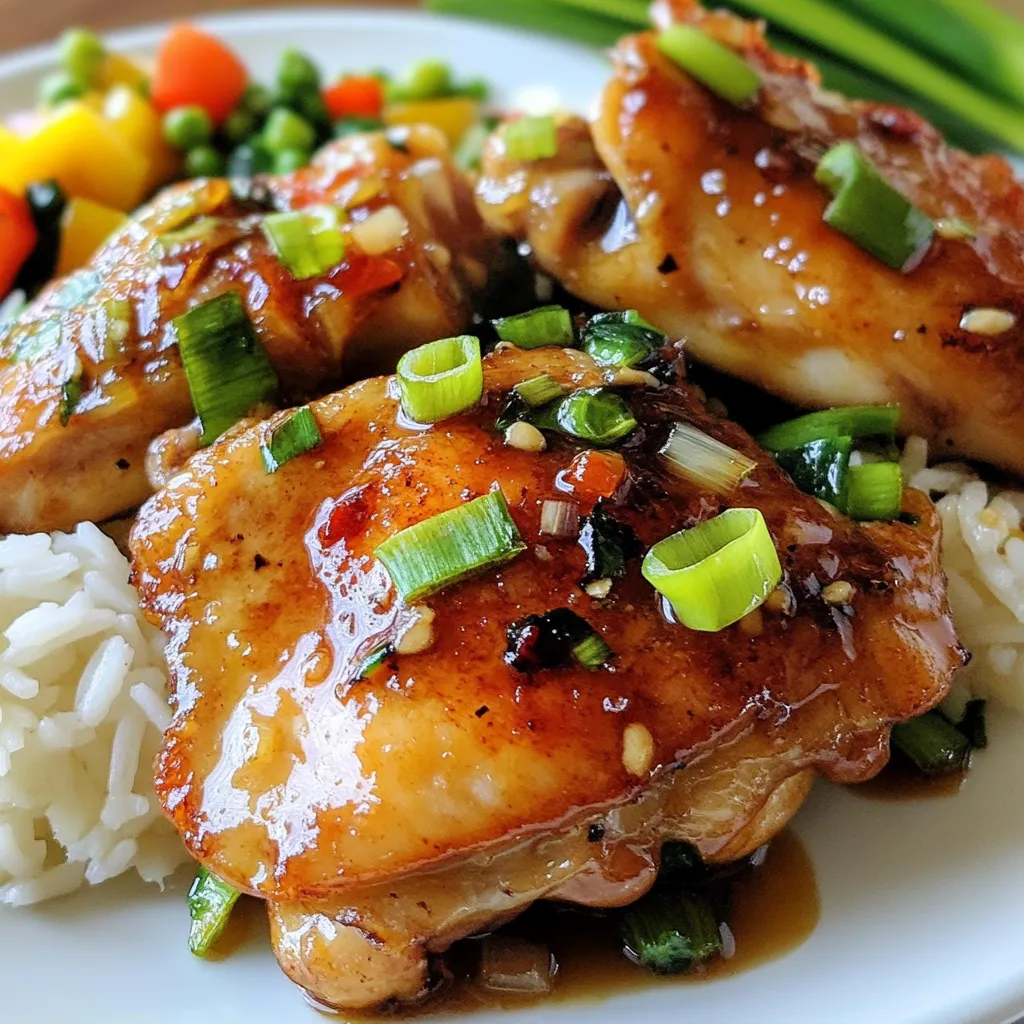
When you serve, drizzle the pan sauce over the chicken. Top with sliced green onions for a fresh touch. Enjoy your delicious Brown Sugar Garlic Chicken!
Tips & Tricks
Enhancing Flavor
For better flavor, marinate your chicken longer. If you can, let it sit overnight. This gives the chicken time to soak up the sweet and savory notes of the marinade. After cooking, always let the chicken rest for a few minutes. Resting helps keep the chicken juicy and tender.
Searing Techniques
Choose a heavy skillet, like cast iron. This helps heat evenly and gives a nice crust. Preheat the skillet before adding the chicken. Sear each side for 3-4 minutes until golden brown. This step locks in flavors and creates a delicious crust.
Serving Recommendations
Serve your brown sugar garlic chicken with fluffy jasmine rice. The rice soaks up the sauce well. Add colorful sautéed vegetables for a bright plate. For a stunning look, arrange the chicken on a large platter. Drizzle with sauce and garnish with green onions. This makes your dish pop with color and flavor.
Pro Tips
- Marinate Longer for Flavor: For the best flavor infusion, try to marinate the chicken thighs overnight. This allows the flavors to penetrate deeply, resulting in an even tastier dish.
- Use a Meat Thermometer: To ensure your chicken is perfectly cooked, use a meat thermometer to check that it has reached an internal temperature of 165°F (75°C).
- Double the Sauce: If you love a saucy dish, consider doubling the marinade ingredients. This provides extra sauce for drizzling over rice or vegetables.
- Garnish for Presentation: Don’t skip the green onions! They add a beautiful pop of color and a fresh flavor that complements the sweetness of the dish.
Variations
Ingredient Substitutions
You can switch up the protein in this recipe. Chicken thighs work great, but chicken breast is a lighter option. If you want a plant-based dish, try using tofu instead. Just make sure to press the tofu to remove excess water for better flavor.
For the sweetener, brown sugar is key for the sauce, but you can use honey or maple syrup for a healthier choice. These alternatives will change the taste a bit, but they still create a lovely sweetness.
Flavor Tweaks
Want to kick up the heat? Add red pepper flakes to the marinade. This will give your chicken a nice spicy kick that balances well with the sweet sauce.
You can also experiment with different vinegars. Try balsamic vinegar for a rich depth or rice vinegar for a lighter taste. Each will add a unique twist to the dish and make it your own.
Storage Info
Leftovers Management
After enjoying your brown sugar garlic chicken, store any leftovers properly. First, let the chicken cool down to room temperature. This helps prevent moisture loss. Place the chicken in an airtight container. I recommend using glass containers. They keep the chicken fresh longer and do not hold odors. You can also use resealable plastic bags. Just make sure to squeeze out all the air before sealing.
Reheating Tips
When it’s time to enjoy those leftovers, reheating is key. The best method is to use an oven. Preheat it to 350°F (175°C). Place the chicken in a baking dish and cover it with foil. This keeps the moisture in and prevents drying out. Heat for about 15-20 minutes. Check it to ensure it’s hot all the way through. You can also use a microwave. Heat in short bursts of 1-2 minutes. This can help keep the chicken tender. Enjoy your tasty meal again!
FAQs
Can I use chicken breasts instead of thighs?
Yes, you can use chicken breasts. However, chicken thighs stay juicier. Breasts may dry out faster during cooking. If you choose breasts, cook them carefully. They need less time than thighs. Check for doneness often. Aim for that same internal temp of 165°F.
How do I know when the chicken is fully cooked?
To check if the chicken is fully cooked, use a meat thermometer. Insert it into the thickest part of the chicken. It should read 165°F. If you don’t have a thermometer, cut into the chicken. The meat should be white, not pink. Juices should run clear.
Can this recipe be prepared ahead of time?
Yes, this recipe can be prepped ahead. Marinate the chicken the night before. This will boost flavor. You can also cook it and store the chicken. Just keep it in the fridge. Reheat it before serving to enjoy all the flavors.
This recipe offers a simple way to cook chicken thighs, using tasty ingredients like brown sugar and soy sauce. You learned how to make a flavorful marinade, marinate the chicken, and achieve perfect doneness. Remember to enhance flavors and rest the chicken for best results. You can even try variations with different proteins or spices. With proper storage and reheating, your meal can last longer. Enjoy creating this dish, and don’t be afraid to experiment with i
<!-- /wp:post-conte


