
Are you ready to bake something that combines the sweet joy of blueberries with the bright zing of lemon? My Blueberry Lemon Scones recipe is simple and perfect for any occasion. With just a few easy steps, you can whip up these delightfully fluffy scones that taste like sunshine. Read on to unlock the secret to getting that perfect texture and presentation for yummy treats everyone will love!
Why I Love This Recipe
- Bright Flavors: The combination of lemon and blueberries creates a refreshing and vibrant taste that is perfect for any occasion.
- Easy to Make: This recipe is straightforward and requires minimal effort, making it accessible for bakers of all skill levels.
- Perfect Texture: The scones come out light and flaky, providing a delightful texture that pairs wonderfully with tea or coffee.
- Customizable: You can easily adapt this recipe by adding different fruits or spices, allowing for endless variations to suit your taste.
Ingredients
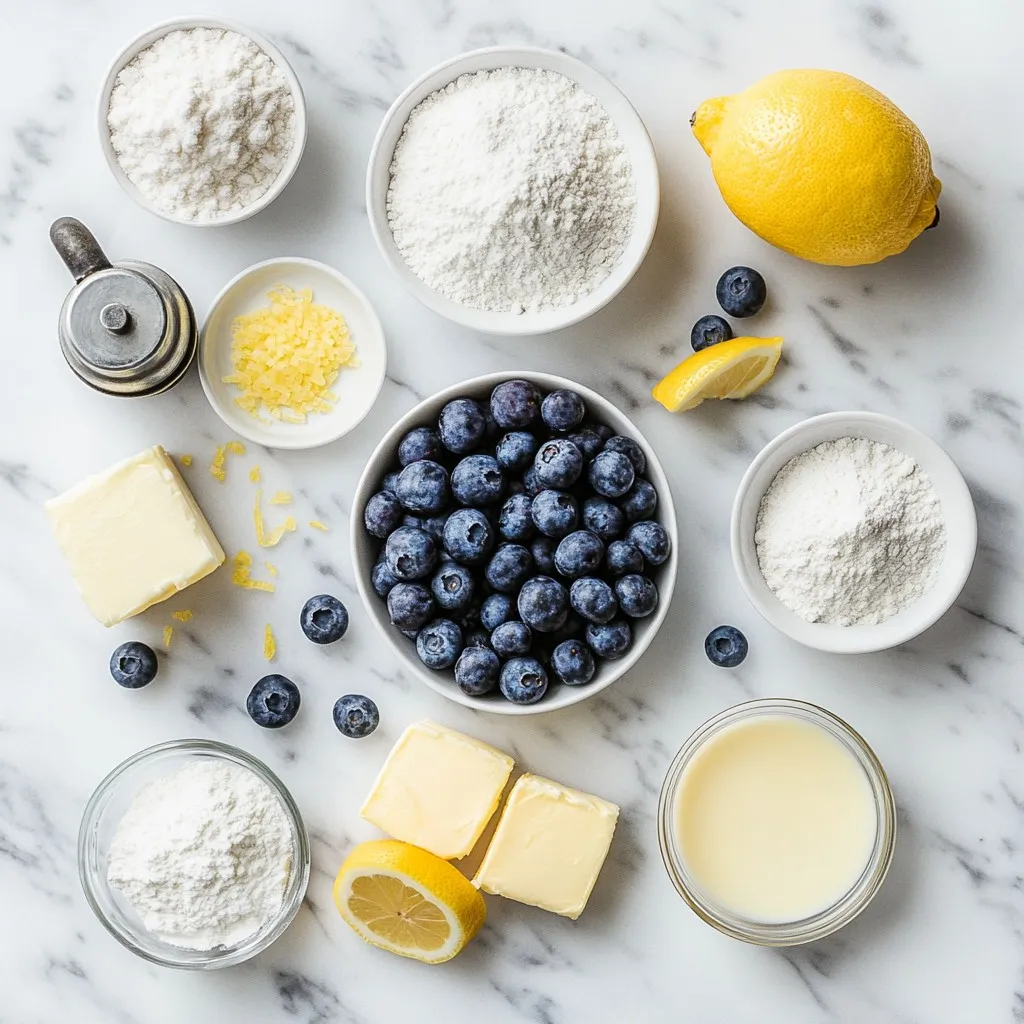
List of Ingredients
To make delicious blueberry lemon scones, gather these simple ingredients:
– 2 cups all-purpose flour
– 1/4 cup granulated sugar
– 1 tablespoon baking powder
– 1/2 teaspoon sea salt
– 1/2 cup unsalted butter, chilled and cubed
– 1 cup fresh blueberries, rinsed and drained
– Zest of 1 medium lemon
– 1/2 cup heavy cream
– 1 large egg, at room temperature
– 1 teaspoon pure vanilla extract
– 1 tablespoon freshly squeezed lemon juice
Ingredient Substitutions
You can swap ingredients easily if needed. Here are some ideas:
– Use whole wheat flour instead of all-purpose flour for more fiber.
– Coconut sugar can replace granulated sugar for a different sweetness.
– Baking soda can work if you don’t have baking powder. Use 1/2 teaspoon of baking soda plus 1/2 teaspoon of vinegar.
– For non-dairy, use vegan butter and almond milk instead of heavy cream.
– You can skip the egg by using a flaxseed meal mix (1 tablespoon flaxseed meal + 2.5 tablespoons water).
Fresh vs. Frozen Blueberries
Fresh blueberries give the best taste and texture. They burst with flavor as they bake. If you use frozen blueberries, don’t thaw them first. Add them straight from the freezer to the dough. This way, they hold their shape better. Just keep in mind that the scones may take a minute longer to bake.
Step-by-Step Instructions
Prepping for Baking
Start by preheating your oven to 400°F (200°C). This step is key for a great rise. Next, line a baking sheet with parchment paper. This makes cleanup easy and helps your scones bake evenly.
Mixing Dry Ingredients
In a large bowl, add 2 cups of all-purpose flour, 1/4 cup of granulated sugar, 1 tablespoon of baking powder, and 1/2 teaspoon of sea salt. Whisk these ingredients together well. This ensures that the baking powder and salt mix evenly into the flour.
Incorporating Wet Ingredients
In another bowl, whisk together 1/2 cup of heavy cream, 1 large egg, 1 teaspoon of pure vanilla extract, and 1 tablespoon of freshly squeezed lemon juice. Make sure this mixture is smooth and well-combined. This mix adds moisture and flavor to the scones.
Forming and Baking Scones
Now, add the cold, cubed butter to the flour mix. Use your fingertips or a pastry cutter to blend in the butter until it looks like coarse crumbs. Then, gently fold in 1 cup of fresh blueberries and the zest of 1 lemon.
Next, pour the wet mix into the dry mix. Stir just until combined; don’t overmix! Lightly flour a clean surface and knead the dough a few times. Shape it into a 1-inch thick circle. Cut the dough into 8 wedges and place them on the baking sheet with space between each.
Bake for 15-20 minutes. The scones should turn golden brown. A toothpick should come out clean when inserted in the middle. Let them cool slightly on a wire rack before serving. Enjoy the delightful taste of blueberry and lemon in every bite!
Tips & Tricks
Achieving the Perfect Texture
To get the right texture, start with cold butter. It helps create flaky layers. Cut the butter into small cubes before adding it to the flour mix. Use your fingers or a pastry cutter to mix until it looks like coarse crumbs. The small butter pieces will melt while baking, making the scones fluffy.
Best Practices for Mixing
When mixing your ingredients, be gentle. Overmixing can make the scones tough. Combine the dry ingredients first, then add the wet ones. Stir just until everything comes together. It’s okay if the dough looks a bit rough. You can knead it lightly to form a circle. Aim for a thickness of about one inch for even baking.
Presentation Tips for Serving
Make your scones look extra special. Once they cool, dust them lightly with powdered sugar. Serve them with clotted cream or lemon curd for a tasty twist. You could also add fresh berries on the side to make the plate pop. These little touches will impress your guests and make your scones shine!
Pro Tips
- Use Cold Ingredients: Ensure your butter and cream are chilled to create a flaky texture in your scones.
- Gently Fold the Blueberries: To avoid mashing, gently fold the blueberries into the dough to keep them intact for bursts of flavor.
- Don’t Overmix: Mix the dough just until combined; overmixing can lead to tough scones.
- Brush with Cream: For a golden crust, brush the tops of the scones with a little heavy cream before baking.
Variations
Adding Nuts or Spices
You can add nuts or spices to your blueberry lemon scones. Walnuts or pecans add a nice crunch. Simply chop them coarsely and fold them into the dough with the blueberries. If you prefer spices, try adding cinnamon or cardamom. A pinch of either spice can add warmth and depth to your scones. Just mix in about 1/2 teaspoon for a noticeable flavor without overpowering the lemon and blueberry.
Using Other Fruits
Blueberries are lovely, but you can swap them for other fruits. Raspberries, blackberries, or diced strawberries work well. Each fruit brings a unique flavor to the scone. If using larger fruits like strawberries, chop them into smaller pieces. This keeps the texture light and fluffy. The result is a delicious twist on the classic recipe that you can enjoy any time!
Lemon Glaze Option
A lemon glaze can elevate your scones even more. To make it, mix powdered sugar with fresh lemon juice. Aim for a thick yet pourable consistency. Start with one cup of powdered sugar and add lemon juice little by little. Drizzle this glaze over warm scones for a sweet and tart finish. This adds shine and a burst of citrus flavor that perfectly complements the scones.
Storage Info
How to Store Leftover Scones
To keep your scones fresh, place them in an airtight container. You can also wrap them in plastic wrap to keep moisture in. Store them at room temperature for up to two days. If you want to enjoy them longer, consider freezing.
Freezing Scones for Later
To freeze scones, place them in a single layer on a baking sheet. Put them in the freezer for about an hour until they are firm. Once frozen, transfer them to a freezer-safe bag. Be sure to label the bag with the date. Frozen scones can last up to three months.
Reheating Instructions
To reheat scones, preheat your oven to 350°F (175°C). Place the scones on a baking sheet lined with parchment paper. Heat them for about 10 minutes. You can also microwave them for 15 to 20 seconds. Enjoy your warm, fluffy scones just like fresh!
FAQs
Can I make these scones ahead of time?
Yes, you can make these scones ahead of time. You can prepare the dough and shape it into wedges. Wrap the wedges tightly in plastic wrap and store them in the fridge. Bake them within 24 hours for the best results. You can also freeze the unbaked scones. Just place them on a baking sheet and freeze until firm. Once frozen, transfer them to a bag. When you’re ready to bake, add a few extra minutes to the baking time.
Why are my scones too dense?
Dense scones often result from overmixing the dough. When you mix too much, you develop the gluten in the flour. This makes the scones tough instead of light and flaky. Also, ensure your baking powder is fresh. If it’s old, it won’t rise properly. Lastly, be careful with the butter. It should be cold and cubed. This helps create a flaky texture.
Can I use non-dairy substitutes in the recipe?
Absolutely! You can use non-dairy milk instead of heavy cream. Almond, soy, or oat milk work well. Choose a milk that is rich to keep the scones moist. For butter, use coconut oil or a vegan butter substitute. These options will still give you a delicious scone without dairy. Just remember to keep the measurements the same for the best results.
To sum up, we covered key ingredients for blueberry scones and tips for success. You learned how to prep, mix, and bake to achieve the perfect texture. We discussed creative variations and how to store your scones. Remember, fresh and frozen blueberries both work well, but choose what you like. With these guidelines, you can bake scones that impress. Enjoy sharing them with friends and family! Your baking journey starts no


