Avocado Corn Salad Fresh and Flavorful Recipe
![To make a tasty avocado corn salad, gather these ingredients: - 2 ripe avocados, diced into bite-sized cubes - 1 cup sweet corn (freshly grilled or canned, drained) - 1 cup cherry tomatoes, halved for a juicy burst - 1 red bell pepper, diced finely for crunch - 1/4 cup red onion, finely chopped for sharpness - 1/4 cup fresh cilantro, chopped for herbal freshness - Juice of 2 limes for tanginess - 2 tablespoons extra virgin olive oil for richness - 1 teaspoon ground cumin for warmth - Salt and freshly cracked pepper to taste Using good-quality ingredients makes a big difference. Choose ripe avocados that yield slightly when pressed. This means they are soft and ready to eat. Fresh corn adds a sweet touch. If you use canned corn, drain it well to keep the salad fresh. Opt for vibrant cherry tomatoes and a crunchy red bell pepper, both of which enhance the salad's look and taste. Fresh cilantro can elevate the flavor, so use it if you like its taste. If you have allergies or preferences, you can easily swap some ingredients. Try using lime juice from one lemon instead. For those with onion allergies, you can skip the red onion or use green onions. If you are not a fan of cilantro, parsley works well too. For a creamier texture, consider adding a bit of Greek yogurt. This makes the salad rich while keeping it fresh. For the complete recipe, check out the [Full Recipe]. To make the avocado corn salad, start by gathering all your ingredients. You need ripe avocados, sweet corn, cherry tomatoes, red bell pepper, red onion, cilantro, lime juice, olive oil, cumin, salt, and pepper. First, take a large bowl. Add the diced avocados and the corn. If you use canned corn, drain it well. Mix these two gently to spread the sweetness of the corn. Next, add the halved cherry tomatoes, diced red bell pepper, and finely chopped red onion. These ingredients give your salad a bright look and a tasty crunch. After that, sprinkle the chopped cilantro over everything. This adds a fresh flavor that brightens the dish. Now, grab a small bowl. Whisk the lime juice, olive oil, cumin, and a pinch of salt and pepper together. This dressing will tie all the flavors in the salad. Pour the dressing over the salad mixture. Use a spatula or wooden spoon to mix everything gently. Be careful not to mash the avocados. Finally, taste your salad. You might want to add more salt or lime juice based on your taste. When mixing, go slow. You want to keep the avocados intact. Over-mixing can turn them mushy. Use a light hand and fold the ingredients together. This keeps your salad looking fresh and colorful. If you notice some pieces are not coated well, you can add a bit more dressing. Just drizzle it slowly and mix again. This helps every bite to burst with flavor. For the best taste, let your salad sit for about 10 minutes at room temperature. This allows the flavors to blend. If you serve it right away, the tastes might not be as strong. After resting, your salad will be ready to eat. Enjoy it fresh for lunch or as a side with dinner. For the full recipe, click here. To select ripe avocados, look for a dark green color. Gently squeeze the avocado; it should feel firm but yield slightly. Avoid any that feel mushy. A ripe avocado should have a smooth skin without dark spots. If you find unripe avocados, leave them at room temperature for a few days. Once ripe, use them within a day or two for best taste. Grilling fresh corn adds a smoky flavor that enhances your salad. Start by husking the corn and removing all silk. Brush the kernels with oil to prevent sticking. Place the corn directly on a hot grill for about 10 minutes. Turn it every few minutes until it’s tender and has grill marks. This method caramelizes the sugars, making the corn sweeter and more delicious. To enhance your salad's flavor, adjust the seasonings to your taste. Start with lime juice and olive oil, then add cumin for warmth. If you prefer a kick, include a pinch of chili powder or chopped jalapeños. Fresh herbs can also brighten the dish. Always taste and adjust as you go. Remember, a little salt can go a long way in bringing out flavors. For more detailed instructions, check the Full Recipe. {{image_4}} You can boost the protein in your avocado corn salad easily. Adding chicken or shrimp makes it more filling. Grilled chicken breast works well; just chop it into bite-sized pieces. For shrimp, try sautéing or grilling them until they are pink. Both options blend nicely with the salad's flavors. You can also use canned chickpeas for a plant-based choice. Just rinse and add them directly for a hearty twist. The dressing can change the whole taste of your salad. A simple lime vinaigrette adds a refreshing zing. Just whisk lime juice, olive oil, salt, and pepper together. For a creamy dressing, mix yogurt with lime juice and cumin. This gives a nice tang and creaminess. You could also try a cilantro-lime dressing for extra flavor. Feel free to experiment with different dressings to find your favorite. Using seasonal ingredients makes your salad even better. In summer, fresh peaches or strawberries add a sweet touch. In fall, diced apples or pears give crunch and sweetness. You can also swap the corn for roasted butternut squash in winter. This keeps your salad fresh and exciting all year. Think about what’s in season for tasty swaps that match the flavors of your dish. For the complete recipe, check out the [Full Recipe]. To store leftover avocado corn salad, use an airtight container. This keeps the air out and helps avoid spoilage. Place the salad in the fridge right after serving. It tastes better cold and stays fresh longer. If you have extra dressing, store it separately to keep the salad crisp. The salad will last about 2 days in the fridge. The avocados may brown, but the taste remains good. Corn and tomatoes hold well for a bit longer. If you used canned corn, it can stay fresh for 3 to 4 days. Always check for any off smells before eating leftovers. To keep avocados fresh, store them whole until you're ready to use them. If you've cut an avocado, squeeze some lime juice on it. The acid helps slow browning. Cover it tightly with plastic wrap or place it in an airtight container. This way, you can enjoy your avocado longer without losing its bright color. To stop avocados from browning, use lime juice. The acid slows down oxidation. You can also store cut avocados with the pit in. Cover them tightly with plastic wrap. This keeps air out and helps maintain their color. Yes, you can prepare the salad in advance. However, add the avocados right before serving. This keeps them fresh and green. If you store it for later, put plastic wrap directly on the surface. This minimizes air exposure and keeps the salad tasty. Look for fresh corn with bright green husks. The kernels should feel plump and firm. If using canned corn, choose a brand with low sodium. Drain and rinse it well to remove extra salt. This will help the corn taste fresh and sweet in your salad. Enjoy the crunch and sweetness! For the complete recipe, check out the Avocado Corn Salad Delight. In this blog post, we covered how to make a delicious avocado corn salad. We explored the best ingredients, tips for preparation, and ways to enhance flavor. You can mix and match based on your taste and needs. Remember to store leftovers properly to keep them fresh. With easy swaps and answers to common questions, you’ll create a great dish every time. Now, you have everything you need to impress your family and friends with your new salad skills. Enjoy making your own special version!](https://dishtreats.com/wp-content/uploads/2025/07/333f1f81-7d50-4cc6-bd3d-a33e08904fb9.webp)
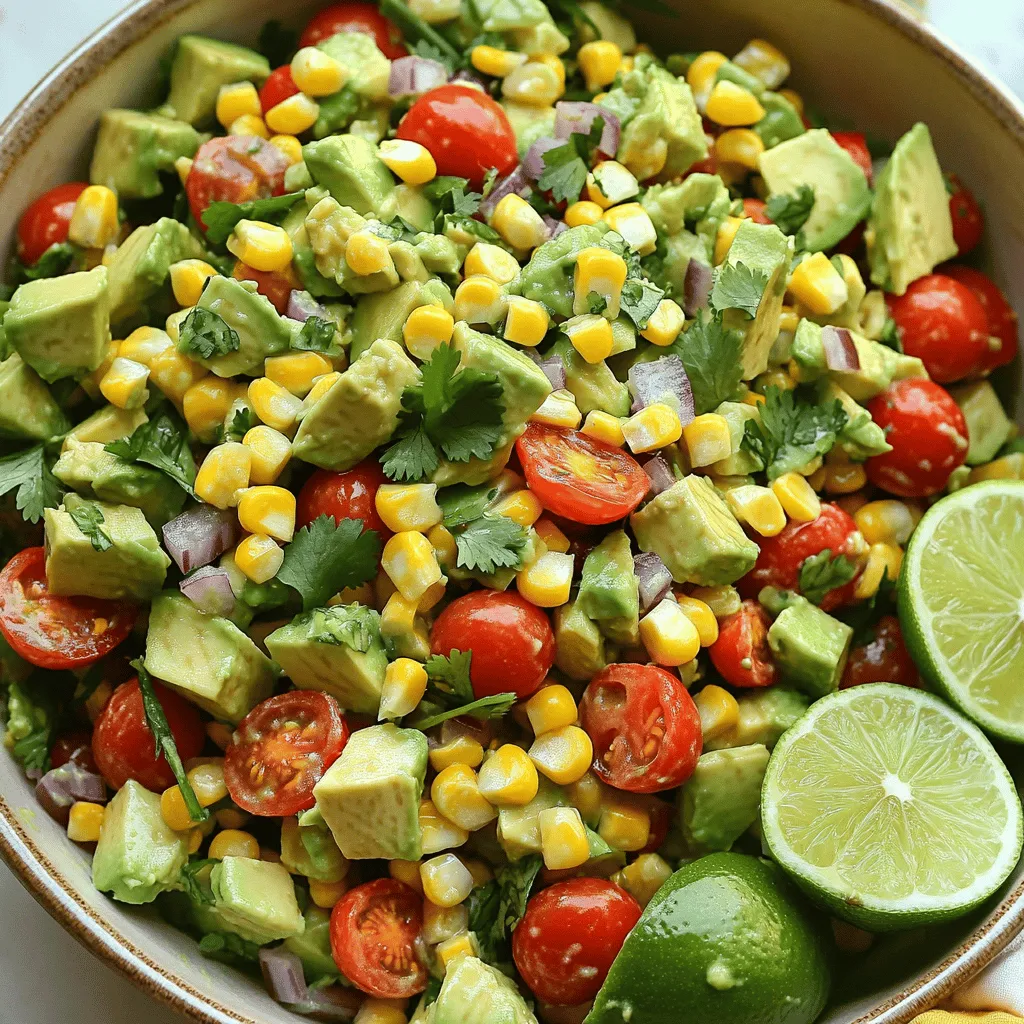
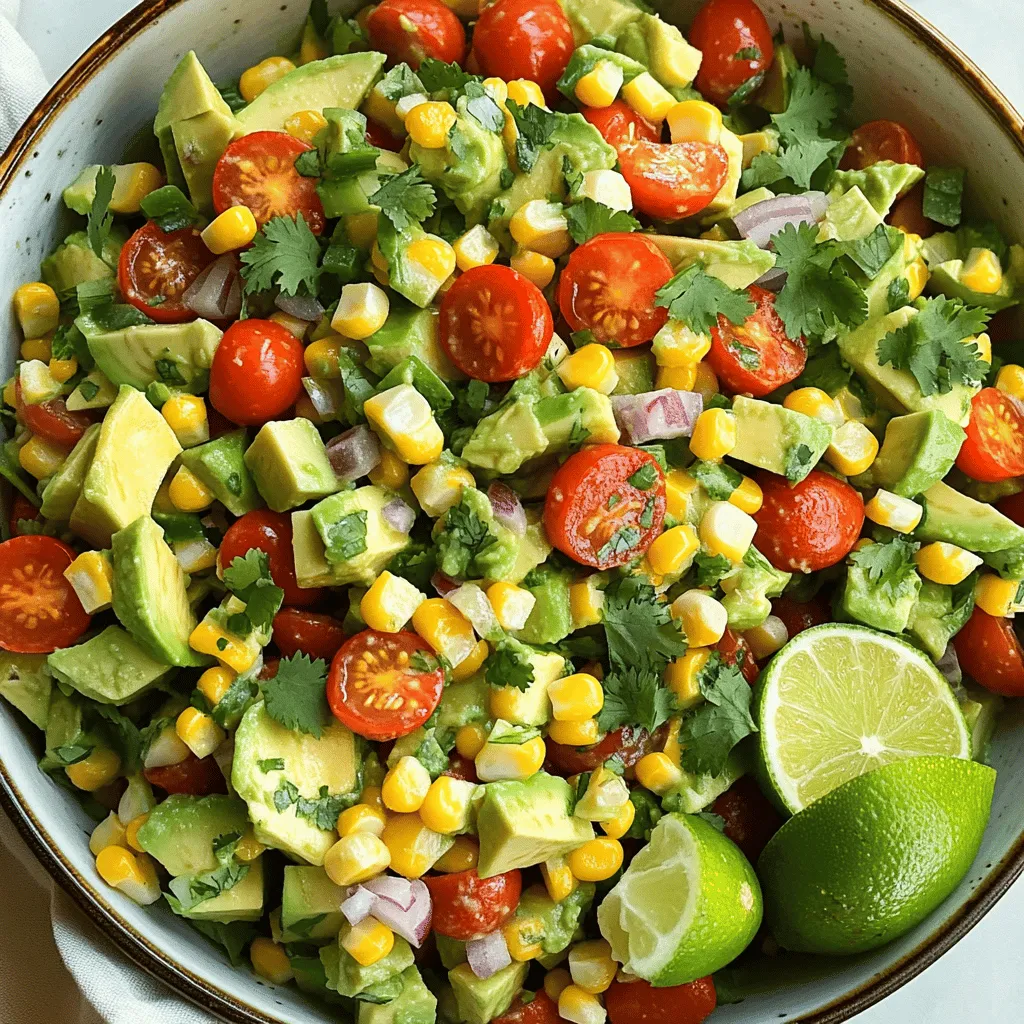
Looking for a fresh and tasty dish that’s perfect for any meal? You’ll love my Avocado Corn Salad! This recipe combines creamy avocado with sweet corn for a vibrant flavor burst. Whether you’re planning a picnic or a family dinner, it’s sure to impress. Let’s dive right into the simple ingredients you’ll need and how to put this delightful salad together!
Ingredients
Complete Ingredients List
To make a tasty avocado corn salad, gather these ingredients:
- 2 ripe avocados, diced into bite-sized cubes
- 1 cup sweet corn (freshly grilled or canned, drained)
- 1 cup cherry tomatoes, halved for a juicy burst
- 1 red bell pepper, diced finely for crunch
- 1/4 cup red onion, finely chopped for sharpness
- 1/4 cup fresh cilantro, chopped for herbal freshness
- Juice of 2 limes for tanginess
- 2 tablespoons extra virgin olive oil for richness
- 1 teaspoon ground cumin for warmth
- Salt and freshly cracked pepper to taste
Notes on Ingredient Quality
Using good-quality ingredients makes a big difference. Choose ripe avocados that yield slightly when pressed. This means they are soft and ready to eat. Fresh corn adds a sweet touch. If you use canned corn, drain it well to keep the salad fresh. Opt for vibrant cherry tomatoes and a crunchy red bell pepper, both of which enhance the salad’s look and taste. Fresh cilantro can elevate the flavor, so use it if you like its taste.
Substitutions for Common Allergens
If you have allergies or preferences, you can easily swap some ingredients. Try using lime juice from one lemon instead. For those with onion allergies, you can skip the red onion or use green onions. If you are not a fan of cilantro, parsley works well too. For a creamier texture, consider adding a bit of Greek yogurt. This makes the salad rich while keeping it fresh.
Step-by-Step Instructions
Preparation Steps
To make the avocado corn salad, start by gathering all your ingredients. You need ripe avocados, sweet corn, cherry tomatoes, red bell pepper, red onion, cilantro, lime juice, olive oil, cumin, salt, and pepper. First, take a large bowl. Add the diced avocados and the corn. If you use canned corn, drain it well. Mix these two gently to spread the sweetness of the corn.
Next, add the halved cherry tomatoes, diced red bell pepper, and finely chopped red onion. These ingredients give your salad a bright look and a tasty crunch. After that, sprinkle the chopped cilantro over everything. This adds a fresh flavor that brightens the dish.
Now, grab a small bowl. Whisk the lime juice, olive oil, cumin, and a pinch of salt and pepper together. This dressing will tie all the flavors in the salad. Pour the dressing over the salad mixture. Use a spatula or wooden spoon to mix everything gently. Be careful not to mash the avocados.
Finally, taste your salad. You might want to add more salt or lime juice based on your taste.
Tips for Proper Mixing
When mixing, go slow. You want to keep the avocados intact. Over-mixing can turn them mushy. Use a light hand and fold the ingredients together. This keeps your salad looking fresh and colorful.
If you notice some pieces are not coated well, you can add a bit more dressing. Just drizzle it slowly and mix again. This helps every bite to burst with flavor.
Timing Your Salad for Maximum Flavor
For the best taste, let your salad sit for about 10 minutes at room temperature. This allows the flavors to blend. If you serve it right away, the tastes might not be as strong.
After resting, your salad will be ready to eat. Enjoy it fresh for lunch or as a side with dinner.
Tips & Tricks
Selecting Ripe Avocados
To select ripe avocados, look for a dark green color. Gently squeeze the avocado; it should feel firm but yield slightly. Avoid any that feel mushy. A ripe avocado should have a smooth skin without dark spots. If you find unripe avocados, leave them at room temperature for a few days. Once ripe, use them within a day or two for best taste.
Grilling Fresh Corn: Method and Benefits
Grilling fresh corn adds a smoky flavor that enhances your salad. Start by husking the corn and removing all silk. Brush the kernels with oil to prevent sticking. Place the corn directly on a hot grill for about 10 minutes. Turn it every few minutes until it’s tender and has grill marks. This method caramelizes the sugars, making the corn sweeter and more delicious.
Enhancing Flavor with Seasoning Adjustments
To enhance your salad’s flavor, adjust the seasonings to your taste. Start with lime juice and olive oil, then add cumin for warmth. If you prefer a kick, include a pinch of chili powder or chopped jalapeños. Fresh herbs can also brighten the dish. Always taste and adjust as you go. Remember, a little salt can go a long way in bringing out flavors.

Variations
Adding Protein Options (Chicken, Shrimp, etc.)
You can boost the protein in your avocado corn salad easily. Adding chicken or shrimp makes it more filling. Grilled chicken breast works well; just chop it into bite-sized pieces. For shrimp, try sautéing or grilling them until they are pink. Both options blend nicely with the salad’s flavors. You can also use canned chickpeas for a plant-based choice. Just rinse and add them directly for a hearty twist.
Different Dressing Ideas (Vinaigrettes, Creamy Dressings)
The dressing can change the whole taste of your salad. A simple lime vinaigrette adds a refreshing zing. Just whisk lime juice, olive oil, salt, and pepper together. For a creamy dressing, mix yogurt with lime juice and cumin. This gives a nice tang and creaminess. You could also try a cilantro-lime dressing for extra flavor. Feel free to experiment with different dressings to find your favorite.
Seasonal Ingredient Swaps
Using seasonal ingredients makes your salad even better. In summer, fresh peaches or strawberries add a sweet touch. In fall, diced apples or pears give crunch and sweetness. You can also swap the corn for roasted butternut squash in winter. This keeps your salad fresh and exciting all year. Think about what’s in season for tasty swaps that match the flavors of your dish.
Storage Info
Best Practices for Leftover Storage
To store leftover avocado corn salad, use an airtight container. This keeps the air out and helps avoid spoilage. Place the salad in the fridge right after serving. It tastes better cold and stays fresh longer. If you have extra dressing, store it separately to keep the salad crisp.
Shelf Life of Ingredients
The salad will last about 2 days in the fridge. The avocados may brown, but the taste remains good. Corn and tomatoes hold well for a bit longer. If you used canned corn, it can stay fresh for 3 to 4 days. Always check for any off smells before eating leftovers.
Tips for Keeping Avocados Fresh
To keep avocados fresh, store them whole until you’re ready to use them. If you’ve cut an avocado, squeeze some lime juice on it. The acid helps slow browning. Cover it tightly with plastic wrap or place it in an airtight container. This way, you can enjoy your avocado longer without losing its bright color.
FAQs
What’s the best way to prevent browning of avocados?
To stop avocados from browning, use lime juice. The acid slows down oxidation. You can also store cut avocados with the pit in. Cover them tightly with plastic wrap. This keeps air out and helps maintain their color.
Can I make Avocado Corn Salad ahead of time?
Yes, you can prepare the salad in advance. However, add the avocados right before serving. This keeps them fresh and green. If you store it for later, put plastic wrap directly on the surface. This minimizes air exposure and keeps the salad tasty.
How do I choose the best corn for this recipe?
Look for fresh corn with bright green husks. The kernels should feel plump and firm. If using canned corn, choose a brand with low sodium. Drain and rinse it well to remove extra salt. This will help the corn taste fresh and sweet in your salad. Enjoy the crunch and sweetness!
For the complete recipe, check out the Avocado Corn Salad Delight.
In this blog post, we covered how to make a delicious avocado corn salad. We explored the best ingredients, tips for preparation, and ways to enhance flavor. You can mix and match based on your taste and needs. Remember to store leftovers properly to keep them fresh. With easy swaps and answers to common questions, you’ll create a great dish every time. Now, you have everything you need to impress your family and friends with your new salad skills. Enjoy making your own special version!
![To make a tasty avocado corn salad, gather these ingredients: - 2 ripe avocados, diced into bite-sized cubes - 1 cup sweet corn (freshly grilled or canned, drained) - 1 cup cherry tomatoes, halved for a juicy burst - 1 red bell pepper, diced finely for crunch - 1/4 cup red onion, finely chopped for sharpness - 1/4 cup fresh cilantro, chopped for herbal freshness - Juice of 2 limes for tanginess - 2 tablespoons extra virgin olive oil for richness - 1 teaspoon ground cumin for warmth - Salt and freshly cracked pepper to taste Using good-quality ingredients makes a big difference. Choose ripe avocados that yield slightly when pressed. This means they are soft and ready to eat. Fresh corn adds a sweet touch. If you use canned corn, drain it well to keep the salad fresh. Opt for vibrant cherry tomatoes and a crunchy red bell pepper, both of which enhance the salad's look and taste. Fresh cilantro can elevate the flavor, so use it if you like its taste. If you have allergies or preferences, you can easily swap some ingredients. Try using lime juice from one lemon instead. For those with onion allergies, you can skip the red onion or use green onions. If you are not a fan of cilantro, parsley works well too. For a creamier texture, consider adding a bit of Greek yogurt. This makes the salad rich while keeping it fresh. For the complete recipe, check out the [Full Recipe]. To make the avocado corn salad, start by gathering all your ingredients. You need ripe avocados, sweet corn, cherry tomatoes, red bell pepper, red onion, cilantro, lime juice, olive oil, cumin, salt, and pepper. First, take a large bowl. Add the diced avocados and the corn. If you use canned corn, drain it well. Mix these two gently to spread the sweetness of the corn. Next, add the halved cherry tomatoes, diced red bell pepper, and finely chopped red onion. These ingredients give your salad a bright look and a tasty crunch. After that, sprinkle the chopped cilantro over everything. This adds a fresh flavor that brightens the dish. Now, grab a small bowl. Whisk the lime juice, olive oil, cumin, and a pinch of salt and pepper together. This dressing will tie all the flavors in the salad. Pour the dressing over the salad mixture. Use a spatula or wooden spoon to mix everything gently. Be careful not to mash the avocados. Finally, taste your salad. You might want to add more salt or lime juice based on your taste. When mixing, go slow. You want to keep the avocados intact. Over-mixing can turn them mushy. Use a light hand and fold the ingredients together. This keeps your salad looking fresh and colorful. If you notice some pieces are not coated well, you can add a bit more dressing. Just drizzle it slowly and mix again. This helps every bite to burst with flavor. For the best taste, let your salad sit for about 10 minutes at room temperature. This allows the flavors to blend. If you serve it right away, the tastes might not be as strong. After resting, your salad will be ready to eat. Enjoy it fresh for lunch or as a side with dinner. For the full recipe, click here. To select ripe avocados, look for a dark green color. Gently squeeze the avocado; it should feel firm but yield slightly. Avoid any that feel mushy. A ripe avocado should have a smooth skin without dark spots. If you find unripe avocados, leave them at room temperature for a few days. Once ripe, use them within a day or two for best taste. Grilling fresh corn adds a smoky flavor that enhances your salad. Start by husking the corn and removing all silk. Brush the kernels with oil to prevent sticking. Place the corn directly on a hot grill for about 10 minutes. Turn it every few minutes until it’s tender and has grill marks. This method caramelizes the sugars, making the corn sweeter and more delicious. To enhance your salad's flavor, adjust the seasonings to your taste. Start with lime juice and olive oil, then add cumin for warmth. If you prefer a kick, include a pinch of chili powder or chopped jalapeños. Fresh herbs can also brighten the dish. Always taste and adjust as you go. Remember, a little salt can go a long way in bringing out flavors. For more detailed instructions, check the Full Recipe. {{image_4}} You can boost the protein in your avocado corn salad easily. Adding chicken or shrimp makes it more filling. Grilled chicken breast works well; just chop it into bite-sized pieces. For shrimp, try sautéing or grilling them until they are pink. Both options blend nicely with the salad's flavors. You can also use canned chickpeas for a plant-based choice. Just rinse and add them directly for a hearty twist. The dressing can change the whole taste of your salad. A simple lime vinaigrette adds a refreshing zing. Just whisk lime juice, olive oil, salt, and pepper together. For a creamy dressing, mix yogurt with lime juice and cumin. This gives a nice tang and creaminess. You could also try a cilantro-lime dressing for extra flavor. Feel free to experiment with different dressings to find your favorite. Using seasonal ingredients makes your salad even better. In summer, fresh peaches or strawberries add a sweet touch. In fall, diced apples or pears give crunch and sweetness. You can also swap the corn for roasted butternut squash in winter. This keeps your salad fresh and exciting all year. Think about what’s in season for tasty swaps that match the flavors of your dish. For the complete recipe, check out the [Full Recipe]. To store leftover avocado corn salad, use an airtight container. This keeps the air out and helps avoid spoilage. Place the salad in the fridge right after serving. It tastes better cold and stays fresh longer. If you have extra dressing, store it separately to keep the salad crisp. The salad will last about 2 days in the fridge. The avocados may brown, but the taste remains good. Corn and tomatoes hold well for a bit longer. If you used canned corn, it can stay fresh for 3 to 4 days. Always check for any off smells before eating leftovers. To keep avocados fresh, store them whole until you're ready to use them. If you've cut an avocado, squeeze some lime juice on it. The acid helps slow browning. Cover it tightly with plastic wrap or place it in an airtight container. This way, you can enjoy your avocado longer without losing its bright color. To stop avocados from browning, use lime juice. The acid slows down oxidation. You can also store cut avocados with the pit in. Cover them tightly with plastic wrap. This keeps air out and helps maintain their color. Yes, you can prepare the salad in advance. However, add the avocados right before serving. This keeps them fresh and green. If you store it for later, put plastic wrap directly on the surface. This minimizes air exposure and keeps the salad tasty. Look for fresh corn with bright green husks. The kernels should feel plump and firm. If using canned corn, choose a brand with low sodium. Drain and rinse it well to remove extra salt. This will help the corn taste fresh and sweet in your salad. Enjoy the crunch and sweetness! For the complete recipe, check out the Avocado Corn Salad Delight. In this blog post, we covered how to make a delicious avocado corn salad. We explored the best ingredients, tips for preparation, and ways to enhance flavor. You can mix and match based on your taste and needs. Remember to store leftovers properly to keep them fresh. With easy swaps and answers to common questions, you’ll create a great dish every time. Now, you have everything you need to impress your family and friends with your new salad skills. Enjoy making your own special version!](https://dishtreats.com/wp-content/uploads/2025/07/333f1f81-7d50-4cc6-bd3d-a33e08904fb9-300x300.webp)

 recipe. You learned how to make tasty air fryer apple chips. We covered the ingredients, equipment, and easy steps. I shared tips for the best crispiness and flavor. You can even try sugar-free options or new spices. Store your chips right for lasting crunch. These apple chips are a fun and healthy snack. I hope you enjoy making them as much as I do! Now go ahead and create your own delicious batch.](https://dishtreats.com/wp-content/uploads/2025/08/8a2bfbc3-9f97-452b-a25b-2e6f6cce62ce-768x768.webp)

![- 1 lb beef sirloin, thinly sliced against the grain - 1 medium onion, finely chopped - 2 cloves garlic, minced - 8 oz mushrooms, sliced (cremini or button) - 1 cup beef broth (preferably low-sodium) - 1 cup sour cream (or Greek yogurt for a lighter option) - 2 tablespoons all-purpose flour - 2 tablespoons olive oil - 1 teaspoon Dijon mustard - Salt and freshly ground black pepper to taste - 12 oz egg noodles (or your favorite pasta) The beef sirloin is the star of the dish. It should be tender and flavorful. Use fresh onions and garlic to build a tasty base. The mushrooms add a nice earthiness. A good beef broth gives depth to the sauce. The sour cream adds creaminess and tang. If you want a lighter dish, Greek yogurt works well too. - Greek yogurt instead of sour cream - Alternative pasta types If you do not have sour cream, Greek yogurt is a great swap. It gives a similar creamy texture while being a bit healthier. You can also try different pasta types, like fettuccine or penne, based on your preference. - 1 teaspoon Dijon mustard - Salt and freshly ground black pepper - Fresh parsley, finely chopped for garnish Dijon mustard adds a subtle kick and depth of flavor. Salt and pepper are key for bringing out the taste in all the ingredients. A sprinkle of fresh parsley on top makes the dish look bright and fresh. It is a simple way to enhance the visual appeal. - Start by boiling salted water in a large pot. - Once boiling, add 12 oz of egg noodles. - Cook them until al dente, following package instructions. - When ready, drain the noodles and set them aside. - Toss the noodles with a drop of olive oil to keep them from sticking. - Heat 2 tablespoons of olive oil in a large skillet over medium-high heat. - Add 1 lb of thinly sliced beef sirloin to the hot pan. - Season the beef with salt and freshly ground black pepper. - Cook for about 3 to 4 minutes until the beef is browned. - Use a slotted spoon to remove the beef and place it on a plate. - In the same skillet, add the remaining olive oil. - Once hot, stir in 1 medium chopped onion and 2 minced garlic cloves. - Sauté for 2 to 3 minutes until the onion is soft and clear. - Next, add 8 oz of sliced mushrooms, cooking for another 4 to 5 minutes. - When the mushrooms are golden, sprinkle 2 tablespoons of flour over the mix. - Slowly pour in 1 cup of beef broth, whisking constantly. - Keep stirring until the mixture thickens, about 3 to 4 minutes. - Lower the heat to medium-low, then stir in 1 cup of sour cream. - Add 1 teaspoon of Dijon mustard for extra flavor. - Return the beef to the skillet, mixing well in the sauce. - Warm it through for 2 to 3 minutes without boiling. - Taste and adjust the seasoning as needed. - For plating, place a generous portion of noodles on each plate. - Ladle the creamy beef stroganoff over the noodles. - Finish by garnishing with finely chopped fresh parsley. - This adds a pop of color and freshness to your dish. For the full recipe, check out the [Full Recipe]. Enjoy this comforting meal! To make a smooth sauce, avoid lumps. When you add flour, stir it well before adding beef broth. This will help mix everything perfectly. Keep the heat low. You want to see gentle bubbles, not a rolling boil. A simmer will thicken your sauce without breaking it down. Slice your beef against the grain. This makes it tender and easy to chew. If you cut with the grain, the beef will be tough. Pay attention to the mushrooms too. Cook them until they are golden brown. This brings out their flavor and gives a nice texture. About 4-5 minutes should do the trick. Serve your beef stroganoff in shallow bowls. This allows the sauce to spread out and look rich. Add a sprinkle of fresh parsley on top for color. A bit of greenery makes the dish pop. It also adds a fresh taste to each bite. {{image_4}} You can make a tasty vegetarian beef stroganoff. Simply swap the beef for mushrooms or tofu. Mushrooms give a great, meaty flavor. Tofu adds protein and absorbs the sauce well. For a creamy mushroom stroganoff, follow these steps: - Use 16 oz of sliced mushrooms instead of beef. - Cook the mushrooms until they are soft and browned. - Add 1 cup of vegetable broth instead of beef broth. - Stir in the same sour cream for creaminess. If you want a lighter option, try using chicken or turkey. Both cook quickly and taste great in stroganoff. Use diced chicken breast or turkey breast instead of beef. Adjust the cooking time to about 5-7 minutes. Ensure the chicken or turkey is cooked through before adding the sauce. To elevate the flavor, consider adding Worcestershire sauce or a splash of red wine. These ingredients add depth and richness. You can also include fresh herbs like thyme or rosemary. They bring a nice aroma and complement the creamy sauce. A teaspoon of Worcestershire sauce or a ¼ cup of red wine can make a big difference. After enjoying your beef stroganoff, you may have some leftovers. Store them in an airtight container. Refrigerate the stroganoff within two hours of cooking. It will stay fresh for about three to four days. When you reheat, warm it gently over low heat. This keeps the sauce creamy. Stir often to avoid burning. You can also use a microwave. Heat it in short bursts, stirring in between. This method helps the dish heat evenly. If you want to keep beef stroganoff longer, freezing is a great option. To freeze, let the dish cool completely. Then, transfer it to a freezer-safe container. Leave some space at the top for expansion. Seal it tightly to prevent freezer burn. For thawing, the best method is overnight in the fridge. This keeps the flavor and texture nice. If you need it fast, you can use the microwave. Set it to defrost and check every few minutes. After thawing, reheat as I mentioned before, ensuring it warms evenly. You can find the full recipe for this comforting dish above. Enjoy every bite! You can enjoy Classic Beef Stroganoff with several tasty sides. Here are some great options: - Steamed green beans - Roasted broccoli - Mashed potatoes - A fresh garden salad - Garlic bread Each side adds a nice touch. Steamed veggies give color and crunch. Mashed potatoes soak up the sauce well. A salad offers a refreshing contrast. Classic Beef Stroganoff lasts about 3 to 4 days in the fridge. Store it in an airtight container. Always cool the dish before sealing it up. Check for any signs of spoilage before eating. If it smells off or looks strange, throw it away. Yes, you can prepare parts of Classic Beef Stroganoff ahead of time. Cook the beef and sauce, then store them separately from the noodles. When you’re ready to eat, heat the beef and sauce. Cook the noodles fresh for best results. This way, you keep everything tasty and warm. Classic Beef Stroganoff is not gluten-free due to the flour in the sauce. You can make it gluten-free by using cornstarch or gluten-free flour. Be sure to check that your beef broth and noodles are also gluten-free. This way, everyone can enjoy this delicious meal. For the full recipe, check my earlier section. You learned about the key ingredients for Classic Beef Stroganoff, including beef sirloin and egg noodles. We discussed how to cook the noodles, sauté the beef, and prepare a rich sauce. You also saw tips for perfecting the dish and its various options for customization, like vegetarian alternatives. In summary, you can make a delicious meal everyone will enjoy. Remember, cooking is about creativity. Feel free to experiment with flavors and ingredients until it’s just right for you. Enjoy your cooking journey!](https://dishtreats.com/wp-content/uploads/2025/06/f14c56cb-cc13-4cc3-a3ff-e0f76ee8bdb9-768x768.webp)

![- 1 lb boneless, skinless chicken breasts, cut into bite-sized pieces - 1 cup dill pickle juice - 1 cup all-purpose flour - 1 teaspoon onion powder - 1 teaspoon garlic powder - 1 teaspoon paprika - 1 teaspoon black pepper - 1/2 teaspoon salt - 2 large eggs, beaten - 1 cup breadcrumbs (use panko for added crunch) - 1/2 cup ranch dressing - Fresh dill, for garnish (optional) These ingredients create a tasty flavor mix. The chicken gets a nice tang from the dill pickle juice. The spices add warmth and depth. The ranch dressing gives a creamy finish. You will need some basic tools for the best results. Here’s what I suggest: - Mixing bowls for marinating and breading - A whisk for beating the eggs - A baking sheet lined with parchment paper or greased - Measuring cups and spoons for accuracy These tools help streamline your cooking process. They ensure that each step flows smoothly and efficiently. If you want to change things up, here are some easy swaps: - Use chicken thighs instead of breasts for more flavor. - Swap out ranch dressing for blue cheese dressing for a bolder taste. - Try gluten-free flour if you need a gluten-free option. - Use crushed cornflakes instead of breadcrumbs for extra crunch. These substitutions can make the recipe your own. You can keep it fun and exciting while still enjoying the core flavors. For the complete recipe, check the [Full Recipe]. To start, grab a mixing bowl. Place the bite-sized chicken pieces into it. Pour in the dill pickle juice, making sure the chicken is fully submerged. Cover the bowl with plastic wrap or a lid. Now, let it chill in the fridge. For best results, marinate for at least one hour. If you have time, overnight is even better. This step adds so much flavor to the chicken! Next, let’s set up a breading station. You will need three bowls. In the first bowl, mix the all-purpose flour with onion powder, garlic powder, paprika, black pepper, and salt. Stir well until everything is combined. In the second bowl, pour in the beaten eggs. Whisk them until they are smooth. In the third bowl, fill it with breadcrumbs, preferably panko. Panko gives a nice crunch to the bites. After marinating, take the chicken out of the fridge. Gently pat the chicken pieces dry with paper towels. Start by dredging each piece in the flour mix. Make sure to shake off any extra flour. Next, dip the chicken into the beaten eggs. Finally, coat the chicken well with the breadcrumbs. Now, preheat your oven to 400°F (200°C). Prepare a baking sheet by lining it with parchment paper or greasing it lightly. Arrange the breaded chicken bites in a single layer. Bake for 15-20 minutes. They should turn golden brown and crispy. Check that the internal temperature reaches 165°F (75°C). Once cooked, move the chicken bites to a serving platter. Drizzle ranch dressing on top and sprinkle with fresh dill if you like. This adds a lovely touch! For the full recipe, be sure to check the details. To get crispy chicken bites, follow a few key steps. First, make sure to marinate the chicken in dill pickle juice. This adds flavor and helps keep the meat moist. Next, dry the chicken pieces well before breading. Excess moisture can lead to soggy bites. When coating, use seasoned flour first, then dip in egg, and finally cover with breadcrumbs. I recommend using panko breadcrumbs for extra crunch. Bake at 400°F (200°C) until golden brown and fully cooked. Avoid common mistakes for the best results. Do not rush the marination process; it is crucial for flavor. Skipping the drying step can lead to less crispy bites. Also, ensure you do not overcrowd the baking sheet. Leave space between each piece to allow hot air to circulate. Lastly, check the internal temperature. Chicken should reach 165°F (75°C) to be safely eaten. For tailgating or parties, serve these bites with extra ranch dressing for dipping. This adds a nice creamy touch. You can also pair them with fresh pickle slices for added crunch. For a fun twist, consider setting up a dipping station. Include various sauces, like buffalo sauce or honey mustard. This lets guests customize their bites. {{image_4}} Want some heat? Add hot sauce to the marinade. This gives your chicken bites a spicy kick. You can also mix cayenne pepper into the flour. Adjust the amount to your taste. This adds flavor without overwhelming the pickle taste. If you enjoy heat, this variation is for you! Looking for a lighter option? Use an air fryer to cook your chicken bites. This method cuts down on oil and keeps them crisp. Preheat your air fryer to 400°F (200°C). Place the breaded chicken in a single layer. Cook for about 12-15 minutes. Check that they reach an internal temperature of 165°F (75°C). You get a crunchy texture without deep frying! Want a veggie twist? Try using cauliflower instead of chicken. Cut cauliflower into bite-sized florets. Marinate them in the dill pickle juice for the same time. Follow the same breading and cooking steps. Bake or air fry until golden and crispy. This gives you a tasty, plant-based snack that everyone will love. You can find the full recipe for Pickle Ranch Chicken Bites and try these fun variations! To keep your leftover chicken bites fresh, place them in an airtight container. Make sure they cool down to room temperature before sealing. This method helps prevent moisture, which can make them soggy. Store the container in the fridge for up to three days. When you're ready to enjoy your chicken bites again, reheating properly is key. I recommend using an oven or an air fryer for the best results. Preheat the oven to 375°F (190°C). Place the chicken bites on a baking sheet and heat for about 10-15 minutes. This method helps restore their crispy texture. If using an air fryer, set it to 350°F (175°C) and heat for about 5-7 minutes. If you want to save some chicken bites for later, freezing is a great option. First, let them cool completely. Then, arrange the bites in a single layer on a baking sheet and freeze for about an hour. Once frozen, transfer them to a freezer-safe bag or container. They can last up to three months in the freezer. When you're ready to eat, just reheat them from frozen, following the tips above for that perfect crunch. For the full recipe, check out the details above. The best way to marinate chicken is to use a flavorful liquid. For Pickle Ranch Chicken Bites, you will soak the chicken in dill pickle juice. This juice adds a zesty kick and keeps the meat juicy. Place the cut chicken in a bowl and cover it with the pickle juice. Make sure all pieces are fully submerged. Cover the bowl and refrigerate for at least an hour. For even better flavor, let it marinate overnight. This method works well for any chicken dish. Yes, you can use frozen chicken for this recipe. However, it is best to thaw the chicken first. Place it in the fridge overnight or submerge it in cold water for quicker thawing. Once thawed, cut the chicken into bite-sized pieces. After that, follow the marination steps as usual. Using frozen chicken may change the texture slightly, but it will still taste great. To make a low-carb version of Pickle Ranch Chicken Bites, you can skip the breadcrumbs. Instead, coat the chicken pieces in crushed pork rinds or almond flour. Both options give a nice crunch without the carbs. You can also use a low-carb ranch dressing for dipping. This way, you keep the flavor and texture while making it suitable for a low-carb diet. Enjoy your tasty bites without the guilt! In this post, we explored how to make Pickle Ranch Chicken Bites. We discussed key ingredients, cooking essentials, and helpful substitutions. I shared step-by-step instructions for marinating, breading, and baking. You learned tips for crispy bites and common mistakes to avoid. We covered variations like spicy bites and vegetarian options. Finally, I provided storage tips and answered FAQs. Try these bites for your next gathering. They’re fun, easy, and full of flavor! Enjoy your cooking adventure!](https://dishtreats.com/wp-content/uploads/2025/07/7f7f749c-ecc1-4920-b674-4460a511463b-768x768.webp)
![- 4 thick slices of bread (brioche or challah) - 2 large eggs - 1/2 cup milk - 1 teaspoon vanilla extract - 1 teaspoon ground cinnamon - 1 tablespoon granulated sugar For this recipe, I love using thick slices of brioche or challah bread. They soak up the egg mixture well and give a soft, rich texture. The eggs, milk, and vanilla extract create a smooth base for dipping. Ground cinnamon adds warmth and flavor, while granulated sugar enhances the sweetness. - 1 tablespoon granulated sugar - 1/2 teaspoon ground cinnamon - 1 tablespoon unsalted butter (for frying) The cinnamon sugar mixture is the star here. It adds a sweet crunch that makes each bite special. Using unsalted butter for frying helps achieve that golden brown crust. You want the sticks to be crispy on the outside but soft inside. - Maple syrup or honey - Optional fresh fruits and berries Serve these French toast sticks with maple syrup or honey for dipping. It adds a nice touch of sweetness. Fresh fruits or berries can brighten the plate and add some refreshing flavor. You can use strawberries, blueberries, or even banana slices. It all comes together for a fun and tasty breakfast! For the full recipe, visit [Full Recipe]. To start, grab a shallow bowl. In this bowl, whisk together 2 large eggs, 1/2 cup of milk, 1 teaspoon of vanilla extract, and 1 teaspoon of ground cinnamon. Add 1 tablespoon of granulated sugar for sweetness. It’s important to mix until everything blends well and becomes slightly frothy. This mixture will coat your bread sticks and give them great flavor. Now, take your thick slices of bread, like brioche or challah. Cut each slice into uniform sticks, about 1 inch wide. This helps them cook evenly. After cutting, dip each stick into the egg mixture. Make sure to fully submerge it so it gets well-coated. Let any extra liquid drip off before cooking. This step is key to avoid soggy sticks. Next, it's time to cook! Preheat a non-stick skillet over medium heat. Add 1 tablespoon of unsalted butter to the pan. Wait for it to melt and swirl it around to coat the bottom. Carefully place the coated bread sticks in the skillet, making sure not to overcrowd them. Cook each side for about 2-3 minutes. You want them to turn golden brown and get a slightly crispy texture. This method gives you the best result for your Cinnamon Sugar French Toast Sticks. For a full recipe with all details, check out the [Full Recipe]. To make great cinnamon sugar French toast sticks, you need to control the heat. I suggest using medium heat for the best results. Medium heat cooks the bread evenly without burning it. If you cook on high heat, you may get burnt outsides and soggy insides. Next, prevent soggy French toast sticks. After dipping the sticks in the egg mixture, let them sit for a moment. This helps the bread absorb the mixture without getting too wet. For an appealing look, stack the French toast sticks neatly on a plate. You can sprinkle a little extra cinnamon sugar on top for a pop of color. Add fresh fruit like strawberries or blueberries on the side. This not only adds color but also freshness. Using the right tools makes cooking easier. A non-stick skillet or griddle is best for frying. This helps prevent sticking and makes cleanup simple. A spatula is handy for flipping the sticks. A shallow bowl is key for mixing the egg mixture. You’ll find this method gives you the best results for your cinnamon sugar French toast sticks. Remember to check the [Full Recipe] for detailed steps and proportions to ensure success. {{image_4}} You can change the flavor of your cinnamon sugar French toast sticks in fun ways. Adding a few drops of almond or orange extract gives a twist to the classic taste. These extracts bring a unique sweetness that pairs well with cinnamon. You can also try using different types of bread. Flavored bread like chocolate or pumpkin spice adds an exciting touch. Just think about how much fun it would be to bite into a chocolate French toast stick! If you need gluten-free or dairy-free options, you can easily adapt this recipe. Use gluten-free bread made from rice or almond flour. For dairy-free, almond or oat milk works well. If you want vegan French toast sticks, substitute eggs with flaxseed meal or a plant-based egg replacement. This way, everyone can enjoy this treat, no matter their diet. Get creative with dipping sauces and toppings! You can try different sauces like chocolate, peanut butter, or fruit compote. These add a fun twist to the flavor. You can also serve your French toast sticks with whipped cream or yogurt. Top them with fresh fruits like strawberries or blueberries for extra color and taste. Each bite can be a new flavor adventure! To store leftover cinnamon sugar French toast sticks, place them in an airtight container. This keeps them fresh and prevents drying out. You can store them in the fridge for up to three days. If you want to keep them longer, consider freezing. When reheating, I recommend using the oven for the best texture. Preheat your oven to 350°F (175°C). Place the sticks on a baking sheet and heat for about 10 minutes. This method helps restore their crispiness. If you use the microwave, heat them for 20-30 seconds. However, they may turn a bit soggy. To freeze cooked French toast sticks, let them cool completely first. Then, place them in a single layer on a baking sheet. Freeze until solid, then transfer them to a freezer-safe bag. They last up to two months in the freezer. To thaw, move them to the fridge overnight. Reheat in the oven for the best results. To make your French toast sticks crispy, use thick slices of bread. Brioche or challah works best. They soak up the egg mixture without getting too soggy. Here are some tips for crispiness: - Preheat your pan: Heat your skillet on medium. A hot pan helps form a nice crust. - Use enough butter: Butter adds flavor and helps create a golden crust. Don't skimp on it! - Cook without crowding: Give each stick space in the pan. This allows heat to circulate for even cooking. - Flip carefully: Use a spatula to turn them gently. This keeps them from breaking apart. Yes, you can prepare the egg mixture in advance. This saves time when you're ready to cook. Here’s how to store it: - Refrigerate: Store the mixture in a sealed container. Use it within 24 hours for the best results. - Give it a whisk: Before using, stir it again to ensure the ingredients mix well. The type of bread you choose can change the flavor and texture of your French toast sticks. Here are some great options: - Brioche: This bread is soft and rich, making it perfect for soaking up the egg mixture. - Challah: It has a slightly sweet flavor and holds up well when cooked. - Texas toast: Thick slices of this bread create a hearty bite. - Sourdough: If you like a tangy taste, sourdough adds a unique twist. For the full recipe, check out the detailed instructions! In this post, we explored how to make delicious French toast sticks. You learned about key ingredients, quick preparation steps, and helpful cooking tips. We also discussed fun variations and smart storage methods for leftovers. With these tips, you can create a tasty meal that impresses. Remember, the right bread and careful cooking make all the difference. Enjoy your French toast sticks, and feel free to get creative with flavors and toppings!](https://dishtreats.com/wp-content/uploads/2025/07/664e1dd1-150a-4660-86e6-505ad35a42cc-768x768.webp)