Air Fryer Crispy Garlic Butter Green Beans Recipe

Looking for a quick, tasty side dish? You’re in the right place! My Air Fryer Crispy Garlic Butter Green Beans are packed with flavor and a delightful crunch. With just a few fresh ingredients and simple steps, you’ll have a side that wow’s friends and family. Ready for an easy recipe that’s sure to impress? Let’s dive in and make your new favorite green beans!
Ingredients
Fresh green beans
- 1 lb fresh green beans, trimmed
Start with fresh green beans. Look for vibrant, firm beans. Trim the ends for even cooking. This will help them cook well in the air fryer.
Garlic butter seasoning components
- 3 tablespoons unsalted butter, melted
- 4 cloves garlic, finely minced
- 1 teaspoon onion powder
- 1 teaspoon smoked paprika
- ½ teaspoon sea salt
- ¼ teaspoon freshly ground black pepper
- 1 tablespoon freshly squeezed lemon juice
Next, we create the garlic butter sauce. Melt the butter in a bowl. Add minced garlic, onion powder, smoked paprika, sea salt, and black pepper. Stir until well mixed. This sauce gives the beans a rich flavor.
Optional garnishes and enhancements
- 2 tablespoons grated Parmesan cheese (optional)
- Fresh parsley, finely chopped (for garnish)
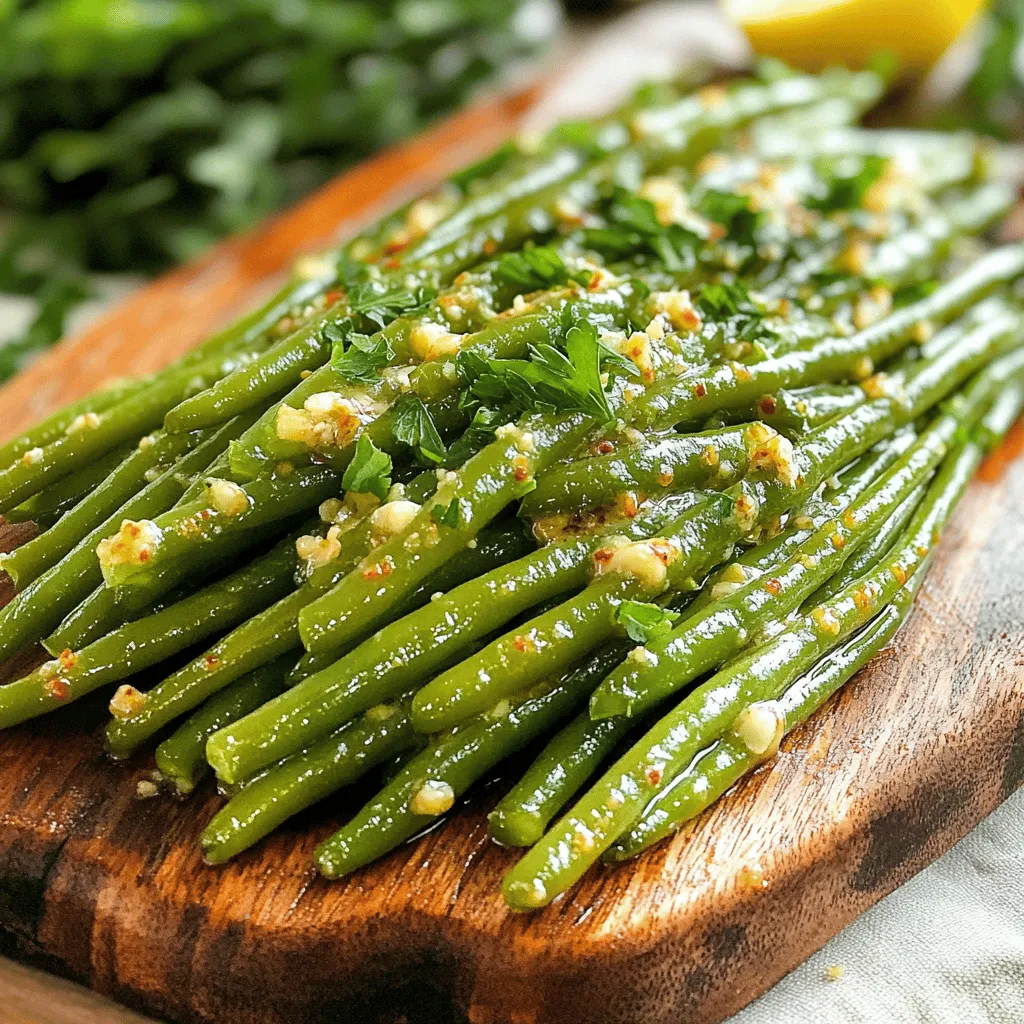
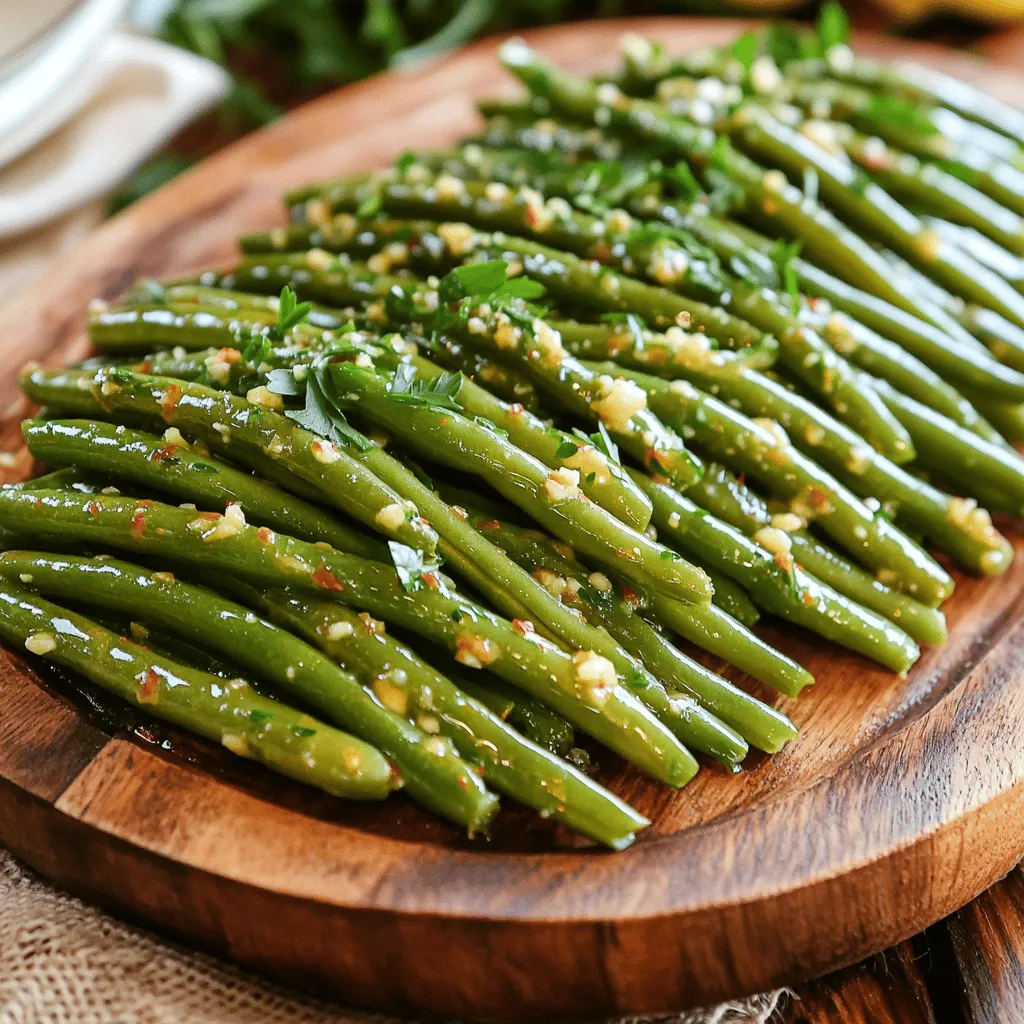
For a tasty twist, use grated Parmesan cheese on top. It adds a nice creaminess. Also, finely chopped parsley makes the dish look fresh and colorful. You can add these at the end for extra flavor and presentation.
These ingredients come together to make a simple yet delicious dish. You will love the crispy texture and the rich garlic taste.
Step-by-Step Instructions
Preparing the garlic butter sauce
First, melt 3 tablespoons of unsalted butter. I prefer using unsalted butter for better control of salt. Next, finely mince 4 cloves of garlic. Combine both in a large mixing bowl. Add 1 teaspoon of onion powder and 1 teaspoon of smoked paprika. Then, sprinkle in ½ teaspoon of sea salt and ¼ teaspoon of black pepper. Mix everything well to create a rich garlic butter sauce. You want all the flavors to blend nicely.
Coating the green beans
Take 1 pound of fresh green beans and trim the ends. Place the trimmed beans in the same bowl. Pour the garlic butter sauce over them. Toss the green beans gently but well, making sure each bean is coated. This step is key to infusing flavor into the beans.
Preheating the air fryer and arranging the beans
Preheat your air fryer to 375°F (190°C). This usually takes about 5 minutes. While it heats up, arrange the coated green beans in the air fryer basket. Spread them in a single layer to help them cook evenly. If your air fryer is small, cook the beans in batches.
Air frying the green beans to perfection
Now, air fry the green beans for 8-10 minutes. Shake the basket halfway through cooking to ensure even crispiness. You want them to turn golden brown and crunchy. Once done, remove them from the air fryer. Drizzle fresh lemon juice over the hot beans for a bright finish. If you like, sprinkle grated Parmesan cheese on top. Finally, garnish with finely chopped parsley for a fresh touch. Enjoy your crispy garlic butter green beans!
Tips & Tricks
Achieving maximum crispiness
To get the best crispiness, choose fresh green beans. Trim the ends for even cooking. The garlic butter mix is key. Make sure every bean gets coated. A single layer in the air fryer helps too. If they overlap, they won’t crisp well.
Ensuring even cooking in the air fryer
Preheating your air fryer is essential. Set it to 375°F (190°C) for five minutes. When you add the green beans, arrange them in a single layer. Shake the basket halfway through cooking. This step ensures all sides cook evenly and get that crunch.
Best storage practices for leftovers
Store leftover green beans in an airtight container. Keep them in the fridge for up to three days. To reheat, use the air fryer for a few minutes. This method helps regain that crispy texture. Avoid the microwave, as it can make them soggy.

Variations
Healthier alternatives to garlic butter
If you want a lighter dish, swap the garlic butter for olive oil. Use about 2 tablespoons of extra virgin olive oil. It gives a nice flavor and is heart-healthy. You can also try using a plant-based butter. This keeps the dish vegan while still tasting great.
Flavor variations with different spices
You can play with spices to change the flavor. Instead of onion powder, try garlic powder for a stronger garlic taste. Add a pinch of cayenne pepper for heat. If you like herbs, try dried thyme or oregano. They add a lovely earthy touch.
Adding extra ingredients for a heartier dish
Want to make it more filling? Add nuts or seeds. Toasted almonds or walnuts offer a delightful crunch. You can also add cooked bacon bits for a savory twist. For a richer dish, consider stirring in cherry tomatoes or bell peppers. They add color and extra nutrients.
Storage Info
How to store leftover green beans
You can store leftover green beans in an airtight container. This keeps them fresh for up to three days in the fridge. Let them cool to room temperature first. This helps avoid condensation that can make them soggy.
Reheating methods to maintain crispiness
To reheat, use the air fryer again. Preheat it to 350°F (175°C). Place the beans in the basket and cook for about 3-5 minutes. This restores their crunch. You can also use a skillet on medium heat. Just toss them for a few minutes until warm.
Freezing options and duration
You can freeze these green beans for later use. Blanch them first in boiling water for two minutes. Then, cool them in ice water. Drain and pack them in freezer bags. They can last up to three months in the freezer. When ready to use, cook them straight from frozen, adding a few more minutes to the air fryer time.
FAQs
How long to cook green beans in an air fryer?
You should cook green beans for 8 to 10 minutes. This time gives them a nice crunch while keeping them tender. Remember to shake the basket halfway through. This helps them cook evenly and get crispy.
Can I use frozen green beans for this recipe?
Yes, you can use frozen green beans. Just add a couple of extra minutes to the cooking time. Make sure to thaw and drain them well. This helps prevent sogginess and ensures they crisp up nicely.
What can I substitute for Parmesan cheese?
If you don’t have Parmesan, try using nutritional yeast for a cheesy flavor. You can also use a different hard cheese, like Pecorino Romano. Both options will still add a nice taste to your dish.
How to prevent green beans from getting soggy?
To keep green beans crisp, follow these tips:
- Make sure they are dry before adding the garlic butter sauce.
- Don’t overcrowd the air fryer basket.
- Shake the basket halfway through cooking to promote even cooking.
These steps help maintain their crunch and vibrant color.
You learned how to make tasty air-fried green beans. We covered fresh ingredients and garlic butter seasoning. You now know the best ways to prepare and coat the green beans. Plus, tips for crispiness and storage will help you keep leftovers fresh. You also discovered various flavors to try, like healthier options and different spices.
Now, enjoy creating your unique dishes with air-fried green beans. Don’t hesitate to experiment and make this recipe your own!


![To make creamy avocado toast, you need these fresh ingredients: - 4 ripe avocados - 8 slices of whole grain bread - 1 tablespoon fresh lemon juice - ½ teaspoon garlic powder - ½ teaspoon smoked paprika - Salt and black pepper, to taste - 1 cup cherry tomatoes, halved - Fresh basil leaves for garnish These ingredients come together to create a bright and tasty dish. The avocados provide creaminess, while the lemon juice adds a zing. Garlic powder and smoked paprika give the avocado spread a delicious depth. You can customize your toast with these optional toppings: - Crumbled feta cheese - Red chili flakes - A drizzle of balsamic glaze These extras let you explore different flavors. Feta adds a salty kick, while red chili flakes bring heat. Balsamic glaze offers a sweet contrast. Feel free to mix and match to suit your taste! Avocados are not just tasty; they also pack a punch in nutrition. They are rich in healthy fats, which can help lower bad cholesterol. They also contain fiber, which aids digestion. Plus, avocados are high in vitamins C, E, and K, supporting your immune system and skin health. Eating avocados promotes heart health and keeps you feeling full longer. This creamy avocado toast is not only a simple delight but a smart choice for your meals. For the full recipe, check out the detailed instructions! To make creamy avocado toast, start by toasting your bread. Use a toaster or a skillet. Aim for a golden brown color. This creates a firm base for your toppings. While the bread toasts, cut the ripe avocados in half. Remove the pits carefully. Use a spoon to scoop the soft flesh into a bowl. Next, add fresh lemon juice, garlic powder, smoked paprika, salt, and black pepper. Mix these into the avocado. Use a fork to mash it until creamy. It should still have some small chunks for texture. Taste it and adjust the seasoning if needed. Once the bread is ready, spread the avocado mix generously over each slice. Make sure to cover the bread completely. For the best toast, choose whole grain bread. It adds flavor and nutrition. Toasting in a skillet gives a nice crispness. Preheat the skillet over medium heat. Add a bit of olive oil for extra flavor. If using a toaster, toast twice for extra crunch. Keep an eye on the bread to avoid burning. Perfect toast should be firm and golden. To achieve the best creaminess, use ripe avocados. They should yield slightly when pressed. Start mashing with a fork in a bowl. Press down firmly to break it up. Mix in your other ingredients as you mash. This helps blend the flavors well. You want a creamy texture, but some chunks are great for bite. Don’t over-mash; keep it fun and textured. For the full recipe, you can check out the [Full Recipe]. When choosing avocados, look for ones that feel slightly soft when you gently squeeze them. A ripe avocado should give a little but not feel mushy. Check the skin color too; darker skin often means it's ripe. If you find hard avocados, leave them at room temperature for a few days to ripen. You can speed this up by placing them in a paper bag with a banana. If you have leftover avocado mixture, store it in an airtight container. To keep it fresh, add a layer of plastic wrap on top, pressing it directly against the surface. This prevents air from causing browning. You can also add a little extra lemon juice for added protection. Serve your creamy avocado toast with fresh toppings for added flavor and fun. Consider adding sliced radishes for crunch, or a poached egg for protein. You can also try smoked salmon or a sprinkle of nuts for extra texture. Customize each slice to create a unique bite every time. For the full recipe, check out the detailed steps and enjoy this simple dish! {{image_4}} Let’s get creative with your creamy avocado toast! You can mix and match toppings to make each bite special. Here are some ideas: - Crumbled feta cheese: This adds a salty kick. - Red chili flakes: For a spicy touch, sprinkle these on top. - Balsamic glaze: Drizzle it for a sweet and tangy flavor. - Radish slices: These add crunch and a peppery note. - Sliced boiled eggs: They provide extra protein and creaminess. You can change the whole vibe of your toast with different flavors. Here are some tasty combos: - Spicy: Mash in jalapeños or add hot sauce for heat. - Mediterranean: Mix in olives, sun-dried tomatoes, and a bit of oregano. - Mexican: Top with black beans, corn, and a squeeze of lime. - Asian: Add sesame seeds, soy sauce, and sliced green onions. Avocado toast is great for everyone! Here are some easy swaps: - Vegan bread: Choose gluten-free bread to keep it vegan and gluten-free. - Nutritional yeast: Use this instead of cheese for a cheesy flavor. - Chickpeas: Mash these into the avocado for added protein and flavor. - Hummus: Spread a layer of hummus under the avocado for extra creaminess. Feel free to explore these variations and make this dish your own. For the full recipe, check the recipe section above. If you have leftover toast, store it in an airtight container. This keeps it from getting soggy. You can also wrap it in foil or plastic wrap. Toast is best eaten fresh, but you can enjoy it later. Just reheat it in a toaster or oven to bring back its crunch. To keep avocados fresh, sprinkle lemon juice on the cut side. The acid slows browning. Cover the avocado tightly with plastic wrap. You can also store it in an airtight container. Place the pit back in the unused half to help it stay fresh longer. If you prepare avocado toast but can't eat it right away, store it carefully. Place the toast in a container with a lid. Avoid stacking to prevent sogginess. When ready to eat, reheat it for a few minutes in an oven. This brings back the crispy texture. For the best taste, enjoy it fresh if you can. Check out the Full Recipe for more tips! To make creamy avocado toast, you need ripe avocados, whole grain bread, and a few spices. Start by toasting the slices of bread until golden brown. Next, cut the avocados in half, remove the pits, and scoop the flesh into a bowl. Add lemon juice, garlic powder, smoked paprika, salt, and pepper. Mash the mixture until creamy but slightly chunky. Spread it on the toast, top with cherry tomatoes, and finish with fresh basil. For full details, check out the Full Recipe. Avocados are packed with good fats. They are rich in fiber, which helps digestion. They also contain vitamins like C, E, K, and B6. These nutrients support heart health and skin. Eating avocados can also boost your mood and give you energy. Plus, they can help lower cholesterol! You can prepare the avocado mixture ahead of time. Store it in an airtight container with lemon juice to prevent browning. However, I advise against toasting the bread too early. Toasted bread tastes best fresh and crunchy. Assemble your avocado toast right before serving for the best flavor and texture. Whole grain bread is my go-to choice. It adds a nice nutty flavor and fiber. Sourdough is also excellent for a tangy twist. Gluten-free bread works well too. Choose a bread that you enjoy, as it will make your toast even better! Creamy avocado toast is simple and delicious. You learned the key ingredients, from ripe avocados to tasty toppings. Following the steps ensures the perfect texture and creaminess. Remember to choose ripe avocados and store them right. You can explore unique flavor combos for a fun twist. This dish offers great health benefits and endless variations. Enjoy making this tasty treat!](https://dishtreats.com/wp-content/uploads/2025/06/dc41bef5-23d5-41ad-b579-59fa0f16c9c9-768x768.webp)
![To make a tasty and healthy crispy chickpea salad, you need these main ingredients: - 1 can (15 oz) chickpeas, drained and rinsed - 2 tablespoons olive oil - 1 teaspoon smoked paprika - 1/2 teaspoon garlic powder - 1/2 teaspoon ground cumin - Salt and freshly ground pepper to taste - 4 cups mixed greens (spinach, arugula, and lettuce blend) - 1 cup cherry tomatoes, halved - 1/2 cucumber, diced - 1/4 red onion, thinly sliced Add some optional ingredients to enhance the flavor and texture of your salad: - 1/4 cup feta cheese, crumbled (optional) - A handful of fresh parsley, chopped (for garnish) You will also need a few kitchen tools to make this salad: - A medium-sized mixing bowl for the chickpeas - A large bowl for the salad - A baking sheet lined with parchment paper - A whisk for the dressing - A separate small bowl for mixing the tahini dressing Using these ingredients and tools, you can create a delicious crispy chickpea salad. Try the full recipe for a step-by-step guide! First, preheat your oven to 400°F (200°C). This makes sure the chickpeas get crispy. Line a baking sheet with parchment paper. This helps with easy cleanup later. In a bowl, mix the drained chickpeas with olive oil. Add smoked paprika, garlic powder, ground cumin, salt, and pepper. Make sure each chickpea is well coated. This blend gives them a tasty kick. Spread the seasoned chickpeas evenly on the baking sheet. Don’t crowd them; they need space to get crispy. Bake for 25-30 minutes. Shake the pan halfway through to help them cook evenly. They should turn golden and crunchy. While the chickpeas bake, prepare the salad base. In a large bowl, toss together mixed greens, halved cherry tomatoes, diced cucumber, and thinly sliced red onion. Mixing them now lets the flavors combine as you assemble. In a small bowl, whisk tahini, fresh lemon juice, and a pinch of salt and pepper. If you want a thinner dressing, add a splash of water. This dressing ties the salad together, adding a rich flavor. Once the chickpeas are crispy, take them out and let them cool for a minute. Top your salad with these warm chickpeas. Drizzle the tahini dressing over everything. Add crumbled feta cheese for creaminess, if you like. Finish with fresh parsley for color. Enjoy your Crispy Chickpea Delight Salad! For the complete recipe, check the [Full Recipe]. To make your chickpeas extra crispy, dry them well before cooking. Drain and rinse the canned chickpeas, then lay them on a paper towel. Pat them gently to remove excess moisture. The drier the chickpeas, the crunchier they will be. Toss them with olive oil and spices right before baking. Spread them out on your baking sheet. Avoid crowding them; it helps with airflow and crispiness. Bake at 400°F for 25 to 30 minutes, shaking the pan halfway through. This step ensures even cooking and crispiness. If you have leftovers, store the salad and chickpeas separately. Place the salad in an airtight container in the fridge. Keep the chickpeas in another container. This will help prevent sogginess. When you want to eat the leftovers, reheat the chickpeas in the oven for a few minutes. This will revive their crisp texture. The salad will stay fresh for about two days in the fridge. For the best taste, serve the salad immediately after assembling. The warm chickpeas add a nice contrast to the cool greens. Drizzle the tahini dressing right before serving. This way, it coats the ingredients nicely. You can also sprinkle some feta cheese on top for extra creaminess. Fresh herbs like parsley can brighten the dish. Try adding avocado for creaminess or nuts for crunch. Each addition enhances the flavor and texture of your salad. Enjoy experimenting! {{image_4}} You can swap out greens to change the salad's taste. Try using kale for a hearty crunch. Baby spinach offers a soft, mild flavor. You can even mix in some crunchy cabbage for more texture. Each option adds its unique twist while still pairing well with crispy chickpeas. If you want to make the salad more filling, add protein. Grilled chicken works great with the chickpeas. You can also try adding sliced hard-boiled eggs for richness. For a vegetarian option, toss in some quinoa or black beans. These choices will help boost the meal's nutrients. While tahini dressing is fantastic, don’t be afraid to experiment. A lemon vinaigrette adds a bright zing. You could also try a yogurt-based dressing for creaminess. If you like a kick, a spicy harissa dressing works wonders too. Each dressing brings a new flavor that can change your salad experience. For the full recipe, check out the Crispy Chickpea Delight Salad 🥗. To store leftover salad, first, let it cool down. Place it in an airtight container. This keeps the salad fresh. Add the crispy chickpeas on top only when serving. This way, they stay crunchy. If you mix them in, they can get soggy. If you have leftover crispy chickpeas, you can reheat them. Preheat your oven to 350°F (175°C). Spread the chickpeas on a baking sheet. Bake them for about 10 minutes. This brings back their crunch. You can also use an air fryer for a quicker option. The salad can last up to three days in the fridge. Chickpeas stay good for about a week if stored well. Fresh veggies have a shorter shelf life. Use them within three to five days. Always check for freshness before eating. For a detailed recipe, refer to the Full Recipe. Yes, you can use dried chickpeas. They need soaking and cooking first. To prepare, soak them overnight in water. Cook them until they are tender. This can take about 1 to 2 hours. Then, follow the same steps as with canned chickpeas in the recipe. This salad is packed with nutrients. Chickpeas provide protein and fiber. Mixed greens bring vitamins A and C. Tomatoes offer antioxidants, while cucumbers add hydration. Olive oil is a healthy fat. Feta cheese, if used, adds calcium. Overall, it is a well-balanced meal. To make this salad vegan, skip the feta cheese. The rest of the ingredients are already plant-based. You can also add more veggies or nuts for extra flavor and nutrition. Try adding avocado for creaminess or nuts for crunch. Yes, you can prep it ahead of time. Store the crispy chickpeas in an airtight container. Keep the salad ingredients separate until you are ready to eat. This keeps everything fresh and crispy. Just assemble when you want to enjoy your meal. This salad pairs well with many dishes. Serve it alongside grilled chicken or fish for protein. It also goes great with a warm pita or flatbread. If you want a lighter meal, enjoy it as a stand-alone dish. You can find the Full Recipe for more details. In summary, this blog post covered how to make a crispy chickpea salad. We explored the main ingredients and added options to boost flavor. I shared step-by-step cooking instructions and tips for the perfect crunch. You learned about storage methods and how to customize the dish. Enjoy this salad any time for a tasty and healthy meal. With its simple steps, you can make it again and again!](https://dishtreats.com/wp-content/uploads/2025/06/a0161600-1d29-449f-a743-39fb8b2e717a-768x768.webp)

![- 1 pound Brussels sprouts - 3 tablespoons olive oil - 2 tablespoons maple syrup - 2 tablespoons balsamic vinegar - 1 teaspoon garlic powder - 1 teaspoon smoked paprika - Salt and pepper to taste - 1/4 cup chopped walnuts (optional) - 2 tablespoons grated Parmesan cheese (optional) To create crispy Brussels sprouts, start with fresh Brussels sprouts. Look for firm, small ones for the best taste. Trim the ends and cut each sprout in half. This helps them cook evenly and get crispy. Next, use olive oil to coat the sprouts. It adds flavor and helps them crisp up in the oven. Maple syrup and balsamic vinegar give the sprouts a sweet and tangy glaze. These flavors work great together! For seasonings, garlic powder and smoked paprika add depth. Adjust salt and pepper to match your taste. If you want to add crunch, use walnuts. Grated Parmesan cheese also makes a delicious topping. You can find the full recipe in the article. Enjoy the process, and get ready for a tasty side dish! - Preheat oven to 425°F (220°C). - Trim and halve the Brussels sprouts. Start by preheating your oven. This step is vital for a perfect roast. Next, take your Brussels sprouts and trim off the tough ends. Then, cut each sprout in half. This helps them cook evenly and get crispy. - Mixing oil and seasonings. - Tossing the Brussels sprouts to coat evenly. In a large bowl, pour in three tablespoons of olive oil. Add garlic powder, smoked paprika, salt, and pepper. Mix well. Now, toss in the halved Brussels sprouts. Use your hands to coat them evenly. Each sprout should be shiny and full of flavor. - Spread out on a baking sheet. - Roasting time and tips for even crispiness. Spread the Brussels sprouts in a single layer on a baking sheet. Make sure there’s space between them; this helps with crispiness. Roast them for 20-25 minutes. Halfway through, stir them around. This helps them brown evenly for that perfect crunch. - Whisking together maple syrup and balsamic vinegar. While the sprouts roast, it’s time to make the glaze. In a small bowl, mix two tablespoons of maple syrup with two tablespoons of balsamic vinegar. Whisk until combined. This glaze adds a sweet and tangy kick to the sprouts. - Drizzling glaze and optional toppings. - Return to oven for additional roasting. Once the Brussels sprouts are done roasting, take them out of the oven. Drizzle the maple balsamic glaze over them. Toss gently to coat each sprout. For extra flavor, sprinkle chopped walnuts and grated Parmesan cheese on top. Return the baking sheet to the oven for another 5 minutes to caramelize the glaze. Serve these crispy Brussels sprouts warm for the best taste. Full Recipe can be found in the earlier section for a complete guide. To get the best crispiness, space matters. Place your Brussels sprouts in a single layer on the baking sheet. This helps them roast evenly. If they touch, they will steam instead of crisp. Stirring is key, too. Halfway through cooking, give them a good stir. This ensures all sides get that golden brown color. You can boost flavor with simple spices. Try adding cayenne for heat or lemon zest for brightness. Fresh herbs like thyme or rosemary also work great. For toppings, consider adding crunchy nuts or cheese. Chopped walnuts or grated Parmesan cheese add fun textures and flavors. Avoid overcrowding your pan. If you pack the sprouts too tight, they won’t crisp up. They need room to breathe. Also, always preheat your oven. A hot oven starts the cooking process right. If the oven isn’t hot enough, you’ll lose that nice crunch. For the full recipe, check out the complete guide on making crispy Brussels sprouts with bacon! {{image_4}} You can make crispy Brussels sprouts without bacon. For a tasty vegetarian version, skip the bacon and add a mix of nuts. Try using walnuts or pecans for crunch. You can also sprinkle on some nutritional yeast to give it a cheesy flavor. Adding roasted chickpeas can boost protein and flavor, making it hearty. To change the taste, try new herbs or spices. Rosemary or thyme can add a lovely earthiness. You could also use chili flakes for some heat. For a fresh twist, add lemon or orange zest. The citrus brightens up the dish and makes it pop. You can squeeze fresh lemon juice over the sprouts after roasting for extra zing. Crispy Brussels sprouts pair well with meats like chicken, pork, or fish. Serve them as a side to grilled chicken for a balanced meal. If you want plant-based protein, try adding lentils or quinoa. This makes the dish more filling and nutritious. You can also toss in some cooked bacon if you like the flavor and want to keep the original dish vibe. For the full recipe, check out the details on how to make this delicious side dish! To keep your crispy Brussels sprouts fresh, you need to cool them well. Allow them to sit at room temperature for about 30 minutes. This prevents moisture buildup. After they cool, use airtight containers. Glass or plastic containers work great. Make sure they are sealed tightly to keep out air. Store them in the fridge for up to three days. When it’s time to enjoy your leftovers, reheating is key. Use an oven or an air fryer. Preheat the oven to 350°F (175°C). Spread the sprouts on a baking sheet. Heat them for about 10 to 15 minutes. This helps regain their crispiness. If using an air fryer, set it to 375°F (190°C) for about 5 to 7 minutes. To keep the sprouts crunchy, avoid using the microwave. The microwave makes them soggy, which is not ideal. Enjoy your tasty side dish again with these simple steps. For the full recipe, check out the detailed instructions above! To make crispy Brussels sprouts, follow these steps: 1. Preheat your oven to 425°F (220°C). 2. Trim and halve 1 pound of Brussels sprouts. 3. Mix 3 tablespoons of olive oil, 1 teaspoon of garlic powder, and 1 teaspoon of smoked paprika in a bowl. 4. Toss the halved sprouts in the oil mixture until they are well coated. 5. Spread the sprouts on a baking sheet in a single layer. 6. Roast them for 20-25 minutes, stirring halfway through. 7. Drizzle with a maple balsamic glaze and toss. 8. Return to the oven for 5 more minutes for extra flavor. This method gives you a delicious side dish with a crisp texture. You can use frozen Brussels sprouts, but they might not get as crispy. Frozen sprouts often have more moisture. This can lead to steaming instead of roasting. If you use them, thaw first and pat dry to help with crispiness. Fresh is always best for a crunchy bite. Crispy Brussels sprouts pair well with many dishes. Try serving them with: - Grilled chicken - Roasted pork - Quinoa salad - Baked salmon These options balance flavors and make for a hearty meal. Crispy Brussels sprouts last in the fridge for about 3-4 days. Store them in an airtight container. This helps keep them fresh and safe to eat. However, they may lose some crispiness over time. Yes, you can prep Brussels sprouts ahead of time. Trim and halve them and store in the fridge for up to 2 days. For cooking, roast them fresh for the best texture. If you need to reheat, use the oven to keep them crispy. For the complete recipe for crispy Brussels sprouts with bacon, check out the [Full Recipe]. In this blog post, we explored how to make crispy Brussels sprouts. You learned about the key ingredients, from Brussels sprouts to maple syrup. We covered easy step-by-step instructions, tips for crispiness, and ways to customize flavors. Remember, good cooking involves attention to detail and a dash of creativity. With the right techniques, you can enjoy this tasty dish at home. Now, go ahead and try making it for yourself!](https://dishtreats.com/wp-content/uploads/2025/06/4d1da713-6118-4ecf-9fc1-c93df0ff8318-768x768.webp)