61. Lemon Basil Pesto Pizza Simple and Tasty Recipe
![- 1 pre-made pizza dough - 1/2 cup fresh basil pesto - 1 cup shredded mozzarella cheese - 1 medium lemon (zested and juiced) - 1 cup cherry tomatoes, halved - 1/4 cup finely grated Parmesan cheese - 1 tablespoon extra-virgin olive oil - Salt and freshly ground black pepper to taste - Fresh basil leaves for garnish - Additional toppings (e.g., olives, peppers) - Alternative cheese options (feta, goat cheese) To make a great Lemon Basil Pesto Pizza, you need these ingredients. They work together to create a fresh, bright flavor. First, the pre-made pizza dough saves time and makes this recipe easy. You can find it in stores. Fresh basil pesto adds a rich, herby taste. It’s the star of this dish. Shredded mozzarella cheese melts beautifully. It gives that familiar cheesy texture we love. The lemon zest and juice bring a tangy punch. Cherry tomatoes add sweetness and color. Grated Parmesan cheese gives a nutty, salty flavor. The olive oil helps everything blend well. Salt and pepper round out the taste. For those who want to mix things up, you can add more toppings. Olives and peppers are great choices. You might also try different cheeses like feta or goat cheese for a twist. With these simple and tasty ingredients, you’re on your way to making a delightful pizza. For the full recipe and step-by-step guide, check out the [Full Recipe]. 1. Preheat your oven to 475°F (245°C). If you have a pizza stone, place it in the oven. This helps the crust cook evenly. If not, use a baking sheet. 2. Lightly flour a clean surface. Roll out the pizza dough to your desired thickness. Make sure it fits your baking surface. 3. Once rolled out, move the dough onto parchment paper. This will help you transfer the pizza later. 1. Spread the fresh basil pesto over the dough. Leave a half-inch border for the crust. 2. Sprinkle the shredded mozzarella cheese over the pesto. Make sure it covers the whole pizza. 3. Add the halved cherry tomatoes on top of the cheese. This adds color and flavor. 4. Drizzle the extra-virgin olive oil over everything. Season with salt and freshly ground black pepper to taste. 5. Zest the lemon and sprinkle it evenly on the pizza. This adds a fresh citrus aroma. 1. Slide the parchment paper with the pizza onto the preheated pizza stone or baking sheet. 2. Bake for about 12-15 minutes. Look for a golden brown crust and bubbling cheese. 3. Carefully take the pizza out of the oven. Drizzle fresh lemon juice over the top. 4. Sprinkle grated Parmesan cheese over the warm pizza. Add fresh basil leaves for garnish. 5. Use a sharp knife or pizza cutter to slice the pizza into wedges. Serve hot for the best taste. You can find the Full Recipe for this delicious Lemon Basil Pesto Pizza above. To get the best crust, I recommend using a pizza stone. It heats up and gives your pizza a crispy base. If you don’t have one, a baking sheet works too. Just make sure you preheat it well. Roll your pizza dough to the right thickness. Aim for about a quarter-inch thick. This allows for a nice rise and crunch without being too thin. For flavor, balance the saltiness with fresh lemon juice. A squeeze of lemon brightens up the taste. It makes the pizza feel fresh and lively. Use only fresh ingredients. Fresh basil, ripe tomatoes, and good cheese make a big difference. They add depth and vibrancy to your dish. When serving, place the pizza on a rustic wooden board. It adds a nice touch. You can also use a colorful platter for a fun look. Garnish with whole basil leaves and a lemon wedge. This makes it visually appealing and invites your guests to dig in. Serve it hot for the best taste! For the full recipe, check out the complete details above. {{image_4}} You can switch up the sauce for your pizza. Tomato sauce works well if you want a classic taste. You can also try a creamy white sauce. This adds a rich flavor that pairs nicely with lemon. Seasonal pesto is another fun option. You can make it with fresh herbs like parsley or cilantro. This gives a new twist to your dish. If you need a gluten-free pizza, several dough options are available. Many stores sell gluten-free pizza crusts. You can also make your own using almond flour or cauliflower. For those who follow a vegan diet, you can skip the cheese. There are many tasty vegan cheese substitutes. Look for brands made from nuts or soy for a creamy texture. Toppings can make your pizza unique. Popular choices include pepperoni, mushrooms, and bell peppers. Try mixing and matching your favorites. Seasonal vegetables add color and flavor. In summer, fresh zucchini or bell peppers work well. In winter, roasted butternut squash or kale can be a great choice. Don't be afraid to get creative with your toppings! To keep your Lemon Basil Pesto Pizza fresh, let it cool to room temperature. This step is key to avoid moisture buildup. Wrap each slice in plastic wrap or aluminum foil. You can also place them in an airtight container. This helps retain flavor and texture. Store the pizza in the fridge for up to three days. For best results, enjoy it within this time frame. When it's time to eat leftovers, you can use either an oven or a microwave. The oven is best for maintaining crispiness. Preheat your oven to 375°F (190°C). Place the pizza on a baking sheet and heat for about 10 minutes. This warms it up well without making it soggy. If you choose the microwave, place a slice on a microwave-safe plate. Add a cup of water next to it. This helps keep the crust from getting too chewy. Heat in 30-second intervals until warm. But remember, the microwave won't keep it crispy. For the best taste, the oven is your friend! Use these tips to enjoy your pizza even after the first delightful slice. For the full recipe, check out the complete article. To make your own basil pesto, you need a few simple ingredients. Combine fresh basil, garlic, pine nuts, Parmesan cheese, and olive oil in a food processor. Blend until smooth. Adjust the taste with salt and pepper. This mix adds great flavor to your pizza. Yes, you can freeze lemon basil pesto pizza. First, let the pizza cool completely. Then, wrap it in plastic wrap and place it in a freezer bag. It can last for up to three months. When you are ready to eat, bake it straight from the freezer. This makes a quick meal! Several side dishes pair well with lemon basil pesto pizza. Here are some of my favorites: - A light green salad with vinaigrette - Garlic bread for a crunchy side - Roasted vegetables for added flavor These sides balance the pizza's taste and make for a complete meal. To cut your pizza into even slices, use a sharp pizza cutter or knife. Start by cutting it in half, then cut each half into smaller sections. Aim for 8 slices for a standard pizza. This way, everyone gets a fair share! You can find high-quality pre-made pizza dough at many grocery stores. Look in the refrigerated section or the freezer aisle. Some local pizzerias also sell their dough. If you want a special option, check out artisan bakeries. They often have fresh dough made with quality ingredients. In this pizza guide, we covered essential ingredients, step-by-step instructions, and useful tips. You learned how to customize your pizza and store leftovers. Remember, fresh ingredients make a big difference in taste. If you try different toppings or variations, have fun with it! I believe cooking should be enjoyable and creative. Follow these steps, and you’ll create delicious pizza every time. Enjoy your cooking adventure!](https://dishtreats.com/wp-content/uploads/2025/06/c2cede7a-626b-4fd1-91be-1b09c425b287.webp)
Lemon Basil Pesto Pizza is a delightful twist on a beloved classic! With its fresh flavors and easy prep, it’s perfect for a weeknight dinner or a casual gathering. In this post, I’ll guide you through making this simple yet tasty dish. You’ll learn about the essential ingredients, tips for perfect crust, and creative variations to suit your taste. Let’s dive into a slice of flavor that will impress everyone!
Ingredients
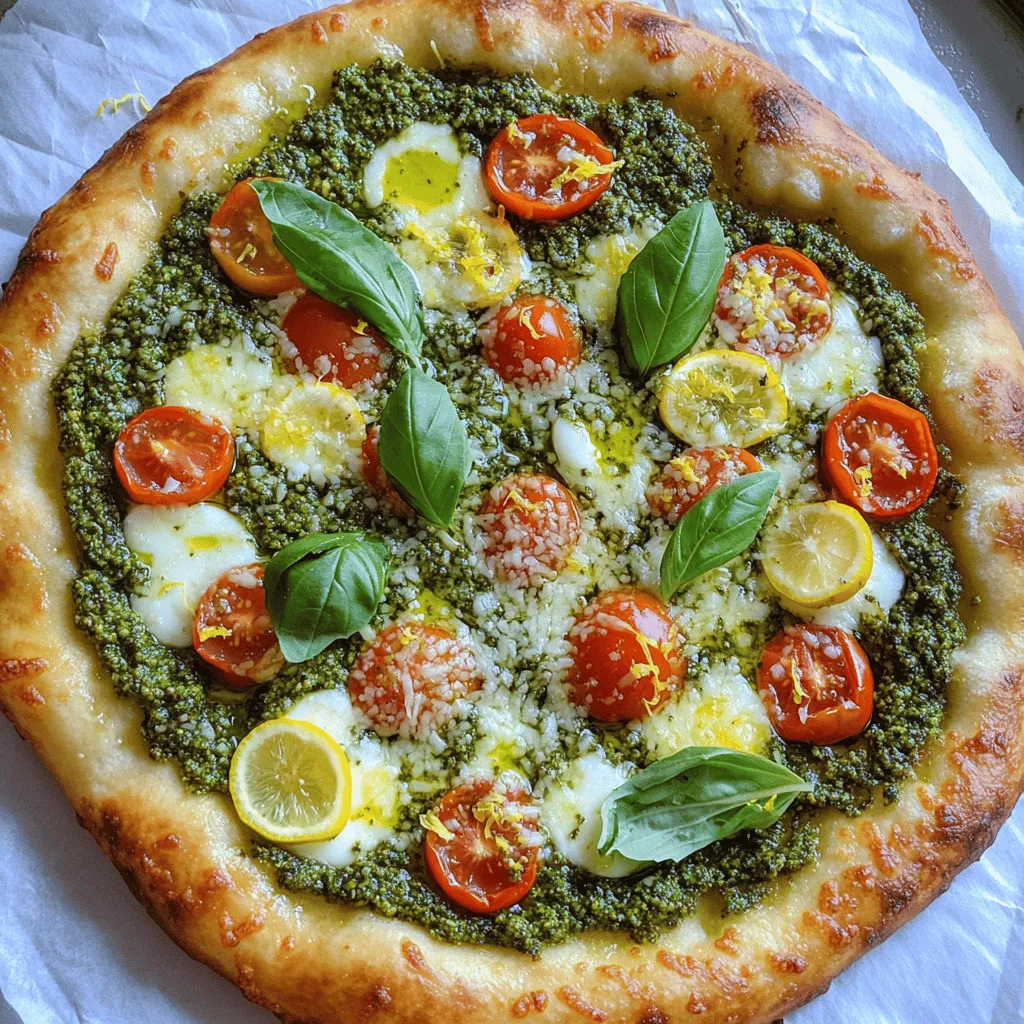
List of Essential Ingredients
- 1 pre-made pizza dough
- 1/2 cup fresh basil pesto
- 1 cup shredded mozzarella cheese
- 1 medium lemon (zested and juiced)
- 1 cup cherry tomatoes, halved
- 1/4 cup finely grated Parmesan cheese
- 1 tablespoon extra-virgin olive oil
- Salt and freshly ground black pepper to taste
- Fresh basil leaves for garnish
Optional Ingredients for Customization
- Additional toppings (e.g., olives, peppers)
- Alternative cheese options (feta, goat cheese)
To make a great Lemon Basil Pesto Pizza, you need these ingredients. They work together to create a fresh, bright flavor.
First, the pre-made pizza dough saves time and makes this recipe easy. You can find it in stores. Fresh basil pesto adds a rich, herby taste. It’s the star of this dish. Shredded mozzarella cheese melts beautifully. It gives that familiar cheesy texture we love.
The lemon zest and juice bring a tangy punch. Cherry tomatoes add sweetness and color. Grated Parmesan cheese gives a nutty, salty flavor. The olive oil helps everything blend well. Salt and pepper round out the taste.
For those who want to mix things up, you can add more toppings. Olives and peppers are great choices. You might also try different cheeses like feta or goat cheese for a twist.
With these simple and tasty ingredients, you’re on your way to making a delightful pizza.
Step-by-Step Instructions
Preparation Steps
1. Preheat your oven to 475°F (245°C). If you have a pizza stone, place it in the oven. This helps the crust cook evenly. If not, use a baking sheet.
2. Lightly flour a clean surface. Roll out the pizza dough to your desired thickness. Make sure it fits your baking surface.
3. Once rolled out, move the dough onto parchment paper. This will help you transfer the pizza later.
Assembly Steps
1. Spread the fresh basil pesto over the dough. Leave a half-inch border for the crust.
2. Sprinkle the shredded mozzarella cheese over the pesto. Make sure it covers the whole pizza.
3. Add the halved cherry tomatoes on top of the cheese. This adds color and flavor.
4. Drizzle the extra-virgin olive oil over everything. Season with salt and freshly ground black pepper to taste.
5. Zest the lemon and sprinkle it evenly on the pizza. This adds a fresh citrus aroma.
Baking Instructions
1. Slide the parchment paper with the pizza onto the preheated pizza stone or baking sheet.
2. Bake for about 12-15 minutes. Look for a golden brown crust and bubbling cheese.
3. Carefully take the pizza out of the oven. Drizzle fresh lemon juice over the top.
4. Sprinkle grated Parmesan cheese over the warm pizza. Add fresh basil leaves for garnish.
5. Use a sharp knife or pizza cutter to slice the pizza into wedges. Serve hot for the best taste.
Tips & Tricks
Achieving an Ideal Crust
To get the best crust, I recommend using a pizza stone. It heats up and gives your pizza a crispy base. If you don’t have one, a baking sheet works too. Just make sure you preheat it well.
Roll your pizza dough to the right thickness. Aim for about a quarter-inch thick. This allows for a nice rise and crunch without being too thin.
Enhancing Flavor
For flavor, balance the saltiness with fresh lemon juice. A squeeze of lemon brightens up the taste. It makes the pizza feel fresh and lively.
Use only fresh ingredients. Fresh basil, ripe tomatoes, and good cheese make a big difference. They add depth and vibrancy to your dish.
Presentation Tips
When serving, place the pizza on a rustic wooden board. It adds a nice touch. You can also use a colorful platter for a fun look.
Garnish with whole basil leaves and a lemon wedge. This makes it visually appealing and invites your guests to dig in. Serve it hot for the best taste!

Variations
Alternative Sauces
You can switch up the sauce for your pizza. Tomato sauce works well if you want a classic taste. You can also try a creamy white sauce. This adds a rich flavor that pairs nicely with lemon. Seasonal pesto is another fun option. You can make it with fresh herbs like parsley or cilantro. This gives a new twist to your dish.
Dietary Modifications
If you need a gluten-free pizza, several dough options are available. Many stores sell gluten-free pizza crusts. You can also make your own using almond flour or cauliflower. For those who follow a vegan diet, you can skip the cheese. There are many tasty vegan cheese substitutes. Look for brands made from nuts or soy for a creamy texture.
Topping Ideas
Toppings can make your pizza unique. Popular choices include pepperoni, mushrooms, and bell peppers. Try mixing and matching your favorites. Seasonal vegetables add color and flavor. In summer, fresh zucchini or bell peppers work well. In winter, roasted butternut squash or kale can be a great choice. Don’t be afraid to get creative with your toppings!
Storage Info
Storing Leftovers
To keep your Lemon Basil Pesto Pizza fresh, let it cool to room temperature. This step is key to avoid moisture buildup. Wrap each slice in plastic wrap or aluminum foil. You can also place them in an airtight container. This helps retain flavor and texture. Store the pizza in the fridge for up to three days. For best results, enjoy it within this time frame.
Reheating Methods
When it’s time to eat leftovers, you can use either an oven or a microwave. The oven is best for maintaining crispiness. Preheat your oven to 375°F (190°C). Place the pizza on a baking sheet and heat for about 10 minutes. This warms it up well without making it soggy.
If you choose the microwave, place a slice on a microwave-safe plate. Add a cup of water next to it. This helps keep the crust from getting too chewy. Heat in 30-second intervals until warm. But remember, the microwave won’t keep it crispy. For the best taste, the oven is your friend!
Use these tips to enjoy your pizza even after the first delightful slice.
FAQs
How do I make my own basil pesto?
To make your own basil pesto, you need a few simple ingredients. Combine fresh basil, garlic, pine nuts, Parmesan cheese, and olive oil in a food processor. Blend until smooth. Adjust the taste with salt and pepper. This mix adds great flavor to your pizza.
Can I freeze lemon basil pesto pizza?
Yes, you can freeze lemon basil pesto pizza. First, let the pizza cool completely. Then, wrap it in plastic wrap and place it in a freezer bag. It can last for up to three months. When you are ready to eat, bake it straight from the freezer. This makes a quick meal!
What are some side dishes to serve with this pizza?
Several side dishes pair well with lemon basil pesto pizza. Here are some of my favorites:
- A light green salad with vinaigrette
- Garlic bread for a crunchy side
- Roasted vegetables for added flavor
These sides balance the pizza’s taste and make for a complete meal.
What is the best way to cut a pizza for even slices?
To cut your pizza into even slices, use a sharp pizza cutter or knife. Start by cutting it in half, then cut each half into smaller sections. Aim for 8 slices for a standard pizza. This way, everyone gets a fair share!
Where can I find high-quality pre-made pizza dough?
You can find high-quality pre-made pizza dough at many grocery stores. Look in the refrigerated section or the freezer aisle. Some local pizzerias also sell their dough. If you want a special option, check out artisan bakeries. They often have fresh dough made with quality ingredients.
In this pizza guide, we covered essential ingredients, step-by-step instructions, and useful tips. You learned how to customize your pizza and store leftovers. Remember, fresh ingredients make a big difference in taste. If you try different toppings or variations, have fun with it! I believe cooking should be enjoyable and creative. Follow these steps, and you’ll create delicious pizza every time. Enjoy your cooking adventure!
![- 1 pre-made pizza dough - 1/2 cup fresh basil pesto - 1 cup shredded mozzarella cheese - 1 medium lemon (zested and juiced) - 1 cup cherry tomatoes, halved - 1/4 cup finely grated Parmesan cheese - 1 tablespoon extra-virgin olive oil - Salt and freshly ground black pepper to taste - Fresh basil leaves for garnish - Additional toppings (e.g., olives, peppers) - Alternative cheese options (feta, goat cheese) To make a great Lemon Basil Pesto Pizza, you need these ingredients. They work together to create a fresh, bright flavor. First, the pre-made pizza dough saves time and makes this recipe easy. You can find it in stores. Fresh basil pesto adds a rich, herby taste. It’s the star of this dish. Shredded mozzarella cheese melts beautifully. It gives that familiar cheesy texture we love. The lemon zest and juice bring a tangy punch. Cherry tomatoes add sweetness and color. Grated Parmesan cheese gives a nutty, salty flavor. The olive oil helps everything blend well. Salt and pepper round out the taste. For those who want to mix things up, you can add more toppings. Olives and peppers are great choices. You might also try different cheeses like feta or goat cheese for a twist. With these simple and tasty ingredients, you’re on your way to making a delightful pizza. For the full recipe and step-by-step guide, check out the [Full Recipe]. 1. Preheat your oven to 475°F (245°C). If you have a pizza stone, place it in the oven. This helps the crust cook evenly. If not, use a baking sheet. 2. Lightly flour a clean surface. Roll out the pizza dough to your desired thickness. Make sure it fits your baking surface. 3. Once rolled out, move the dough onto parchment paper. This will help you transfer the pizza later. 1. Spread the fresh basil pesto over the dough. Leave a half-inch border for the crust. 2. Sprinkle the shredded mozzarella cheese over the pesto. Make sure it covers the whole pizza. 3. Add the halved cherry tomatoes on top of the cheese. This adds color and flavor. 4. Drizzle the extra-virgin olive oil over everything. Season with salt and freshly ground black pepper to taste. 5. Zest the lemon and sprinkle it evenly on the pizza. This adds a fresh citrus aroma. 1. Slide the parchment paper with the pizza onto the preheated pizza stone or baking sheet. 2. Bake for about 12-15 minutes. Look for a golden brown crust and bubbling cheese. 3. Carefully take the pizza out of the oven. Drizzle fresh lemon juice over the top. 4. Sprinkle grated Parmesan cheese over the warm pizza. Add fresh basil leaves for garnish. 5. Use a sharp knife or pizza cutter to slice the pizza into wedges. Serve hot for the best taste. You can find the Full Recipe for this delicious Lemon Basil Pesto Pizza above. To get the best crust, I recommend using a pizza stone. It heats up and gives your pizza a crispy base. If you don’t have one, a baking sheet works too. Just make sure you preheat it well. Roll your pizza dough to the right thickness. Aim for about a quarter-inch thick. This allows for a nice rise and crunch without being too thin. For flavor, balance the saltiness with fresh lemon juice. A squeeze of lemon brightens up the taste. It makes the pizza feel fresh and lively. Use only fresh ingredients. Fresh basil, ripe tomatoes, and good cheese make a big difference. They add depth and vibrancy to your dish. When serving, place the pizza on a rustic wooden board. It adds a nice touch. You can also use a colorful platter for a fun look. Garnish with whole basil leaves and a lemon wedge. This makes it visually appealing and invites your guests to dig in. Serve it hot for the best taste! For the full recipe, check out the complete details above. {{image_4}} You can switch up the sauce for your pizza. Tomato sauce works well if you want a classic taste. You can also try a creamy white sauce. This adds a rich flavor that pairs nicely with lemon. Seasonal pesto is another fun option. You can make it with fresh herbs like parsley or cilantro. This gives a new twist to your dish. If you need a gluten-free pizza, several dough options are available. Many stores sell gluten-free pizza crusts. You can also make your own using almond flour or cauliflower. For those who follow a vegan diet, you can skip the cheese. There are many tasty vegan cheese substitutes. Look for brands made from nuts or soy for a creamy texture. Toppings can make your pizza unique. Popular choices include pepperoni, mushrooms, and bell peppers. Try mixing and matching your favorites. Seasonal vegetables add color and flavor. In summer, fresh zucchini or bell peppers work well. In winter, roasted butternut squash or kale can be a great choice. Don't be afraid to get creative with your toppings! To keep your Lemon Basil Pesto Pizza fresh, let it cool to room temperature. This step is key to avoid moisture buildup. Wrap each slice in plastic wrap or aluminum foil. You can also place them in an airtight container. This helps retain flavor and texture. Store the pizza in the fridge for up to three days. For best results, enjoy it within this time frame. When it's time to eat leftovers, you can use either an oven or a microwave. The oven is best for maintaining crispiness. Preheat your oven to 375°F (190°C). Place the pizza on a baking sheet and heat for about 10 minutes. This warms it up well without making it soggy. If you choose the microwave, place a slice on a microwave-safe plate. Add a cup of water next to it. This helps keep the crust from getting too chewy. Heat in 30-second intervals until warm. But remember, the microwave won't keep it crispy. For the best taste, the oven is your friend! Use these tips to enjoy your pizza even after the first delightful slice. For the full recipe, check out the complete article. To make your own basil pesto, you need a few simple ingredients. Combine fresh basil, garlic, pine nuts, Parmesan cheese, and olive oil in a food processor. Blend until smooth. Adjust the taste with salt and pepper. This mix adds great flavor to your pizza. Yes, you can freeze lemon basil pesto pizza. First, let the pizza cool completely. Then, wrap it in plastic wrap and place it in a freezer bag. It can last for up to three months. When you are ready to eat, bake it straight from the freezer. This makes a quick meal! Several side dishes pair well with lemon basil pesto pizza. Here are some of my favorites: - A light green salad with vinaigrette - Garlic bread for a crunchy side - Roasted vegetables for added flavor These sides balance the pizza's taste and make for a complete meal. To cut your pizza into even slices, use a sharp pizza cutter or knife. Start by cutting it in half, then cut each half into smaller sections. Aim for 8 slices for a standard pizza. This way, everyone gets a fair share! You can find high-quality pre-made pizza dough at many grocery stores. Look in the refrigerated section or the freezer aisle. Some local pizzerias also sell their dough. If you want a special option, check out artisan bakeries. They often have fresh dough made with quality ingredients. In this pizza guide, we covered essential ingredients, step-by-step instructions, and useful tips. You learned how to customize your pizza and store leftovers. Remember, fresh ingredients make a big difference in taste. If you try different toppings or variations, have fun with it! I believe cooking should be enjoyable and creative. Follow these steps, and you’ll create delicious pizza every time. Enjoy your cooking adventure!](https://dishtreats.com/wp-content/uploads/2025/06/c2cede7a-626b-4fd1-91be-1b09c425b287-300x300.webp)


![For a tasty chicken burrito bowl, you need fresh and simple ingredients. Here’s what you’ll gather: - 2 cups of fluffy cooked brown rice - 1 lb diced chicken breast, preferably organic - 1 tablespoon high-quality olive oil - 1 teaspoon chili powder - 1 teaspoon ground cumin - 1/2 teaspoon garlic powder - 1/2 teaspoon onion powder - Salt and freshly cracked black pepper, to taste - 1 can of black beans, rinsed thoroughly and drained - 1 cup sweet corn (fresh, canned, or frozen) - 1 cup cherry tomatoes, lovingly halved - 1 ripe avocado, diced into bite-sized pieces - 1/2 cup shredded cheese (cheddar or a delightful Mexican blend) - 1/4 cup fresh cilantro, chopped finely - Lime wedges, for serving Each ingredient adds flavor and texture. The brown rice gives a hearty base. The chicken, seasoned with chili and cumin, adds warmth. Black beans and corn bring sweetness. Fresh tomatoes and avocado add color and freshness. Finally, cheese and cilantro give a lovely finish. This mix makes every bite a delight. For the full recipe, check out the [Full Recipe]. 1. Heat olive oil in a large skillet over medium heat. Let it shimmer a bit. 2. Add diced chicken to the skillet. Sprinkle with chili powder, cumin, garlic powder, onion powder, salt, and pepper. 3. Sauté the chicken for about 5-7 minutes. Stir it often. Ensure it is fully cooked and golden. The chicken should not be pink inside. 1. Cook the brown rice according to the package instructions. Make sure it is fluffy and tender. 2. In serving bowls, layer the rice first. Then add black beans, sweet corn, and the seasoned chicken. 3. Top each bowl with halved cherry tomatoes, diced avocado, and shredded cheese. 1. Finish each bowl with fresh cilantro and a squeeze of lime juice. This adds a bright flavor. 2. Serve the bowls right away. Include lime wedges on the side for a refreshing touch. For detailed cooking steps, check the Full Recipe. Enjoy making these easy chicken burrito bowls! To ensure your chicken is cooked through, start by cutting it into small pieces. This helps the chicken cook evenly and faster. Use a meat thermometer to check if it’s at 165°F. If you don’t have one, cut a piece open. It should be white inside, not pink. For optimal rice cooking, I recommend using a rice cooker if you have one. It makes perfect rice every time. If not, follow the package instructions carefully. Use the right water ratio for fluffy rice. Let it sit covered for a few minutes after cooking to steam. To enhance flavor, try adding a pinch of smoked paprika or cayenne pepper for heat. These spices add depth to the dish. You can also mix in fresh lime juice or diced jalapeño for a fresh kick. For serving suggestions, consider adding a dollop of sour cream or Greek yogurt. These add creaminess and balance the spices. You could also top with salsa or pico de gallo for a fresh twist. Presentation is key for restaurant-style bowls. Use deep, colorful bowls to make the dish pop. Layer the ingredients in a way that shows off their colors. Start with rice, then beans, followed by chicken, and finally the colorful toppings. For garnishing, sprinkle fresh cilantro on top for a burst of green. Add a lime wedge on the side for a splash of color and zest. You can also use a sprinkle of cheese as a finishing touch for added visual appeal. For the full recipe, check out the detailed instructions above. {{image_4}} You can change up your chicken burrito bowls with different proteins. Try tofu for a plant-based meal. Ground beef or turkey also works well if you want something heartier. Switching beans can add unique flavors too. Instead of black beans, use pinto or kidney beans. You might even try lentils for a twist. For cheese, feel free to swap cheddar for Monterey Jack or queso fresco. Each choice gives a new taste. You can make your burrito bowls sing with flavors. For a Southwestern-style bowl, add a smoky spice like chipotle. You can also use fresh cilantro and lime for a bright touch. If you prefer traditional Mexican flavors, go for a mix of cumin and coriander. For the heat lovers, add jalapeños or a dash of hot sauce. This brings a lively kick to your meal. If you need gluten-free options, use brown rice and check labels on beans and spices. Most ingredients in this recipe are gluten-free, making it easy to enjoy. For vegan adaptations, replace chicken with tofu or tempeh. Use nutritional yeast instead of cheese for a cheesy flavor without dairy. You can still enjoy a tasty burrito bowl while meeting your dietary needs. Try out these variations and create a meal that suits your taste. For detailed steps, check the Full Recipe. To keep your chicken burrito bowls fresh, use airtight containers. Glass or BPA-free plastic works best. Store them in the fridge for up to three days. Always let your food cool before sealing it up. This helps prevent moisture buildup and keeps it tasty. When it's time to eat, heat your bowls gently. The microwave is quick and easy. Use a microwave-safe dish and cover it with a damp paper towel. This keeps food moist. You can also use a skillet on low heat for better texture. Make sure to heat until it's steaming hot to ensure safety. For busy days, prep your ingredients in advance. Cook the rice and chicken ahead of time. You can store them separately. This way, you can mix and match when you're ready to eat. Batch cooking works great, too. Cook a double batch of chicken and rice. You can use them for different meals throughout the week. You can prep these burrito bowls for the week easily. Start by cooking your chicken and rice as per the recipe. After cooking, let everything cool. Store each ingredient in separate containers. This keeps them fresh longer. - Chicken: Store in an airtight container. - Rice: Keep in a fridge-safe container. - Beans and Veggies: Rinse and store properly to avoid spoilage. When ready to eat, just assemble the bowls. This method saves time on busy days. You can also mix and match ingredients based on your mood! Yes, you can freeze chicken burrito bowls. To freeze, let the cooked ingredients cool to room temperature. Then, place them in freezer-safe containers. Label the containers with the date for easy reference. - Freezing: Layer the chicken, rice, and beans. - Reheating: Thaw in the fridge overnight before reheating. Reheat in a microwave or on the stove until hot. This way, you have a tasty meal ready in no time! Adding toppings makes your burrito bowls even better. Here are some popular choices: - Sour Cream: Adds creaminess and tang. - Pico de Gallo: Fresh and zesty. - Jalapeños: For a spicy kick. - Olives: Salty and savory. - Hot Sauce: For extra heat. These toppings take your bowls to the next level. You can even try new combinations to find your favorites! This article covered how to make delicious chicken burrito bowls. You learned about essential ingredients, cooking steps, and helpful tips. I shared variations to fit different diets and how to store leftovers safely. These bowls are easy to customize and perfect for any meal. With fresh flavors and simple prep, you can enjoy a tasty dish any time. Now, gather your ingredients and start crafting your own wholesome burrito bowls!](https://dishtreats.com/wp-content/uploads/2025/07/006ace9b-198d-45c7-b7d7-425f7861f9a7-768x768.webp)


![- 12 ounces of spaghetti or linguine - 4 cups of vegetable broth - 1 tablespoon of olive oil - 6 cloves of garlic, finely minced - 1 teaspoon of red pepper flakes - Zest of 1 lemon - Juice of 2 fresh lemons - 1 cup of cherry tomatoes, halved - 1 cup of fresh spinach leaves - 1/2 cup of grated Parmesan cheese - Salt and freshly ground black pepper to taste - Fresh parsley, chopped for garnish Gathering the right ingredients is key for One-Pot Lemon Garlic Pasta. Each item plays a role in creating a bright and tasty dish. The spaghetti or linguine serves as the base. The vegetable broth gives it depth and flavor. Olive oil adds richness, while garlic brings a punch. Red pepper flakes add just a hint of heat. Next, the lemon zest and juice bring brightness. Cherry tomatoes offer sweetness and color. Fresh spinach adds a pop of green and nutrition. Parmesan cheese gives a creamy finish. Finally, don’t forget salt and pepper to enhance all the flavors. - Use nutritional yeast instead of Parmesan cheese for a vegan option. - Try gluten-free pasta like brown rice or quinoa pasta. If you want to make this dish vegan, swap out the cheese for nutritional yeast. It adds a similar nutty flavor without dairy. For those who need gluten-free options, plenty of pasta choices exist. You can use brown rice or quinoa pasta for a tasty alternative. This recipe stays flexible while keeping its delicious essence. Enjoy exploring these options as you cook! First, heat one tablespoon of olive oil in a large pot over medium heat. Once the oil is hot, add six cloves of finely minced garlic and one teaspoon of red pepper flakes. Sauté this mix for about one to two minutes. Stir it often to avoid burning the garlic. Burnt garlic can ruin the flavor of your dish. Next, pour in four cups of vegetable broth. Then, add the zest of one lemon and the juice of two fresh lemons. Stir gently to mix everything well. The lemon adds a bright flavor that makes this dish special. Now, bring the mixture to a rolling boil. Carefully add twelve ounces of spaghetti or linguine. Make sure the pasta is fully submerged in the broth. This helps it cook evenly. Reduce the heat to a gentle simmer. Cook the pasta while stirring occasionally for about ten to twelve minutes. You want it to be al dente, which means it should be firm to the bite. Most of the liquid should be absorbed by now. After the pasta is cooked, add one cup of halved cherry tomatoes and one cup of fresh spinach. Cook for an additional two to three minutes. Stir until the spinach wilts and the tomatoes soften slightly. Remove the pot from the heat. Stir in half a cup of grated Parmesan cheese. This will give your pasta a creamy texture. Taste it and season with salt and freshly ground black pepper as needed. Allow the pasta to rest for a couple of minutes in the pot. This helps it thicken slightly before serving. For the full recipe, check out the details provided above. Enjoy your flavorful one-pot lemon garlic pasta! To cook pasta al dente, follow these steps: - Use plenty of water for boiling. - Check the pasta package for cooking times. - Taste a piece a minute before the time is up. To avoid burnt garlic, do this: - Keep the heat at medium. - Stir the garlic often. - As soon as it smells good, move to the next step. If you want a zesty kick, add more lemon juice. - Start with an extra half lemon. - Taste and add more if needed. To balance spices, try adding fresh herbs. - Basil or thyme work well. - Chop them finely and mix in before serving. For best pairings, serve with a crisp salad. - A simple green salad brightens the meal. - Garlic bread makes a great side, too. For a nice presentation, use shallow bowls. - Garnish with parsley and extra cheese. - A sprinkle of red pepper flakes adds color. Check the Full Recipe for more details and tips on making this dish shine! {{image_4}} You can make One-Pot Lemon Garlic Pasta even more filling by adding protein. Grilled chicken is a great choice. Just slice it thin and mix it in before serving. Shrimp is another tasty option. Simply cook the shrimp in the pot for a few minutes until they turn pink. If you want a plant-based option, try chickpeas. They are easy to add and packed with protein. Use a can of chickpeas, rinse them, and stir them in with the pasta. They will soak up the lemon flavor and add a nice texture. Using seasonal vegetables can brighten your dish. Fresh veggies add color and nutrition. In spring, consider asparagus or peas. In summer, zucchini or bell peppers work well. You can also substitute spinach with kale or arugula. These greens offer a different taste and texture. Just chop them and add them in the last few minutes of cooking. You can change the sauce to suit your taste. For a creamy lemon sauce, add a splash of cream after cooking. This gives the pasta a rich flavor. If you prefer a dairy-free option, use coconut milk instead. Another way to deepen the flavor is by adding a splash of white wine. Pour it in before the broth. This adds a nice depth that complements the lemon. Just let it cook down for a minute before adding the rest of the ingredients. These variations will keep your One-Pot Lemon Garlic Pasta exciting and new each time you make it. For the complete recipe, check out [Full Recipe]. You can store One-Pot Lemon Garlic Pasta in the fridge for about three days. To keep it fresh, place it in an airtight container. When reheating, add a splash of water or broth to prevent it from drying out. Heat it gently on the stove or in the microwave, stirring often. This keeps the pasta creamy and tasty. If you want to freeze One-Pot Lemon Garlic Pasta, let it cool completely first. Transfer it to a freezer-safe container. It can last for up to three months in the freezer. When you are ready to eat, move it to the fridge to thaw overnight. Reheat it on the stove with a little broth or water. This helps regain its original texture and flavor. Enjoy your meal without fuss! I recommend using spaghetti or linguine for this dish. These shapes cook well and absorb the lemon-garlic flavors nicely. You can also try fettuccine or thin spaghetti if you like. Choose your favorite type based on what you have at home. Yes! You can use gluten-free pasta like brown rice or chickpea pasta. These options hold up well in the dish and taste great. Be sure to check the cooking time, as gluten-free pasta may vary. If you want less heat, simply reduce the red pepper flakes. You can start with half a teaspoon and add more if you want. You can also replace them with a pinch of black pepper for flavor without the heat. This pasta pairs well with a fresh salad or garlic bread. A simple green salad with lemon vinaigrette adds a nice touch. You can also serve it with grilled vegetables or a light protein like chicken or shrimp. Enjoy your meal! This blog post shared a simple recipe for One-Pot Lemon Garlic Pasta. You learned about the key ingredients, including pasta, broth, and fresh veggies. I offered tips on cooking techniques, flavor enhancements, and ways to add protein. You also found storage tips and answers to common questions. This dish is easy to make and great for any meal. Enjoy experimenting with your favorite ingredients and variations!](https://dishtreats.com/wp-content/uploads/2025/07/777f1442-06da-446c-8bc8-b5c2e5ded698-768x768.webp)