Go Back
- 1 package (14.3 oz) Oreo cookies, finely crushed - 8 oz cream cheese, softened to room temperature - 1 teaspoon pure vanilla extract - 1 cup white chocolate chips - 1 tablespoon coconut oil - Additional crushed Oreo cookies for coating - Mixing bowl - Hand mixer or spatula - Baking sheet - Parchment paper - Microwave-safe bowl For the Oreo Cheesecake Truffles, you need just a few simple items. The star of this treat is the Oreo cookies. They add great flavor and texture. Next, you need cream cheese. It makes the truffles creamy and rich. Don’t forget the vanilla extract to enhance the taste. You’ll want some white chocolate chips. These melt beautifully and give a sweet coating. A little coconut oil helps the chocolate melt smoothly. Finally, grab some extra crushed Oreos for rolling the truffles. This adds a fun crunch and extra flavor. Gather these tools to make your life easier. A mixing bowl is a must for combining your ingredients. A hand mixer or a spatula will help you mix everything well. Use a baking sheet lined with parchment paper to hold your truffles. The parchment paper makes cleanup easy. And a microwave-safe bowl is needed to melt the chocolate. With these ingredients and tools ready, you will make the best Oreo Cheesecake Truffles! Start by taking your Oreo cookies and crushing them finely. You can use a food processor or place them in a bag and crush them with a rolling pin. Next, grab a mixing bowl and add in the softened cream cheese. Mix these two ingredients together until they form a smooth, creamy base. I like using a hand mixer for this step. It makes everything blend better and quicker. Now, it’s time to give your truffles some extra taste! Pour in one teaspoon of pure vanilla extract into the Oreo and cream cheese mixture. Stir well to make sure the vanilla is mixed throughout. This little touch will make your truffles taste even more delicious. Once your mixture is ready, wash your hands and grab a small amount. Roll it into a ball about one inch wide. It helps to have a uniform size, so they look nice together. Place each rolled ball onto a baking sheet lined with parchment paper. Keep going until you’ve shaped all the mixture into truffles. Now, we wait for a bit. Place the baking sheet with your truffles into the refrigerator. Let them chill for at least 30 minutes. This step is important because it helps the truffles firm up, making them easier to coat later. While the truffles chill, let’s work on the chocolate coating. In a microwave-safe bowl, combine one cup of white chocolate chips with one tablespoon of coconut oil. Microwave this mixture in 30-second intervals. Stir after each interval until the chocolate is smooth. This will create a nice, shiny coating. Take your chilled truffles out of the fridge. Carefully dip each truffle into the melted white chocolate. Make sure every part is covered, then let any extra chocolate drip off. After that, roll them in the additional crushed Oreo cookies for a tasty finish. Place them back on the baking sheet and return them to the fridge for another 15 minutes. This will help the chocolate set perfectly, giving you a great treat! To make great truffles, it is key to soften the cream cheese. Leave it out for about 30 minutes before mixing. Softened cream cheese blends well with crushed Oreos. This step helps you get a smooth and creamy mixture. For rolling uniform truffles, use a small scoop or your hands. Aim for about 1 inch in size. This keeps them easy to handle and fun to eat. Microwaving chocolate can be tricky. Use a microwave-safe bowl and add white chocolate chips with coconut oil. Heat in 30-second bursts at medium power. Stir well between each burst. This helps avoid clumps. Stop when the chocolate is smooth and fully melted. Presenting your truffles can be just as fun as making them. Use mini cupcake liners to hold each truffle. This adds a cute touch and keeps them tidy. For a fancy look, drizzle melted white chocolate on top. You can also sprinkle a few crushed Oreos for extra flair. Arrange them on a decorative plate or tiered tray for a stunning display. {{image_4}} You can change up the coating for your Oreo cheesecake truffles. Try using different types of chocolate. Dark chocolate or milk chocolate both work well. Each type adds a unique taste. You might also want to add sprinkles or chopped nuts for extra fun. Sprinkles bring color, while nuts add crunch. Both options can make your dessert look even more appealing. If you want to mix things up, consider adding flavors to the cheesecake base. Mint extract can give a fresh twist. Just a little goes a long way! Peanut butter is another great choice. It adds a rich, nutty flavor that pairs well with the Oreos. You can even try mixing in some crushed candy or fruit for added taste. For those looking for a lighter treat, you have options. Use low-fat cream cheese as a swap. This change reduces calories while keeping the creamy texture. If you're gluten-free, there are Oreo alternatives made without gluten. These swaps let everyone enjoy this tasty treat without worry. Store your Oreo cheesecake truffles in an airtight container. A good option is a glass or plastic container with a tight seal. This keeps them fresh and prevents them from drying out. You can stack them gently, but don’t squish them. Layer parchment paper between truffles if needed, to avoid sticking. These truffles taste best within a week. You can keep them in the fridge for up to ten days. After that, they may not taste as good, but they will still be safe to eat. The texture may change if you keep them too long. You can freeze the truffles for longer storage. To do this, place them in a single layer on a baking sheet. Freeze them for about two hours until they are solid. Then transfer them to a freezer-safe bag. When you want to eat them, take out as many as you need. Thaw them in the fridge for a few hours before serving. Avoid microwaving them, as it can change their texture. Yes, you can swap Oreos for other cookies. Try chocolate sandwich cookies or even graham crackers. Just remember, the flavor will change. Use cookies that blend well with cream cheese. To make dairy-free truffles, use dairy-free cream cheese. You can find options made from nuts or soy. For the chocolate, choose dairy-free chocolate chips. This keeps the treat creamy and delicious. If your chocolate is thick, add a little coconut oil. Start with a teaspoon and mix well. If it's still thick, add more oil slowly. This will help create a smoother coating for your truffles. Yes, you can add toppings after the chocolate has set. Use melted chocolate to stick on sprinkles, crushed cookies, or nuts. Just drizzle a bit of melted chocolate on top to hold them in place. Yes, chilling the truffles is important. It helps them hold their shape when you dip them in chocolate. Chill for at least 30 minutes. This step makes the process easier and keeps your truffles firm. These Oreo truffles are simple and fun to make. You combine crushed Oreos with cream cheese, roll them into balls, and coat them in chocolate. With tips for ideal texture and lots of variations, these treats fit any taste. You can store them easily or even freeze them for later. Enjoy your sweet creations! They are sure to impress anyone who tries them. Happy cooking!

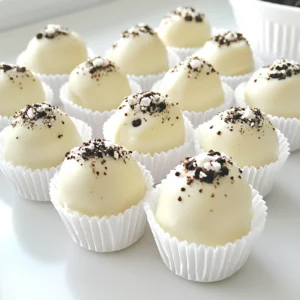
Oreo Cheesecake Truffles No Bake

Indulge your sweet tooth with these irresistible Oreo Cheesecake Truffles! Made with crushed Oreos, cream cheese, and a creamy white chocolate coating, these delightful treats are perfect for any occasion. Easy to make and sure to impress, they’re a chocolate lover’s dream. Click to discover the full recipe and create your own batch of these delicious truffles today! #OreoCheesecakeTruffles #DessertRecipes #ChocolateLovers #EasyTreats

Ingredients
  

1 package (14.3 oz) Oreo cookies, finely crushed

8 oz cream cheese, softened to room temperature

1 teaspoon pure vanilla extract

1 cup white chocolate chips

1 tablespoon coconut oil

Additional crushed Oreo cookies for coating

Instructions
 

Mix the Base: In a spacious mixing bowl, combine the finely crushed Oreo cookies with the softened cream cheese. Use a hand mixer or a sturdy spatula to blend the ingredients together thoroughly until the mixture is smooth and well combined.

    Flavor It Up: Pour in the vanilla extract, continuing to stir until it is fully incorporated into the cream cheese and Oreo mixture.

      Form the Truffles: With clean hands, take portions of the mixture and roll them into small, uniform balls, approximately 1 inch in diameter. Arrange the finished truffle balls on a parchment-lined baking sheet.

        Chill for Firmness: Once all truffles are formed, place the baking sheet in the refrigerator. Allow them to chill for at least 30 minutes, which will help them firm up and hold their shape.

          Melt the Coating: In a microwave-safe bowl, combine the white chocolate chips and coconut oil. Microwave the mixture in 30-second intervals, stirring well between each interval, until the chocolate is completely melted and smooth in texture.

            Coat the Truffles: Retrieve the chilled truffles from the refrigerator. Carefully dip each truffle into the melted white chocolate, ensuring that they are fully covered. Allow any excess chocolate to drip off, then roll the truffles in the additional crushed Oreo cookies to coat evenly.

              Set the Coating: Return the coated truffles to the lined baking sheet. Place them back in the refrigerator for an additional 15 minutes, allowing the chocolate to set properly.

                - Prep Time: 10 minutes | Total Time: 55 minutes | Servings: About 20 truffles

                  - Presentation Tips: Arrange the truffles in mini cupcake liners on a decorative plate or a tiered tray for an elegant display. For an extra touch of flair, drizzle a little bit of melted white chocolate over the top of the truffles before serving!