Go Back
To make a No-Bake Oreo Cheesecake, you need a few simple items. Here’s what you’ll need: - 24 Oreo cookies (plus extra for garnish) - 4 tablespoons unsalted butter, melted - 16 oz cream cheese, softened to room temperature - 1 cup powdered sugar - 1 teaspoon pure vanilla extract - 1 cup heavy whipping cream - 1/2 cup mini chocolate chips (optional) These ingredients come together to create a rich and creamy dessert. The Oreo cookies give a wonderful crunch and flavor. The cream cheese makes the filling smooth and light. Together, they make a perfect treat for any occasion. When you gather your ingredients, make sure the cream cheese is at room temperature. This step helps it mix smoothly with the other ingredients. The heavy cream should also be cold for whipping. This will help it reach stiff peaks, making your cheesecake fluffy. You can add mini chocolate chips to the filling if you like a bit of extra texture. They add a fun surprise in every bite. If you want to make the dessert look fancy, save a few crushed Oreos for garnish. Trust me, your guests will love it! For the full recipe, check the details above. First, I take 24 Oreo cookies and place them in my food processor. I pulse them until they turn into fine crumbs. Next, I add 4 tablespoons of melted unsalted butter. I blend these two until I have a sandy texture. This mixture will form the base of my cheesecake. I grab a 9-inch springform pan and press the Oreo crumb mixture firmly into the bottom. I make sure it is even and well-packed. Once done, I refrigerate it to chill while I prepare the filling. This step is key to a great crust. In a large bowl, I beat 16 ounces of softened cream cheese until it’s smooth. Then, I gradually add 1 cup of powdered sugar and 1 teaspoon of pure vanilla extract. I keep beating until the mixture is creamy and has no lumps. This filling is rich and delicious. In a separate cold bowl, I pour in 1 cup of heavy whipping cream. I whip it until stiff peaks form. This process takes a few minutes. I am careful not to over-whip it. Then, I gently fold the whipped cream into the cream cheese mixture. If I want, I can add half a cup of mini chocolate chips for extra crunch. I carefully spoon the cheesecake filling onto the chilled crust. Using a spatula, I smooth the surface for a nice finish. After that, I cover the cheesecake and place it back in the fridge. I let it chill for at least 4 hours, but overnight is best for great texture and flavor. When I’m ready to serve, I gently remove the cheesecake from the springform pan. I like to garnish the top with crushed Oreo cookies for a nice touch. Then, I slice it into wedges and serve. This dessert looks as good as it tastes! To make your cheesecake smooth, start with room temperature cream cheese. Cold cream cheese can lead to lumps. Mix until it is silky and creamy. Next, when whipping the cream, watch your timing. Over-whipping will make the cream too stiff. You want it to be fluffy but still soft. This balance helps create a light texture in your cheesecake. When it's time to serve, let your creativity shine. Drizzle chocolate sauce over each slice for a rich touch. You can also add a dollop of whipped cream to make it pop. Serving on decorative plates adds an elegant feel. Each plate can be a mini work of art! If you like, garnish with extra crushed Oreo cookies for that extra crunch. This dessert will impress everyone at your table. {{image_4}} You can change the flavor of your no-bake Oreo cheesecake easily. One fun twist is to add mint extract. This gives your dessert a cool, mint chocolate flavor. Just a little goes a long way, so start with half a teaspoon. Mix it in when you add the vanilla extract. Another great idea is to add fresh fruit toppings. Strawberries or raspberries work perfectly. They add a burst of color and taste. You can place them on top right before serving. This makes your cheesecake look even more inviting! If you need a gluten-free option, use gluten-free Oreo cookies. Many brands offer these, and they taste just as good. Your cheesecake will still be rich and delicious. For a dairy-free version, swap out the cream cheese. Use vegan cream cheese and coconut cream instead. This will keep your cheesecake creamy and yummy. Just follow the same steps in the Full Recipe, and you’ll have a tasty treat for everyone! After enjoying your No-Bake Oreo Cheesecake, store any leftovers in an airtight container. This keeps it fresh and tasty. You can keep it in the fridge for up to 5 days. If you see any signs of spoilage, toss it out. For longer storage, freeze the cheesecake. It can last up to 2 months in the freezer. Wrap it tightly in plastic wrap. Then, place it in a freezer-safe container. When you're ready to eat, let it thaw in the fridge overnight. This method keeps the cheesecake's flavor and texture intact. If you want to make it ahead of time, freezing is a great option. Just remember to label it with the date. The cheesecake needs a chilling time of at least 4 hours. For the best firmness, let it chill overnight. Yes, you can use any chocolate sandwich cookies for the crust. Oreos work well, but others give great taste too. Absolutely! You can make this cheesecake a day or two in advance. It saves time and still tastes fresh. To prevent cracks, ensure proper cooling and chilling. If it cracks, you can cover it with toppings to hide the flaws. Yes, you can use low-fat cream cheese. It may change the richness and texture a little, but it still works well. This blog post shines a light on making a delicious Oreo cheesecake. We covered the key ingredients, clear steps for making the crust and filling, serving tips, and creative variations. Perfecting your cheesecake is all about small details. Remember to use room temperature cream cheese and avoid over-whipping the cream. You can store leftover cheesecake easily, making it great for later. With these tips in hand, you're ready to create a dessert that impresses everyone. Enjoy every bite of your creamy, tasty cheesecake!

No-Bake Oreo Cheesecake

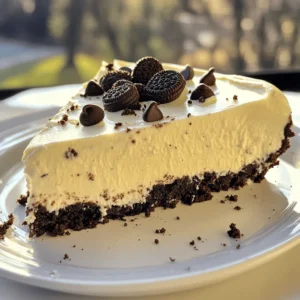
Indulge in a creamy No-Bake Oreo Cheesecake Delight that will satisfy your sweet cravings! This simple recipe combines the rich taste of cream cheese and Oreo cookies for a luscious dessert perfect for any occasion. With easy-to-follow steps, you can whip up this delightful treat in just 20 minutes and let it chill for the ultimate flavor. Click to discover how to make this irresistible cheesecake and impress your friends and family!

Ingredients
  

24 Oreo cookies (plus extra for garnish)

4 tablespoons unsalted butter, melted

16 oz cream cheese, softened to room temperature

1 cup powdered sugar

1 teaspoon pure vanilla extract

1 cup heavy whipping cream

1/2 cup mini chocolate chips (optional)

Instructions
 

Create the Crust: Begin by placing the 24 Oreo cookies in a food processor. Pulse them until they turn into fine crumbs. Next, drizzle in the melted unsalted butter and blend until the mixture is well combined and has a sandy texture.

    Prepare the Springform Pan: Take a 9-inch springform pan and press the Oreo crumb mixture firmly into its bottom, ensuring an even and compact layer. Once done, place the pan in the refrigerator to allow the crust to chill and set while you work on the filling.

      Prepare the Cheesecake Filling: In a large mixing bowl, use an electric mixer to beat the softened cream cheese until it is silky smooth. Gradually add the powdered sugar and vanilla extract, beating continuously until the mixture is completely smooth and creamy, with no lumps remaining.

        Whip the Heavy Cream: In a separate, cold mixing bowl (this helps with whipping), pour in the heavy whipping cream. Whip it using a hand mixer until stiff peaks form — this may take a few minutes. Take care not to over-whip. Gently fold the whipped cream into the cream cheese mixture using a rubber spatula until just combined. If you like, fold in the mini chocolate chips to add a delightful crunch to the filling.

          Assemble the Cheesecake: Carefully spoon the luscious cheesecake filling onto the chilled Oreo crust. Use a spatula to smooth the surface evenly, creating a beautiful top for your cheesecake.

            Chill the Cheesecake: Cover the cheesecake with plastic wrap or a lid, and place it back in the refrigerator. Let it set for at least 4 hours, though overnight is recommended for the best firmness and flavor.

              Serve with Style: When ready to serve, gently remove the cheesecake from the springform pan. For an elegant touch, garnish the top with crushed Oreo cookies and slice into wedges.

                Prep Time, Total Time, Servings: 20 minutes | 4 hours chilling time | 8 servings

                  - Presentation Tips: Serve each slice on a decorative dessert plate. For added flair, drizzle with chocolate sauce or top with a dollop of whipped cream, transforming your cheesecake into an irresistible treat worthy of any occasion.