Go Back
- 2 ripe bananas - 1 cup dark chocolate chips - 1 tablespoon coconut oil - 1/4 cup crushed nuts (almonds, peanuts, or hazelnuts) - 1/4 cup shredded coconut (optional) - 4 popsicle sticks Gathering the right ingredients makes this recipe fun and easy. Ripe bananas work best because they are sweet and soft. Dark chocolate chips give a rich flavor. The coconut oil helps the chocolate melt smoothly. You can choose any nuts you love for crunch. Shredded coconut adds a tropical twist but is optional. Lastly, popsicle sticks are key for holding the banana pops. Make sure to measure everything before you start. This way, you will have a smooth cooking process. Enjoy picking your toppings! {{ingredient_image_2}} Start by peeling the bananas. Then, cut them in half crosswise. This gives you two pops per banana. Next, take a popsicle stick and insert it into the cut end of each banana half. Make sure it goes in deep enough to hold the banana securely. This step is key for easy handling later. For melting the chocolate, use a microwave-safe bowl. Combine the dark chocolate chips with one tablespoon of coconut oil. The oil helps the chocolate stay smooth. Microwave the bowl in 30-second intervals. Stir well between each interval to avoid burning. Continue until the chocolate looks smooth and fully melted. Hold each banana by the popsicle stick and dip it into the melted chocolate. Make sure you coat each banana half evenly. Turn it around to cover all sides. After dipping, lift the banana out and let any excess chocolate drip back into the bowl. This step gives you a nice, even coating. While the chocolate is still wet, sprinkle your toppings. Use crushed nuts or shredded coconut for extra flavor. Try to coat them well so they stick. For fun, mix and match toppings. You might like almonds with coconut or peanuts with chocolate sprinkles. Once you’ve coated the bananas, arrange them on a baking sheet lined with parchment paper. This keeps them from sticking. Place the baking sheet in the freezer. Let the pops chill for about one hour. This time ensures the chocolate hardens well. When you’re ready to serve, take the banana pops from the freezer. Arrange them on a nice plate for a fun look. You can drizzle some leftover melted chocolate on top for flair. If you want, add fresh mint leaves for color and freshness. These ideas make your pops look even more tempting! To get a smooth chocolate coat, pay close attention to temperature. Melt your chocolate slowly. Use a microwave in short bursts. Stir often to keep the heat even. If it gets too hot, it will seize. This means it clumps and won’t coat well. To avoid cracks, let the chocolate cool slightly before dipping. A thicker coat helps too. After dipping, allow excess chocolate to drip off. This step keeps the surface smooth. Choose bananas that are ripe but not too mushy. A good banana feels firm but gives slightly when you press it. This ripeness gives great flavor and texture. If you want to try something else, use strawberries or peaches. They work just as well and taste great. You can even use frozen fruit for a cool treat. One big mistake is to overheat the chocolate. If it gets too hot, it will not melt well. Always heat in small bursts, and stir in between. Also, avoid using bananas that are too ripe or too unripe. Overripe bananas may be too soft, while unripe bananas taste starchy. Stick to the right ripeness for the best results. Pro Tips Use Ripe Bananas: Choose bananas that are ripe but not overly soft. They should be firm enough to hold their shape while being dipped in chocolate. Enhance the Chocolate: Adding a tablespoon of coconut oil helps create a smoother chocolate coating and gives it a nice sheen. Experiment with Toppings: Feel free to mix and match toppings such as sprinkles, chia seeds, or dried fruits for added flavor and texture. Store Properly: Once frozen, store the banana pops in an airtight container to keep them fresh and prevent freezer burn. {{image_4}} You can make your chocolate-covered banana pops even better! Try infusing the chocolate with flavors. Add a few drops of vanilla extract or a pinch of cinnamon. This gives a warm, cozy taste. You can also switch up the type of chocolate. Use milk chocolate for a sweeter bite. White chocolate offers a creamy finish. Each option brings its own flair to your pops! Toppings can take your pops to the next level. Try colorful sprinkles for fun. They add a crunch and a pop of color. Chia seeds are also a great option. They give a nice texture and are healthy too. You can mix and match toppings. Use crushed nuts, shredded coconut, or even mini chocolate chips. Each pop can be unique, so get creative! Bananas are great, but other fruits work too. Strawberries are a sweet choice. They pair well with chocolate and are easy to dip. Peaches offer a juicy twist. Their soft texture makes for a tasty treat. When adapting the recipe, cut the fruit into similar sizes. Ensure the pieces are easy to hold. This way, you keep the fun of a popsicle shape! To keep your chocolate-covered banana pops fresh, use an airtight container. A plastic container or a resealable bag works well. Place a piece of parchment paper between pops to avoid sticking. Store them in the freezer for best results. The ideal storage condition is a consistent temperature below 0°F. This helps maintain flavor and texture. If you store them in the fridge, they may become mushy and lose their snap. You can freeze chocolate-covered banana pops for up to two months. This makes them a great make-ahead treat. To thaw, simply move them from the freezer to the fridge for about 30 minutes. Serving them while still slightly frozen gives a nice texture. If you want to enjoy them right away, let them sit at room temperature for a few minutes. This way, you can bite into a soft, yet firm banana pop. Chocolate-covered banana pops are best eaten within one week if stored in the fridge. After that, they may start to lose flavor and texture. Signs of spoilage include discoloration or off smells. If you notice these signs, it's best to discard them. To ensure they stay fresh, always check for any changes before serving. Enjoy your tasty treats while they are still at their best! If your chocolate isn’t melting well, check the following: - Use a microwave-safe bowl. Ensure it’s marked for microwave use. - Avoid water. Water can cause chocolate to seize up. - Heat in short bursts. Use 30-second intervals to slowly melt the chocolate. - Stir often. Stir the chocolate every time you check it. This helps it melt evenly. - Add coconut oil. Mixing in a tablespoon of coconut oil can help smooth the chocolate. These tips will help you get smooth, melted chocolate every time. You can use chocolate syrup instead of chips, but there are pros and cons. - Pros: - It’s easy to pour and coat. - No melting needed; just drizzle it on. - Cons: - It may not harden like melted chocolate. - It can be thinner, which may not stick well to the bananas. If you want a solid coating, I recommend sticking with chocolate chips. Chocolate-covered banana pops can be a healthy treat. Here are some points: - Bananas are good for you. They provide potassium and fiber. - Dark chocolate offers health benefits. It contains antioxidants and may improve heart health. - Watch your portions. Too much chocolate can add sugar and fat. Enjoy these pops in moderation for a sweet yet nutritious snack. Yes, you can make this recipe vegan! Here’s how: - Choose dairy-free chocolate chips. Many brands offer vegan options. - Use coconut oil. This is already vegan and adds creaminess. These simple swaps will keep your pops delicious and dairy-free. Making these pops gluten-free is easy. Here are your options: - Choose gluten-free toppings. Use nuts or gluten-free granola. - Avoid cross-contamination. Make sure all your tools and surfaces are clean. With these tips, everyone can enjoy chocolate-covered banana pops! You learned how to make chocolate-covered banana pops with simple steps and fun variations. Start with ripe bananas, melt chocolate, and dip them for a tasty treat. Don’t forget to add toppings and chill them for a perfect snack. In the end, these pops are not only easy to make but also customizable. Feel free to try different fruits or toppings. Enjoy sharing your tasty creations with friends and family!

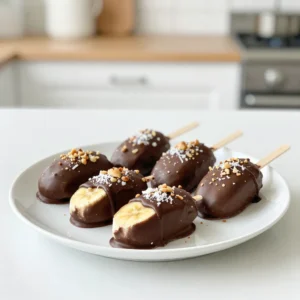
Chocolate-Covered Banana Pops

Delicious banana halves coated in melted dark chocolate, topped with nuts and shredded coconut.
Prep Time 15 minutes
Total Time 1 hour 15 minutes
Course Dessert
Cuisine American
Servings 4
Calories 150 kcal

Ingredients
  

  • 2 pieces ripe bananas
  • 1 cup dark chocolate chips
  • 1 tablespoon coconut oil
  • 1/4 cup crushed nuts (almonds, peanuts, or hazelnuts)
  • 1/4 cup shredded coconut (optional)
  • 4 pieces popsicle sticks

Instructions
 

  • Prepare the Bananas: Begin by peeling the bananas and cutting them in half crosswise. Carefully insert a popsicle stick into the cut end of each banana half, creating a popsicle shape that will be easy to hold.
  • Melt the Chocolate: Using a microwave-safe bowl, combine the dark chocolate chips with the coconut oil. Microwave the mixture in 30-second intervals, stirring well between each interval. Continue this process until the chocolate is completely melted and smooth in consistency.
  • Dip the Bananas: Grasp each banana by the popsicle stick and dip it into the melted chocolate, ensuring each banana half is thoroughly coated. Allow any excess chocolate to drip back into the bowl.
  • Add Toppings: While the chocolate is still wet, generously sprinkle crushed nuts and shredded coconut over the chocolate-covered bananas, allowing them to adhere to the surface.
  • Chill: Arrange the chocolate-coated banana pops on a parchment-lined baking sheet. Transfer the baking sheet to the freezer and let the pops chill for about 1 hour, or until the chocolate has hardened completely.
  • Serve: After the banana pops are fully frozen, remove them from the freezer and serve immediately for a delightful, refreshing treat!

Notes

For an elegant display, arrange the banana pops on a decorative plate. Drizzle any leftover melted chocolate over them for an extra touch of decadence. Optionally, garnish with fresh mint leaves for a pop of color and added freshness.
Keyword banana, chocolate, dessert, frozen treat