Maple Glazed Brussels Sprouts Flavorful Side Dish

If you’re looking for a side dish that bursts with flavor and joy, look no further. Maple Glazed Brussels Sprouts combine sweet and savory notes for a dish that will impress everyone at your table. From simple ingredients to quick cooking steps, this recipe is easy enough for any kitchen. Let’s dive into how you can whip up this mouthwatering treat and elevate your meals!
Ingredients
Main Ingredients
- 1 lb Brussels sprouts, trimmed and halved
- 3 tablespoons pure maple syrup
- 2 tablespoons extra virgin olive oil
Additional Flavor Enhancers
- 1 tablespoon balsamic vinegar
- 2 cloves fresh garlic, finely minced
- Salt and freshly cracked black pepper, to taste
Optional Add-ins
- 1/4 cup pecans, coarsely chopped
- 1/4 cup dried cranberries
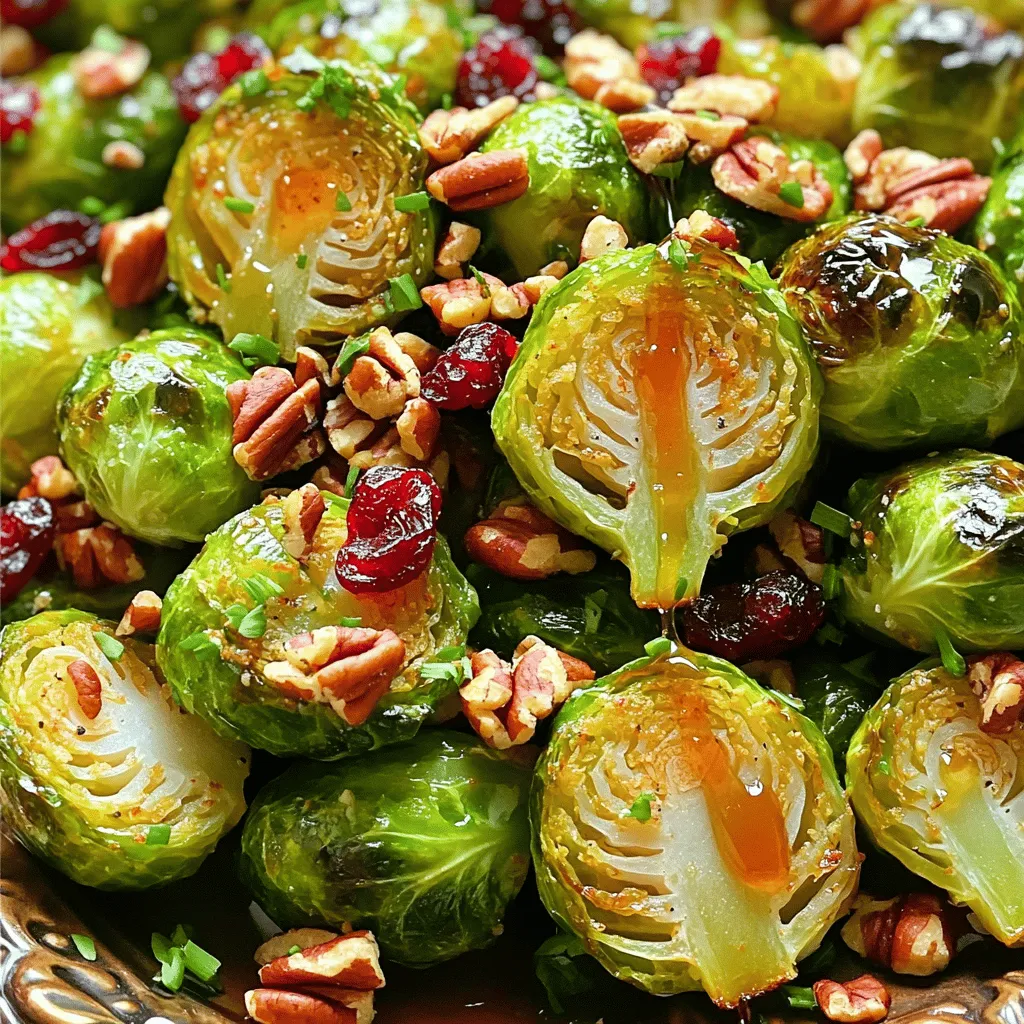
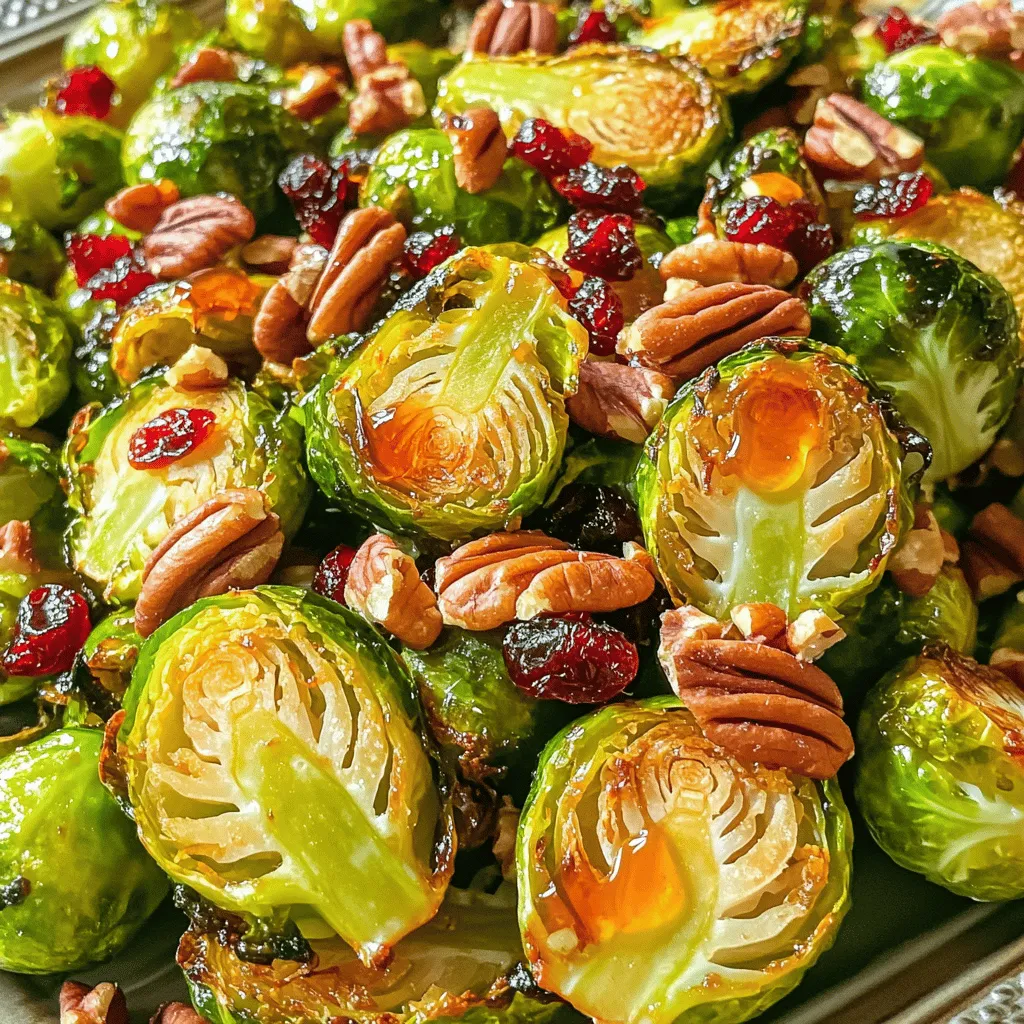
To make maple glazed Brussels sprouts, you need a few simple ingredients. The main star is, of course, the Brussels sprouts. You want to start with about one pound. Trim them by cutting off the stem and halving them. This helps them roast evenly.
Next, you’ll need pure maple syrup. This gives the dish a sweet and rich flavor. You’ll use three tablespoons of this golden goodness. The olive oil adds a nice depth and helps with roasting. Two tablespoons will do the trick.
For extra flavor, add balsamic vinegar. It gives a tangy kick. You only need one tablespoon. Don’t forget the garlic! Fresh garlic makes everything better. Two cloves, finely minced, will infuse the dish with a lovely aroma.
Season with salt and freshly cracked black pepper to taste. This balances all the flavors.
If you want to take it up a notch, consider adding some optional extras. Pecans add a nice crunch and richness. Use about 1/4 cup, coarsely chopped. Dried cranberries provide a sweet and chewy contrast. A 1/4 cup will add a pop of color and flavor.
With these ingredients ready, you are set for a delightful side dish.
Step-by-Step Instructions
Prepping the Ingredients
- Preheat the oven to 400°F (200°C).
- In a large bowl, combine the halved Brussels sprouts with olive oil, maple syrup, balsamic vinegar, and minced garlic.
Cooking Process
- Generously season the mixture with salt and freshly cracked black pepper. Toss until the Brussels sprouts are coated.
- Spread the seasoned Brussels sprouts on a large baking sheet. Make sure they are in a single layer for even cooking.
Final Touches
- In the last 5 minutes of roasting, sprinkle coarsely chopped pecans over the Brussels sprouts. This adds a nice crunch.
- Once you take them out of the oven, gently fold in the dried cranberries. This adds a sweet touch that complements the dish well.
These steps create a flavorful side dish that pairs well with many meals.
Tips & Tricks
Achieving Perfect Roasting
To ensure even cooking, cut Brussels sprouts in half. This helps them cook evenly. Spread them out on the baking sheet. They should not touch each other. Stir them halfway through roasting. This promotes even browning and caramelization.
To keep Brussels sprouts crispy, don’t overcrowd the baking sheet. If they are too close, they steam instead of roast. Use a hot oven, set at 400°F (200°C). The heat helps them get crispy on the outside.
Enhancing Flavor
Best practices for seasoning include using fresh ingredients. Fresh garlic adds a strong flavor. Salt and pepper should be generous, but not overwhelming. You can also mix in a bit of red pepper flakes for heat.
Try different vinegars or sweeteners for a new taste. Instead of balsamic, use apple cider vinegar for a tangy twist. Honey or brown sugar can replace maple syrup if you want a different sweetness. Each option gives the dish a unique flavor profile.
Presentation Ideas
For serving, use a wide platter to show off the Brussels sprouts. This makes them look inviting. Drizzle extra maple syrup on top for shine. Scatter chopped pecans and cranberries for color and crunch.
For special occasions, consider adding fresh herbs as a garnish. Chopped parsley or thyme can enhance the look and flavor. You can also serve them alongside roasted meats or a rich grain dish. This makes your meal more complete and appealing.

Variations
Alternative Sweeteners
You can switch the maple syrup for other sweet options. Honey adds a floral note. Agave nectar is a good choice for a mild flavor. If you prefer brown sugar, it gives a rich, warm sweetness. Just replace maple syrup with the same amount of your chosen sweetener.
Adding Other Vegetables
Brussels sprouts are great alone, but you can mix in other veggies. Carrots add a nice crunch and sweetness. Sweet potatoes bring a hearty feel and bright color. You can also use cauliflower or green beans for more variety. This makes your dish colorful and more nutritious.
Flavor Infusions
Spices can elevate your Brussels sprouts even more. Try adding paprika for a smoky taste. A pinch of cayenne can add heat for those who like it spicy. You can also use herbs like thyme or rosemary for fresh flavors. Just sprinkle these in when you mix the sprouts before roasting.
Storage Info
Storing Leftovers
To keep your maple glazed Brussels sprouts fresh, use airtight containers. Glass or plastic containers work well. Store them in the fridge for up to three days. After that, they may lose their flavor and texture.
Reheating Instructions
When you’re ready to enjoy leftovers, reheat them in the oven. Preheat your oven to 350°F (175°C). Place the sprouts on a baking sheet and warm them for about 10 minutes. This method keeps them crispy and delicious. You can also use a skillet on low heat. This way, they won’t get soggy.
Freezing Tips
Yes, you can freeze maple glazed Brussels sprouts! To freeze them, first, let them cool completely. Then, place them in a freezer-safe bag. Squeeze out as much air as possible before sealing. They can last for up to three months in the freezer.
When you’re ready to use them, thaw overnight in the fridge. For best results, reheat them in the oven, as mentioned above. Avoid microwaving, as it can make them mushy. Enjoy your tasty side dish anytime with these storage tips!
FAQs
Can I make maple glazed Brussels sprouts ahead of time?
Yes, you can make maple glazed Brussels sprouts ahead of time. Cook them, then cool and store in the fridge. Reheat them in the oven for about 10 minutes at 350°F (175°C). This keeps them warm and tasty.
What can I serve with maple glazed Brussels sprouts?
Maple glazed Brussels sprouts pair well with many dishes. Try serving them with roasted chicken or grilled salmon. They also go great with a warm quinoa salad. For a hearty meal, serve them alongside mashed potatoes or a creamy risotto.
How do I make this recipe vegan?
To make this recipe vegan, replace the honey with maple syrup. Ensure all your ingredients are plant-based. Use olive oil for cooking and skip any dairy products. The flavors will still shine through beautifully.
Are Brussels sprouts healthy?
Yes, Brussels sprouts are very healthy. They are low in calories and high in fiber. They also contain vitamins C and K. Eating Brussels sprouts can help support heart health and boost the immune system.
What are the best ways to trim Brussels sprouts?
Trimming Brussels sprouts is easy. Start by removing any yellow or wilted leaves. Then, cut off the stem end. If they are large, you can halve them for even cooking. This helps them roast nicely and absorb flavor better.
You learned how to make delicious maple glazed Brussels sprouts. We covered the key ingredients, step-by-step cooking, and handy tips. You can now serve them with flair or store them for later.
Experiment with the add-ins for more flavor. Try different techniques for roasting to get the best results. Enjoy your cooking journey and share your dish with friends. Delicious food brings people together!


![To make delicious grilled veggie kabobs, gather these fresh ingredients: - 1 bell pepper (any color), cut into 1-inch pieces - 1 zucchini, sliced into rounds - 1 yellow squash, sliced into rounds - 1 red onion, cut into wedges - 8 cherry tomatoes - 1 cup mushrooms, cleaned and stems removed - 3 tablespoons olive oil - 2 cloves garlic, finely minced - 1 teaspoon smoked paprika - 1 teaspoon dried oregano - Salt and freshly ground black pepper to taste - 8 skewers (wooden or metal) Fresh vegetables make a big difference in flavor. You can swap in seasonal veggies, like asparagus or eggplant, based on what you find at the market. This keeps your kabobs fresh and exciting. If you have frozen vegetables, use those too! Just remember to thaw and drain them well. Fresh veggies often taste better but frozen can be a great backup. Using fresh ingredients ensures better taste and texture. Fresh veggies hold their shape and crunch better on the grill. When you bite into a grilled kabob, you want that satisfying crunch. Plus, fresh produce packs more nutrients and flavor. So, always try to choose fresh when you can! For the full recipe, check the section above. Cutting vegetables evenly ensures they cook at the same rate. Aim for 1-inch pieces for bell peppers and wedges for onions. Slice zucchini and yellow squash into rounds. If using wooden skewers, soak them in water for at least 30 minutes. This step prevents burning and keeps them strong. Marinating vegetables adds rich flavor. Combine olive oil, minced garlic, smoked paprika, and oregano. Toss in salt and pepper, then mix well. Add your veggies and coat them with the marinade. Let them sit for 15 minutes to soak up the flavors. Preheat your grill to medium-high heat. A hot grill helps create nice grill marks and a good sear. Place the kabobs on the grill grates. Arrange them evenly for better cooking. Cook for about 10-15 minutes. Turn them occasionally to ensure even cooking. Look for tender veggies with nice grill marks. To serve kabobs, use a rustic platter for a warm touch. Garnish with fresh herbs for added color. Serve with tzatziki or yogurt dip for a creamy contrast. Pair with a light salad or grilled protein for a complete meal. Enjoy your delicious creation! For the full recipe, check out the Grilled Veggie Kabobs details above. To boost the taste of your grilled veggie kabobs, try different marinades. Balsamic vinegar adds a sweet tang. Citrus juices like lemon or lime give a bright kick. You can also add spices or herbs. Consider rosemary, thyme, or cayenne pepper for extra flavor. Smoking the veggies adds depth too. If you have a grill with a smoker box, use it. Wood chips like hickory or mesquite can make a big difference. When you assemble your kabobs, think about color and texture. Alternate your veggies for a pretty look. Start with a bell pepper, then add a mushroom, followed by a cherry tomato. This keeps the kabob interesting. To prevent veggies from falling apart, push them snugly together on the skewer. Avoid overloading them; a little space helps. You can also add proteins like chicken or shrimp, or even cheese cubes for variety. This makes your kabobs more filling and tasty. For a twist, try marinating the protein in the same mix as the veggies. If you want to dive deeper into the recipe, check out the Full Recipe for more details! {{image_4}} You can easily customize grilled veggie kabobs by using seasonal vegetables. Here are some ideas: - Summer: Try corn on the cob, eggplant, and asparagus. - Fall: Use butternut squash, Brussels sprouts, and sweet potatoes. - Winter: Consider root veggies like carrots, turnips, and beets. You can also grill fruits alongside your veggies. Fruits add sweetness and a nice contrast. Pineapple, peaches, and bell peppers work well. Skewer them together for fun color and taste. For a great look and texture, combine different colors and shapes. Mix round cherry tomatoes with long zucchini slices. Use bright peppers with earthy mushrooms. This creates visual interest on your plate. You can make grilled veggie kabobs vegan by omitting any animal products. The recipe is already plant-based, so it’s a perfect choice. If you want a gluten-free version, ensure your marinade is gluten-free. Most spices and oils are safe, but check labels. You can enhance nutrition by adding grains or legumes. Try adding cooked quinoa or chickpeas to your kabobs. This gives extra protein and fiber. If you follow a low-carb diet, focus on non-starchy vegetables. Zucchini, bell peppers, and mushrooms are great picks. You can skip the starchy veggies like corn or potatoes. Check out the Full Recipe for more ideas on how to adapt these kabobs! To keep your leftover kabobs fresh, store them in the fridge. Place them in an airtight container. They can last up to three days. For longer storage, freeze them. Wrap each kabob in plastic wrap, then place them in a freezer bag. They can stay frozen for up to three months. When reheating kabobs, use the oven or grill. Preheat the oven to 350°F. Place the kabobs on a baking sheet. Heat them for about 10 minutes. This method keeps the veggies tender. You can also grill them for 5 minutes on medium heat. Avoid microwaving, as it makes them soggy. The freshness of your ingredients matters. Bell peppers and zucchini last well in the fridge for about a week. Tomatoes and mushrooms are best if used within three days. Always check for signs of spoilage before using leftovers. You can prep veggies ahead of time for easy grilling. Cut your bell pepper, zucchini, and onion in advance. Store them in the fridge in sealed bags. This saves time when you're ready to grill. Kabobs are great for meal plans. You can mix and match different veggies throughout the week. Pair them with grains or salads for a full meal. They also work well for lunch boxes. Just make sure to keep them cool until you eat. If you have a gathering, kabobs are a hit! You can set up a kabob station. Guests can choose their favorite veggies. This adds fun and personalization to your meal. Kabobs not only taste great but also look colorful and inviting on the table. For the complete recipe, check out the [Full Recipe]. Can I make these kabobs in the oven? Yes, you can! Set your oven to 400°F. Place the kabobs on a baking sheet. Bake for about 20 minutes, turning halfway through. This gives you a tasty option when grilling isn't possible. What are the best vegetables for grilling? The best vegetables for grilling include: - Bell peppers - Zucchini - Yellow squash - Red onion - Cherry tomatoes - Mushrooms These veggies hold up well on the grill and taste great! How to know when the vegetables are done cooking? Look for nice grill marks and tenderness. You can pierce them with a fork. If they are soft but still firm, they are ready to eat. How to make grilled veggie kabobs more flavorful? Use a good marinade with olive oil, garlic, and spices. Let the veggies soak in the marinade for at least 15 minutes. This step really boosts their taste. Why should you marinate vegetables? Marinating adds flavor and helps keep them juicy. The oil and spices soak into the veggies, making each bite delicious. What type of skewers work best for grilling? Both wooden and metal skewers work well. If using wooden skewers, soak them first. This prevents burning. Metal skewers can be reused and do not need soaking. Can I use tofu or tempeh in veggie kabobs? Yes, tofu or tempeh can add protein. Cut them into cubes and marinate like the veggies. They grill nicely and taste great with the other flavors. How do I prevent vegetables from burning on the grill? Start with a clean grill and preheat it. Keep an eye on the kabobs while grilling. Turn them often to ensure even cooking and avoid burning. What can I serve alongside grilled veggie kabobs? Serve kabobs with dips like tzatziki or hummus. They also pair well with rice, quinoa, or a fresh salad. Adding some bread can complete the meal nicely. You now have all the tools to create delicious grilled veggie kabobs. We covered essential ingredients, preparation methods, grilling tips, and serving ideas. Remember, fresh ingredients make a big difference. You can also customize with various vegetables and flavors. Don’t forget to store leftovers properly for future meals. Enjoy your grilling adventure, and get creative with your kabob variations. With practice, you'll master this fun cooking method that delights everyone!](https://dishtreats.com/wp-content/uploads/2025/06/56cc5cbd-3bee-4e7d-a92f-dff27107e6fe-768x768.webp)
![- 2 medium zucchinis - 1 cup cherry tomatoes - 1 cup fresh mozzarella balls - 1/4 cup fresh basil leaves - 2 tablespoons balsamic vinegar - 1 tablespoon extra virgin olive oil - Sea salt and freshly cracked black pepper - 1 tablespoon basil pesto (optional) When making Zucchini Noodle Caprese Salad, you want the freshest ingredients. Start with the zucchinis. I like using medium-sized ones, as they spiralize well. Spiralizing turns them into fun noodles. Next, grab a cup of cherry tomatoes. Halve them to release their juicy flavor. Fresh mozzarella balls add creamy texture. Halve these too for easy bites. You can't forget the fresh basil! I suggest tearing the leaves for a fragrant touch. Now, for the dressing, grab balsamic vinegar and extra virgin olive oil. These will bring brightness to your salad. Don't skip on sea salt and cracked black pepper. They enhance the flavors. If you're feeling adventurous, add basil pesto for an extra kick. For the full recipe, check out the details in the complete guide. Enjoy the fresh taste and vibrant colors of this simple dish! To start, you need to spiralize the zucchinis. Use a spiralizer or a vegetable peeler. Aim for long, noodle-like strands. This will give your salad a fun texture. After spiralizing, transfer the noodles to a large mixing bowl. Make sure they are separate from the other ingredients. Next, it's time to add the other ingredients. Toss in the halved cherry tomatoes and fresh mozzarella balls. Be careful not to crush the mozzarella. It adds creaminess to the salad. Now, take the fresh basil leaves. Tear them by hand and scatter them over the salad. This adds a bright aroma. In a small bowl, whisk together balsamic vinegar and extra virgin olive oil. Add a pinch of sea salt and freshly cracked black pepper. Whisk until the mixture is smooth. This vinaigrette will bring all the flavors together. Now it’s time to combine everything. Drizzle the vinaigrette over the salad. Use tongs to gently mix the ingredients. Aim to coat every strand of zucchini without breaking them. If you want extra flavor, you can add basil pesto on top before serving. Enjoy your salad right away for the best taste. For a deeper flavor, let it sit for 10-15 minutes. You can find the Full Recipe above for detailed instructions. To make great zucchini noodles, use a good spiralizer. A handheld spiralizer works well, but a countertop version is even better. This tool gives you long, even noodles. After spiralizing, place the noodles in a colander. This helps drain excess water. Zucchini holds a lot of moisture, so this step is key. If your noodles are too wet, they can make your salad soggy. Adjusting seasoning is easy. Start with sea salt and black pepper. Taste the salad as you mix. If you want more flavor, add a bit more salt or pepper. Fresh herbs bring your salad to life. I love using torn basil leaves. They add a lovely aroma and taste. You can also try parsley or mint for a twist. Serve your salad in wide, shallow bowls. This makes it look beautiful and inviting. For a gourmet touch, drizzle balsamic reduction on top. It adds a nice shine and flavor. Finally, garnish with extra torn basil. This not only looks good but adds freshness too. Enjoy your meal that is as pretty as it is tasty. For the full recipe, be sure to follow my detailed steps! {{image_4}} You can easily swap out the zucchini for other vegetables. Carrots, cucumber, or even sweet potatoes can add crunch and color. Each veggie brings its own taste and texture. If you want to change the cheese, try feta or goat cheese. These options add a tangy twist to your salad. You can explore different vinaigrettes to change the flavor. A lemon vinaigrette can give a bright, fresh taste. You can also try a garlic-infused dressing. This adds depth and makes each bite exciting. Don't be afraid to mix and match! Pair this salad with proteins to make it a full meal. Grilled chicken or shrimp works well. You can also enjoy it as a side dish with steak or fish. Add some crusty bread, and you have a lovely dinner. Enjoy it at a picnic or a barbecue for a fun twist! To keep your Zucchini Noodle Caprese Salad fresh, store it in an airtight container. This helps keep moisture out. If possible, separate the dressing from the salad. This keeps the zucchini from getting soggy. You can mix it just before serving. For the best taste, use the salad within two days. If you plan to enjoy leftovers, consider adding fresh basil and mozzarella right before eating. This keeps the flavors bright and vibrant. In the fridge, this salad lasts about two days. After that, the zucchini may lose its crunch. Check for any off smells or slimy textures. These are signs that the salad has gone bad. If you notice them, it’s time to toss it out. Enjoy your fresh salad while it’s at its best! For the full recipe, click here: [Full Recipe]. Yes, you can prepare parts of the salad ahead of time. Spiralize the zucchinis and store them in an airtight container. Keep them in the fridge. You can also chop the tomatoes and mozzarella and store them separately. Assemble the salad just before serving. This keeps the flavors fresh and bright. Zucchini noodles are very healthy. They are low in calories and high in water content. This makes them great for hydration. Zucchini is full of vitamins A and C, which boost your immune system. They are also a good source of fiber, which promotes good digestion. If you don’t like mozzarella, try using feta cheese or goat cheese. Both options add a nice tangy flavor. You can also use avocado for creaminess if you want a dairy-free choice. Each option adds its own twist to the salad. Yes, you can use many herbs instead of basil. Fresh parsley, cilantro, or mint can add unique flavors. Oregano is another great option. Feel free to mix and match to create your own version. This keeps the salad exciting and fresh. To avoid soggy noodles, salt the zucchini first. Let them sit for about 10 minutes. This draws out excess moisture. After that, pat them dry with a paper towel. This helps keep your salad crisp and enjoyable. This salad combines fresh zucchini noodles, tomatoes, and mozzarella for a tasty dish. You learned how to prepare the ingredients, mix flavors, and present it beautifully. Customizing the salad with unique flavors or proteins can make it your own. Always store leftovers properly to keep them fresh. With these tips, you can enjoy a delicious and healthy meal anytime. Embrace creativity and have fun in the kitchen!](https://dishtreats.com/wp-content/uploads/2025/06/9c06bc60-1dc6-4324-8b6b-f347b8231277-768x768.webp)
![- 1 can (15 oz) of chickpeas - 2 tablespoons extra virgin olive oil - Spice seasoning options: smoked paprika, garlic powder, ground cumin Crispy air fryer chickpeas need just a few simple ingredients. First, grab a can of chickpeas. They provide protein and fiber. Next, use extra virgin olive oil for richness. This oil helps the spices stick and adds flavor. For seasoning, I love smoked paprika, garlic powder, and ground cumin. These spices add depth and warmth to the dish. - Chopped fresh parsley or cilantro for garnishing - Alternative spices for flavor enhancement You can add fresh herbs like parsley or cilantro to make it pop. They add a burst of color and freshness. Feel free to play with spices. Try cayenne for heat or even cinnamon for a sweet twist. The options are endless! If you want to see the full recipe, check it out [Full Recipe]. - Preheat air fryer to 400°F (200°C). - Rinse and dry chickpeas thoroughly. Start by preheating your air fryer. Set it to 400°F (200°C) and let it heat for about five minutes. While it warms up, rinse the chickpeas well. It’s key to remove all the canning liquid. After rinsing, spread the chickpeas on a kitchen towel. Pat them dry gently. This step helps them get that perfect crisp. - Mix chickpeas with olive oil and spices. - Transfer to air fryer basket. In a large bowl, add the dried chickpeas. Pour in two tablespoons of olive oil. Sprinkle in smoked paprika, garlic powder, ground cumin, sea salt, and black pepper. Mix well so every chickpea gets coated. Next, transfer the seasoned chickpeas to the air fryer basket. Make sure they are in a single layer. Crowding the basket can lead to uneven cooking. - Set cooking time for 15–20 minutes. - Shake basket every 7 minutes for even cooking. Set the timer for 15 to 20 minutes. It’s important to shake the basket every seven minutes. This ensures all sides get crispy. Look for a nice golden-brown color and a satisfying crunch. When they’re done, let them cool for a few minutes. They will crisp up even more as they cool. If you like, garnish with chopped parsley or cilantro for a fresh touch before serving. To get the best crunch, drying chickpeas is key. Start by rinsing them well. Then, spread them on a clean kitchen towel and gently pat them dry. This step removes excess moisture, which helps them crisp up nicely in the air fryer. Next, set your air fryer to 400°F (200°C). Preheat it for about 5 minutes. This heat is crucial for achieving that perfect texture. When you place the chickpeas in the basket, make sure they are in a single layer. Overcrowding can lead to soggy chickpeas. Crispy chickpeas pair well with many dips. Hummus and tzatziki are two of my favorites. They add creaminess that balances the crunch. You can also toss them into salads for an extra crunch or use them to top soups. If you want to get creative, try using crispy chickpeas as a snack on their own. They make a great addition to trail mixes or can be sprinkled on popcorn for a fun twist. Chickpeas are not just tasty; they're nutritious too. They are high in protein and fiber. This makes them a filling snack that can help you feel satisfied. Air frying reduces the amount of oil needed, so you get a low-calorie snack option without sacrificing flavor. These crispy chickpeas are a great way to enjoy a healthy snack without the guilt. You can feel good about munching on them anytime! For the full recipe, check the section above. {{image_4}} You can change the flavor of your crispy air fryer chickpeas. One fun option is to add spice. Try cayenne or chili powder for a spicy kick. Just mix in a little with your other spices before cooking. If you prefer sweet snacks, go for cinnamon and sugar. This will give your chickpeas a unique twist that's fun and tasty. These chickpeas are healthy and fit many diets. They are naturally gluten-free and vegan-friendly. This means everyone can enjoy them! For those watching their salt intake, you can lower the sodium. Simply reduce or skip the sea salt in the recipe for a low-sodium version. If you're hosting a party, you might want more chickpeas. To increase the batch size, just double or triple the ingredients. The cooking time may stay the same, but keep an eye on them. You can also swap chickpeas for other legumes like black beans or lentils. They will work well in the air fryer and offer different flavors. Each option can give you a fun new snack! Check out the [Full Recipe](#) for detailed steps on making these crispy delights! To store your crispy chickpeas, use an airtight container. This will help them stay crunchy. A glass jar or a plastic container with a tight lid works well. Make sure to let them cool completely before sealing. This step prevents moisture buildup. You can easily reheat chickpeas in an air fryer. Set it to 350°F (175°C) and heat for about 5 minutes. This method keeps them crispy. If you prefer the oven, place them on a baking sheet at the same temperature. Check often to avoid sogginess. Crispy chickpeas last for about 3 days at room temperature. If you store them in the fridge, they may last a bit longer, but they can lose some crispiness. For best results, enjoy them fresh! To make air fryer chickpeas crispy, first dry them well. After rinsing, spread them on a clean towel and pat them dry. Removing moisture is key for that perfect crunch. Next, toss the chickpeas with olive oil and spices. The oil helps them crisp up in the air fryer. Set your air fryer to 400°F (200°C). Cook them for 15 to 20 minutes, shaking the basket every 7 minutes. This ensures even cooking and a nice, golden-brown color. Keep an ear out for a satisfying crunch as they cook. Let them cool for a few minutes after frying. They will get even crunchier as they cool. Yes, you can use dried chickpeas, but they require more prep. Start by soaking the dried chickpeas overnight. This softens them and reduces cooking time. After soaking, rinse and boil them until tender, about 1 to 2 hours. Once cooked, follow the same steps to dry and season them. Air frying time may be longer, as dried chickpeas need to lose more moisture. Pay close attention to their texture for that perfect crunch. Crispy chickpeas pair well with many dips. Try hummus for a classic touch. Tzatziki offers a cool contrast. You can also serve them with guacamole for a creamy twist. For a spicy kick, mix them with a sriracha mayo. These dips enhance the flavors of the chickpeas. They make for a fun and tasty snack or appetizer. Enjoy exploring different combinations to find your favorite! For the full recipe, check out the [Full Recipe]. Crispy air fryer chickpeas are easy and fun to make. We covered the main ingredients, like chickpeas and olive oil, and talked about spices for extra flavor. You learned preparation steps, tips for crispiness, and fun ways to enjoy this snack. Try different spices or dips to keep it exciting. Crispy chickpeas are a tasty, healthy option for any event. Enjoy your cooking and happy snacking!](https://dishtreats.com/wp-content/uploads/2025/07/61bc6060-fad3-40a7-be2f-ccc6788a1d37-768x768.webp)