Grilled BBQ Chicken Skewers Flavorful and Juicy Delight

Get ready to fire up your grill for a tasty treat! Grilled BBQ chicken skewers are not just easy to make; they’re packed with flavor and juicy goodness. With the right ingredients and simple steps, you’ll impress your family and friends at the next cookout. Whether you stick to classic chicken or explore fun variations, I’ve got tips and tricks to help you create the perfect skewers. Let’s dive in!
Ingredients
Main Ingredients for Grilled BBQ Chicken Skewers
- Chicken breast
- BBQ sauce (homemade or store-bought)
- Olive oil
- Apple cider vinegar
Spices and Seasonings
- Smoked paprika
- Garlic powder
- Ground cumin
Vegetables for Skewering
- Bell peppers (red and green)
- Red onion
- Choosing fresh ingredients
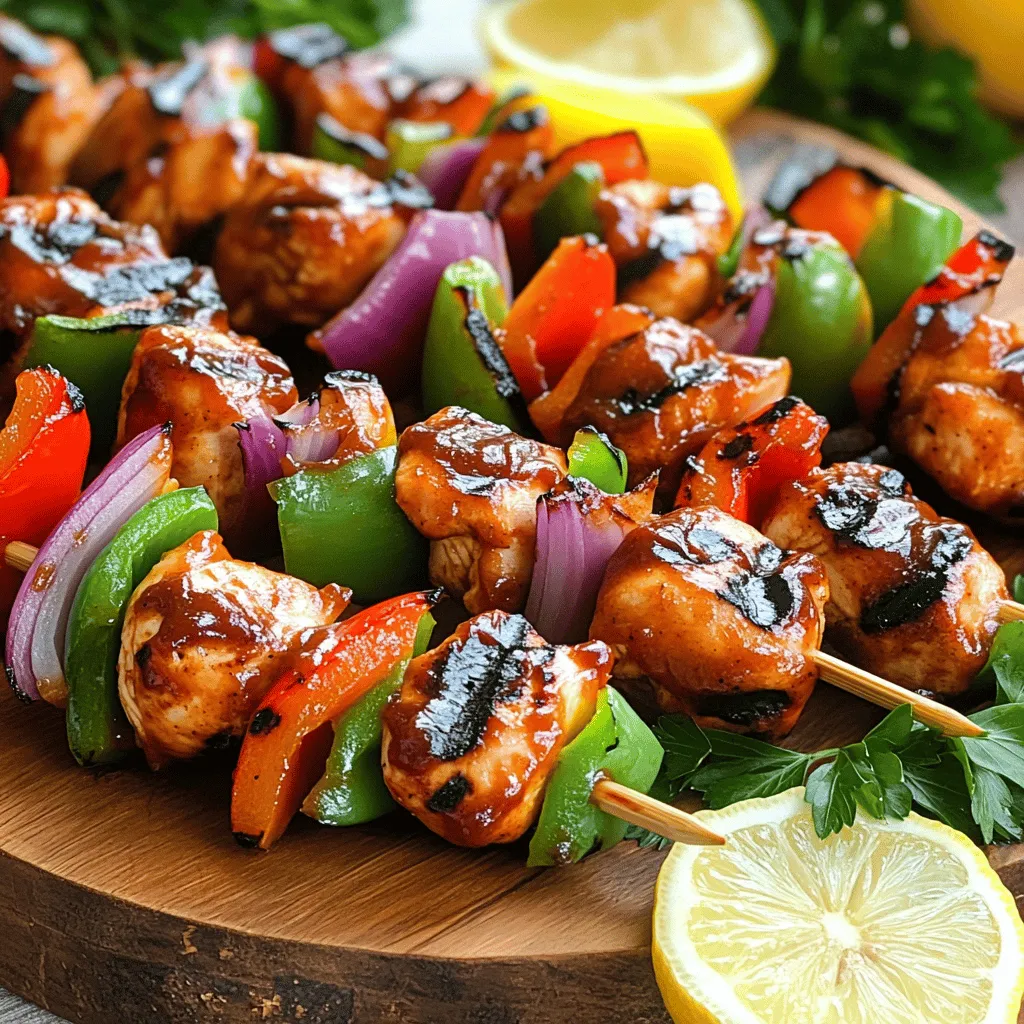
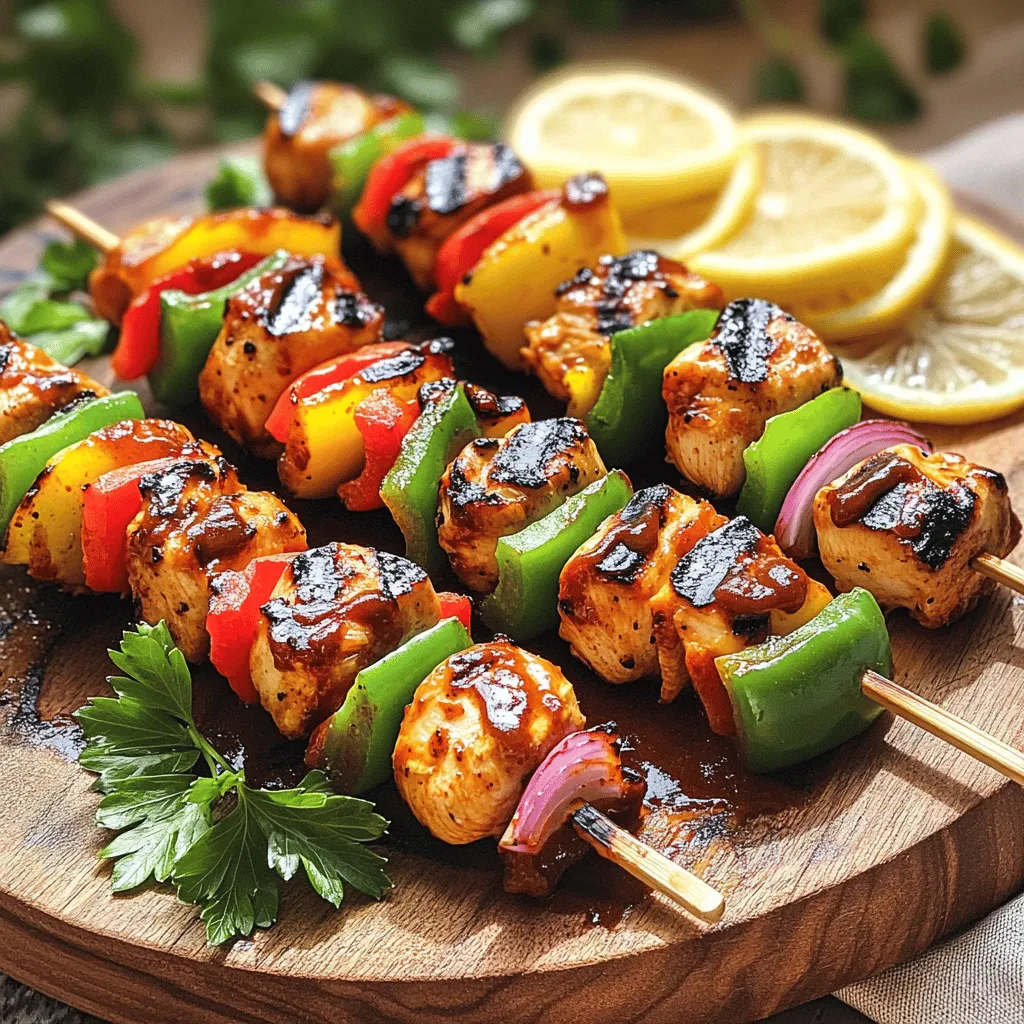
To create tasty grilled BBQ chicken skewers, you need key ingredients. The main star is chicken breast, which you should cut into 1-inch cubes. This size cooks evenly and stays juicy. Next, grab your BBQ sauce. You can use homemade sauce for a personal twist or your favorite store-bought brand. Olive oil adds moisture, while apple cider vinegar gives a nice tang.
For spices, smoked paprika brings a hint of sweetness. Garlic powder adds depth, and ground cumin adds warmth. These spices make your chicken flavorful.
When it comes to vegetables, I love using vibrant bell peppers and red onion. They add color and crunch. Choose fresh ingredients for the best taste. Fresh veggies not only look good but also enhance the overall flavor.
Remember, the balance of these ingredients creates juicy, flavorful skewers.Enjoy your cooking!
Step-by-Step Instructions
Creating the Marinade
To start, gather your marinade ingredients. In a bowl, whisk together the BBQ sauce, olive oil, apple cider vinegar, smoked paprika, garlic powder, cumin, sea salt, and black pepper. Mix until smooth. This step is key for flavor. Next, add the chicken cubes. Make sure every piece is coated well in the marinade. Cover the bowl and let it sit in the fridge for at least 30 minutes. This gives the chicken time to soak up the tasty flavors.
Preparing the Skewers
If you use wooden skewers, soak them in water for 30 minutes. This helps stop them from burning on the grill. If you go with metal skewers, you can skip this step. Once ready, take the marinated chicken from the fridge. Start threading the chicken pieces onto the skewers. Alternate with chunks of red bell pepper, green bell pepper, and red onion. This makes your skewers colorful and tasty.
Grilling the Chicken Skewers
Now, it’s time to grill! Preheat your grill to medium-high heat, around 400°F (200°C). This temperature gives you nice grill marks and juicy chicken. Once hot, place the skewers on the grill. Grill them for 10-12 minutes. Remember to turn them often for even cooking. Your chicken is ready when it hits 165°F (75°C) inside. For a flavor boost, brush on some more BBQ sauce in the last few minutes of grilling.
Tips & Tricks
Marinating for Maximum Flavor
Marinating chicken is key to great taste. I like to marinate for at least 30 minutes. If you have time, two hours works best. This gives the chicken time to soak up all the flavors. Use a mix of BBQ sauce, olive oil, apple cider vinegar, and spices. Make sure each piece is coated well. This helps every bite burst with flavor.
Choosing the Right BBQ Sauce
You can use homemade or store-bought BBQ sauce. Homemade sauce adds a personal touch. It lets you control the taste. Store-bought sauces are quick and easy. Look for sauces that match your taste. Some are sweet, while others are spicy. Try different ones to find your favorite.
Achieving Perfect Grill Marks
To get those perfect grill marks, preheat your grill first. Aim for a medium-high heat of about 400°F (200°C). This heat sears the chicken quickly and gives great marks. Don’t forget to turn your skewers while grilling. This ensures even cooking on all sides. Aim for about 10-12 minutes of cooking time. Your chicken will be juicy and full of flavor.

Variations
Different Proteins You Can Use
You can easily swap chicken for shrimp or beef. Shrimp cooks fast and adds a nice touch. Just be careful not to overcook it. Beef gives a hearty flavor. Use tender cuts like sirloin for best results. If you prefer a veggie option, try tofu or mushrooms. Both soak up flavors well and grill nicely.
Flavor Infusions
Adding spices or citrus to the marinade boosts flavor. Try lemon or lime juice for a fresh kick. You can also mix in herbs like thyme or rosemary. They add a nice earthy taste. Experiment with different BBQ sauces too. Sweet, smoky, or spicy options can change the taste. Each sauce brings a new twist to your skewers.
Skewering Vegetables
Don’t forget the veggies! Zucchini and cherry tomatoes are great choices. They cook fast and add color. Cut veggies into even pieces for even cooking. Brush them lightly with olive oil before grilling. This helps them stay moist and adds flavor. Rotate your skewers often for the best grill marks.
Storage Info
Storing Leftovers
After a fun meal, I want to keep those grilled skewers fresh. To do this, let them cool first. Then, place the skewers in an airtight container. You can also wrap them tightly in plastic wrap. They will stay fresh in the fridge for about three to four days. Always check for any signs of spoilage before eating.
Freezing Options
If you want to keep your skewers longer, freezing is a great choice. First, let the skewers cool completely. Then, wrap them well in plastic wrap. Place them in a freezer-safe bag or container. They can last up to three months in the freezer. When you are ready to eat, thaw them in the fridge overnight. For reheating, place them on a hot grill for about five to seven minutes. This will bring back their juicy flavor and nice grill marks.
Serving Suggestions
Pair your grilled BBQ chicken skewers with tasty sides. Some great choices are coleslaw, corn on the cob, or a fresh garden salad. These dishes add crunch and freshness. For drinks, try cold lemonade, iced tea, or a light beer. These beverages will enhance the meal’s flavors.
FAQs
How to Ensure Chicken is Fully Cooked?
To ensure your chicken is fully cooked, use a meat thermometer. The internal temperature should reach 165°F (75°C). This ensures the chicken is safe to eat.
Look for visual cues too. The chicken should have no pink inside. Juices should run clear, not pink. These signs show that your chicken is ready to enjoy.
Can I Use Wooden Skewers Without Soaking?
You can use wooden skewers without soaking, but it’s not ideal. Soaking helps prevent burning on the grill. It keeps your skewers sturdy and safe while cooking.
If you skip soaking, use metal skewers. They do not burn and work well for grilling. You can also coat the wooden skewers in oil to help reduce burning.
What BBQ Sauce is Best for Skewers?
The best BBQ sauce depends on your taste. If you like sweet, try sauces with honey or brown sugar. For a kick, look for sauces with chipotle or cayenne pepper.
Some popular brands include Sweet Baby Ray’s and Stubbs. If you want to make your own, mix ketchup, vinegar, and spices. Homemade sauce can give your skewers a personal touch.
Grilling BBQ chicken skewers is simple and fun. You learned key ingredients, spices, and grilling tips. Proper marinating and choosing fresh veggies boost flavor. Substituting proteins or trying new marinades offers tasty variations.
Remember to store leftovers the right way to keep them fresh. Follow safety tips for cooking and grilling techniques. Enjoy great meals with your friends and family. Happy grilling!


![- 2 cups cooked chicken, shredded - 1/2 cup dill pickles, finely chopped - 1/2 cup ranch dressing - 4 large eggs - 1/4 cup milk - 1 cup shredded cheddar cheese - 4 large flour tortillas - 1/2 teaspoon garlic powder - 1/2 teaspoon onion powder - Salt and pepper to taste - Fresh chives, chopped (for garnish) The main ingredients bring the best flavors to our burritos. First, we use cooked chicken. You can use leftovers from dinner or rotisserie chicken for ease. Shredded chicken mixes well with the tangy dill pickles. You get a nice crunch and zest. The ranch dressing adds creaminess and ties everything together. Next, we add eggs for protein. They make the burritos filling and tasty. Mixing them with milk keeps them soft and fluffy. Garlic and onion powders give the eggs extra flavor. Don’t forget salt and pepper! They enhance all the other tastes. The additional ingredients round out the meal. Cheddar cheese melts beautifully, adding richness. Flour tortillas wrap it all up nicely. Chives make the dish look fresh and bright. You can find the complete recipe in the [Full Recipe] section. With these ingredients, your Pickle Ranch Chicken Breakfast Burritos will be a hit! To start, grab a medium mixing bowl. Combine 2 cups of shredded chicken, 1/2 cup of finely chopped dill pickles, and 1/2 cup of ranch dressing in the bowl. Stir this mixture well until the chicken is coated with the ranch. This flavorful filling is key to our burrito. Set it aside for later use. Next, we need to make our scrambled eggs. In a separate bowl, crack 4 large eggs. Add 1/4 cup of milk, 1/2 teaspoon of garlic powder, 1/2 teaspoon of onion powder, and some salt and pepper. Whisk everything until smooth. Heat a non-stick skillet over medium heat and gently pour the egg mixture into the hot skillet. Stir the eggs softly with a spatula until they are creamy and just set. Remove the skillet from heat once they look perfect. Now, let’s put the burritos together! Lay out 4 large flour tortillas on a clean surface. In the center of each tortilla, place a generous amount of the chicken and pickle mixture. Top this with a scoop of the fluffy scrambled eggs and a sprinkle of 1 cup of shredded cheddar cheese. To form the burritos, fold the sides of each tortilla inward, and then roll them up tightly from the bottom. Make sure the filling stays secure. Return the same skillet to medium heat. Place the rolled burritos seam-side down in the skillet. Cook them for 2-3 minutes on each side until they are golden brown and crispy. After cooking, let the burritos cool a bit before slicing them in half for easier serving. You can find the Full Recipe for more details! - Use low heat for creamy eggs. - Stir gently for fluffy texture. When making scrambled eggs, low heat is key. High heat can make eggs dry. Cooking slowly helps keep them soft and creamy. Stirring gently lets air in, making them light and fluffy. - Ensure an even fill to secure the burritos. - Tuck in sides to prevent spillage. Rolling burritos can be tricky, but practice makes perfect. Start with an even fill of chicken and eggs in the center. This helps secure the filling. Tuck in the sides before rolling. This way, you keep everything snug inside. - Use fresh chives for a pop of color. - Serve with extra pickles or hot sauce for added flavor. A great garnish makes your dish shine. Fresh chives add color and a mild flavor. Extra pickles bring crunch and tang. If you like spice, drizzle hot sauce on top. It adds a kick everyone will love. For the full recipe, check out the Pickle Ranch Chicken Breakfast Burritos. {{image_4}} You can switch the chicken for shredded turkey if you like. Turkey gives a nice flavor too. If you want a vegetarian option, use tofu instead. Tofu absorbs spices well and will keep your burrito filling tasty. Want to spice things up? Add diced jalapeños to the filling. They give a nice kick without being too hot. You can also change the cheese. Try pepper jack for a creamy heat or feta for a tangy twist. Both options will make your burritos even more delicious. Tortillas are not just for flour. You can use whole wheat or corn tortillas for a healthier choice. If you want color, try spinach or tomato-based tortillas. These will add a fun look to your dish. You can mix and match to find your favorite combination. For the full recipe, check out the complete guide. Refrigerate leftover burritos for up to 3 days. Place them in an airtight container. This keeps them fresh and tasty. When you are ready to eat, enjoy them cold or reheated. You can freeze uncooked burritos for up to 1 month. Wrap each burrito tightly in plastic wrap. Then place them in a freezer bag to prevent freezer burn. When you want to eat them, you can reheat them directly from the freezer or thaw them in the fridge overnight. To keep the texture nice, use an oven or skillet. For the oven, preheat it to 350°F (175°C). Place the burritos on a baking sheet and heat for about 15-20 minutes. For the skillet, warm it over medium heat. Cook the burritos for about 3-4 minutes on each side until they are hot and crispy. Yes, you can prepare and refrigerate the filling or entire burritos to save time. I often make the filling a day in advance. This lets the flavors meld together. You can store it in an airtight container. If you want to make the whole burrito, wrap them well in foil or plastic wrap before refrigerating. When you’re ready to eat, just heat them up in the skillet or microwave. Add hot sauce to the chicken mixture or include spicy pickles. I love using pickles with a kick for extra flavor. You can also mix in some diced jalapeños. This gives a nice heat that pairs well with the ranch dressing. Just remember to taste as you go. You want the spice to enhance, not overpower. Pair with fresh fruit, a side salad, or crispy potato wedges for a complete meal. I enjoy adding a fruit salad for a sweet touch. A simple green salad with a light dressing also works well. Crispy potato wedges bring a satisfying crunch. You can even sprinkle some extra chives on top for a fresh finish. If you like, serve with your favorite hot sauce for dipping. These Pickle Ranch Chicken Breakfast Burritos pack flavor in every bite. We combined shredded chicken, dill pickles, and ranch for a tasty filling. Scrambled eggs bring creaminess, while tips for soft eggs and proper rolling help achieve perfect burritos. You can even switch ingredients to fit your taste. Whether you pick turkey or a spicy twist, the options are endless. With proper storage, you can enjoy them later, too. Don't hesitate to try this fun, delicious recipe that makes mornings brighter!](https://dishtreats.com/wp-content/uploads/2025/07/caeedbb3-1f25-4c27-bd1d-713cf7cd2d52-768x768.webp)
![- 1 lb (450g) chicken breast, thinly sliced - 1 cup fresh Thai basil leaves, packed - 3 cloves garlic, minced - 2 red Thai chili peppers, thinly sliced (adjust based on your spice preference) For this dish, I prefer chicken breast. It cooks quickly and stays juicy. Fresh Thai basil gives this meal its unique flavor. Garlic adds a nice aroma, and Thai chili peppers bring heat. You can control the spice by adding more or less chili. - 2 tablespoons soy sauce - 1 tablespoon oyster sauce (or substitute with mushroom sauce for vegetarian) - 1 tablespoon fish sauce (or an extra tablespoon of soy sauce for vegetarian) - 1 teaspoon sugar (to balance flavors) - 1 tablespoon vegetable oil (for frying) These sauces are key to great taste. Soy sauce offers saltiness, while oyster and fish sauces add depth. Sugar balances the salty flavors, making everything taste better. - 1 bell pepper, sliced (your choice of color for visual appeal) - 1 small onion, sliced into thin wedges - Optional: other vegetables for added nutrition I like using bell pepper and onion for color and crunch. You can add other veggies like carrots or snap peas. They bring more nutrition and flavor, making the dish more vibrant. For the full recipe, refer to the [Full Recipe]. To start, you need to combine the chicken with the sauces. In a medium bowl, add the sliced chicken breast, soy sauce, oyster sauce, fish sauce, and sugar. Mix these ingredients well so the chicken gets all the flavor. Let it marinate for 15 minutes. This short time helps the chicken absorb the tasty sauces. Next, heat the vegetable oil in a large skillet or wok over medium-high heat. You want the oil to shimmer before adding anything. Then, add the minced garlic and sliced Thai chili peppers. Stir-fry them for about 30 seconds until they smell amazing. Be careful not to burn the garlic. Now, add the marinated chicken to the pan. Spread it out evenly for even cooking. Stir-fry for about 5 to 7 minutes. Cook until the chicken is no longer pink and has a nice brown color. After that, toss in the sliced bell pepper and onion. Stir-fry for another 3 to 4 minutes. This will make the vegetables tender but still crisp. Once the chicken and veggies are done, take the skillet off the heat. Gently fold in the fresh Thai basil leaves. They will wilt quickly from the heat and add a lovely aroma. Serve the dish hot, over a bed of fluffy jasmine rice. This rice complements the stir-fry well. Enjoy your Thai Basil Chicken Stir-Fry! For the full recipe, check out the details above. Using fresh ingredients makes a big difference. Fresh Thai basil gives a sweet and fragrant flavor to the dish. Always choose bright green basil leaves. They should smell strong and sweet. The chicken should be fresh, too. This keeps your stir-fry tasty and safe to eat. For the best flavor, cook on high heat. A hot pan helps to sear the chicken. This adds a nice caramel color and enhances the taste. When you add garlic and chili, cook them quickly. This brings out their strong flavors without burning them. You can change the heat level easily. If you want it milder, remove the seeds from the chili peppers. You can also use fewer peppers or substitute with sweet bell peppers. If you like a kick but want it less spicy, try adding sugar. It balances the heat. You can also use a bit of honey for sweetness without heat. Pair your Thai basil chicken stir-fry with jasmine rice. The rice absorbs the sauce well. You can also add a side of steamed veggies for extra nutrition. For garnishes, consider adding lime wedges or crushed peanuts. They add color and crunch. Fresh cilantro or extra basil leaves also make it pop. Enjoy your meal with these simple touches! For the full recipe, check out the details above. {{image_4}} For a vegetarian or vegan version, you can swap chicken for tofu or tempeh. These options give a nice texture. Use mushroom sauce instead of oyster sauce. It brings depth and umami flavor. For the fish sauce, simply add an extra tablespoon of soy sauce. This keeps the taste bold. To maintain flavor, marinate the tofu or tempeh just like chicken. Allow it to soak up the sauces. When cooking, make sure to press out excess moisture. This helps achieve that nice, crispy texture we all love. If you want to try something new, switch the chicken for shrimp or beef. Shrimp cooks quickly, so cut down the cooking time to about 3-4 minutes. Beef takes longer. Slice it thin and cook it for about 6-8 minutes. Remember, cooking times change based on what protein you use. Always make sure your protein is fully cooked before adding in the veggies. Want to shake things up? Add sauces like teriyaki or sriracha for an exciting twist. Teriyaki gives a sweet flavor, while sriracha adds heat. You can even mix both for a sweet and spicy kick. Feel free to experiment with herbs and spices too. Adding cilantro or mint can brighten the dish. Try a sprinkle of lime juice for an extra zest. These tiny changes can create a whole new taste experience. For the full recipe, check the section above. Enjoy cooking! To keep your Thai basil chicken stir-fry fresh, store it in an airtight container. Refrigerate the leftovers within two hours of cooking. If you want to save it longer, freeze the stir-fry. Make sure to cool it completely before freezing. This method helps retain flavor and texture. When you reheat your stir-fry, use a skillet for the best results. Heat it over medium warmth and stir often. This keeps the chicken juicy and prevents it from drying out. For rice, add a splash of water and cover it. This helps the rice steam and become fluffy again. In the fridge, your Thai basil chicken stir-fry lasts up to four days. If frozen, it can last for about three months. Always check for off smells or changes in color. If you see these, it's best to discard it for safety. Thai Basil Chicken Stir-Fry has roots in Thai street food. This dish reflects the vibrant flavors of Thai cuisine. It showcases fresh herbs, bold spices, and simple cooking techniques. Thai basil, known for its unique flavor, is key to this dish. It adds a sweet and slightly spicy note that enhances the chicken. This meal represents the balance of sweet, salty, and spicy tastes typical in Thai dishes. Each bite transports you to bustling markets in Thailand. Yes, you can prepare Thai basil chicken stir-fry in advance. Cook and store it in the fridge for up to three days. To keep it fresh, store it in an airtight container. When you are ready to eat, simply reheat it on the stove. This dish tastes even better the next day as flavors meld. Serve it over freshly cooked jasmine rice for a quick meal. If you cannot find Thai basil, you have options. Sweet basil or holy basil works well as a substitute. Sweet basil offers a milder flavor, while holy basil is spicier. You can also mix in a bit of mint for a fresh twist. While these substitutes change the taste slightly, they still create a tasty dish. Just remember, the flavor will differ from the original recipe. The spice level of Thai Basil Chicken Stir-Fry can vary. It depends on the number of Thai chili peppers you use. Typically, this dish has a mild to medium heat. If you prefer a milder dish, use fewer chilis or remove the seeds. For those who love heat, add extra chilis or a dash of hot sauce. Adjusting spice levels allows everyone to enjoy this flavorful meal. Thai Basil Chicken Stir-Fry is a simple yet flavorful dish. You learned about the key ingredients, like fresh basil and chicken. The step-by-step instructions make cooking easy, even for beginners. We explored tips to enhance flavor and adjust spice levels to suit your taste. You can even try fun variations with different proteins or herbs. Enjoy making it your own, and savor the fresh flavors. Every bite will bring joy to your table.](https://dishtreats.com/wp-content/uploads/2025/06/20a2f9de-1755-4b6a-ade1-393123d10e24-768x768.webp)


