Garlic Herb Roasted Fingerling Potatoes Delightful Dish

Garlic Herb Roasted Fingerling Potatoes are a must-try! This tasty dish brings buttery potatoes to life with garlic, fresh herbs, and lemon zest. Perfect for any meal, they are simple to make and packed with flavor. In this post, I will guide you through easy steps and tips to achieve the perfect roast. Get ready to impress your family and friends with this delightful potato dish!
Ingredients
To make Garlic Herb Roasted Fingerling Potatoes, gather the following items:
- 1.5 pounds fingerling potatoes, halved lengthwise
- 4 cloves garlic, minced
- 3 tablespoons extra virgin olive oil
- 1 tablespoon fresh rosemary, finely chopped
- 1 tablespoon fresh thyme, finely chopped
- 1 teaspoon sea salt
- ½ teaspoon freshly ground black pepper
- Zest of 1 lemon
These ingredients come together to create a dish that is both tasty and easy to prepare. The fingerling potatoes are small and tender, making them a perfect choice for roasting. The garlic adds a robust flavor. Fresh herbs like rosemary and thyme bring a lovely aroma and taste. Olive oil helps the potatoes crisp up nicely.
Lemon zest adds a bright note that balances the dish. The sea salt and black pepper enhance all the flavors, making every bite a delight.
You can easily find these ingredients at your local grocery store. Make sure to pick fresh herbs, as they can elevate the dish.
Step-by-Step Instructions
Preheat and Prepare
1. Preheat your oven to 425°F (220°C). This helps the potatoes roast perfectly.
2. In a large mixing bowl, combine the halved fingerling potatoes and minced garlic. Pour in the olive oil. Sprinkle the chopped rosemary and thyme. Add sea salt, black pepper, and lemon zest. Toss everything until the potatoes are well coated.
Roasting Process
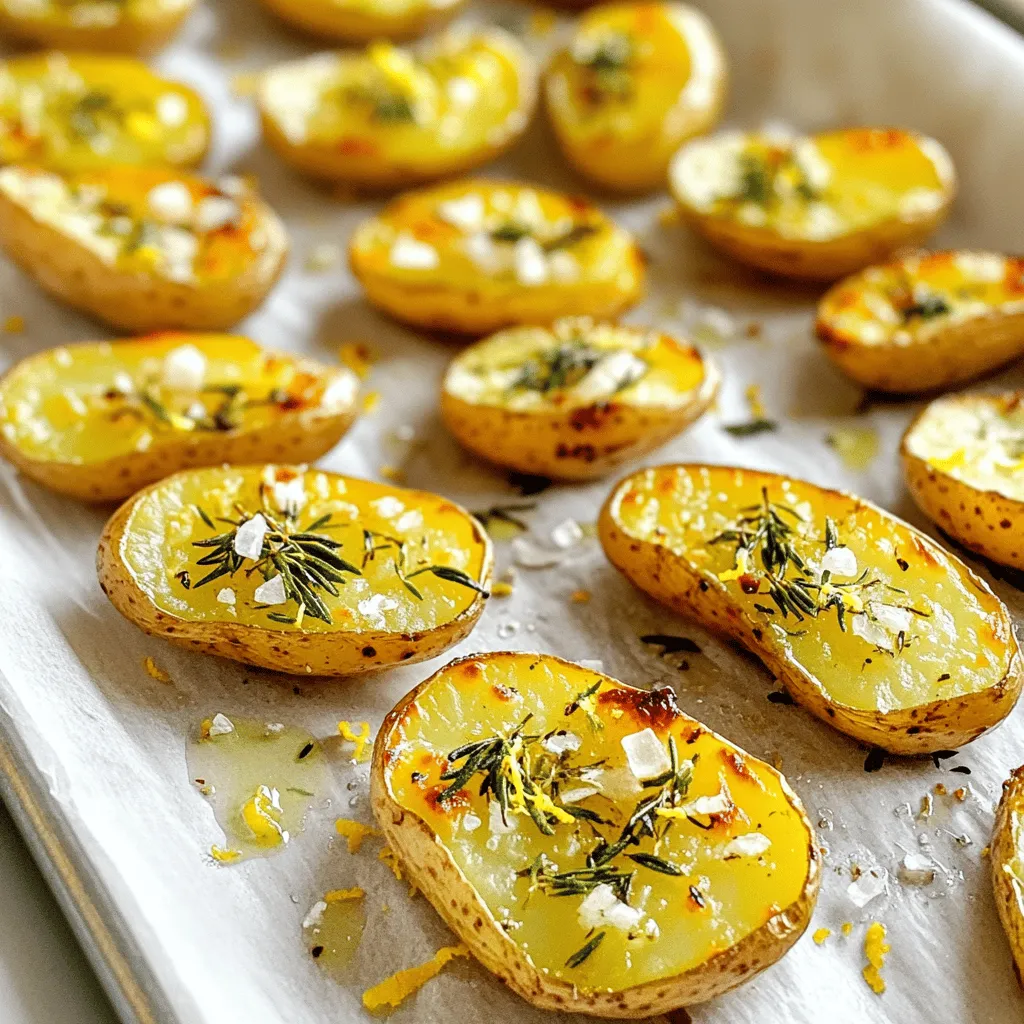
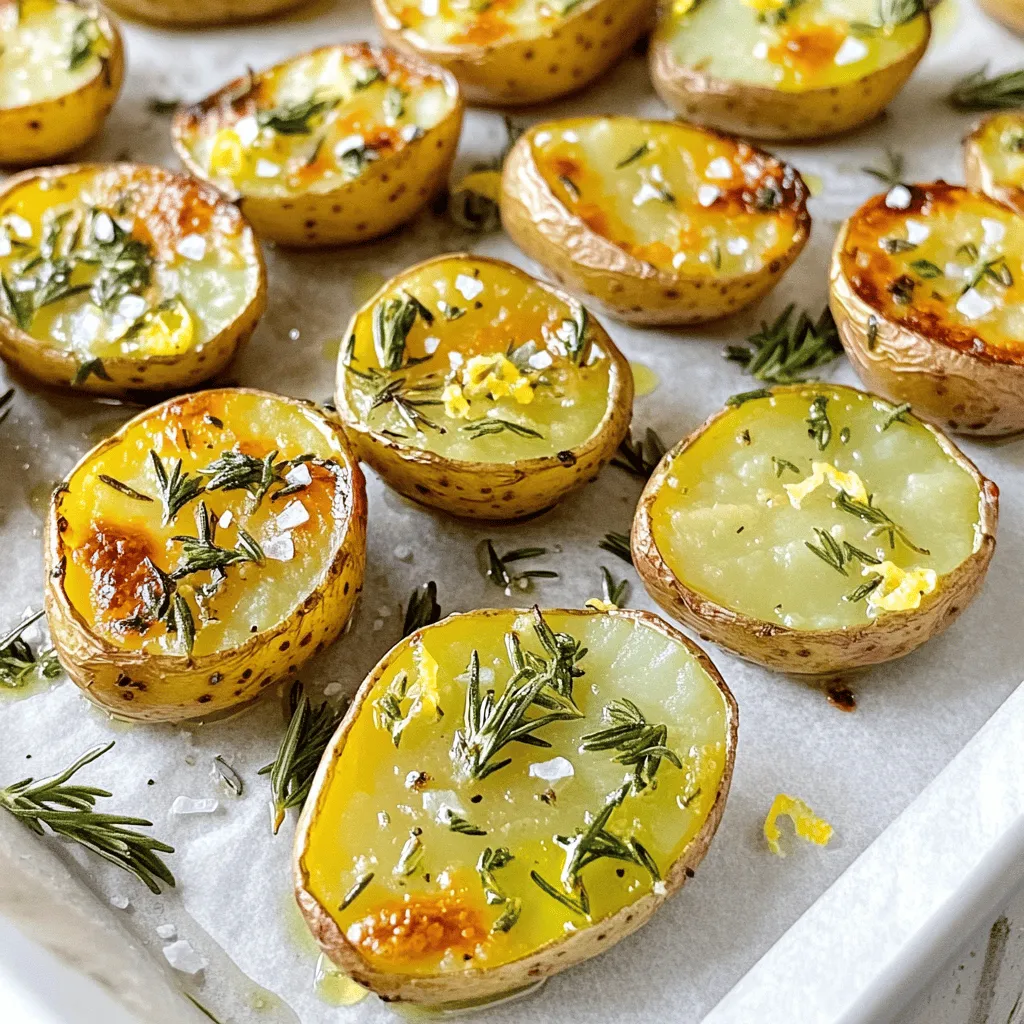
1. Arrange the potatoes on a baking sheet lined with parchment paper. Make sure the cut sides face down. This helps them get crispy.
2. Place the baking sheet in the oven. Roast the potatoes for 25-30 minutes. Halfway through, flip them with a spatula. This ensures even cooking and a nice golden color.
Final Touches
1. After roasting, let the potatoes cool for about 5 minutes. Taste them and add more salt or pepper if needed.
2. For a great presentation, serve the potatoes in a rustic bowl. Garnish with fresh herbs and a little extra lemon zest for a pop of flavor.
Tips & Tricks
Achieving the Perfect Roast
For the best roast, always place the cut sides down. This helps the potatoes cook evenly and get crispy. When you bake them this way, the heat hits the cut sides directly. This is key for a nice golden crust.
To ensure crispy potatoes, avoid crowding the baking sheet. Spread them out in one layer. This allows hot air to circulate. Flipping the potatoes halfway through cooking also helps. You want them to be golden all around.
Flavor Enhancements
You can add spices or other herbs to change the flavor. Try smoked paprika or cumin for a warm twist. You can also mix in fresh parsley or basil for a bright touch.
Using different types of potatoes adds variety too. Yukon golds or reds can be great alternatives. Each type brings a unique taste and texture. Experimenting with these options can lead to new favorites.
Cooking Equipment Recommendations
For roasting, use a heavy-duty baking sheet. A rimmed sheet helps contain any oil or juices. Non-stick or parchment paper can make cleanup easier.
For easy cleanup, soak the baking sheet right after use. This helps remove any stuck-on bits. You can also line it with foil for less scrubbing. Keeping your tools clean saves time and effort for next time.

Variations
Ingredient Swaps
You can easily change the recipe to suit your taste. One tasty swap is to use sweet potatoes instead of fingerling potatoes. Sweet potatoes add a hint of sweetness and a colorful touch. You can also try different herbs. Substitute parsley for rosemary or use basil instead of thyme. Adding spices like paprika or cumin can create exciting new flavors.
Cooking Techniques
If you want to try a different cooking method, the air fryer is a fun option. Cooking in the air fryer results in crispy potatoes in less time. Set your air fryer to 400°F (200°C) and cook for about 20 minutes. Shake the basket halfway through for even cooking.
Grilling is another great method. It adds a lovely smoky flavor to the potatoes. Toss the seasoned potatoes in a grill basket and cook over medium heat. Grill for about 15-20 minutes, turning often until they are tender and have nice grill marks.
Serving Suggestions
Garlic herb roasted fingerling potatoes pair well with many dishes. They go great with grilled meats, like chicken or steak. For a vegetarian meal, serve them with roasted veggies or a fresh salad.
You can also get creative with dips! Try a garlic aioli or a tangy yogurt sauce. A sprinkle of fresh herbs or a drizzle of balsamic glaze can elevate your dish.
Storage Info
How to Store Leftovers
To keep your Garlic Herb Roasted Fingerling Potatoes fresh, refrigerate them. Place the cooled potatoes in an airtight container. This helps to retain their flavor and texture. If you have a lot, consider using a glass container. Glass keeps them from picking up other odors in the fridge.
Reheating Tips
Reheating your potatoes can be easy. For the oven, preheat it to 400°F (200°C). Spread the potatoes on a baking sheet. Heat them for about 10-15 minutes. This method keeps them crispy. If using a microwave, place them in a microwave-safe dish. Add a splash of water to keep them moist. Heat in short bursts, checking often to prevent sogginess.
Freezing Guidelines
You can freeze these potatoes for later use. First, let them cool completely. Spread them on a baking sheet in a single layer. Freeze until solid, then transfer to a freezer-safe bag. This keeps them from sticking together. To thaw, place them in the fridge overnight. Reheat in the oven to regain their crunch. Enjoy their deliciousness even after freezing!
FAQs
How long to roast fingerling potatoes?
Roasting fingerling potatoes takes about 25 to 30 minutes at 425°F (220°C). You want them golden and tender. Flip the potatoes halfway through to ensure they cook evenly. This step helps them achieve that perfect crispy texture.
Can I make this recipe ahead of time?
Yes, you can prep the fingerling potatoes ahead of time. Cut and coat them in the olive oil and herbs. Store them in the fridge for up to 24 hours. Just remember to bring them to room temperature before roasting. This will make sure they cook evenly.
What can I serve with Garlic Herb Roasted Fingerling Potatoes?
You can serve these tasty potatoes with many dishes. They pair well with roasted chicken or grilled steak. For a lighter option, try them with a fresh salad or fish. They also make a great side for vegetarian meals. The options are endless!You start by preheating your oven to 425°F (220°C). Next, you mix halved fingerling potatoes with minced garlic, olive oil, fresh herbs, salt, pepper, and lemon zest in a bowl. Toss them until well-coated, then arrange them cut-side down on a baking sheet.
Roast for about 25-30 minutes, flipping halfway for even cooking. The result? Golden, crispy potatoes that are soft inside. Serve them warm, garnished with fresh herbs and lemon zest. They pair nicely with meats or can shine alone as a side dish.
In summary, garlic herb roasted fingerling potatoes are easy and tasty. You learned about the best ingredients, tools, and tips for roasting. I shared ways to change the recipe and how to store leftovers. Remember to try different herbs and cooking methods for added flavor. With simple steps, you can impress anyone with this dish. Cooking should be fun and enjoyable, so don’t hesitate to experiment! Enjoy your perfectly roasted potatoes and make them a regular part of your meals.


![To make a Banana Berry Protein Shake, you need the right ingredients. Here’s what to gather: - 1 ripe banana, sliced - 1 cup mixed berries (strawberries, blueberries, raspberries) - 1 cup unsweetened almond milk (or your preferred milk) - 1 scoop vanilla protein powder - 1 tablespoon creamy almond butter - 1 tablespoon chia seeds (optional) - 1 teaspoon honey or maple syrup - Ice cubes (optional for chill) Each ingredient plays a key role in taste and nutrition. The banana adds natural sweetness and creaminess. Mixed berries bring a burst of flavor and antioxidants. Almond milk keeps it light, while protein powder helps build muscle. Almond butter adds healthy fats, and chia seeds offer extra fiber. Honey or maple syrup gives a touch more sweetness. If you like it cold, ice cubes are great! Gather all these items, and you're ready to blend a tasty and nutritious sip. Check the [Full Recipe] for more details on how to combine them. 1. Prepping the Ingredients Start by getting all your ingredients ready. Peel the banana and slice it into rounds. Rinse the mixed berries in cold water. This step ensures your shake tastes fresh and clean. 2. Blending the Banana and Berries Take your blender and add the sliced banana and mixed berries. These fruits give your shake a sweet and fruity flavor. The banana also adds creaminess. 3. Adding Sweeteners and Ice Next, pour in the almond milk and add the scoop of vanilla protein powder. For extra richness, add the creamy almond butter. If you want it sweeter, drizzle in honey or maple syrup. If you like your shake cold, toss in some ice cubes. 4. Blending to Perfection Blend all the ingredients on high speed. Keep blending until the mixture is smooth and creamy. If needed, stop the blender and scrape down the sides. This helps mix everything well. 5. Final Adjustments and Serving Taste your shake. If it needs more sweetness, add more honey or syrup. Blend for a few more seconds. Once ready, pour your shake into a tall glass. For a nice touch, garnish with whole berries and a sprinkle of chia seeds. Follow these steps for a quick and tasty Banana Berry Protein Shake. Check the Full Recipe for more details! Choosing the Best Ingredients Choosing ripe, fresh ingredients makes a big difference. Use a banana that is soft but not brown. This gives your shake a creamy texture. For berries, mix a few types. Strawberries, blueberries, and raspberries all work well together. They add flavor and vibrant color. Almond milk is a great choice, but feel free to use any milk you like. A scoop of vanilla protein powder boosts nutrition and taste. For extra creaminess, add almond butter. Adjusting Sweetness to Taste Not everyone likes the same level of sweetness. Start with one teaspoon of honey or maple syrup. Blend your shake, then taste it. If you want it sweeter, add more honey or syrup. Blend again for a few seconds. This way, you control the sweetness just right for you. Achieving the Right Consistency The texture of your shake matters. If it’s too thick, add more almond milk. If you want it thicker, add ice cubes or more banana. Blend until smooth. If needed, stop the blender to scrape down the sides. Make sure everything is mixed well. The perfect shake should be creamy, not runny. Enjoy your shake right away for the best flavor and texture. For the full recipe, check out the detailed steps above. {{image_4}} You can make this shake your own by changing a few ingredients. Here are some fun ways to do that. - Using Different Protein Powder Flavors: You do not have to stick with vanilla. Try chocolate, strawberry, or even peanut butter protein powder. Each adds a unique twist to the shake. - Swapping the Milk Options: While almond milk works great, feel free to use any milk you like. Cow's milk, soy milk, or oat milk all blend well. Each milk type changes the taste and creaminess. - Adding Other Fruits or Nut Butters: Mix in a scoop of peanut butter for a nutty flavor. You can also try adding spinach for more nutrients without changing the taste. Other fruits, like mango or pineapple, can bring a tropical vibe to the shake. Explore these variations to make your Banana Berry Protein Shake even more exciting. For the full recipe, check out the main article. Best Practices for Refrigeration After making your shake, store it in a sealed container. Glass jars work well. Keep it in the fridge. This will keep it fresh for up to 24 hours. Shake it well before drinking again. The ingredients may settle. Freezing Suggestions for Longer Storage If you want to save your shake for later, freeze it! Pour the shake into ice cube trays. Once frozen, pop the cubes into a freezer bag. This way, you can blend a quick smoothie later. Just blend the cubes with a little extra milk for a quick treat. Reheating Tips for Enjoyment You can’t really heat a protein shake. It’s best enjoyed cold. If you want a warm drink, try making a warm smoothie instead. Blend your fruits with warm milk. This makes a nice cozy drink. Don't forget to check out the full recipe for more details on making your shake! Can I make this shake without protein powder? Yes, you can skip protein powder. Use extra almond butter or Greek yogurt instead. This keeps the shake creamy and adds more protein naturally. Are there vegan options for the ingredients? Absolutely! Use almond milk or oat milk for the base. Choose plant-based protein powder, and all your ingredients will be vegan-friendly. How can I make this shake higher in protein? To boost protein, add more protein powder or include Greek yogurt. You can also mix in seeds like hemp or flax for extra protein and nutrition. What are the health benefits of a banana berry shake? This shake is rich in vitamins and minerals. Bananas offer potassium, while berries are full of antioxidants. Protein supports muscle growth and recovery. It’s a great snack or meal replacement. For the full recipe, check out the details above! In this blog post, we covered how to make a Banana Berry Protein Shake. We explored key ingredients, preparation steps, and tips for the best shake. You learned how to customize it and store any leftovers. This shake is tasty, healthy, and easy to make. It can give you energy for your day. I hope you enjoy making this shake as much as I do!](https://dishtreats.com/wp-content/uploads/2025/06/30fc0a4a-a0e9-4093-9184-98c8d7d33465-768x768.webp)


![- Firm tofu and its preparation Use 14 oz of firm tofu for this recipe. Press it for about 30 minutes to remove excess water. This step helps the tofu absorb the teriyaki sauce, making it more flavorful. Cut the tofu into 1-inch cubes for even cooking. - Marinade ingredients for teriyaki sauce The marinade is key to the dish's taste. For a simple teriyaki sauce, mix together: - 1/4 cup soy sauce - 2 tablespoons maple syrup - 1 tablespoon rice vinegar - 1 tablespoon sesame oil - 1 teaspoon minced garlic (about 2 cloves) - 1 teaspoon minced ginger (fresh preferred) This blend gives the skewers a sweet and savory profile. - Colorful vegetables to enhance the skewers Color matters! Use a mix of vegetables for a vibrant look and taste. I suggest: - 1 red bell pepper, cut into 1-inch chunks - 1 medium zucchini, sliced into 1/2-inch thick rounds - 1 red onion, cut into quarters These veggies not only add color but also texture and flavor. - Additional seasonings or garnishes Feel free to add sesame seeds for garnish. They add a nice crunch and look great. You can also sprinkle some fresh cilantro or green onions for extra flavor and color. - Suggestions for protein substitutions If you want to mix it up, consider other proteins. You can use tempeh or seitan for a similar texture. Chicken or shrimp works too, if you prefer meat. Just adjust the cooking time accordingly. For the complete recipe, refer to the [Full Recipe]. The ingredients listed here create a great base for the teriyaki grilled tofu skewers. Happy cooking! To make the teriyaki marinade, combine soy sauce, maple syrup, rice vinegar, sesame oil, minced garlic, and minced ginger in a bowl. Whisk until mixed well. This marinade adds deep flavors to the tofu. For great results, use firm tofu. Press it to remove excess water. This helps the tofu absorb the marinade. After mixing, gently add the cubed tofu. Toss carefully to coat without breaking it. Cover the bowl and let it sit in the fridge for at least 30 minutes. For a stronger taste, try marinating it overnight. If you use wooden skewers, soak them in water for 20 to 30 minutes. This simple step prevents burning on the grill. While the skewers soak, prepare your vegetables. Cut red bell pepper, zucchini, and red onion into bite-sized pieces. After soaking, take the skewers and assemble them. Start with a tofu cube, then add a piece of red bell pepper, followed by zucchini and red onion. Repeat this pattern until the skewer is filled. This creates a colorful and tasty mix. Preheat your grill to medium-high heat. This ensures even cooking for your skewers. Once heated, place the skewers on the grill. Cook them for 8 to 10 minutes. Use tongs to turn the skewers occasionally. This helps them cook evenly. In the last minute, brush any leftover teriyaki marinade over the skewers. This adds extra glaze and flavor. When done, carefully take the skewers off the grill. Let them cool for about a minute before serving. Enjoy your teriyaki grilled tofu skewers! For the full recipe, check the earlier section. To make your teriyaki marinade pop, use fresh ingredients. Fresh garlic and ginger add great taste. A longer marinating time gives deeper flavors. Aim for at least 30 minutes, but overnight is best. Common mistakes include not pressing the tofu well. If the tofu is too wet, it won’t absorb the marinade. Also, avoid using too much soy sauce, as it can overpower the dish. Balance is key. When grilling tofu, medium-high heat works best. This helps the tofu get a nice char. Don’t forget to turn the skewers often. This ensures even cooking on all sides. For veggies, keep an eye on cooking time. Overcooked veggies lose their crunch. Aim for tender but still crisp, which adds great texture. Style your dish neatly on a platter. Arrange the skewers in a fan shape for visual appeal. For garnishing, sprinkle sesame seeds over the skewers. Fresh cilantro or green onions also add color and flavor. Serve with steamed rice or a fresh salad to make a complete meal. For the full recipe, check out the detailed instructions above. {{image_4}} You can easily make these skewers with other proteins. Try using seitan or tempeh. Both absorb flavors well and work great. If you prefer legumes, marinated chickpeas can add a nice touch. These options keep the dish vegan while still being tasty. Want to spice things up? Add some sriracha or chili paste to the marinade. This adds heat and depth. You can also mix in some pineapple juice for a sweeter twist. Experimenting with different spices like smoked paprika or five-spice powder can also create unique flavors. Switch up the veggies based on the season. In spring, try asparagus or snap peas. For summer, zucchini and bell peppers shine. In fall, use mushrooms and butternut squash for a hearty taste. Winter calls for root vegetables like carrots or sweet potatoes. Each season brings fresh flavors to your skewers. To store leftover teriyaki grilled tofu skewers, place them in an airtight container. Make sure to let them cool down first. This step helps keep them fresh. Store the container in the fridge for up to three days. If you want to keep them longer, consider freezing. Just keep in mind that the texture may change. To reheat the skewers, the oven works best. Preheat it to 350°F (175°C). Place the skewers on a baking sheet. Heat them for about 10 minutes, or until warm. You can also use a microwave. Just heat for 30 seconds at a time, checking to avoid overcooking. Yes, you can freeze the skewers! Wrap them in plastic wrap and put them in a freezer bag. Squeeze out as much air as you can. They will stay good for about two months. When you're ready to eat, let them thaw in the fridge overnight. Then, reheat as mentioned above. This method keeps the flavor intact. Marinating tofu for at least 30 minutes gives it good flavor. If you want even more taste, let it sit overnight. The longer the tofu marinates, the better it absorbs the teriyaki sauce. Yes, you can use store-bought teriyaki sauce. It saves time and still tastes great. Just make sure to check the label for quality ingredients. These skewers pair well with steamed rice or a fresh green salad. You can also serve them with a side of grilled vegetables. For extra flavor, add a dollop of spicy mayo or a drizzle of extra teriyaki sauce. To stop skewers from sticking, oil the grill grates before cooking. You can also brush a little oil on the skewers. If using wooden skewers, soaking them in water helps too. This keeps them from burning and sticking. This blog post covered how to make tasty teriyaki grilled tofu skewers. We explored key ingredients like firm tofu, flavorful marinade, and vibrant veggies. I shared step-by-step instructions for marinating, preparing, and grilling the skewers. You learned tips to enhance the dish, like perfecting the marinade and improving presentation. In the end, these skewers are a fun and healthy meal. With simple ingredients and steps, you can enjoy grilling any time.](https://dishtreats.com/wp-content/uploads/2025/06/0e56396a-f5cd-46e1-b6b9-5b907260de8f-768x768.webp)