Cherry Almond Breakfast Bites Healthy and Tasty Treat

Looking for a quick and healthy breakfast option? Dive into my Cherry Almond Breakfast Bites! They’re easy to make, tasty, and packed with nutrients. Whether you need a grab-and-go snack or a fun family treat, these bites deliver. I’ll guide you through the simple steps, share tips for perfecting the recipe, and show you how to customize them. Get ready to whip up a delicious breakfast that fits your busy lifestyle!The oats provide fiber, while the almond butter adds protein. Cherries give a sweet touch, and almonds add crunch.
Suggested Equipment Needed
To make these bites, you will need:
- A large mixing bowl
- A spoon for mixing
- Plastic wrap or a lid
- A baking tray
- Parchment paper
This equipment makes it easy to mix and shape the bites.They are simple to make and perfect for breakfast or a snack!
Step-by-Step Instructions
Preparation of the Mixture
To start, gather your ingredients. You need rolled oats, almond butter, honey or maple syrup, dried cherries, sliced almonds, vanilla extract, sea salt, and ground cinnamon. In a large mixing bowl, combine the rolled oats, almond butter, and honey (or maple syrup). Mix these until they form a sticky dough. Next, add the vanilla, sea salt, and cinnamon. Stir well to blend the flavors. Now, gently fold in your chopped dried cherries and sliced almonds. Ensure they spread evenly throughout the mixture for great taste.
Forming the Breakfast Bites
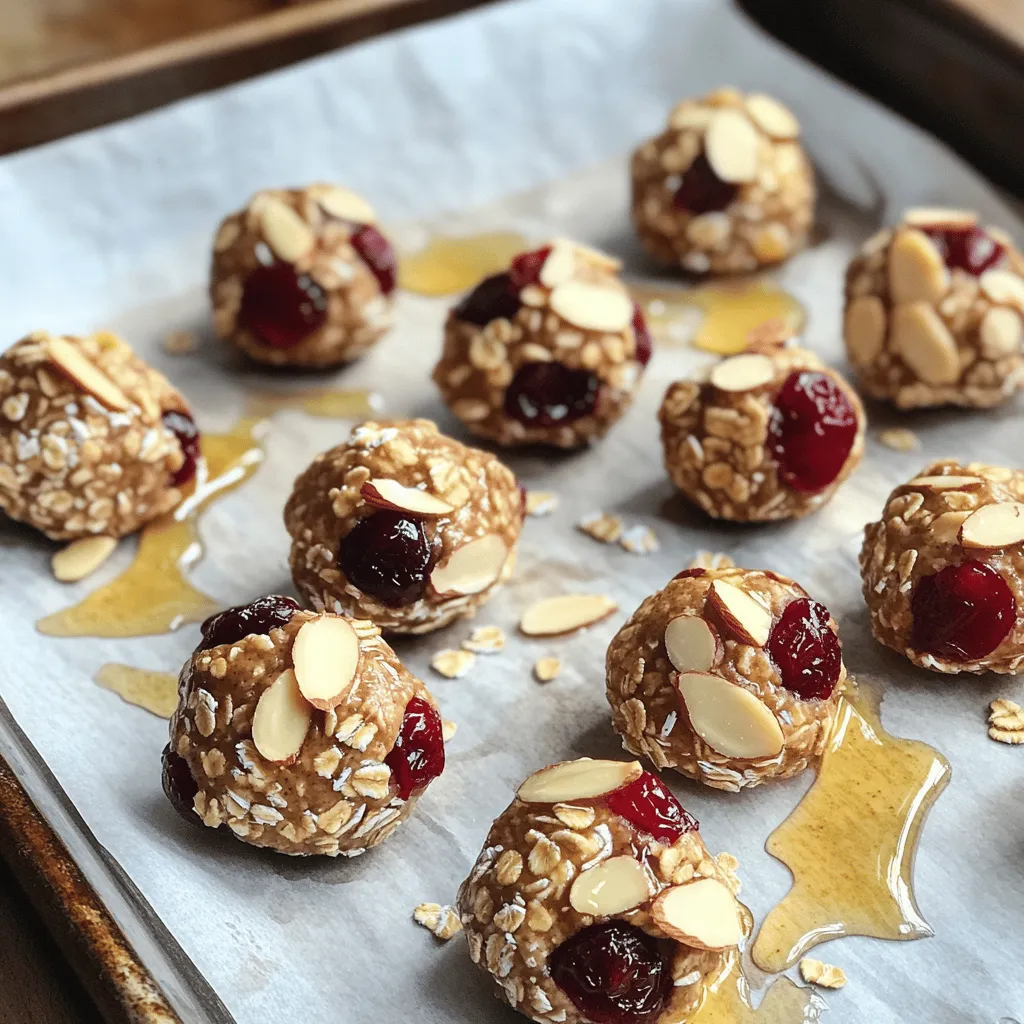
After preparing the mixture, cover the bowl with plastic wrap. Place it in the fridge for about 30 minutes. Chilling helps the dough firm up. When it’s ready, take it out. Use clean hands to scoop small spoonfuls of the mixture. Roll each spoonful into a ball about 1 inch in size. This step is fun and easy! Once shaped, place each Cherry Almond Bite onto a parchment-lined baking tray. Make sure they are spaced out.
Chilling and Serving Suggestions
Now that all the bites are on the tray, put it back in the fridge. Let them chill for another 15-20 minutes. This helps the bites firm up even more. When they are ready, serve them chilled or at room temperature. These bites make a great breakfast or a quick snack. For a nice touch, arrange them on a decorative plate. You can add whole dried cherries and almonds for a beautiful presentation. Enjoy your healthy and tasty treat!
Tips & Tricks
How to Perfect the Texture
To achieve the best texture, use rolled oats. They give a chewy bite. The almond butter binds everything together. If the mixture feels too sticky, add more oats. If too dry, a splash of water helps. Chilling the mixture for 30 minutes also makes it easier to shape.
Substitutions for Ingredients
You can swap almond butter with peanut butter or sunflower seed butter. Maple syrup works well if you want a vegan option. Dried cherries can be replaced with raisins or cranberries. Feel free to adjust the nuts, too; walnuts or pecans are tasty choices.
Enhancing Flavor with Additions
Want extra flavor? Add a pinch of nutmeg or a dash of cocoa powder. You can fold in some mini chocolate chips for a sweet touch. For a fruity twist, try adding orange zest. Each addition can make your bites unique and fun!

Variations
Alternative Nut Butters
You can swap almond butter for other nut butters. Peanut butter works great. Sunflower seed butter is a good option for nut-free diets. Each nut butter brings a unique flavor. You can also try cashew butter for a creamy twist.
Different Fruits and Add-Ins
While dried cherries shine in this recipe, you can mix it up. Try dried cranberries or apricots for a different taste. Chopped dates add natural sweetness. You can also fold in some dark chocolate chips for a treat. Fresh fruits like banana or apple can add moisture but may change texture.
Gluten-Free Version
To make these bites gluten-free, use certified gluten-free oats. This small change keeps the bites safe for those with gluten sensitivities. You can enjoy the same great taste without worry. Just make sure all your other ingredients are gluten-free too.
Storage Info
Best Practices for Storing
To keep your Cherry Almond Breakfast Bites fresh, store them in an airtight container. Use a container that seals well to prevent air from getting in. Place parchment paper between layers if you stack them. This step stops them from sticking together. Store the container in the fridge for the best taste.
Shelf Life of Cherry Almond Bites
These bites will stay fresh for about one week in the fridge. After that, they may lose flavor and texture. If you notice any changes in smell or look, it’s best to toss them out. Keeping them sealed helps maintain their yummy flavor.
Freezing for Longer Storage
If you want to keep them longer, freezing is a smart choice. Place the bites in a single layer on a baking tray first. Freeze them for about an hour until firm. Then, transfer them to a freezer-safe bag or container. They can last up to three months in the freezer. When ready to enjoy, just thaw them overnight in the fridge. This method keeps your Cherry Almond Breakfast Bites ready for a healthy treat anytime.
FAQs
Can I use fresh cherries instead of dried?
Yes, you can use fresh cherries. However, fresh cherries have more water. This can make the bites too wet. If you choose fresh, chop them finely. You might need to reduce the amount of almond butter or oats to keep the right texture.
How long can I store the Cherry Almond Bites?
You can store these bites in an airtight container. They last about five days in the fridge. For longer storage, keep them in the freezer. They can stay fresh for up to three months when frozen.
What are some serving ideas for these bites?
These bites are great on their own. You can also serve them with yogurt for a tasty breakfast. Pair them with fruit for a balanced snack. Try adding a drizzle of honey over them for extra sweetness.
You learned how to make Cherry Almond Breakfast Bites today. This recipe is simple and fun. With just a few ingredients and easy steps, you’ll create tasty bites. You can customize the flavors and textures with tips and variations.
Now, enjoy these bites as a snack or breakfast. Store them well to keep them fresh. Try different ingredients to make them your own. Enjoy the process and the delicious results!


![- Rice paper wrappers - 1 ripe mango, peeled and cut into thin julienne strips - 2 ripe avocados, halved, pitted, and sliced into thin wedges - 1/2 cucumber, peeled and julienned - 1 cup shredded carrots - 1/4 cup fresh mint leaves, torn if large - 1/4 cup fresh cilantro leaves - 1 tablespoon sesame seeds (optional) - 3 tablespoons soy sauce - 1 tablespoon freshly squeezed lime juice - 1 teaspoon honey or agave syrup - 1/2 teaspoon freshly grated ginger Mango avocado summer rolls shine with fresh ingredients. You need rice paper wrappers to hold all this goodness. The key fresh items are ripe mango and creamy avocado. Their flavors blend perfectly. Crunchy cucumber and colorful carrots add texture and fun. Fresh herbs like mint and cilantro brighten the rolls. For a twist, sprinkle sesame seeds for extra crunch. Now, let's talk about the dipping sauce. It's easy to make and enhances the taste. Just mix soy sauce, lime juice, honey, and ginger. This sauce adds a tangy, sweet kick that pairs well with the rolls. You can find the full recipe with all these details. Enjoy creating your mango avocado summer rolls today! To start, you need to make the dipping sauce. In a small mixing bowl, add the soy sauce, lime juice, honey or agave syrup, and grated ginger. Whisk these ingredients together well. This sauce adds a bright, tangy flavor that pairs nicely with the fresh summer rolls. Set it aside for the flavors to blend. Next, grab a shallow dish or a large plate. Fill it with warm water. Take one rice paper wrapper and dip it in the warm water for about 10 seconds. You want it to be soft but not too mushy. Carefully lift it out and lay it flat on a damp kitchen towel or a clean surface. This makes it easier to work with. Now it’s time to layer your ingredients. In the center of the rice paper wrapper, place a few strips of mango, a couple of avocado slices, sticks of cucumber, and a handful of shredded carrots. Don’t forget the fresh mint and cilantro leaves! They add a burst of flavor. You can also sprinkle sesame seeds on top for extra crunch if you like. To roll up the summer rolls, fold the sides of the wrapper over the filling. Then, gently roll the wrapper away from you while tucking in the filling tightly. This helps keep everything secure inside. Repeat this for the rest of the wrappers and filling. You’ll soon have a beautiful platter of summer rolls! After rolling, place the summer rolls on a serving plate. Cover them with a damp cloth. This keeps them fresh and prevents them from drying out while you finish the rest. Make sure they stay moist for the best taste. When you are ready to serve, present the summer rolls with the dipping sauce on the side. This makes it fun for everyone to dip their rolls as they wish. Enjoy the fresh flavors and the crisp textures of your homemade Mango Avocado Summer Rolls! For the full recipe, check out the complete instructions above. To avoid tearing the rice paper wrappers, keep these tips in mind: - Soak each wrapper just until soft, about 10 seconds in warm water. - Work on a damp surface to prevent sticking. - Don't overfill the wrapper; less is more! - When rolling, tuck in the sides gently, but firmly. Choosing ripe ingredients makes a big difference. Here are my best practices: - Look for mangoes that yield slightly to gentle pressure. - Choose avocados that are firm but not hard. - Select cucumbers that are crisp and have a smooth skin. - Fresh herbs should be vibrant and fragrant; avoid wilting. Want to make your rolls even better? Try these ideas: - Add cooked shrimp or chicken for extra protein. - Include bell peppers or radishes for a crunchier bite. - Swap in different herbs like basil or parsley for a unique flavor. - Use quinoa or rice noodles for a heartier filling. For the complete recipe, check out the [Full Recipe]. Enjoy making your summer rolls! {{image_4}} If you want a fully plant-based dish, there are many fun swaps. You can use tofu instead of fish or shrimp. Try adding bean sprouts for a nice crunch. You can also toss in sliced bell peppers for a splash of color. These swaps keep the rolls fresh and tasty. To give your summer rolls an Asian twist, add fresh herbs like basil or dill. You can also use hoisin sauce or peanut sauce instead of the soy sauce. A drizzle of sriracha can bring some heat. These changes will make your rolls pop with flavor. For easy assembly, prep your ingredients ahead of time. Cut your mango, avocado, and cucumber in advance. Store them in airtight containers in the fridge. This way, you can whip up these rolls in just a few minutes. It makes summer roll night so much easier! For the full recipe, check out the detailed instructions provided. To keep your summer rolls fresh, wrap them in a damp cloth. Place them on a plate and cover with plastic wrap. This method helps prevent the rice paper from drying out. Store the rolls in the fridge if you plan to eat them later. Try to consume them within 24 hours for the best taste and texture. If you want to freeze unassembled summer rolls, first prepare the ingredients. Gather your mango, avocados, and veggies. Then, make the rolls but do not roll them up yet. Lay each rice paper wrapper flat on a parchment-lined tray. Fill the wrappers but leave them open. Freeze the tray for about one hour. Once frozen, place the rolls in a freezer bag. This helps you save space and keeps them fresh. When you’re ready to enjoy your summer rolls, take them out of the freezer. Place them in the fridge for a few hours or overnight to thaw. For a faster option, you can run them under warm water for a few seconds. Never use a microwave, as it can make the rice paper tough. After thawing, assemble the rolls with your favorite sauce, and enjoy a fresh and tasty meal! To make Mango Avocado Summer Rolls, follow these steps: 1. First, prepare the dipping sauce by mixing soy sauce, lime juice, honey, and ginger. 2. Next, soak rice paper wrappers in warm water for about 10 seconds. 3. Lay the softened wrapper on a damp surface. 4. Place mango strips, avocado slices, cucumber sticks, shredded carrots, and herbs in the center. 5. Optionally, add sesame seeds for crunch. 6. Fold the sides over the filling and roll tightly. 7. Repeat until all ingredients are used. Serve with dipping sauce. This process is easy and fun, perfect for summer gatherings. Yes, you can add meat or seafood to your summer rolls. Here are some great options: - Grilled chicken or shrimp adds protein and flavor. - Thinly sliced beef or pork works well too. - For a tasty twist, try crab or lobster. These additions make your rolls even more filling and delicious. You can try different dipping sauces beyond the suggested one. Here are some ideas: - Peanut sauce for a creamy texture and nutty flavor. - Sweet chili sauce adds a spicy kick. - A simple vinegar and soy sauce mix is also tasty. Feel free to experiment with flavors you love! You now know how to make delicious summer rolls with fresh ingredients and tasty dipping sauce. We covered the necessary components, step-by-step instructions, and tips for success. Remember, you can customize these rolls to fit your tastes. With the right care, you can store or even freeze them for later. Enjoy the fun of making and sharing these tasty treats. Trust me, they’re worth the effort!](https://dishtreats.com/wp-content/uploads/2025/07/e9c41e61-bd63-46cf-9640-b605cd161798-768x768.webp)


![- 1 can (15 oz) of chickpeas - 2 tablespoons extra virgin olive oil - Spice seasoning options: smoked paprika, garlic powder, ground cumin Crispy air fryer chickpeas need just a few simple ingredients. First, grab a can of chickpeas. They provide protein and fiber. Next, use extra virgin olive oil for richness. This oil helps the spices stick and adds flavor. For seasoning, I love smoked paprika, garlic powder, and ground cumin. These spices add depth and warmth to the dish. - Chopped fresh parsley or cilantro for garnishing - Alternative spices for flavor enhancement You can add fresh herbs like parsley or cilantro to make it pop. They add a burst of color and freshness. Feel free to play with spices. Try cayenne for heat or even cinnamon for a sweet twist. The options are endless! If you want to see the full recipe, check it out [Full Recipe]. - Preheat air fryer to 400°F (200°C). - Rinse and dry chickpeas thoroughly. Start by preheating your air fryer. Set it to 400°F (200°C) and let it heat for about five minutes. While it warms up, rinse the chickpeas well. It’s key to remove all the canning liquid. After rinsing, spread the chickpeas on a kitchen towel. Pat them dry gently. This step helps them get that perfect crisp. - Mix chickpeas with olive oil and spices. - Transfer to air fryer basket. In a large bowl, add the dried chickpeas. Pour in two tablespoons of olive oil. Sprinkle in smoked paprika, garlic powder, ground cumin, sea salt, and black pepper. Mix well so every chickpea gets coated. Next, transfer the seasoned chickpeas to the air fryer basket. Make sure they are in a single layer. Crowding the basket can lead to uneven cooking. - Set cooking time for 15–20 minutes. - Shake basket every 7 minutes for even cooking. Set the timer for 15 to 20 minutes. It’s important to shake the basket every seven minutes. This ensures all sides get crispy. Look for a nice golden-brown color and a satisfying crunch. When they’re done, let them cool for a few minutes. They will crisp up even more as they cool. If you like, garnish with chopped parsley or cilantro for a fresh touch before serving. To get the best crunch, drying chickpeas is key. Start by rinsing them well. Then, spread them on a clean kitchen towel and gently pat them dry. This step removes excess moisture, which helps them crisp up nicely in the air fryer. Next, set your air fryer to 400°F (200°C). Preheat it for about 5 minutes. This heat is crucial for achieving that perfect texture. When you place the chickpeas in the basket, make sure they are in a single layer. Overcrowding can lead to soggy chickpeas. Crispy chickpeas pair well with many dips. Hummus and tzatziki are two of my favorites. They add creaminess that balances the crunch. You can also toss them into salads for an extra crunch or use them to top soups. If you want to get creative, try using crispy chickpeas as a snack on their own. They make a great addition to trail mixes or can be sprinkled on popcorn for a fun twist. Chickpeas are not just tasty; they're nutritious too. They are high in protein and fiber. This makes them a filling snack that can help you feel satisfied. Air frying reduces the amount of oil needed, so you get a low-calorie snack option without sacrificing flavor. These crispy chickpeas are a great way to enjoy a healthy snack without the guilt. You can feel good about munching on them anytime! For the full recipe, check the section above. {{image_4}} You can change the flavor of your crispy air fryer chickpeas. One fun option is to add spice. Try cayenne or chili powder for a spicy kick. Just mix in a little with your other spices before cooking. If you prefer sweet snacks, go for cinnamon and sugar. This will give your chickpeas a unique twist that's fun and tasty. These chickpeas are healthy and fit many diets. They are naturally gluten-free and vegan-friendly. This means everyone can enjoy them! For those watching their salt intake, you can lower the sodium. Simply reduce or skip the sea salt in the recipe for a low-sodium version. If you're hosting a party, you might want more chickpeas. To increase the batch size, just double or triple the ingredients. The cooking time may stay the same, but keep an eye on them. You can also swap chickpeas for other legumes like black beans or lentils. They will work well in the air fryer and offer different flavors. Each option can give you a fun new snack! Check out the [Full Recipe](#) for detailed steps on making these crispy delights! To store your crispy chickpeas, use an airtight container. This will help them stay crunchy. A glass jar or a plastic container with a tight lid works well. Make sure to let them cool completely before sealing. This step prevents moisture buildup. You can easily reheat chickpeas in an air fryer. Set it to 350°F (175°C) and heat for about 5 minutes. This method keeps them crispy. If you prefer the oven, place them on a baking sheet at the same temperature. Check often to avoid sogginess. Crispy chickpeas last for about 3 days at room temperature. If you store them in the fridge, they may last a bit longer, but they can lose some crispiness. For best results, enjoy them fresh! To make air fryer chickpeas crispy, first dry them well. After rinsing, spread them on a clean towel and pat them dry. Removing moisture is key for that perfect crunch. Next, toss the chickpeas with olive oil and spices. The oil helps them crisp up in the air fryer. Set your air fryer to 400°F (200°C). Cook them for 15 to 20 minutes, shaking the basket every 7 minutes. This ensures even cooking and a nice, golden-brown color. Keep an ear out for a satisfying crunch as they cook. Let them cool for a few minutes after frying. They will get even crunchier as they cool. Yes, you can use dried chickpeas, but they require more prep. Start by soaking the dried chickpeas overnight. This softens them and reduces cooking time. After soaking, rinse and boil them until tender, about 1 to 2 hours. Once cooked, follow the same steps to dry and season them. Air frying time may be longer, as dried chickpeas need to lose more moisture. Pay close attention to their texture for that perfect crunch. Crispy chickpeas pair well with many dips. Try hummus for a classic touch. Tzatziki offers a cool contrast. You can also serve them with guacamole for a creamy twist. For a spicy kick, mix them with a sriracha mayo. These dips enhance the flavors of the chickpeas. They make for a fun and tasty snack or appetizer. Enjoy exploring different combinations to find your favorite! For the full recipe, check out the [Full Recipe]. Crispy air fryer chickpeas are easy and fun to make. We covered the main ingredients, like chickpeas and olive oil, and talked about spices for extra flavor. You learned preparation steps, tips for crispiness, and fun ways to enjoy this snack. Try different spices or dips to keep it exciting. Crispy chickpeas are a tasty, healthy option for any event. Enjoy your cooking and happy snacking!](https://dishtreats.com/wp-content/uploads/2025/07/61bc6060-fad3-40a7-be2f-ccc6788a1d37-768x768.webp)
