Garlic Parmesan Roasted Red Potatoes Easy and Tasty

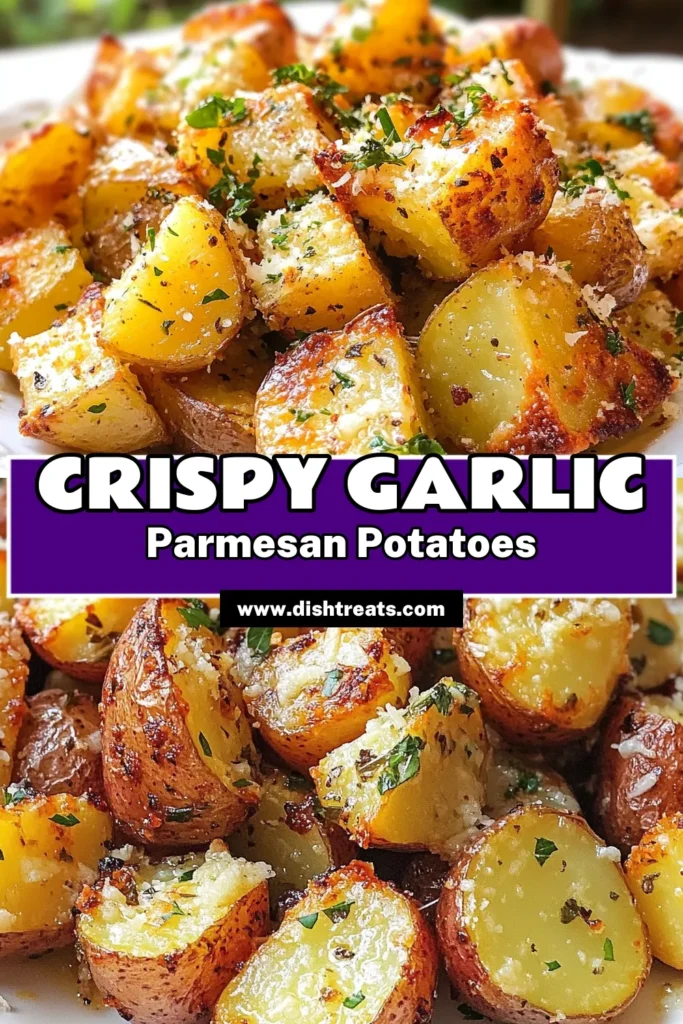
Are you craving a side dish that’s both easy to make and packed with flavor? Look no further than Garlic Parmesan Roasted Red Potatoes! This simple recipe uses just a few everyday ingredients to create crispy, golden potatoes that are bursting with taste. Perfect for any meal, these tender bites will delight your taste buds. Let’s dive into how to make this tasty dish that will have everyone coming back for seconds!
Why I Love This Recipe
- Flavorful Combination: The rich taste of garlic combined with the sharpness of Parmesan creates a mouthwatering experience that elevates simple potatoes to a gourmet dish.
- Easy Preparation: With minimal ingredients and straightforward steps, this recipe is perfect for both novice cooks and experienced chefs looking for a quick side dish.
- Versatile Serving: These garlic Parmesan delight potatoes pair wonderfully with a variety of main courses, making them a go-to side for any meal.
- Crispy Texture: The roasting process ensures that the potatoes develop a crispy exterior while remaining soft and fluffy on the inside, providing the perfect contrast in texture.
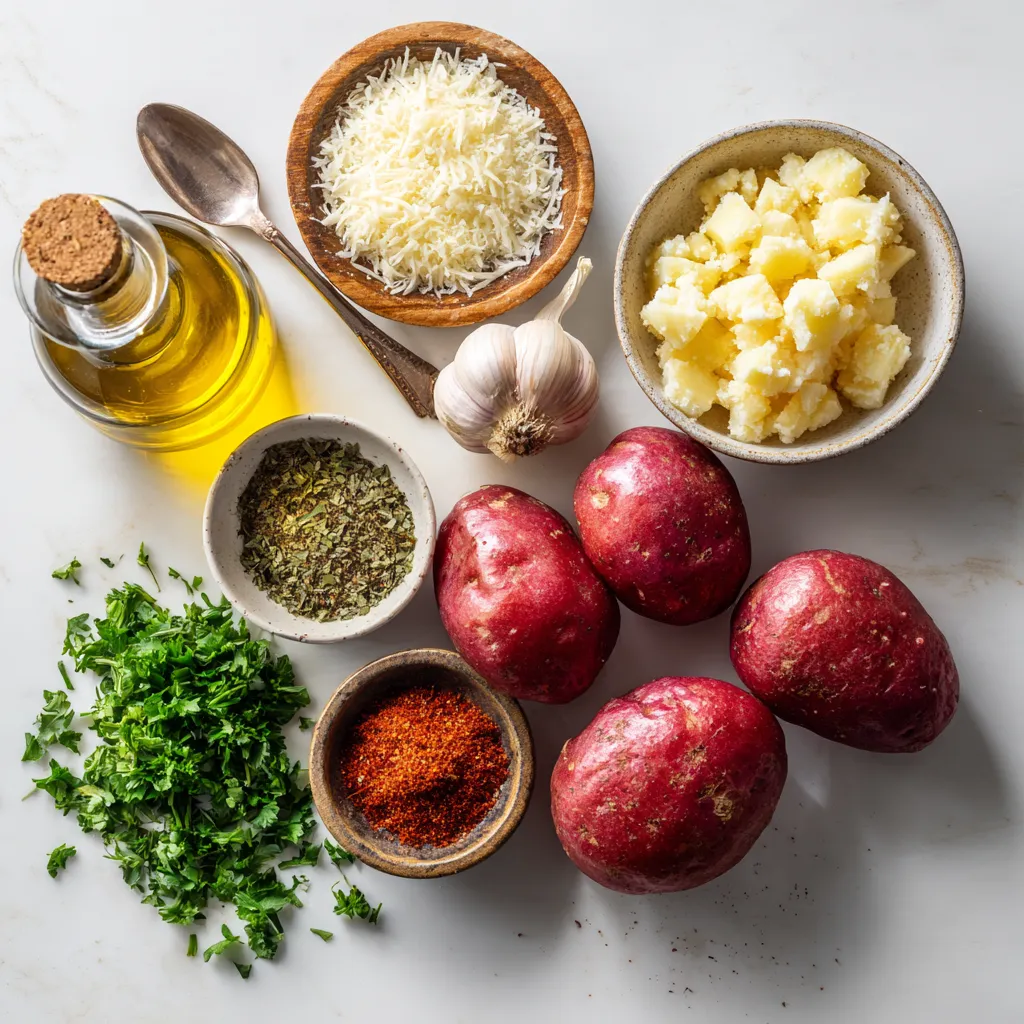
Ingredients
To make Garlic Parmesan Roasted Red Potatoes, you will need these simple ingredients:
- 2 pounds red potatoes, quartered
- 4 tablespoons extra virgin olive oil
- 4 cloves garlic, finely minced
- 1/2 cup freshly grated Parmesan cheese
- 1 teaspoon dried oregano
- 1 teaspoon sweet paprika
- Salt and freshly ground black pepper to taste
- Fresh parsley, finely chopped (for garnish)
Each ingredient plays a key role in flavor and texture. The red potatoes give a creamy inside with a crispy skin. The olive oil helps achieve that golden crunch. Garlic brings a strong, savory taste while Parmesan adds richness. Oregano and paprika provide depth. Salt and pepper enhance all these flavors. Finally, fresh parsley adds a pop of color and freshness. This mix creates a dish that is both easy and tasty.

Step-by-Step Instructions
Preparation Steps
- Preheat the oven to 425°F (220°C).
- Prepare the baking sheet with parchment paper.
- Quarter the red potatoes.
Getting the oven hot helps the potatoes roast well. Lining the baking sheet with parchment makes cleanup easy. Quartering the potatoes gives them a nice size for roasting.
Combining Ingredients
- Toss potatoes with olive oil.
- Add garlic, Parmesan, and seasonings.
In a bowl, drizzle the olive oil over the potatoes. Toss them well so they are all coated. Then, add minced garlic, grated Parmesan, oregano, paprika, salt, and pepper. Mix everything well until each piece is covered in flavor.
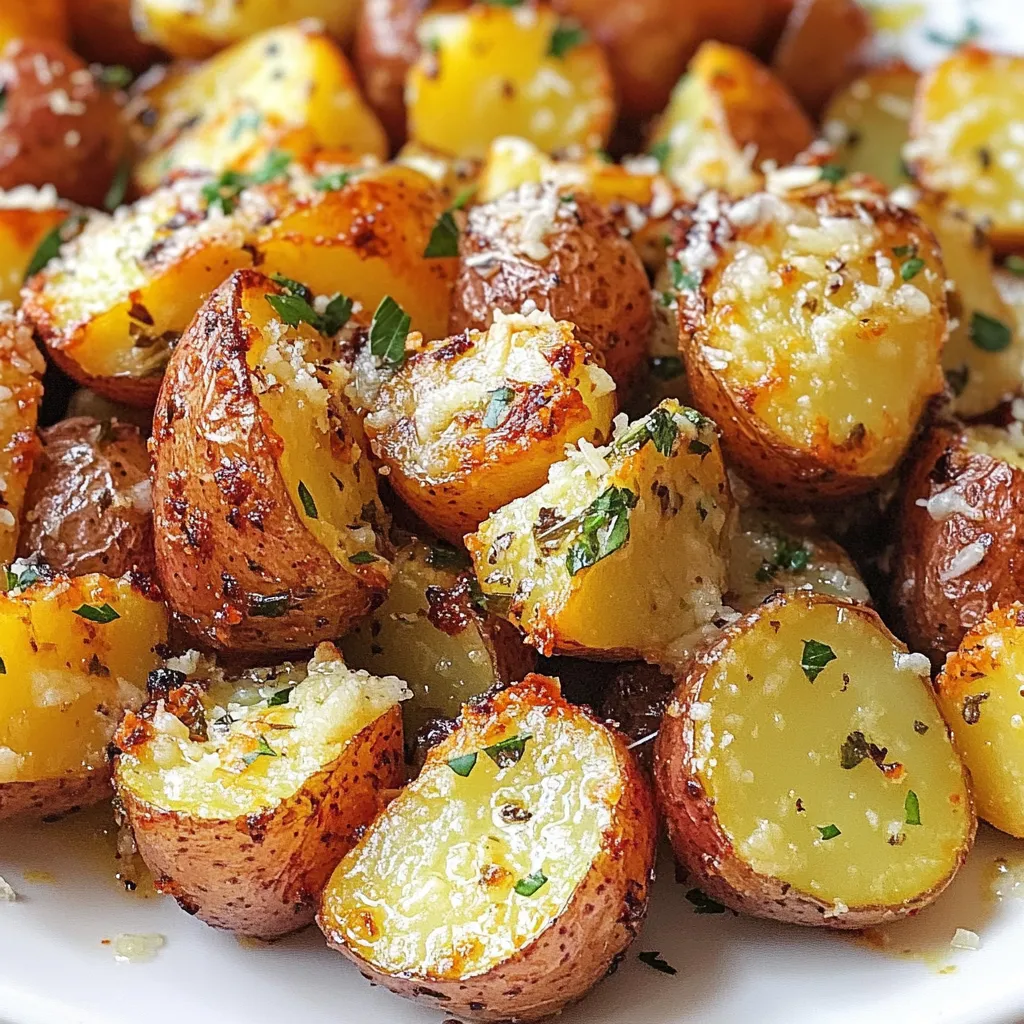
Roasting Process
- Spread potatoes on the baking sheet.
- Roast for 25-30 minutes with stirring halfway.
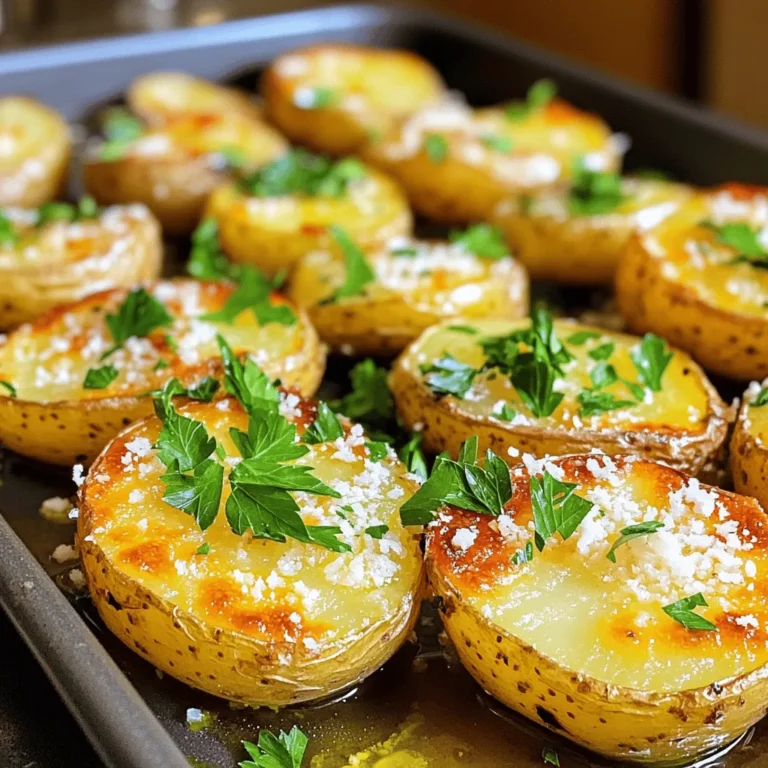
Spread the potatoes evenly on the baking sheet. This helps them get crispy and cook evenly. Roast them in the oven for 25 to 30 minutes. Stir them halfway through cooking to promote even browning. When they are golden and crispy, they are ready!
Tips & Tricks
Achieving Crispy Potatoes
To get those perfect crispy potatoes, spread them out evenly on the baking sheet. If they sit too close together, they steam instead of roast. Stirring them halfway through cooking helps them brown evenly. Move them around a bit to ensure all sides get that nice golden color.
Flavor Enhancements
Want to take your flavors up a notch? Try adding fresh herbs like rosemary or thyme. They add a burst of freshness that dried herbs can’t match. If you use dried herbs, remember they are more potent, so use a bit less. A sprinkle of chili flakes can also add a nice kick.
Presentation Ideas
When serving, place the potatoes in a rustic bowl. This lets those crispy edges shine. For a colorful touch, add fresh parsley on top. You can even sprinkle extra Parmesan cheese for a gourmet look. A little garnish makes everything look special and appetizing!
Pro Tips
- Choose the Right Potatoes: Red potatoes are great for roasting due to their waxy texture, but feel free to experiment with Yukon Gold or fingerling potatoes for different flavors and textures.
- Maximize Crispiness: For extra crispy potatoes, soak them in cold water for 30 minutes before roasting. This helps remove excess starch and results in a crunchier exterior.
- Adjust Seasonings: Don’t hesitate to modify the herbs and spices according to your preference. Adding a pinch of cayenne pepper or some fresh rosemary can elevate the flavor profile.
- Serve Immediately: Roasted potatoes are best served hot out of the oven. If they sit too long, they may lose their crispiness, so plan to serve them right after cooking.

Variations
Cheese Options
You can swap out Parmesan for other cheeses. Try using sharp cheddar for a bolder taste. Feta cheese adds a nice tang. A blend of mozzarella and Parmesan gives a creamy touch. Mixing cheeses can create exciting flavor profiles.
Herb Variations
Fresh herbs can change the whole dish. Rosemary or thyme work great with these potatoes. They add a fresh, earthy flavor. You can also use Italian seasoning for a more robust taste. This adds depth and makes the dish even better.
Ingredient Substitutions
If you need to swap ingredients, you have options. Use garlic powder instead of fresh garlic if needed. For olive oil, try butter for a richer flavor. You can also add other veggies like carrots or bell peppers. They roast well and add color to your meal.
Storage Info
Storing Leftovers
To keep your Garlic Parmesan roasted potatoes fresh, store them in an airtight container. This method prevents moisture and air from spoiling their taste. You can keep them in the fridge for about 3 to 5 days. If you want them to last longer, freezing is a good option.
Reheating Instructions
To reheat your potatoes and keep them crispy, the oven is best. Preheat your oven to 400°F (200°C). Place the potatoes on a baking sheet and heat for about 10 to 15 minutes. Stir them halfway to help them warm evenly. If you’re short on time, you can use a microwave, but this may make them soft. If you choose the microwave, heat in short bursts of 30 seconds.
Freezing Potatoes
You can freeze cooked Garlic Parmesan potatoes for up to 3 months. To freeze, let them cool completely first. Spread them out on a baking sheet in a single layer so they don’t stick together. Once frozen, transfer them to a freezer bag. To use frozen potatoes, thaw them overnight in the fridge. Reheat them in the oven for the best texture.
FAQs
How do I know when the potatoes are done?
You can tell when the potatoes are done by checking their color and texture. Look for a golden brown color and a crispy outside. Insert a fork into a potato; it should slide in easily. The inside should be soft and fluffy. These signs mean your potatoes are perfect!
Can I make this recipe in advance?
Yes, you can prepare this dish ahead of time. You can cut the potatoes and mix them with the oil and seasonings a few hours before cooking. Store the mixture in the fridge. For the best taste, cook them right before serving. If you need to store them longer, keep them in a sealed container for up to two days.
What can I serve with Garlic Parmesan Roasted Red Potatoes?
Garlic Parmesan roasted red potatoes pair well with many dishes. Try serving them with grilled chicken or steak for a hearty meal. They also go great with roasted veggies or a fresh salad. These potatoes make a yummy side for any meal!
This blog post covered everything you need to make Garlic Parmesan Roasted Red Potatoes. We looked at the simple yet tasty ingredients, step-by-step instructions, and useful tips for the perfect roast. You learned ways to customize the flavor and how to store and reheat leftovers. Whether you want a quick side dish or a flavorful addition to your meal, these potatoes hit the spot. Enjoy cooking, and don’t hesitate to experiment with your favorite flavor

Garlic Parmesan Delight Potatoes
Ingredients
- 2 pounds red potatoes, quartered
- 4 tablespoons extra virgin olive oil
- 4 cloves garlic, finely minced
- 0.5 cup freshly grated Parmesan cheese
- 1 teaspoon dried oregano
- 1 teaspoon sweet paprika
- to taste salt and freshly ground black pepper
- for garnish fresh parsley, finely chopped
Instructions
- Begin by preheating your oven to 425°F (220°C). While the oven heats, prepare a large baking sheet by lining it with parchment paper for easy cleanup.
- In a spacious mixing bowl, add the quartered red potatoes and drizzle the olive oil over them. Toss the potatoes gently to ensure each piece is thoroughly coated in the oil.
- Next, incorporate the minced garlic, grated Parmesan cheese, dried oregano, paprika, salt, and pepper into the bowl. Mix everything together well, making sure that each potato piece is generously coated in the aromatic seasonings.
- Spread the seasoned potatoes across the prepared baking sheet in a single layer, taking care not to overcrowd them. This step is crucial for achieving perfectly roasted, crispy potatoes.
- Place the baking sheet in the preheated oven and roast the potatoes for 25-30 minutes. Halfway through the cooking time, give them a stir to promote even roasting and color. Look for a beautiful golden brown and crispy exterior as an indicator of doneness.
- Once the potatoes are perfectly roasted, remove them from the oven and allow them to rest for a few moments.
- Just before serving, sprinkle fresh chopped parsley over the potatoes for a vibrant touch and added flavor.


![- 8 oz linguine or spaghetti - 1 lb large shrimp, peeled and deveined - 4 cloves garlic, finely minced - 1/4 cup extra-virgin olive oil - 1 teaspoon red pepper flakes - 1/2 cup fresh parsley, finely chopped - 1 lemon, juiced and zested - Salt and freshly ground black pepper to taste - Grated Parmesan cheese (optional) To make Quick Garlic Shrimp Pasta, you need fresh and quality ingredients. The base of this dish is linguine or spaghetti, which holds the sauce nicely. I love using large shrimp because they cook quickly and have a great flavor. Garlic is a must here. It adds a rich, aromatic taste that makes the dish special. Next, the olive oil brings everything together. I always choose extra-virgin for its fresh and fruity flavor. Red pepper flakes add that perfect kick. Adjust the amount to fit your spice level. Fresh parsley brightens the dish, making it look vibrant. The lemon juice and zest add a zesty touch that balances the richness. Don’t forget salt and pepper to enhance all the flavors. If you want to make it extra savory, sprinkle some grated Parmesan cheese on top. These ingredients work together to create a dish that is simple yet full of flavor. For the full recipe, refer to the section above. - Bring a large pot of water to a boil. - Add salt to the water for flavor. - Cook the pasta according to the package instructions. - Reserve about 1 cup of the pasta water before draining. - Heat olive oil in a large skillet over medium heat. - Add minced garlic and red pepper flakes. - Sauté the garlic for about 30 seconds until fragrant. - Introduce the shrimp into the skillet. - Season the shrimp with salt and black pepper. - Cook for about 2-3 minutes until the shrimp turn pink and opaque. - Toss the cooked pasta into the skillet with the shrimp. - Add the reserved pasta water for creaminess. - Pour in lemon juice and zest for brightness. - Fold in the chopped fresh parsley for a fresh taste. - Taste and adjust seasoning if needed. - Plate the pasta into individual bowls. - Garnish with extra parsley and a lemon wedge. - Serve warm and enjoy this dish. For detailed cooking steps, check the Full Recipe. To get the best garlic taste, avoid burning it. When you heat garlic, it should become fragrant but not brown. Burnt garlic can taste bitter and ruin your dish. Start with medium heat and watch it closely. If you like spice, adjust the red pepper flakes. Add more for heat or less for mildness. Taste as you go, and find what suits you best. Cooking pasta to al dente is key. This means the pasta should be firm but not hard. Overcooked pasta can turn mushy and lose its bite. Before draining your pasta, save some pasta water. This starchy water helps the sauce stick and adds flavor. It’s a simple trick that makes a big difference! For side dishes, consider a fresh salad or garlic bread. These pair well with the pasta and add balance to your meal. When it comes to wine, a crisp white wine works best. Look for a Sauvignon Blanc or a Pinot Grigio. These wines enhance the garlic flavors and make the meal feel special. {{image_4}} You can switch up the pasta to fit your needs. Try whole wheat or gluten-free pasta. Both options work well with this dish and add a different taste. Fresh herbs can change the flavor too. Use basil or chives for a fresh twist. They brighten up the shrimp pasta and add a new layer of taste. You can explore other seafood options if you want. Scallops and calamari both taste great in this dish. They offer a nice change from shrimp while keeping the dish light. For a vegetarian version, use mushrooms instead of shrimp. Mushrooms have a meaty texture and soak up flavors well. This swap keeps the dish satisfying without meat. Want a richer sauce? Adding cream can make your dish more decadent. It gives the pasta a smooth texture that many love. You can also add cherry tomatoes for freshness. They pop with flavor and add color to your plate. This small change can elevate your garlic shrimp pasta experience. For a full recipe, check out the details above. To store leftover pasta, place it in an airtight container. Make sure to let it cool first. This helps prevent sogginess. You can keep it in the fridge for up to three days. After that, the shrimp may lose its quality. Always check for any off smells or changes in color before eating. When reheating pasta, use a skillet. This keeps the dish from getting too dry. Add a splash of water or olive oil to help. Heat it on low, stirring gently. Avoid using the microwave if you can. It can make the shrimp rubbery. Always taste a little before serving to ensure it's warm and flavorful. Yes, you can freeze garlic shrimp pasta! First, let the dish cool completely. Then, place it in a freezer-safe container. Leave some space for expansion. You can freeze it for up to two months. To thaw, move it to the fridge overnight. Reheat it on the stove, adding a bit of water or oil to restore moisture. You can make Quick Garlic Shrimp Pasta in about 30 minutes. - Prep time: 10 minutes - Cooking time: 20 minutes Yes, you can use frozen shrimp. Just thaw them first. - To thaw shrimp, place them in cold water for about 15-20 minutes. - Ensure shrimp are peeled and deveined before cooking. You can pair this dish with several sides: - A fresh garden salad - Garlic bread for dipping - Steamed vegetables like broccoli or asparagus To reduce the spice, you can: - Use fewer red pepper flakes or omit them. - Add more olive oil or butter to mellow the heat. I recommend using linguine or spaghetti. - These pasta types hold the sauce well. - You can also try fettuccine for a different texture. For the full recipe, refer to the [Full Recipe]. Quick Garlic Shrimp Pasta is simple and tasty. You learned about key ingredients, cooking steps, and useful tips. I focused on making garlic and shrimp shine while keeping it easy. You can swap out ingredients, store leftovers, and reheat without losing flavor. Try different flavors to make it your own. Follow these steps, and enjoy a delicious meal any day of the week. Cooking should be fun and satisfying, so gather your ingredients and start creating!](https://dishtreats.com/wp-content/uploads/2025/06/6901a993-fcd3-4db1-9297-5790b6f94dfa-768x768.webp)
![- 1 block firm tofu, thoroughly drained and pressed - 1 cup jasmine rice - 2 tablespoons Sriracha sauce The firm tofu acts as the main protein. It absorbs flavors well and provides a hearty bite. Jasmine rice, with its fluffy texture, makes a great base. Sriracha sauce adds the spicy kick, balancing heat and taste. - 1 cup broccoli florets, fresh or frozen - 1 red bell pepper, thinly sliced - ½ cup carrots, julienned or matchstick-cut Broccoli florets add crunch and color. The red bell pepper brings sweetness and a pop of color. Carrots add a nice crunch and a bit of earthiness. Together, they create a vibrant mix that enhances the dish. - 1 tablespoon soy sauce (preferably low-sodium) - 1 tablespoon sesame oil - Fresh cilantro, for garnish Soy sauce brings umami depth. Sesame oil adds a nutty flavor that complements the spice. Fresh cilantro brightens the dish, giving it a fresh finish. This combo of flavors makes each bite exciting. For the full recipe, check out the complete guide. To start, cut the pressed tofu into 1-inch cubes. This size helps the tofu cook evenly. Next, toss the cubes in a bowl with cornstarch. Make sure every piece is coated. This coating is key for a crispy finish when you cook it. Pressing the tofu is vital. It removes excess water, allowing better flavor absorption and texture. Bring vegetable broth to a boil in a medium saucepan. Add the jasmine rice and stir it once. Cover the pan, reduce the heat, and let it simmer for about 15 minutes. This method infuses flavor into the rice. Once the liquid absorbs, fluff the rice with a fork. This step keeps the rice light and airy, which balances the dish. Heat vegetable oil in a large skillet over medium-high heat. Carefully add the cornstarch-coated tofu cubes in a single layer. Fry them for about 8-10 minutes, turning occasionally. You want all sides to turn golden brown and crispy. Once done, transfer the tofu to a plate lined with paper towels. This helps absorb any excess oil. In the same skillet, add the broccoli, red bell pepper, and carrots. Stir-fry the veggies for 4-5 minutes. You want them tender but still bright and colorful. This keeps their nutrients intact. Add the sliced green onions for the last minute. Their fresh taste adds a nice crunch to the mix. In a small bowl, whisk together the Sriracha sauce, soy sauce, sesame oil, and honey (or maple syrup). Mix until well blended. This sauce brings all the flavors together. If you like it spicier, add more Sriracha. For a milder version, reduce the amount. Now, it’s time to put it all together! Divide the fluffy jasmine rice into bowls. Top it with the spicy tofu and vegetable mix. For a polished finish, sprinkle sesame seeds and fresh cilantro on top. This adds flavor and a pop of color to your bowl. For the full recipe, refer back to the main section. Enjoy your Spicy Sriracha Tofu Bowl! To make crispy tofu, you need to press it well. Start by wrapping the block of firm tofu in a clean kitchen towel. Place a heavy object, like a cast iron pan, on top for about 20-30 minutes. This helps remove excess moisture. Next, coat the tofu cubes with cornstarch. Use about 2 tablespoons, ensuring each piece is covered. This coating creates a crunchy texture when cooked. Not everyone enjoys the same heat. If you want less spice, use only 1 tablespoon of Sriracha. You can also mix Sriracha with a bit of honey or ketchup to mellow the heat. For a different flavor, try other sauces. Chili garlic sauce or sweet chili sauce can work well too. Experiment with these options to find what you like best. To save time, prep your ingredients ahead of time. You can chop the vegetables and store them in the fridge for up to three days. Cook the rice and tofu in advance, too. Store them separately in airtight containers. This way, you can quickly assemble your Spicy Sriracha Tofu Bowl when you’re ready to eat. Enjoy the convenience of quick meals without sacrificing taste! For the full recipe, check out the Spicy Sriracha Tofu Bowl. {{image_4}} You can switch the tofu for other protein sources. Tempeh is a great choice. It has a nutty flavor and holds up well in stir-fries. Seitan is another tasty option. It mimics the texture of meat nicely. If you prefer meat, chicken or shrimp work well too. Chicken adds a mild taste, while shrimp brings a sweet, briny flavor. Both cook quickly, making your meal even faster. Feel free to change the vegetables based on the season. In spring, try snap peas or asparagus. In summer, zucchini and bell peppers shine. Winter vegetables like Brussels sprouts and kale add heartiness. You can also use frozen veggies. They save time and are often just as nutritious as fresh ones. Just make sure to thaw and drain excess water before cooking. If you need a gluten-free option, swap soy sauce for tamari. Tamari has a similar flavor but is gluten-free. For the rice, try quinoa or cauliflower rice. Both options are nutritious and add a unique texture to your bowl. Quinoa is protein-rich, while cauliflower rice is low in carbs and calories. These swaps ensure everyone can enjoy this spicy dish! For the complete recipe, check the [Full Recipe]. To keep your spicy Sriracha tofu bowl fresh, store leftovers in an airtight container. Place the bowl in the fridge within two hours of cooking. This helps keep the food safe. Your leftovers can last for up to four days in the fridge. To reheat the tofu without losing its crispness, use an oven or a skillet. If using an oven, preheat it to 350°F (175°C). Place the tofu on a baking sheet for about 10-15 minutes. If using a skillet, heat over medium heat for about 5-7 minutes, turning the tofu occasionally. This keeps it crispy and delicious. You can freeze cooked bowls if you want to save some for later. Place the cooled bowl in a freezer-safe container. It can stay frozen for up to three months. To thaw, move the bowl to the fridge overnight. Reheat it in the oven or a skillet as mentioned above. This way, you can enjoy your spicy Sriracha tofu bowl anytime! For the full recipe, check the earlier sections. To make the Spicy Sriracha Tofu Bowl vegan, swap honey for maple syrup. This simple change keeps the dish sweet and plant-based. Also, check that all products you use are vegan-friendly. For example, ensure your soy sauce is made without animal products. Yes, you can use brown rice. However, remember that brown rice takes longer to cook. It usually needs about 40-50 minutes, while jasmine rice only takes around 15 minutes. Brown rice has a nuttier taste and chewier texture. So, it can change the feel of your bowl. If you don’t have Sriracha, several substitutes work well. You can use chili garlic sauce or sambal oelek for a similar heat. You can also make a homemade version by mixing hot sauce, garlic, and a bit of sugar. This gives you control over the flavor. The spice level of this dish depends on the amount of Sriracha you use. One tablespoon adds mild heat, while two tablespoons ramp up the spice. To adjust heat to your taste, start with less and add more if you like it spicier. Always taste as you go. You can serve this bowl with a side of edamame or a fresh salad. They add nice contrast and extra crunch. For more flavor, drizzle extra Sriracha or sesame oil on top. You can also add lime juice for a zesty touch. Enjoy your meal! For the full recipe, check out the Spicy Sriracha Tofu Bowl details above. You learned how to make a tasty Spicy Sriracha Tofu Bowl. We covered each ingredient and how to prepare them. From cooking the rice to achieving crispy tofu, each step matters. Remember to adjust spices to suit your taste. Feel free to swap in different proteins or veggies to keep it fresh. Store leftovers well to enjoy later. This bowl is not just good; it’s fun to make and share. Enjoy your cooking adventure!](https://dishtreats.com/wp-content/uploads/2025/07/ee3e23f0-fb80-42df-ace0-60219f206871-768x768.webp)


