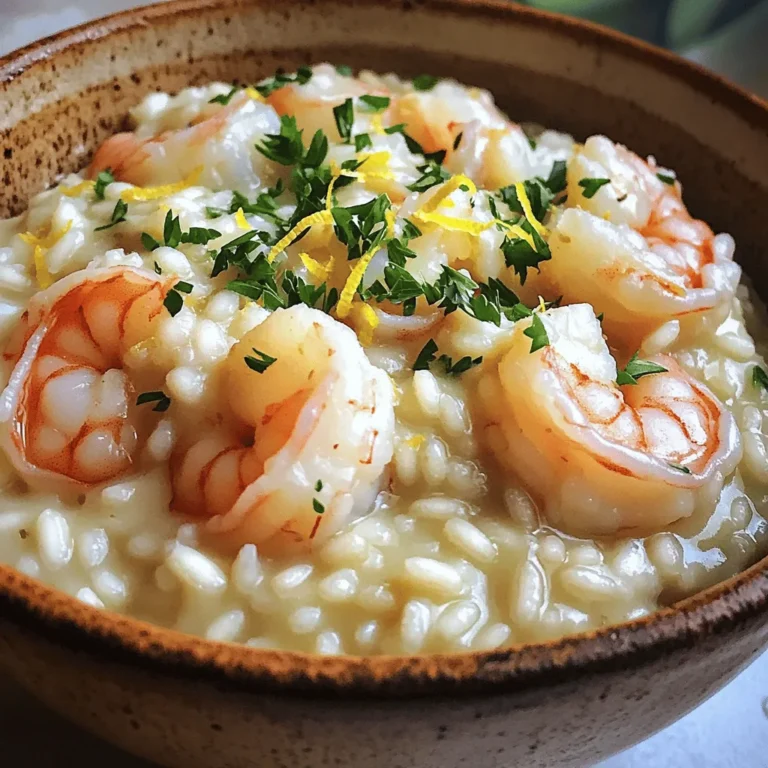
Honey Garlic Shrimp Fried Rice Flavorful Easy Recipe

Craving a delicious and easy meal? Let me introduce you to Honey Garlic Shrimp Fried Rice! This recipe is quick, packed with flavor, and perfect for any night of the week. With fresh shrimp, sweet honey, and vibrant veggies, this dish is a winner. Whether you’re cooking for yourself or hosting friends, you’ll impress everyone at the table. Ready to dive in? Let’s get cooking!
Why I Love This Recipe
- Quick and Easy: This recipe comes together in just 30 minutes, making it perfect for busy weeknights when you want something delicious without spending hours in the kitchen.
- Flavorful Combination: The blend of honey and garlic creates a sweet and savory sauce that perfectly complements the shrimp and vegetables, delivering a burst of flavor in every bite.
- Customizable: This fried rice dish can easily be modified with your favorite vegetables or proteins, allowing you to tailor it to your tastes or what you have on hand.
- One-Pan Wonder: With everything cooked in one skillet, cleanup is a breeze. You can enjoy a fantastic meal without the hassle of washing multiple pots and pans.
Ingredients
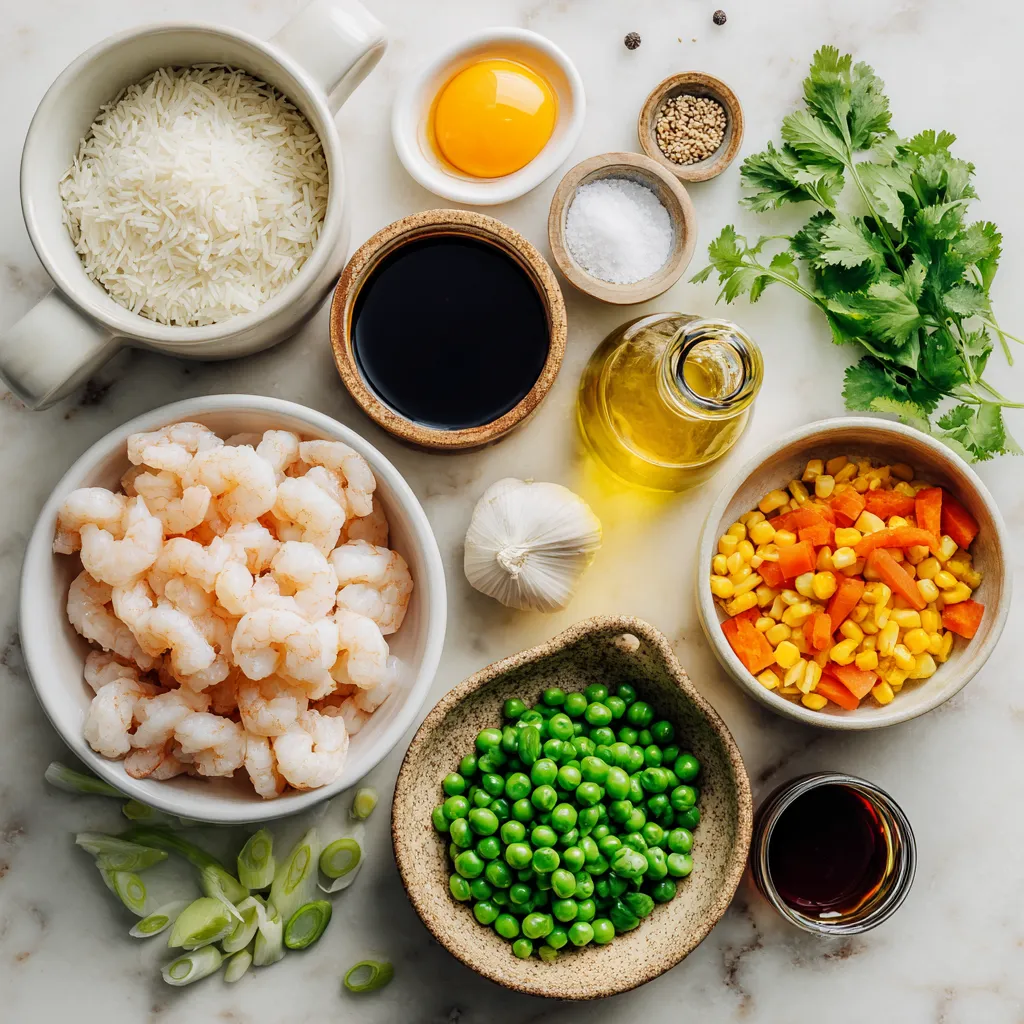
To make Honey Garlic Shrimp Fried Rice, you need a few key ingredients. Here’s a simple list for you:
- 1 cup uncooked jasmine rice
- 1 lb shrimp, peeled and deveined
- 2 tablespoons honey
- 2 tablespoons soy sauce
- 3 cloves garlic, minced
- 1 tablespoon sesame oil
- 1 cup mixed vegetables (peas, carrots, corn)
- 2 green onions, chopped
- 2 eggs, lightly beaten
- Salt and pepper to taste
- Fresh cilantro or parsley for garnish (optional)
Each ingredient plays a big role in the dish. The jasmine rice gives a nice texture. The shrimp adds a sweet and savory flavor when combined with honey and soy sauce. Garlic brings warmth, and sesame oil adds a nutty taste. The mixed veggies add color and crunch. Green onions offer a fresh bite, while eggs help bind everything together.
Using fresh ingredients makes a big difference. Fresh shrimp will taste better, and fresh veggies keep the dish vibrant. You can also mix in your favorites if you want to customize the dish.
Feel free to add or swap ingredients as you like. This dish is flexible, so have fun with it!

Step-by-Step Instructions
Preparing the Rice
1. Rinse 1 cup of jasmine rice under cold water until the water runs clear. This step removes excess starch.
2. In a medium pot, combine the rinsed rice and 2 cups of water. Bring it to a boil over high heat.
3. Once boiling, reduce the heat to low and cover the pot. Let it simmer for 15 minutes until the water absorbs.
4. Remove the pot from heat and fluff the rice with a fork. Set it aside to cool slightly.
Cooking the Shrimp
1. Heat 1 tablespoon of sesame oil in a large skillet over medium heat.
2. Add 3 cloves of minced garlic and sauté for 1-2 minutes. Watch it closely so it doesn’t burn.
3. Now, add 1 pound of peeled and deveined shrimp to the skillet. Sauté for about 3-4 minutes until the shrimp turn pink and opaque.
4. Drizzle 2 tablespoons of honey and 2 tablespoons of soy sauce over the shrimp. Stir gently for 1-2 minutes to coat evenly. Transfer the shrimp to a plate and set aside.
Sautéing the Vegetables
1. In the same skillet, add 1 cup of mixed vegetables, such as peas, carrots, and corn. Stir-fry for 3-4 minutes until they are tender yet crisp.
2. Push the vegetables to one side of the pan. This creates space for the eggs.
Scrambling the Eggs
1. Pour 2 lightly beaten eggs into the empty side of the skillet. Stir gently to scramble.
2. Cook until the eggs are fully set and no longer runny. Once cooked, mix the eggs with the sautéed vegetables.
Mixing Rice and Shrimp
1. Add the fluffed jasmine rice to the skillet, breaking up any clumps as you go.
2. Stir everything together thoroughly. Fold in the honey garlic shrimp, ensuring they are evenly spread throughout the rice.
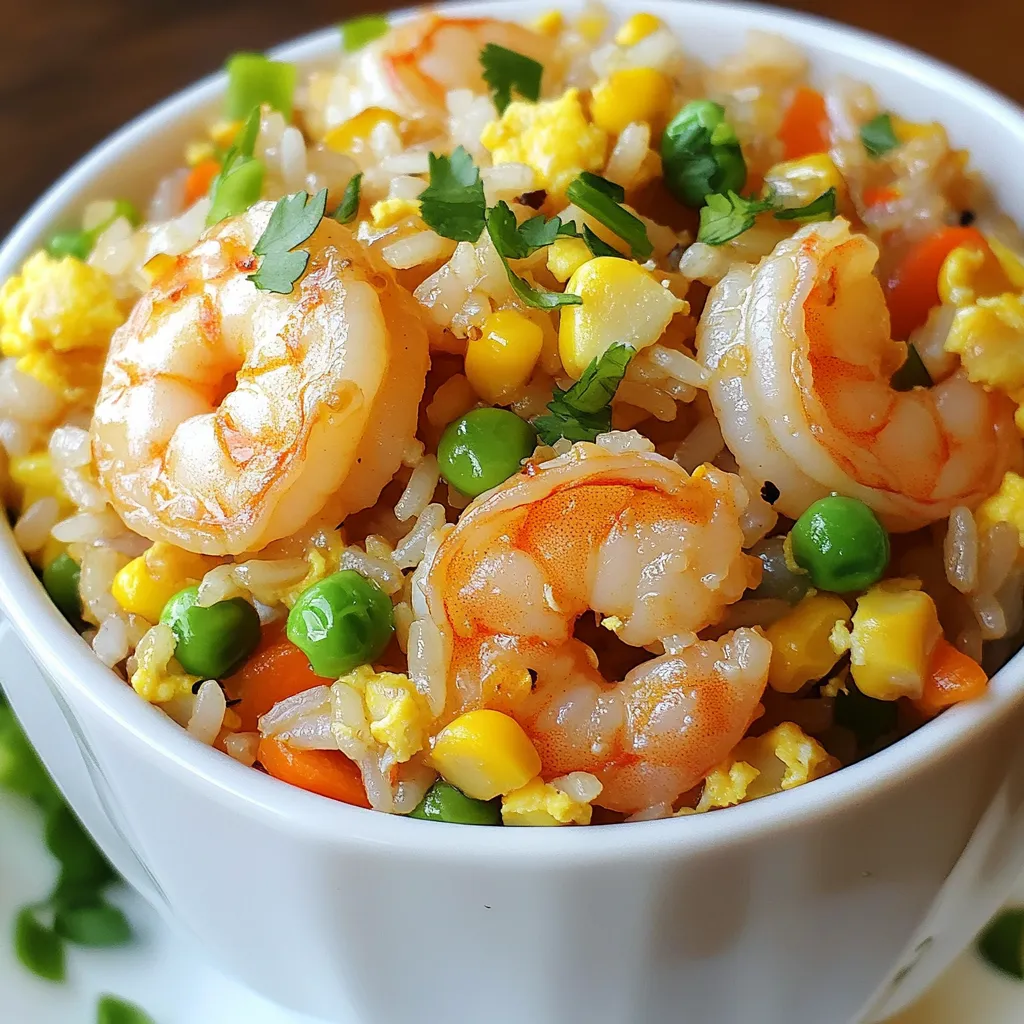
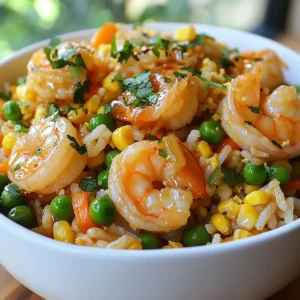
Final Seasoning and Serving
1. Season the dish with salt and pepper to taste. This step enhances the overall flavor.
2. Sprinkle chopped green onions over the top and mix well.
3. Serve the Honey Garlic Shrimp Fried Rice hot. Optionally, garnish with fresh cilantro or parsley for color and flavor.
Tips & Tricks
Selecting Fresh Shrimp
When choosing shrimp, you have two main options: fresh and frozen. Fresh shrimp often tastes better, but frozen shrimp can be just as good if handled well. To tell if shrimp is fresh, look for a few signs:
- Clear, shiny shells
- Mild ocean smell
- Firm texture
If the shrimp smells strong or has dark spots, avoid it.
Perfecting Fried Rice Texture
The texture of your fried rice matters a lot. It’s best to use cooled rice. Freshly cooked rice can turn mushy. Follow these tips to keep your fried rice perfect:
- Cook the rice a few hours ahead.
- Spread the rice on a tray to cool.
- If using leftover rice, break any clumps before cooking.
This helps each grain stay separate.
Enhancing Flavor
To make your honey garlic shrimp fried rice even tastier, think about adding more seasonings. Here are some ideas:
- Try a splash of fish sauce for depth.
- Add some oyster sauce for richness.
- Adjust the heat by adding chili paste or flakes if you want spice.
You can always tweak the flavors to match your taste. Enjoy crafting a dish that feels just right for you!
Pro Tips
- Rinse the Rice: Rinsing jasmine rice before cooking removes excess starch, which helps prevent the rice from becoming too sticky.
- Cook Shrimp Perfectly: Be careful not to overcook the shrimp; they should be pink and opaque, which usually takes about 3-4 minutes.
- Use Fresh Vegetables: Fresh or frozen mixed vegetables work well, but make sure they are still crisp to maintain their texture in the fried rice.
- Garnish for Flavor: Don’t skip the fresh cilantro or parsley; it adds a burst of flavor and color to your dish.

Variations
Vegetarian Option
You can easily replace shrimp with tofu or tempeh. These options soak up flavors well. This change makes it a great dish for vegetarians. You can also add more vegetables. Try bell peppers, broccoli, or snap peas. These add color and crunch.
Spicy Honey Garlic Shrimp Fried Rice
If you like heat, add chili paste or red pepper flakes. Start with a small amount and taste. You can always add more if you want. Adjust heat levels based on your taste. This spicy twist brings a new flavor to the dish.
Adding Protein
You can use chicken or even beef instead of shrimp. Adjust cooking times for these proteins. Chicken needs about 5-7 minutes until it’s fully cooked. Tofu cooks quickly, like shrimp, in about 3-4 minutes. This way, everyone can enjoy their favorite protein in your fried rice.
Storage Info
Storing Leftovers
To keep your honey garlic shrimp fried rice fresh, use airtight containers. Glass or plastic containers work well. Make sure to let the rice cool before sealing it. This helps prevent moisture buildup. Store the leftovers in the fridge for up to four days. If you want to save it longer, freezing is a great option. Just make sure to use freezer-safe containers. You can keep the fried rice in the freezer for up to three months.
Reheating Instructions
When it’s time to enjoy the leftovers, reheating is simple. The best way is to use a skillet. Heat it on medium and add a splash of water. This helps steam the rice and keeps it moist. Stir occasionally until heated through. If you prefer the microwave, use a microwave-safe bowl. Cover it with a damp paper towel. Heat on high for 1-2 minutes, stirring halfway to ensure even heating.
Shelf Life
Leftovers can stay good for about four days in the fridge. If you freeze the rice, it can last up to three months. Always check for signs of spoilage before eating. If the rice smells sour or has a strange color, toss it out. Food safety is important, so when in doubt, throw it out.
FAQs
Can I use brown rice instead of jasmine rice?
Yes, you can use brown rice. Brown rice has a nuttier flavor and a chewier texture. It takes longer to cook, about 40-50 minutes. You will need more water too. The rice should be rinsed like jasmine rice. Cooking time is key, so adjust your steps if you swap.
What can I substitute for sesame oil?
If you need a substitute, try olive oil. It has a mild flavor that works well. You can also use canola oil or avocado oil. These oils can bring different tastes to your dish. They won’t have the same nutty flavor as sesame oil, but they will still be good.
How do I make this recipe in advance?
To prep ahead, cook the rice and store it in the fridge. You can also cook the shrimp and vegetables early. Let them cool before storing them. When you’re ready to cook, just reheat the shrimp and veggies. Add the rice and eggs last for the freshest taste.
This blog shared how to make shrimp fried rice using fresh ingredients. You learned step-by-step instructions for cooking rice, shrimp, and veggies. I also gave you tips to improve texture and flavor, along with storage advice.
Remember, cooking is about experimenting. So, try different proteins and seasonings to find your perfect dish. You can enjoy great fried rice for meals today and later. Keep these tips handy and happy cookin

Honey Garlic Shrimp Fried Rice
Ingredients
- 1 cup uncooked jasmine rice
- 2 cups water
- 1 lb shrimp, peeled and deveined
- 2 tablespoons honey
- 3 cloves garlic, minced
- 2 tablespoons soy sauce
- 1 tablespoon sesame oil
- 1 cup mixed vegetables (peas, carrots, corn)
- 2 green onions chopped
- 2 eggs lightly beaten
- Salt and pepper to taste
- Fresh cilantro or parsley for garnish (optional)
Instructions
- Prepare the Rice: Rinse the jasmine rice under cold water until clear. Combine rice and 2 cups of water in a pot, bring to a boil, then reduce heat and simmer for 15 minutes. Fluff rice and set aside.
- Cook the Shrimp: Heat sesame oil in a skillet over medium heat. Add minced garlic and sauté for 1-2 minutes until fragrant.
- Add the Shrimp: Add shrimp to the skillet and sauté for 3-4 minutes until pink. Drizzle honey and soy sauce over shrimp, stir, and cook for an additional 1-2 minutes. Transfer shrimp to a plate.
- Sauté the Vegetables: In the same skillet, add mixed vegetables and stir-fry for 3-4 minutes until tender. Push to one side of the pan.
- Scramble the Eggs: Pour beaten eggs into the empty side of the skillet and scramble until fully cooked. Mix with vegetables.
- Combine Rice and Shrimp: Add fluffed rice to the skillet, breaking up clumps. Stir to combine, then fold in shrimp.
- Season and Serve: Season with salt and pepper. Sprinkle chopped green onions on top and mix well.
- Plating: Serve hot, garnished with cilantro or parsley if desired.


![- 4 boneless, skinless chicken thighs - 1 cup teriyaki sauce - 1/2 fresh pineapple, sliced into 1/2-inch rings - 2 tablespoons soy sauce - 1 tablespoon brown sugar - 1 teaspoon freshly grated ginger - 2 cloves garlic, finely minced - 1 tablespoon sesame oil - 1 tablespoon rice vinegar - 2 green onions, finely chopped - Sesame seeds Gathering the right ingredients is key for Grilled Pineapple Teriyaki Chicken. Start with fresh chicken thighs. They stay juicy and tender when grilled. You can use store-bought or homemade teriyaki sauce. I often prefer making my own, as it gives a fresh taste. Next, you want ripe pineapple. Choose one that feels heavy and smells sweet. The sweetness will balance the salty teriyaki sauce. For the marinade, you need a few simple items. Soy sauce adds saltiness, while brown sugar gives a nice caramel note. Ginger and garlic bring warmth and depth. Sesame oil adds a nutty flavor, and rice vinegar gives a bit of tang. Finally, for garnishing, chop green onions for color and freshness. A sprinkle of sesame seeds adds a nice crunch. These ingredients come together to create a vibrant, tasty dish. For the full recipe, check the provided link. First, gather your ingredients for the marinade. In a bowl, mix teriyaki sauce, soy sauce, brown sugar, grated ginger, minced garlic, sesame oil, and rice vinegar. Whisk these together until smooth. Add the chicken thighs and coat them well with the marinade. Cover the bowl with plastic wrap and put it in the fridge. Let the chicken marinate for at least 30 minutes. For more flavor, let it marinate for up to 2 hours. While the chicken marinates, preheat your grill to medium-high heat. If you’re using charcoal, wait for the coals to glow red. This will ensure even grilling and great flavor in your chicken. Now it's time to grill the pineapple. Take your pineapple rings and brush both sides with teriyaki sauce. Once the grill is hot, place the pineapple on it. Grill for about 3-4 minutes on each side. You want to see nice grill marks and a caramelized look. When done, set the grilled pineapple aside on a plate. Next, take the chicken thighs out of the fridge. Let any extra marinade drip off. Place the chicken on the hot grill. Cook for about 5-7 minutes per side. Aim for an internal temperature of 165°F (75°C). In the last few minutes, brush on more marinade for added flavor. When the chicken is cooked, take it off the grill. Let it rest for a few minutes. This helps keep the juices inside. To serve, place a grilled pineapple ring on each plate. Top it with a grilled chicken thigh. For a beautiful touch, sprinkle chopped green onions and sesame seeds on top. Enjoy your meal! For the full recipe, check out [Full Recipe]. For juicy chicken, preheat your grill to medium-high heat. This temperature helps create a nice sear on the chicken. A hot grill also locks in moisture, making the meat tender. If using charcoal, wait until the coals glow red and spread evenly for the best result. The marinade is key to great flavor. I suggest marinating the chicken for at least 30 minutes. This time allows the flavors to soak in. For an even richer taste, let it marinate for up to 2 hours. Just remember, don’t go over 2 hours, or the chicken might turn mushy. When picking a pineapple, look for one that feels heavy for its size. The skin should be golden and slightly soft at the base. A ripe pineapple smells sweet at the bottom. Avoid ones that are too green or have brown spots. A good pineapple adds the perfect touch to your grilled chicken. For more details and to try the dish, check out the Full Recipe. {{image_4}} You can easily swap chicken for other proteins. Try pork tenderloin or shrimp for a tasty twist. Tofu is a great choice for a vegetarian option. Just make sure to press the tofu to remove extra moisture. This helps it absorb the marinade better. No matter what protein you choose, aim for similar cooking times for best results. Want to kick up the flavor? Add red pepper flakes for heat or lime juice for zest. You can also mix in a dash of sesame seeds or a splash of orange juice for sweetness. Experimenting with spices like smoked paprika or five-spice powder can add depth. This way, you can create a unique flavor profile each time. Pair your grilled pineapple teriyaki chicken with steamed rice or a fresh salad. Jasmine rice complements the dish's sweetness well. For salads, consider a mix of greens with a light vinaigrette. You can also serve it with grilled vegetables for added color and nutrition. These options enhance your meal and make it more satisfying. For the full recipe, check out the details above. Store your Grilled Pineapple Teriyaki Chicken in an airtight container. This keeps it fresh and prevents odors from mixing. The chicken and pineapple can last in the fridge for about 3 to 4 days. Always let the chicken cool down before sealing it. This helps avoid condensation inside the container. To freeze your grilled chicken and pineapple, first, let them cool completely. Wrap each piece tightly in plastic wrap. Then place them in a freezer bag or a container. This keeps air out and prevents freezer burn. You can freeze it for up to 3 months. Label the bags with the date for easy tracking. To reheat your chicken, use the oven or stovetop. Preheat your oven to 350°F (175°C). Place the chicken in a baking dish and add a splash of water or broth. Cover it with foil. Heat for about 15-20 minutes until warm. For stovetop, use a skillet over medium heat. Add a bit of oil and warm the chicken gently. Avoid high heat to keep it juicy. You can make teriyaki sauce easily at home. Here’s how: - 1 cup soy sauce - 1/2 cup brown sugar - 1/4 cup rice vinegar - 2 tablespoons sesame oil - 1 teaspoon grated ginger - 2 cloves minced garlic Combine all these ingredients in a saucepan. Heat over medium until the sugar dissolves. Stir it well, and let it simmer for a few minutes. Your homemade teriyaki sauce is ready to use! Yes, you can use chicken breasts. They are leaner but may dry out faster than thighs. To prevent this, marinate them longer. Chicken thighs stay juicy and tender. If you prefer breasts, just keep an eye on cooking time. Many sides pair well with this dish. Here are some ideas: - Steamed jasmine rice - Grilled vegetables - Asian slaw - Quinoa salad These sides will complement the sweet and savory flavors of the chicken. Marinate the chicken for at least 30 minutes. For the best flavor, aim for 2 hours. The longer it sits, the more flavor it absorbs. Just don’t marinate too long, or the texture may change. Yes, you can grill indoors! Use a grill pan on your stovetop. Another option is to use a broiler in your oven. Both methods will give you a nice char and keep the flavor intact. This blog post covered how to make Grilled Pineapple Teriyaki Chicken. We explored key ingredients, marinade tips, and grilling steps. I shared variations and storage info to help you enjoy this dish longer. Always remember to adjust the marinade and experiment with flavors. Whether serving to friends or family, this dish is sure to impress. With these tips, you'll cook with confidence and skill. Enjoy the process and the delicious outcome!](https://dishtreats.com/wp-content/uploads/2025/06/0924d723-9b8a-4a49-9695-7d965ac302d4-768x768.webp)
![- 1 lb boneless, skinless chicken breast, thinly sliced - 1 large bell pepper (red or yellow), sliced into strips - 1 cup broccoli florets, cut into bite-sized pieces - 1 cup snap peas, trimmed - 1 medium carrot, julienned - 1/4 cup low-sodium soy sauce - 1 tablespoon honey - 1 tablespoon rice vinegar - 2 tablespoons sesame oil, divided - 3 cloves garlic, finely minced - 1 tablespoon fresh ginger, finely minced - Sesame seeds for garnish - 3 green onions, chopped (white and green parts kept separate) Using these ingredients, you can create a dish that bursts with flavor. Each element adds its own unique taste. The chicken breast serves as a great protein base. Bell peppers and broccoli contribute crunch and color. Snap peas and carrots add sweetness and texture. When you use sesame oil, garlic, and ginger, you create a rich aroma. These cooking essentials infuse the dish with depth. Finally, the sesame seeds and green onions provide a delightful finish. They enhance the dish's look and add a touch of brightness. For the full recipe, check the detailed instructions. Heat a large skillet or wok over medium-high heat. Add 1 tablespoon of sesame oil. When the oil shimmers, add the thinly sliced chicken. Season it with salt and pepper. Cook the chicken for 5-7 minutes. Stir it often until golden brown and fully cooked. Once done, remove the chicken from the skillet and set it aside. In the same skillet, add the second tablespoon of sesame oil. Let it heat up. Then, add the minced ginger and garlic. Sauté these for about 30 seconds. This step helps unlock their amazing flavors. Now, add the sliced bell pepper, broccoli florets, snap peas, and julienned carrot to the skillet. Stir-fry the vegetables for 4-5 minutes. You want them tender but still crisp. This keeps the dish colorful and crunchy. Return the cooked chicken to the skillet with the vegetables. In a separate small bowl, mix the soy sauce, honey, and rice vinegar. Whisk these until they blend well. Pour this sauce evenly over the chicken and veggies in the skillet. Stir everything together gently. Bring the mixture to a simmer over medium heat. This helps combine all the flavors and makes the dish more delicious. Next, slowly add the cornstarch slurry to the stir-fry. Stir constantly as you add it. Cook for 1-2 more minutes until the sauce thickens to your liking. This gives the dish a nice glossy finish. Remove the skillet from the heat. Add the chopped green tops of the green onions. Toss everything gently to combine. Serve the stir-fry on plates. Sprinkle sesame seeds on top for extra crunch. Enjoy this delightful meal! For the full recipe, you can refer to the earlier sections. For the best chicken stir-fry, use boneless, skinless chicken breast. Thinly slice it for quick cooking. This cut stays tender and soaks up flavors well. Heat your skillet over medium-high heat. This helps sear the chicken quickly, locking in moisture. Want to spice things up? Try adding a dash of red pepper flakes for heat. You can also mix in a splash of hoisin sauce for extra sweetness. Serve this stir-fry with jasmine rice or noodles. Both options soak up the sauce nicely. To plate your dish, start with a mound of rice in the center. Arrange the chicken and veggies around it. This creates a beautiful, colorful display. For garnish, sprinkle sesame seeds and chopped green onions on top. This adds a nice crunch and fresh flavor. For the full recipe, click here: [Full Recipe]. {{image_4}} You can easily change the protein in this dish. If you don’t like chicken, try these options: - Pork: Thinly sliced pork loin works well. - Beef: Flank steak adds great flavor. - Tofu: Firm tofu is perfect for a vegetarian option. - Shrimp: Quick-cooking shrimp gives a seafood twist. For vegetarian or vegan options, stick with tofu or tempeh. These protein sources soak up flavors well and add a nice texture. If you use tofu, press it to remove excess water for better frying. You can swap vegetables based on what’s in season or what you like best. Here are some great choices: - Zucchini: Adds a nice crunch and color. - Mushrooms: They bring an earthy flavor. - Asparagus: Great for spring dishes. - Cauliflower: A fun way to add some fiber. Mixing different veggies can also create a more colorful dish. Try to use at least three different kinds for variety. Adjust the sauce to match your taste. If you like it sweeter, add more honey. For a spicier kick, toss in some red pepper flakes. You can also switch vinegars. Here are some options: - Apple cider vinegar: It gives a fruity flavor. - Balsamic vinegar: Adds depth and sweetness. - White vinegar: For a sharper taste. Experimenting with these changes makes the dish your own. Don’t be afraid to try new flavors! For the full recipe, check the original instructions. To store leftovers, let the stir-fry cool down first. Place it in an airtight container. This keeps it fresh for up to three days in the fridge. When you're ready to eat, just take out the portion you want. If you want to freeze the stir-fry, use a freezer-safe bag or container. Remove as much air as possible to prevent freezer burn. You can freeze it for up to three months. Remember, some veggies may lose crunch when thawed, so choose your mix carefully. To reheat, the best method is on the stovetop. Add a splash of water or broth to keep it moist. Heat it over medium until hot. If you prefer the microwave, use a microwave-safe dish. Cover it with a damp paper towel to keep steam in. This helps maintain the texture and flavor. You can make this dish your own by adding personal touches. Try using different vegetables like zucchini or bok choy. You can also swap chicken for shrimp or tofu. Add your favorite nuts for a crunchy texture. Experiment with spicy sauces to kick up the heat. Each change can give you a new dish! Yes, frozen vegetables work well in this stir-fry. They save time and are easy to use. However, keep in mind that they may cook faster than fresh ones. You might need to adjust your cooking time. Aim for 3-4 minutes instead of 4-5 minutes for the veggies to stay crisp. Stir-fry goes great with several side dishes. Serve it with steamed jasmine rice for a classic touch. You can also pair it with brown rice for a healthier option. Noodles, like soba or rice noodles, also work well. Add a simple side salad for freshness and extra crunch. Absolutely! This sesame ginger chicken stir-fry is perfect for meal prep. Cook a big batch and divide it into containers. It stores well in the fridge for up to three days. To reheat, use a microwave or skillet. Just be sure to add a splash of water to keep it moist. To make this dish healthier, try a few simple swaps. Use less oil, or replace it with cooking spray. Choose low-sodium soy sauce to cut down on salt. Add more vegetables to increase fiber and nutrients. You can also cut back on honey for fewer calories. This blog post covered how to make a tasty Sesame Ginger Chicken Stir-Fry. We discussed key ingredients like chicken, fresh veggies, and flavorful sauces. I shared step-by-step cooking instructions, along with tips to enhance flavor and presentation. We also explored variations for dietary needs and the best ways to store leftovers. In summary, stir-fry is easy, fun, and flexible. You can customize it to suit your tastes. Enjoy making this dish your own, and share it with friends and family!](https://dishtreats.com/wp-content/uploads/2025/06/887f9040-7330-4bb7-a0e7-766c5efe9124-768x768.webp)


![Here’s what you need for a creamy, dreamy mac and cheese: - 1 lb elbow macaroni - 4 cups water - 2 tablespoons unsalted butter, divided - 1 teaspoon garlic powder - 1 teaspoon onion powder - ½ teaspoon smoked paprika - Salt and pepper, to taste - 2 cups sharp cheddar cheese, shredded - 1 cup mozzarella cheese, shredded - ½ cup cream cheese, softened - ½ cup whole milk Gather these ingredients to make your Instant Pot creamy mac and cheese. The elbow macaroni cooks perfectly in the Instant Pot, soaking up all the flavors. The two types of cheese give a rich taste. Cream cheese adds smoothness, while whole milk makes it extra creamy. Each spice, like garlic and paprika, adds a nice touch. Want to make your mac and cheese even better? Try these add-ins: - Cooked bacon for a salty crunch - Steamed broccoli for a healthy twist - Diced tomatoes for freshness - Jalapeños for heat Feel free to mix and match! You can make it just how you like. For the full recipe, check out the detailed cooking steps. Gather all your ingredients. You will need: - 1 lb elbow macaroni - 4 cups water - 2 tablespoons unsalted butter, divided - 1 teaspoon garlic powder - 1 teaspoon onion powder - ½ teaspoon smoked paprika - Salt and pepper, to taste - 2 cups sharp cheddar cheese, shredded - 1 cup mozzarella cheese, shredded - ½ cup cream cheese, softened - ½ cup whole milk Measure everything out before you start. This makes cooking easier and faster. Pour 4 cups of water into your Instant Pot. Add the elbow macaroni, 1 tablespoon of unsalted butter, garlic powder, onion powder, smoked paprika, and a pinch of salt. Stir this mix well to coat the pasta. Now, close the lid and set the valve to sealing. Choose the manual cooking option and set the timer to cook on high pressure for 4 minutes. Once the time is up, do a quick release by moving the valve to venting. Open the lid once the steam has escaped. Add the remaining tablespoon of unsalted butter, shredded cheddar cheese, shredded mozzarella cheese, softened cream cheese, and whole milk. Stir everything together with a spatula until it’s creamy. If it’s too thick, add a little more milk for a smoother texture. Season with salt and pepper to your liking. Stir again to mix in the flavors. For the complete recipe, check out the Full Recipe. Enjoy your creamy mac and cheese! To make your mac and cheese super creamy, use a mix of cheeses. I love combining sharp cheddar and mozzarella. The cheddar gives a bold flavor, while mozzarella adds stretchiness. Cream cheese also helps create a rich texture. If it's too thick, add a splash of whole milk. This will help achieve the creamy consistency you want. Here are some great cheese combos: - Sharp cheddar - Mozzarella - Cream cheese - Gruyere - Fontina Mixing these cheeses gives depth and flavor. Try different amounts to find your favorite mix. You can also add a bit of parmesan for a salty kick. Common mistakes can ruin your dish. First, don't overcook the pasta. Set your timer for 4 minutes. Overcooked pasta becomes mushy. Second, be careful when releasing steam. Always use a kitchen towel for safety. Lastly, remember to season well. Taste your mac and cheese before serving. Add more salt and pepper if needed. For more details, check out the Full Recipe. {{image_4}} You can make your mac and cheese heartier by adding protein. Cooked chicken or crispy bacon works great. Simply chop the cooked chicken or crumble the bacon into pieces. Stir it in after mixing the cheese. This adds flavor and makes it a full meal. For a vegan twist, swap the dairy for plant-based ingredients. Use cashew cream or coconut milk in place of whole milk. Replace the cheese with vegan cheese or nutritional yeast for a cheesy taste. This keeps the dish creamy while making it dairy-free. Add extra flavor by mixing in spices and herbs. A dash of cayenne pepper gives it a kick. Fresh herbs like basil or thyme add brightness. Try Italian seasoning for a different twist. You can also add mustard powder for depth. Experiment to find your favorite mix. For the full recipe, check out [Full Recipe]. To store your creamy mac and cheese, let it cool first. Place it in an airtight container. You can keep it in the fridge for up to three days. Make sure it is sealed tightly to keep it fresh. If you want to enjoy it later, consider freezing it. When you want to reheat mac and cheese, use the microwave or stovetop. If using the microwave, place your serving in a bowl. Add a splash of milk to keep it creamy. Heat it in short bursts, stirring in between. For the stovetop, warm it in a pot over low heat. Stir well and add milk if needed. This helps it regain its creamy texture. To freeze mac and cheese, use an airtight container or freezer bag. Make sure it is cool before you put it in. It can last in the freezer for up to three months. When you are ready to eat it, thaw it overnight in the fridge. Then, reheat using one of the methods above. This way, you can enjoy that yummy flavor again! For the full recipe, check the details above. Yes, you can use gluten-free pasta in this recipe. Just choose your favorite brand. Cook times may vary slightly, so check the package instructions. Gluten-free pasta can be just as creamy and tasty as regular pasta. To spice up your mac and cheese, add cayenne pepper or red pepper flakes. Start with a small amount, like 1/4 teaspoon, and taste as you go. You can also mix in some diced jalapeños for a fresh kick. Adjust it based on your spice level preference. Any Instant Pot model works well for this creamy mac and cheese. I recommend using a model with at least a 6-quart capacity. This size gives enough room for the pasta and water. The Instant Pot Duo or Ultra are popular choices, offering great features for beginners and pros alike. For the full recipe, check the link. This blog has shared everything you need for perfect mac and cheese in your Instant Pot. We covered the needed ingredients, cooking steps, and tips to avoid mistakes. You learned how to make it creamy and flavorful, even with variations. Remember to store leftovers properly for later. Keep experimenting with flavors and ingredients to find what you enjoy. Each recipe can be a new adventure. Enjoy your cooking journey!](https://dishtreats.com/wp-content/uploads/2025/07/aef5e05b-bf60-4c96-8d62-11668510c0c6-768x768.webp)