Savory Honey Garlic Sesame Chicken Bites Delight


Get ready to savor a dish that’s perfect for any occasion—Savory Honey Garlic Sesame Chicken Bites! These tasty bites bring a sweet and tangy flavor that you won’t forget. Whether you’re throwing a party or craving a quick meal, I’ve got you covered. I’ll share easy steps to create this dish along with helpful tips, variations, and storage advice. Let’s dive into the world of bold flavors and satisfying bites!
Why I Love This Recipe
- Quick and Easy: This recipe is straightforward and doesn’t require advanced cooking skills, making it perfect for any home cook.
- Flavor Explosion: The combination of honey, garlic, and sesame creates a deliciously sweet and savory flavor that is simply irresistible.
- Versatile Dish: These chicken bites can be served as an appetizer, snack, or main course, making them great for any occasion.
- Healthy Option: Using low-sodium soy sauce and fresh ingredients makes this dish a healthier choice without sacrificing taste.
Ingredients
Main Ingredients for Honey Garlic Sesame Chicken Bites
For this tasty dish, you need a few key items:
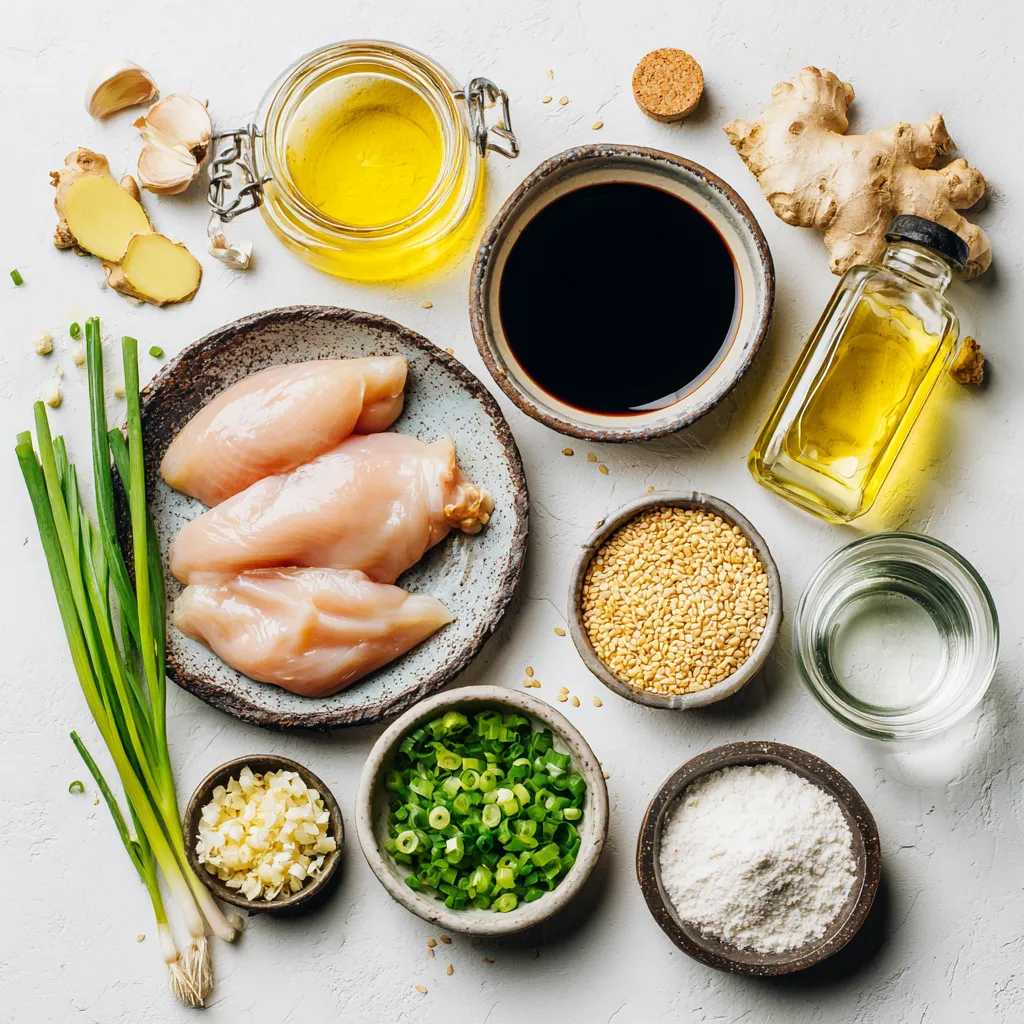
- 1 lb (450g) chicken breast, cut into bite-sized pieces
- 1/4 cup (60ml) honey
- 2 tablespoons (30ml) low-sodium soy sauce
- 3 cloves garlic, minced
- 1 teaspoon fresh ginger, grated
- 1 tablespoon (15ml) sesame oil
- 1 tablespoon (8g) cornstarch
- 2 tablespoons (30ml) water
- 2 tablespoons (20g) sesame seeds
- 3 green onions, finely chopped (for garnish)
- Salt and pepper to taste
- Oil for frying
These ingredients come together to make a sweet and savory flavor that everyone will love.
Cooking Oil Options
When frying the chicken, you have many oil choices. I recommend using:
- Canola oil
- Vegetable oil
- Peanut oil
These oils have high smoke points. They work well for frying without burning. Choose any of these to achieve golden, crispy chicken bites.
Garnishes and Accompaniments
Garnishes add a nice touch to your dish. Here are some ideas:
- Finely chopped green onions for freshness
- Extra sesame seeds for crunch
- Steamed rice for a complete meal
- A refreshing salad to balance flavors
These add-ons make your honey garlic sesame chicken bites not just tasty, but also beautiful on the plate.
Step-by-Step Instructions
Preparing the Marinade
To start, grab a medium mixing bowl. In it, add 1/4 cup of honey, 2 tablespoons of low-sodium soy sauce, 3 minced garlic cloves, and 1 teaspoon of grated fresh ginger. Pour in 1 tablespoon of sesame oil. Whisk these ingredients together until they mix well. This marinade will give your chicken an amazing flavor.
Marinating the Chicken
Take your 1 lb of chicken breast and cut it into bite-sized pieces. Place these pieces into the bowl with the marinade. Make sure every piece is covered by the marinade. Cover the bowl tightly with plastic wrap and place it in the fridge. Let the chicken marinate for at least 30 minutes. This step is key to getting deep flavor.
Cooking the Chicken Bites
Now, it’s time to cook! Heat a large skillet over medium-high heat and add enough oil for frying. When the oil shimmers, take the marinated chicken out of the fridge. Add the chicken pieces in batches, making sure not to crowd the pan. Cook each batch for about 5-6 minutes until they turn golden brown and are fully cooked. Once done, remove them and set on a plate lined with paper towels to drain any extra oil.
Thickening the Sauce
In a separate small bowl, mix 1 tablespoon of cornstarch with 2 tablespoons of water to create a slurry. Lower the heat on your skillet to medium and pour in the leftover marinade. Stir in the cornstarch slurry and cook for 2-3 minutes. Stir constantly until the sauce thickens to your liking.
Final Assembly and Garnishing
Return the cooked chicken bites to the skillet. Make sure to coat them well in the thick sauce. Cook for another minute while stirring gently. Remove the skillet from the heat. Sprinkle 2 tablespoons of sesame seeds over the chicken. Add finely chopped green onions for a pop of color and fresh taste. Serve these bites hot and enjoy the sweet and savory flavors!
Tips & Tricks
Perfecting Your Chicken Bites
To make the best honey garlic sesame chicken bites, the marinade is key. Use fresh garlic and ginger for bright flavors. Marinate the chicken for at least 30 minutes. This lets the flavors soak in and makes the chicken tender. When cooking, don’t overcrowd the pan. Each piece needs space to brown nicely. This step helps give you that golden crust.
Common Mistakes to Avoid
One common mistake is not letting the chicken marinate long enough. Skipping this step can make the chicken bland. Another mistake is using too much oil in the pan. It can lead to greasy bites instead of crispy ones. Also, avoid stirring the chicken too much while it cooks. Let it sit to brown well on each side.
Serving Suggestions for Honey Garlic Sesame Chicken Bites
These chicken bites shine on their own but pair well with many sides. Serve them on a wooden board for a rustic look. You can also use small skewers for easy serving. A side of steamed rice complements the sweet and savory flavors. A fresh salad adds a nice crunch. Sprinkle extra sesame seeds and chopped green onions on top for color and texture.
Pro Tips
- Marinate for Maximum Flavor: Allow the chicken to marinate for at least 30 minutes, but if time permits, marinating for a few hours or overnight will enhance the flavor even more.
- Use High Smoke Point Oil: For frying, choose an oil with a high smoke point like canola or peanut oil to achieve a crispy texture without burning.
- Adjust Sauce Thickness: If you prefer a thicker sauce, simply add more cornstarch slurry, but be sure to cook it long enough to eliminate the raw starch taste.
- Garnish for Color: Fresh herbs or colorful vegetables can elevate your dish. Consider adding red pepper flakes for a hint of spice or a squeeze of lime for brightness.

Variations
Spicy Honey Garlic Variation
If you like heat, add red pepper flakes. Start with 1/2 teaspoon and adjust to taste. This spice adds a bold kick to the sweet honey and garlic mix. You can also use Sriracha. Just mix it in the marinade. It brings warmth and flavor that pairs well with the chicken.
Gluten-Free Adaptation
To make this dish gluten-free, simply swap regular soy sauce for tamari. Tamari is a great option that offers the same taste without gluten. Check the cornstarch too; most brands are gluten-free. This way, everyone can enjoy the bites without worry.
Alternative Proteins for the Recipe
Chicken isn’t the only option here. Try shrimp or tofu for a fun twist. Shrimp cooks quickly and soaks up the flavors well. For tofu, press it first to remove excess water, then cut it into cubes. Both options bring new tastes to this dish. Just follow the same steps for marinating and cooking.
Storage Info
How to Store Leftovers
After enjoying your honey garlic sesame chicken bites, store any leftovers in an airtight container. Make sure to let them cool to room temperature first. Place the bites in the fridge, where they will last for about three to four days.
Reheating Tips
When reheating, use the oven or stovetop for the best results. Preheat your oven to 350°F (175°C). Spread the chicken bites on a baking sheet, and heat for about 10 minutes. This method keeps them crispy. If you prefer the stovetop, warm a skillet over medium heat and add a splash of water. Cover the pan to steam the bites for about five minutes.
Freezing Honey Garlic Chicken Bites
If you want to save some chicken bites for later, freezing is an option. First, let them cool completely. Then, place them in a single layer on a baking sheet. Freeze them for about two hours. After that, transfer the frozen bites to a freezer bag or container. They can last up to three months in the freezer. When ready to eat, thaw them in the fridge overnight before reheating.
FAQs
Can I use chicken thighs instead of chicken breasts?
Yes, you can use chicken thighs. They are juicier and have more flavor. Cut the thighs into bite-sized pieces like you would with chicken breasts. Cook them the same way, and they will turn out great.
What can I serve with honey garlic sesame chicken bites?
These chicken bites pair well with many sides. Try serving them with steamed rice or a fresh salad. You can also add some crispy veggies or noodles for a complete meal. For a fun touch, serve them on skewers for easy eating.
How do I make the sauce thicker or thinner?
To thicken the sauce, mix cornstarch with water. Add this slurry to the sauce while heating. Stir continuously until it thickens. If you want a thinner sauce, add a little more water. Heat it gently while stirring until you reach your desired consistency.
Can I prepare the marinade in advance?
Yes, you can! Make the marinade a day ahead and store it in the fridge. Just add the chicken right before cooking. This saves time and allows the flavors to blend even more.
What’s the best way to choose ingredients for this recipe?
Choose fresh ingredients for the best flavor. Look for bright green onions and firm chicken pieces. Use raw, unfiltered honey for a richer taste. For soy sauce, low-sodium options are great if you want to control the salt. Always check expiration dates on your ingredients too!
Honey garlic sesame chicken bites are fun and easy to make. We covered ingredients, step-by-step cooking, and tips to perfect your dish. You learned to avoid mistakes and explore tasty variations. Storing and reheating leftovers keeps meals fresh.
Try different proteins or spice levels to match your taste. Remember, cooking is about joy and creativity. Enjoy sharing these bites with family and friends. Now, grab your ingredients and start making your delicious honey garlic chicken bite

Honey Garlic Sesame Chicken Bites
Ingredients
- 1 lb chicken breast, cut into bite-sized pieces
- 1/4 cup honey
- 2 tablespoons low-sodium soy sauce
- 3 cloves garlic, minced
- 1 teaspoon fresh ginger, grated
- 1 tablespoon sesame oil
- 1 tablespoon cornstarch
- 2 tablespoons water
- 2 tablespoons sesame seeds
- 3 green onions, finely chopped (for garnish)
- Salt and pepper to taste
- Oil for frying
Instructions
- In a medium mixing bowl, whisk together the honey, low-sodium soy sauce, minced garlic, grated ginger, and sesame oil until the mixture is smooth and well combined.
- Add the chicken pieces to the marinade, ensuring each piece is evenly coated. Cover the bowl with plastic wrap and let it marinate in the refrigerator for at least 30 minutes to enhance the flavor.
- In a separate small bowl, mix the cornstarch and water to create a smooth slurry; set this aside for thickening the sauce later.
- Heat a generous amount of oil in a large skillet or frying pan over medium-high heat. Once the oil is shimmering, carefully add the marinated chicken pieces in batches, making sure not to overcrowd the pan. Cook each batch for about 5-6 minutes, or until golden brown and fully cooked. Remove the cooked chicken bites and place them on a plate lined with paper towels to absorb excess oil.
- Lower the heat to medium. In the same skillet, pour in the remaining marinade. Stir in the cornstarch slurry and cook, stirring continuously, for approximately 2-3 minutes, or until the sauce has thickened to your desired consistency.
- Return the cooked chicken bites to the skillet, ensuring they are well coated in the thickened sauce. Cook for an additional minute, stirring gently.
- Remove the skillet from heat and sprinkle sesame seeds over the chicken. Garnish with the finely chopped green onions for a fresh finish.
![- 1 cup plain Greek yogurt - 1/4 cup creamy mayonnaise - 1 tablespoon freshly squeezed lemon juice - 1 teaspoon garlic powder - 1 teaspoon onion powder - 1 teaspoon dried dill weed - 1 teaspoon dried parsley - 1/2 teaspoon sea salt - 1/4 teaspoon freshly ground black pepper - 1/4 teaspoon smoked paprika - Assorted fresh vegetables (carrots, celery, bell peppers, cucumber) To make a delicious Creamy Greek Yogurt Ranch Dip, you need a few simple ingredients. Start with the main trio: Greek yogurt, creamy mayonnaise, and lemon juice. The yogurt gives the dip its rich and tangy base. The mayonnaise adds a smooth, creamy texture, while the lemon juice brightens the flavors. Next, you’ll want to gather your seasonings. Garlic powder and onion powder add a savory punch. Dried dill weed and parsley bring in that classic ranch flavor. Salt, black pepper, and smoked paprika round out the taste, adding depth and a hint of spice. Finally, think about what to dip. Fresh veggies like carrots, celery, bell peppers, and cucumber work perfectly. They add crunch and freshness, creating a balanced snack. For the full recipe, check out the details above. First, grab a medium-sized mixing bowl. In this bowl, add 1 cup of plain Greek yogurt and 1/4 cup of creamy mayonnaise. These two ingredients create a rich base for our dip. Use a whisk or spatula to blend them well until smooth. It should look creamy and inviting. Next, squeeze in 1 tablespoon of freshly squeezed lemon juice. This adds a nice tang to the dip. Now, sprinkle in the seasonings: 1 teaspoon each of garlic powder, onion powder, dried dill weed, and dried parsley. Add 1/2 teaspoon of sea salt, 1/4 teaspoon of freshly ground black pepper, and 1/4 teaspoon of smoked paprika. These flavors will come together beautifully. Now it's time to whisk everything together. Vigorously mix the ingredients until the dip is fully combined. It should be smooth and creamy, with a lovely thickness. Take a taste and adjust the seasonings as needed. If you want more flavor, feel free to add a pinch of salt or a few more herbs. Your taste buds will guide you. Once you're happy with the flavor, it's time to chill the dip. Cover the bowl with plastic wrap or transfer the dip to an airtight container. Place it in the refrigerator for at least 30 minutes. This step allows the flavors to meld and deepen. When you're ready to enjoy, take the dip out of the fridge. Serve it chilled with an assortment of fresh vegetables for dipping, like carrots, celery, bell peppers, and cucumber. This adds a vibrant touch and makes for a fun snack! For the complete recipe, check out the [Full Recipe]. To make your Creamy Greek Yogurt Ranch Dip even tastier, try using fresh herbs. Fresh chives, dill, or parsley can add great flavor. You can also adjust the lemon juice for more tanginess. A little extra juice can brighten the dip. If you want a thicker dip, add more Greek yogurt. It will make the dip creamier. You can also cut back on the mayonnaise for a lighter version. This keeps the flavor while reducing calories. This dip is perfect for parties and gatherings. It pairs well with crackers or pita chips. Serve it with an array of fresh veggies, like carrots or cucumbers. They make great dippers, adding crunch to your snack. For the full recipe, check the earlier sections. {{image_4}} You can easily change the herbs in this dip. Fresh herbs like chives or basil work great. They add a nice twist to the flavor. Dried herbs can also give you different tastes. Think about using oregano or thyme for a unique touch. If you love some heat, add a spicy twist. Incorporate hot sauce or cayenne pepper. This will give your dip a zesty kick. You can also add chopped jalapeños for extra spice. Just be careful with the amount; you want to enjoy the heat, not overpower it! For a vegan version, swap the yogurt and mayonnaise. Use a plant-based yogurt and vegan mayo. Make sure all seasonings are plant-based too. This way, you can enjoy the same creamy dip without any animal products. It's delicious and fits many diets! For the full recipe, check out the link above. To keep your creamy Greek yogurt ranch dip fresh, store it in an airtight container. This helps prevent any odors from other foods in your fridge. You can enjoy the dip for up to one week. Just make sure to seal it tightly. Freezing this dip is not recommended. The texture may change after thawing, making it watery. Only freeze if it is necessary. If you must, use a freezer-safe container. If you freeze the dip, place it in the refrigerator to thaw. This method gives you the best results. Once thawed, stir it well before serving again. This helps bring back the creamy texture. Yes, non-fat can be used for a lighter version. This choice keeps the dip creamy while cutting down on fat. The flavor remains rich and satisfying. The dip lasts up to one week in the refrigerator. Store it in an airtight container to keep it fresh. I find it gets even better after a day. Fresh veggies, crackers, pita chips, or pretzels are great options. Carrots, celery, and bell peppers work well. You can get creative with your dippers! Yes, all ingredients are gluten-free; verify brands to be sure. This makes it a perfect snack for anyone with gluten sensitivities. Yes, it’s recommended to make it a few hours ahead to enhance flavors. The longer it sits, the more the flavors blend. I often prepare it the night before. This blog post shared a tasty Greek yogurt dip recipe. We covered the key ingredients, easy steps, and tips to make it even better. You learned how to customize the dip, try vegan options, and store it correctly. Think of this dip for your next party or snack. It’s healthy, easy to make, and perfect with fresh veggies or chips. Enjoy your tasty dip and feel good about sharing it with friends!](https://dishtreats.com/wp-content/uploads/2025/07/4dca82da-d028-43ac-94fd-c211b04a114a-768x768.webp)


![- 1 pound Brussels sprouts - 3 tablespoons extra virgin olive oil - 2 tablespoons honey - 2 tablespoons Sriracha sauce - 1 teaspoon garlic powder - Salt and pepper to taste - 1 tablespoon sesame seeds (optional) - 2 green onions (for garnish) Gather these ingredients to create a sweet and spicy dish. The Brussels sprouts are the star here. You’ll want to trim and halve them for even cooking. The olive oil helps the sprouts roast nicely, while honey adds sweetness. Sriracha gives it that kick, which you can adjust based on your taste. Garlic powder adds depth, and salt and pepper enhance the flavors. The sesame seeds add a nice crunch and the green onions bring freshness. You can skip any optional ingredients, but they do make the dish pop. For the full recipe, check out the detailed instructions that guide you through each step of cooking these tasty Honey Sriracha Brussels sprouts! - Preheat oven to 425°F (220°C). - Line baking sheet with parchment paper. Start by heating your oven. This step is key, as it helps the Brussels sprouts roast evenly and get that perfect crisp. Lining the baking sheet with parchment paper keeps the sprouts from sticking. Plus, it makes cleanup easy! - Combine Brussels sprouts with oil, honey, Sriracha, garlic powder, salt, and pepper. In a large bowl, toss the halved Brussels sprouts with olive oil, honey, Sriracha, garlic powder, salt, and pepper. Make sure every sprout gets a good coating. This mix brings out the best flavors. The sweet honey balances the heat from the Sriracha. - Arrange sprouts on baking sheet. - Roast for 20-25 minutes, stirring halfway. Spread the sprouts in a single layer on your baking sheet. Place them cut-side down for a nice caramelization. This helps them turn golden brown and crispy. Roast them for 20 to 25 minutes. Halfway through, stir the sprouts. This ensures they brown evenly. You're aiming for fork-tender sprouts with crispy edges. Once they are done, feel free to check the [Full Recipe] for extra tips! To make sure your Brussels sprouts roast well, follow these tips: - Cut Brussels sprouts for maximum crispiness. Halve them and make sure the cut side faces down. This helps them get that nice, crispy edge. - Check doneness with a fork. When the sprouts are soft inside and crispy outside, they are ready. A fork should easily poke through. You can play with the flavors to suit your taste: - Customize Sriracha amount for desired spice level. If you like it hot, add more Sriracha. If you prefer mild, use less. - Use different sweeteners for variety. You can swap honey for maple syrup or agave nectar to change the flavor. Each sweetener gives a unique taste to the dish. For a full guide on making this yummy dish, check the Full Recipe. {{image_4}} You can make Honey Sriracha Brussels sprouts even better. Try adding bacon or pancetta. The salty taste pairs well with the sweet and spicy sauce. Just cook the bacon first, then toss it in before serving. You can also include extra veggies. Bell peppers add color and sweetness. Cut them into strips and mix with the Brussels sprouts. This way, you get more flavor and texture in every bite. If you want to change the sweet flavor, use maple syrup instead of honey. It gives a different taste, but still sweet. This swap can make the dish a bit more unique. You can also try different chili sauces. Sriracha works great, but others can add interesting flavors. Look for sauces with different heat levels. This lets you control the spice to fit your taste. Store extra Honey Sriracha Brussels sprouts in an airtight container in the fridge. This keeps them fresh and tasty. You can enjoy them for up to 3 days. Make sure to cool them down before sealing the container. This helps avoid condensation and sogginess. For the best texture, reheat the sprouts in the oven. Preheat the oven to 350°F (175°C) and spread them out on a baking sheet. Bake for about 10 minutes or until they are warm and crispy. If you’re in a hurry, you can use the microwave. Just remember, they might lose their crunch this way. Enjoy your tasty dish again! For the full recipe, refer back to the main article. Yes, you can prep the sprouts and sauce ahead. Just trim and halve the Brussels sprouts. Mix the sauce with honey and Sriracha to keep flavors fresh. Store them in the fridge until you're ready to roast. This saves you time on busy nights. These sprouts pair well with grilled meats and rice dishes. The sweet and spicy taste enhances simple proteins like chicken or pork. You can also serve them alongside fried rice or quinoa for a tasty meal. Yes, but they are best consumed fresh for optimal taste. Freezing can change the texture of the sprouts. If you do freeze them, make sure to cool them first. Store in an airtight container and use within a month for the best flavor. In this post, we explored how to make Honey Sriracha Brussels sprouts. We covered the main ingredients, step-by-step instructions, and tips for perfect roasting. You learned how to customize the flavors, add extra ingredients, and store leftovers effectively. With this recipe, you can enjoy a spicy and sweet side dish that pleases any crowd. Try it out, and feel free to get creative with your own variations. Happy cooking!](https://dishtreats.com/wp-content/uploads/2025/06/e27bd237-cd9d-45ea-93fd-8494cb919a9a-768x768.webp)