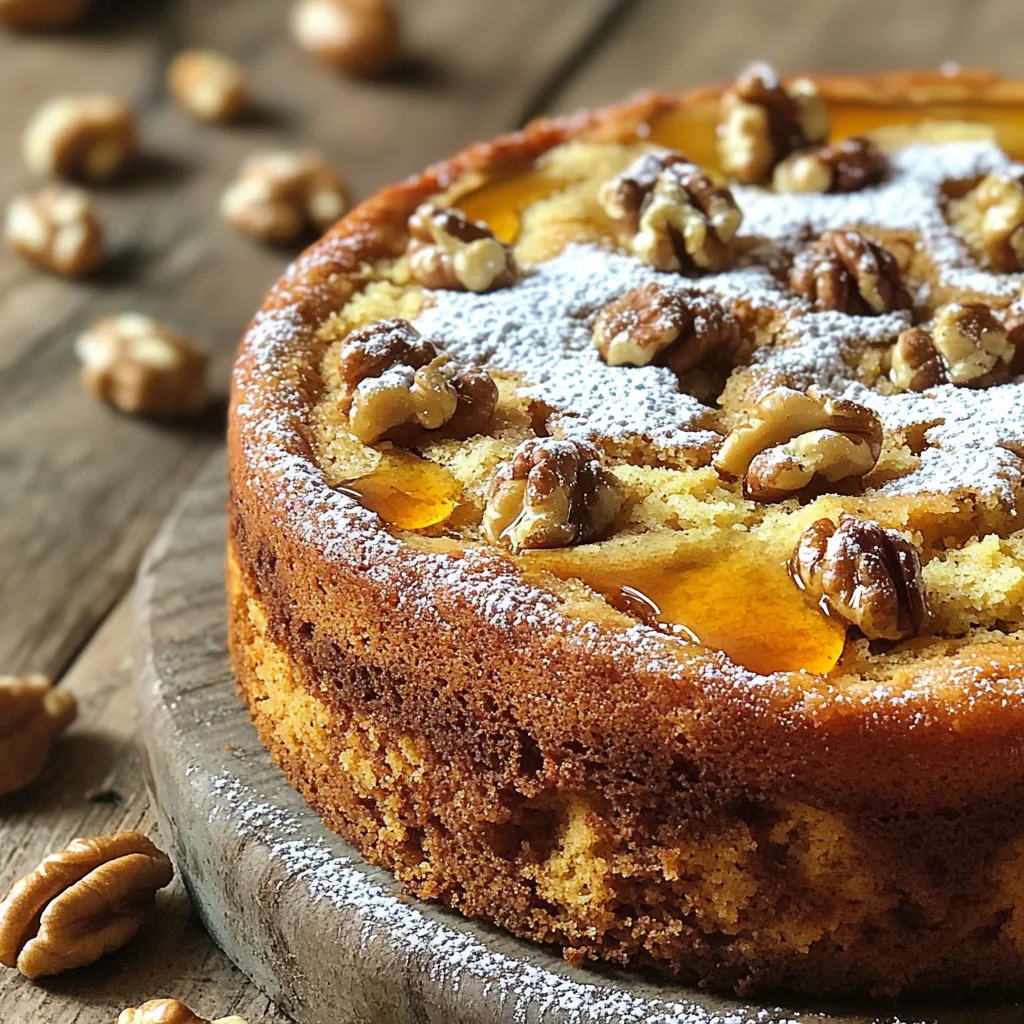
Maple Walnut Coffee Cake Delightful and Easy Recipe

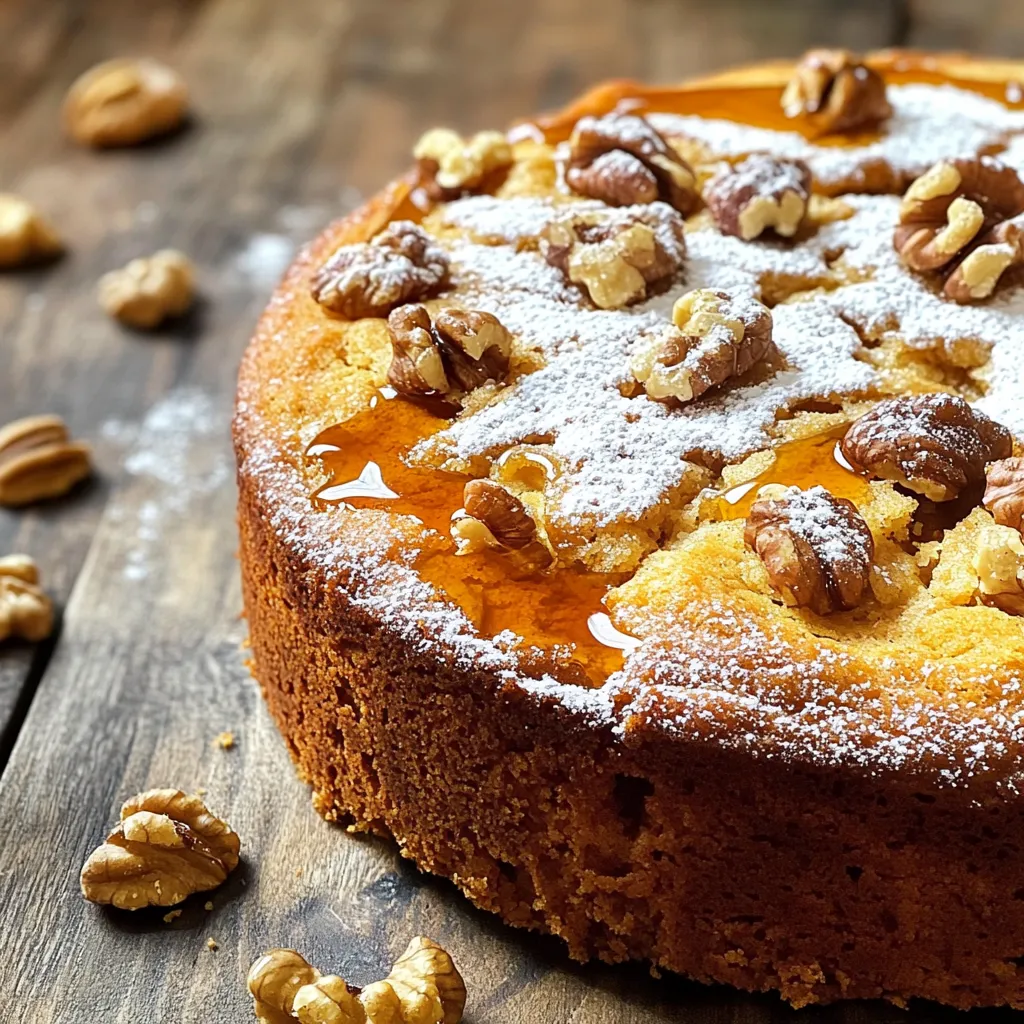
Are you ready to elevate your coffee break? This Maple Walnut Coffee Cake is easy to make and bursting with rich maple flavor. Perfect for breakfast or an afternoon snack, it’s a sweet treat you won’t want to miss. Gather your ingredients, and let’s dive into this delightful recipe that will impress your family and friends alike. Trust me, once you taste this cake, you’ll be back for seconds!
Ingredients
When making Maple Walnut Coffee Cake, having the right ingredients is key. Here’s what you need:
- 2 cups all-purpose flour
- 1 cup granulated sugar
- 1/2 cup unsalted butter, softened
- 1 cup pure maple syrup
- 1/2 cup whole milk
- 2 large eggs
- 1 teaspoon pure vanilla extract
- 1 tablespoon baking powder
- 1/2 teaspoon baking soda
- 1/4 teaspoon salt
- 1 cup walnuts, chopped
- 1/2 teaspoon ground cinnamon
- Additional walnuts for topping
Each ingredient plays a role. The flour gives structure, while the sugar adds sweetness. Butter adds richness, and maple syrup infuses a lovely flavor. Eggs keep the cake moist, and milk helps blend everything. Baking powder and soda help it rise, while salt balances flavors. Walnuts add a nice crunch and nutty taste.
Using fresh, quality ingredients will make your cake taste amazing. Make sure your butter is softened for easy mixing. Also, walnuts taste best when chopped just before using. This keeps them fresh and flavorful. If you want to make it special, consider using organic maple syrup. It enhances the taste and is better for your health.
Keep this list handy as you prepare. With these ingredients, you will create a delightful coffee cake that everyone will enjoy!
Step-by-Step Instructions
Preheat and Prepare
- Preheat the oven to 350°F (175°C).
- Grease the cake pan or line it with parchment paper.
Start by preheating your oven. This ensures the cake bakes evenly. Greasing the pan helps the cake release easily later.
Creaming Butter and Sugar
- Combine butter and sugar in a mixing bowl.
- Beat until light and fluffy.
In a large bowl, mix the softened butter and sugar. Use a hand mixer to beat them together. This should take about 3-4 minutes. The mixture should be light and fluffy.
Mixing in Wet Ingredients
- Add eggs one at a time, mixing well.
- Incorporate vanilla extract and maple syrup.
Now, add the eggs to the bowl. Add them one at a time. Mix well after each egg. Then, pour in the vanilla extract and maple syrup. Combine until the mixture is smooth.
Combining Dry Ingredients
- Whisk together flour, baking powder, baking soda, salt, and cinnamon.
In another bowl, whisk the flour, baking powder, baking soda, salt, and cinnamon. This helps to mix the dry ingredients evenly.
Mixing Wet and Dry Ingredients
- Gradually add dry ingredients to wet, alternating with milk.
- Fold in chopped walnuts.
Next, slowly add the dry mix to the wet mixture. Alternate this with the milk. Start and end with the dry mix. Mix gently to keep the cake tender. Now, fold in the chopped walnuts for crunch.
Baking the Cake
- Pour batter into the pan and top with reserved walnuts.
- Bake for 25-30 minutes.
Pour the batter into your prepared pan. Use a spatula to spread it evenly. Then, top with a handful of reserved walnuts. Place the cake in the oven and bake for 25-30 minutes. A toothpick should come out clean when inserted in the center.
This simple method gives you a delicious Maple Walnut Coffee Cake to enjoy!
Tips & Tricks
Ensuring a Tender Cake
To make your cake tender, avoid overmixing the batter. Mix just until the ingredients combine. Overmixing can make your cake tough. Use room temperature ingredients, like butter and eggs. This helps them blend better and creates a smooth batter.
Perfecting the Maple Flavor
Choose quality pure maple syrup for the best taste. This syrup adds a rich flavor that shines through. You can also consider adding maple extract. A small amount gives an extra boost of maple goodness.
Presentation Tips
Dust your cooled cake with powdered sugar before serving. This adds a nice touch and makes it look fancy. Serve it warm with extra maple syrup on the side. You can also top it with whole walnuts for a crunchy finish.

Variations
Adding Fruits
You can add chopped fruits to your cake. Try incorporating apples or pears for a fresh taste. These fruits blend well with maple and walnuts. Dried fruits also work great. Adding cranberries gives a nice tartness. This adds depth to the cake’s flavor.
Nut Alternatives
You can switch up the nuts. If you don’t have walnuts, use pecans or almonds instead. These nuts bring their unique flavors and textures. For a sweet twist, try adding chocolate chips. They melt into the cake, creating a rich taste that pairs well with maple.
Dietary Adaptations
Making this cake gluten-free is easy. Just use gluten-free flour in place of all-purpose flour. This keeps the cake light and fluffy. If you want a dairy-free option, substitute whole milk with almond or oat milk. Both options work well and keep the cake moist.
Storage Info
Best Storage Practices
To keep your maple walnut coffee cake fresh, store it in an airtight container at room temperature. This keeps the cake moist and flavorful. If you want it to last longer, refrigerate it. The cool air helps preserve its taste for several days.
Freezing Instructions
You can freeze the coffee cake to enjoy later. First, let the cake cool completely. Then, wrap it tightly in plastic wrap. Place it in a freezer-safe bag or container. This keeps out air and prevents freezer burn.
When you want to eat it, simply take it out of the freezer. Let it thaw in the fridge overnight for the best texture. If you’re in a hurry, you can thaw it at room temperature for a few hours. Enjoy your cake just as delicious as when it was fresh!
FAQs
How do I know when the Maple Walnut Coffee Cake is done?
To check if your cake is ready, use a toothpick. Insert it into the center of the cake. If it comes out clean or with a few moist crumbs, your cake is done. This method works well because it helps you avoid overbaking.
Can I use pancake syrup instead of maple syrup?
You can use pancake syrup, but the flavor changes. Pancake syrup is sweeter and less rich than pure maple syrup. If you want that deep, warm flavor, stick with real maple syrup. It makes a big difference in your cake.
How long does the cake stay fresh?
At room temperature, the cake stays fresh for about three days. If you put it in the fridge, it lasts up to a week. Just be sure to keep it in an airtight container. This helps keep it moist and tasty.
What toppings can I add besides walnuts?
You have many tasty options for toppings. Try adding a simple icing made from powdered sugar and milk. Fresh fruits like strawberries or raspberries also work well. For a twist, drizzle extra maple syrup on top for added flavor.
In this blog post, we explored how to make a delicious Maple Walnut Coffee Cake. We covered the key ingredients, detailed step-by-step instructions, and shared tips for perfecting the flavor and presentation. Remember, using quality ingredients is vital for the best taste. Feel free to experiment with fruits or nuts to make this recipe your own. Store it properly to enjoy it longer. Your baking journey can lead to tasty treats and joyful moments. Enjoy your cake!


![To make classic chocolate brownies, you need the following ingredients: - 1 cup (2 sticks) unsalted butter - 2 cups granulated sugar - 4 large eggs, at room temperature - 1 teaspoon pure vanilla extract - 1 cup all-purpose flour - 1 cup unsweetened cocoa powder - ½ teaspoon baking powder - ½ teaspoon sea salt - 1 cup semi-sweet chocolate chips - Optional: ½ cup chopped walnuts or pecans for added crunch You can use margarine if you need a butter alternative. For a deeper flavor, try using dark cocoa powder instead of regular cocoa. If you want to make this recipe gluten-free, swap the all-purpose flour with a gluten-free blend. Feel free to customize your brownies with these fun ideas: - Nuts: Consider using walnuts or pecans for extra texture. Almonds also work great. - Chocolate types: Mix semi-sweet and dark chocolate chips for rich flavor. - Flavor variations: Add a teaspoon of mint extract or some orange zest for a twist. These add-ins can enhance the taste and make your brownies unique. Mixing flavors can lead to exciting new experiences in every bite. To make the brownie batter, follow these steps: 1. Melt the butter: Start by melting 1 cup of unsalted butter in a medium saucepan over low heat. Stir often until it’s fully melted. 2. Add sugar: Once the butter is melted, remove it from the heat. Stir in 2 cups of granulated sugar until it looks smooth. 3. Add eggs: Crack 4 large eggs into the butter-sugar mix. Add them one at a time. Mix well after each egg, so the batter combines nicely. 4. Mix in vanilla: Add 1 teaspoon of pure vanilla extract. This gives the brownies a nice flavor. 5. Combine dry ingredients: In another bowl, sift together 1 cup of all-purpose flour, 1 cup of unsweetened cocoa powder, ½ teaspoon of baking powder, and ½ teaspoon of sea salt. This helps mix the dry ingredients well. 6. Fold dry into wet: Gently fold the dry mix into the wet mix. Use a spatula to combine until just mixed. Do not overmix, or the brownies won’t be fudgy. 7. Add chocolate chips: Toss in 1 cup of semi-sweet chocolate chips. If you like, add ½ cup of chopped walnuts or pecans for crunch. Mix until they are spread evenly in the batter. 8. Prepare the pan: Grease a 9x13-inch baking pan or line it with parchment paper. This makes it easy to remove the brownies later. 9. Pour batter: Pour the brownie batter into the pan. Use a spatula to spread it evenly. Now, it’s time to bake! 1. Preheat oven: Set your oven to 350°F (175°C). This ensures even baking. 2. Bake brownies: Place the pan in the oven. Bake for 30 to 35 minutes. 3. Check for doneness: To check, insert a toothpick into the center. It should come out with a few moist crumbs. If it’s wet, bake a little longer. Avoid overbaking for that perfect fudgy texture. After baking, let’s cool and cut the brownies. 1. Cool in the pan: Allow the brownies to cool in the pan for at least 15 minutes. This helps them firm up. 2. Transfer to wire rack: After 15 minutes, move the brownies to a wire rack. Let them cool completely before cutting. 3. Cutting tips: Use a sharp knife for clean cuts. Wipe the knife after each cut for neat squares. 4. Serving size: Cut into generous squares. Each piece should be a lovely bite of fudgy goodness. For a special touch, dust the brownies with powdered sugar before serving. Enjoy these delightful treats with a scoop of vanilla ice cream for extra indulgence. For the complete recipe, refer to the Full Recipe. To make the best fudgy brownies, focus on mixing. After melting the butter, stir in the sugar until smooth. Add eggs one at a time. Mix well after each egg. This helps create a rich texture. Don't overmix the dry and wet ingredients. Fold them gently just until combined. Common mistakes include overbaking and using too much flour. Overbaking leads to dry brownies. Aim for a toothpick with few moist crumbs. If you use too much flour, your brownies will be cake-like. Measure carefully for the best results. Brownies keep well at room temperature. Store them in an airtight container for up to five days. If you want to keep them longer, the fridge is a good option. Just remember, cold brownies can lose some flavor. To revive leftovers, warm them in the microwave for 10-15 seconds. This restores their fudgy goodness. You can also serve them with a scoop of ice cream for a tasty treat. For the full recipe, check out the [Full Recipe]. {{image_4}} For a gluten-free treat, try flourless brownies. You can use almond flour or ground oats instead of regular flour. These options add a nice texture and flavor. You should also reduce baking time. Check them after 25 minutes to avoid dryness. If you want a lighter version, use less sugar. You can swap half of the sugar with unsweetened applesauce. This keeps the brownies moist. For fats, use avocado or coconut oil. These substitutes make the brownies healthier but still tasty. To spice things up, add a dash of coffee or a pinch of sea salt. These flavors enhance the chocolate taste. You can also use extracts like almond or orange for a lovely twist. Just a little goes a long way in changing the flavor profile. Serving classic chocolate brownies is easy and fun. You can serve them warm with a scoop of ice cream. Vanilla ice cream works great, but try mint or coffee flavors for a twist. You can also top brownies with whipped cream. A sprinkle of chocolate shavings adds a nice touch. For a beautiful presentation, cut the brownies into squares. Place them on a decorative plate. Dust with powdered sugar for a fancy look. Add fresh berries or a sprig of mint beside each brownie. These details make the dish more appealing. Brownies are versatile and can be served in many ways. One fun idea is a brownie sundae. Start with a warm brownie, add a scoop of ice cream, and drizzle chocolate sauce on top. Finish with whipped cream and a cherry for a delightful treat. You can pair brownies with drinks too. A strong cup of coffee complements the rich chocolate flavor. Hot cocoa or milk also works well. For a unique twist, serve brownies with a side of fresh fruit. The sweetness of the fruit balances the rich brownies. For more ideas, check out the Full Recipe to explore all the delicious details! To check if your brownies are done, look for a few signs. The top should look set and slightly shiny. When you insert a toothpick in the center, it should come out with a few moist crumbs. This means your brownies are fudgy and perfect. If the toothpick comes out with wet batter, they need more time. Keep a close watch in the last few minutes of baking to avoid overbaking. Yes, you can freeze brownies! To freeze them, let them cool completely first. Cut your brownies into squares, then wrap each piece in plastic wrap. Place them in a freezer bag or container. They can last up to three months in the freezer. When you're ready to eat them, thaw them in the fridge overnight or at room temperature for a few hours. For neat cuts, use a sharp knife. First, let the brownies cool completely in the pan. For even cleaner cuts, wipe the knife with a damp cloth after each cut. This way, you have smooth edges. You can also use a pizza cutter for quick slicing. If you want, line your baking pan with parchment paper. This makes it easy to lift out the brownies for cutting. You’ve learned how to make classic chocolate brownies, from ingredients to serving tips. Whether you prefer fudgy or flourless, options abound to suit your taste. Remember, small changes can create big flavors. Experiment with add-ins or healthier swaps to make them your own. With these steps, you can enjoy delicious brownies any time. Happy baking!](https://dishtreats.com/wp-content/uploads/2025/07/8475203d-ada8-4920-a61c-065e4c50bd3f-768x768.webp)