Minute Sesame Garlic Chicken Noodles Easy Recipe
Craving a quick, tasty meal? Look no further! This Minute Sesame Garlic Chicken Noodles recipe is your answer. With just a handful of simple ingredients, you can whip up a delicious dinner in no time. Picture juicy chicken, egg noodles, and savory garlic sauce all coming together for a satisfying dish. Ready to create a dinner that wows? Let’s get cooking!
Ingredients
Main Ingredients
- 2 boneless, skinless chicken breasts, thinly sliced
- 200g egg noodles
- 3 tablespoons sesame oil, divided
- 4 cloves garlic, finely minced
- 1 teaspoon fresh ginger, grated
The chicken gives a solid base. The egg noodles add a soft, chewy texture. Sesame oil brings a nutty flavor that enriches the dish. Garlic and ginger provide a fragrant aroma that elevates the taste.
Sauce Components
- 2 tablespoons soy sauce (or tamari for gluten-free)
- 2 tablespoons rice vinegar
- 1 tablespoon honey
The sauce ties everything together. Soy sauce adds saltiness and umami. Rice vinegar adds a tangy kick. Honey balances flavors with its sweetness, making the dish more exciting.
Toppings and Garnishes
- 2 green onions, thinly sliced
- 1 tablespoon sesame seeds (choose between white or black)
- Fresh cilantro or parsley, for garnish
Toppings add freshness and crunch. Green onions give a mild onion flavor. Sesame seeds add texture and a nutty touch. Fresh herbs brighten the dish, making it more appealing.
Step-by-Step Instructions
Cooking the Noodles
To cook the noodles, start by boiling salted water in a pot. Use about 1 tablespoon of salt for every 4 cups of water. Once the water boils, add 200g of egg noodles. Follow the package instructions for cooking time. Usually, it takes around 4-6 minutes until they are al dente. After cooking, drain the noodles and rinse them with cold water. This stops the cooking process and keeps them firm. Set the noodles aside in a colander.
Stir-Frying the Chicken
Next, you need to stir-fry the chicken. Heat a large skillet or wok over medium-high heat. Add 2 tablespoons of sesame oil to the pan. When the oil is hot, add the thinly sliced chicken breasts. Season them with salt and pepper. Stir-fry the chicken for about 5-7 minutes. Cook until the chicken turns golden brown and is no longer pink inside.
Adding Flavors
Now, let’s add some flavor. Once the chicken is cooked, add 4 cloves of finely minced garlic and 1 teaspoon of freshly grated ginger to the skillet. Sauté this mix for 1-2 minutes. Stir constantly to avoid burning the garlic. The aroma will fill your kitchen, making it smell amazing.
Combining Ingredients
Time to bring it all together! In a small bowl, mix 2 tablespoons of soy sauce, 2 tablespoons of rice vinegar, and 1 tablespoon of honey. Whisk until well combined. Pour this sauce over the chicken in the skillet. Then, gently add the cooked egg noodles. Use tongs or a spatula to toss everything together. Ensure the noodles are well-coated in the sauce and heated through. This usually takes about 2-3 minutes.
Final Touches
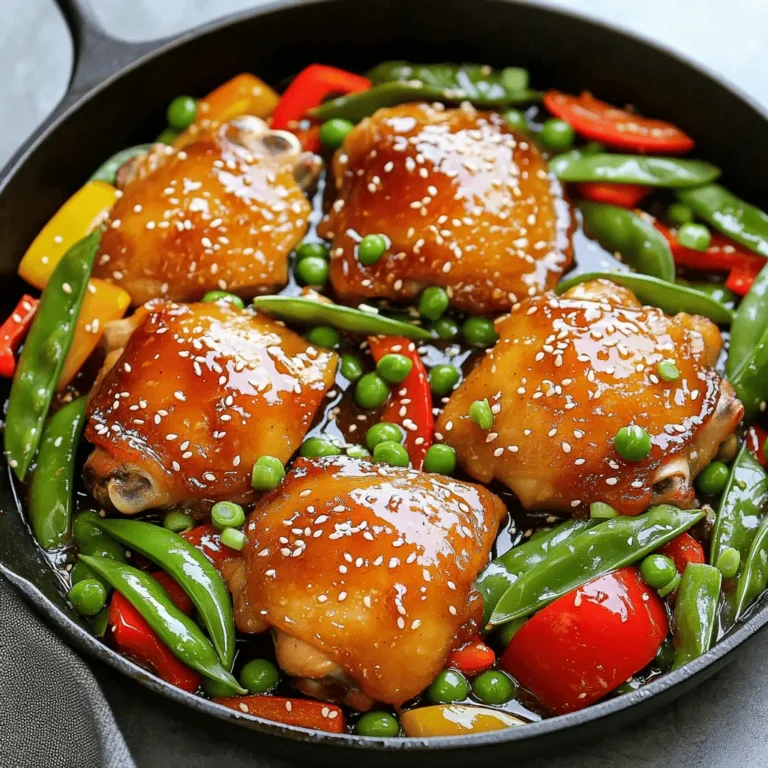
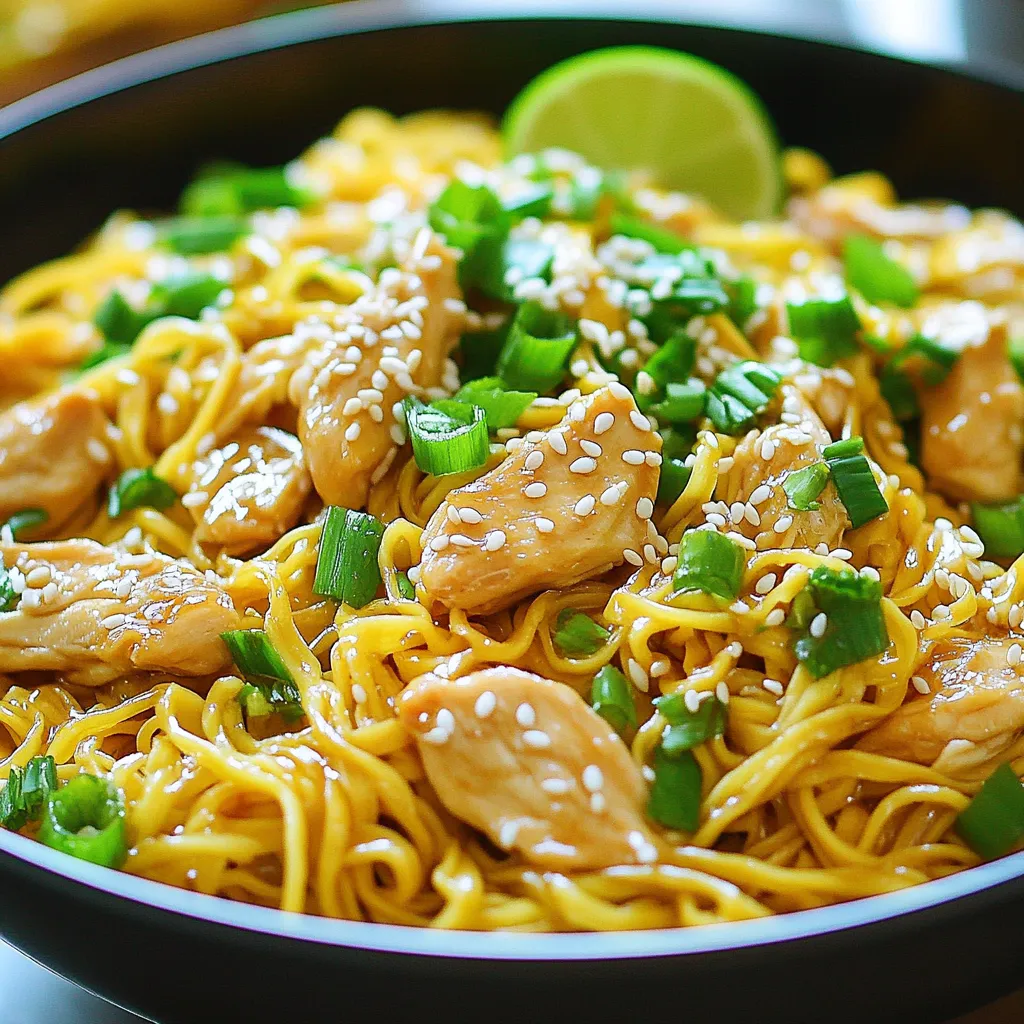
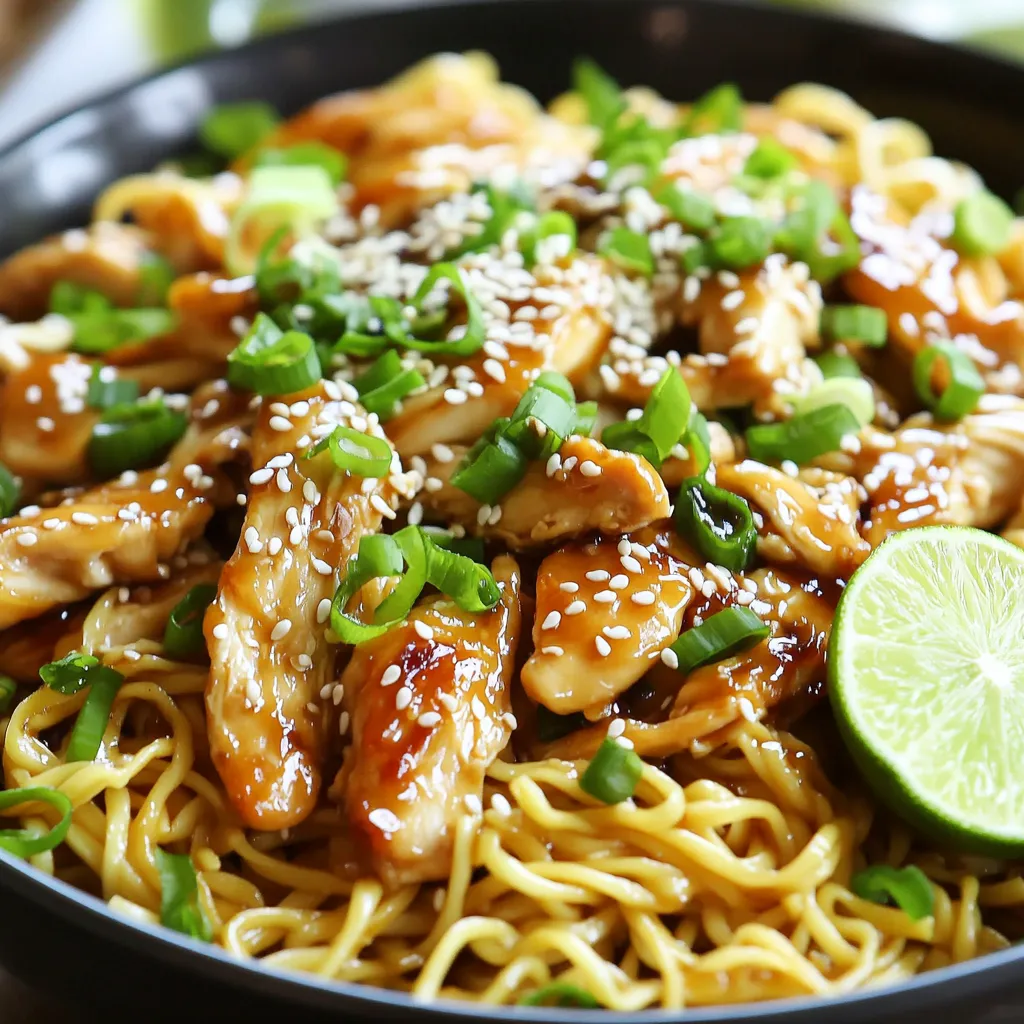
Before serving, add some finishing touches. Remove the skillet from heat. Sprinkle 2 thinly sliced green onions and 1 tablespoon of sesame seeds over the dish. If you like, add fresh cilantro or parsley for extra flavor. For presentation, serve the chicken and noodle mix in a large, shallow bowl. Garnish with more green onions and a sprinkle of sesame seeds. A lime wedge on the side adds a nice touch and a zesty kick!
Tips & Tricks
Cooking Variations
If you need a gluten-free option, use tamari instead of soy sauce. For a low-carb meal, try zoodles made from zucchini instead of noodles. You can also switch up the protein. Use tofu for a vegetarian choice or shrimp for seafood lovers. Both options bring a unique taste.
Flavor Enhancements
Boost your dish’s nutrition by adding colorful vegetables. Bell peppers, broccoli, or snap peas work well. You can also try adding spices like chili flakes for heat or five-spice powder for depth. These additions make the dish more exciting and nutritious.
Time-Saving Techniques
Prep your ingredients before you start cooking. Slice the chicken and chop the garlic and ginger ahead of time. This keeps things quick and smooth. If you have leftover chicken or noodles, use them! They save time and add flavor to your meal.
Variations
Different Protein Options
You can switch up the protein in this dish. Try using tofu or shrimp for a fun twist. Tofu works great for a vegetarian option. Just make sure to press it well to remove extra water. Shrimp cooks fast and adds a nice, sweet flavor. You can also use beef if you want something hearty. Slice it thinly, and it will cook quickly with the noodles. Each choice brings a new taste and texture.
Different Noodle Choices
Don’t feel stuck with egg noodles. You can try rice noodles for a gluten-free option. They soak up flavors well and cook fast. Whole grain noodles are also a good choice. They add more fiber and have a nutty taste. Experimenting with different noodles can change the whole dish.
Flavor Profile Changes
Want to spice things up? Add some chili flakes or sriracha for heat. A little goes a long way, so taste as you go. If you prefer sweet flavors, try different types of honey. Maple syrup or agave can also work. These changes can make your noodle dish unique and exciting.
Storage Info
Refrigerating Leftovers
To keep your Minute Sesame Garlic Chicken Noodles fresh, store leftovers in an airtight container. This will help lock in moisture and flavor. You can store them in the fridge for up to three days. Use glass containers or plastic ones that seal tightly. Avoid leaving them out at room temperature for too long.
Reheating Instructions
When it’s time to enjoy leftovers, heat them on the stove or in the microwave. If using the stove, warm them in a skillet over medium heat. Stir gently for about 5 minutes until heated through. If you prefer the microwave, place the noodles in a microwave-safe bowl. Heat for 1-2 minutes, stirring halfway through. This keeps the noodles tasty and prevents them from drying out.
Freezing Tips
For meal prep, you can freeze portions of the dish. Place the noodles and chicken in freezer-safe bags or containers. Remove excess air to prevent freezer burn. These can last for up to three months. When you’re ready to eat, thaw them overnight in the fridge. Reheat them on the stove or microwave as mentioned before. This way, you’ll have a quick, delicious meal ready to go!
FAQs
Can I make this dish ahead of time?
Yes, you can make this dish ahead of time. To prep in advance, cook the chicken and sauce first. Store them in separate containers in the fridge. Cook the noodles just before serving. This keeps them fresh and tasty.
What can I substitute for sesame oil?
You can use other oils like olive or canola. These oils have milder flavors. Toasted peanut oil can add a nice touch too. Each oil will change the taste slightly. Adjust based on what you like.
How can I make this recipe vegetarian?
To make it vegetarian, swap chicken for tofu or tempeh. Press and cube the tofu, then cook until golden. Use soy sauce and rice vinegar for the sauce. This keeps the dish flavorful and hearty.
What sides pair well with Sesame Garlic Chicken Noodles?
You can serve this dish with steamed broccoli or a fresh salad. Pickled vegetables add a nice crunch too. Rice or stir-fried veggies are great options. They balance the meal and add variety.
Is this recipe suitable for meal prep?
Yes, it’s perfect for meal prep. Portion the noodles and chicken into containers. Store them in the fridge for up to three days. Reheat in the microwave or on the stove. This makes for easy, quick meals!
This blog post covered the key ingredients and steps for making Sesame Garlic Chicken Noodles. You learned how to combine chicken, noodles, and flavorful sauce. I shared tips for cooking, variations, and storage. You can make this dish your own with different proteins and flavors.
Cooking can be fun and rewarding. I hope you enjoy creating this meal and sharing it with others.

![- Cooked chicken - Creamy mayonnaise - Dill pickle relish - Ranch seasoning mix - Green onions - Celery - Salt and black pepper - Buttery croissants - Lettuce leaves - Dill pickle slices To make the Pickle Ranch Chicken Salad Croissants, you need a few simple ingredients. Start with cooked chicken. Shredded chicken works best, and you can use leftover rotisserie chicken if you like. Next, grab creamy mayonnaise, which adds richness and binds everything together. You will also need some dill pickle relish. This gives the salad a tangy kick. For flavor, add a packet of ranch seasoning mix. It brings a burst of taste to the dish. Then, you will need green onions and celery. They add crunch and freshness to the chicken salad. Don’t forget salt and black pepper to season your salad to your liking. For the base, use buttery croissants. They are soft and flaky, perfect for holding the chicken salad. You’ll also need lettuce leaves to line the croissants and keep them from getting soggy. Lastly, you can add dill pickle slices on the side for extra crunch and flavor. You can find the full recipe [Full Recipe] in the next section. First, we mix the chicken salad. Start with two cups of cooked chicken, shredded. Add half a cup of creamy mayonnaise and a quarter cup of dill pickle relish. Then, mix in one tablespoon of ranch seasoning. Stir until everything is well combined. Next, we season the mixture. Taste your chicken salad and add salt and black pepper to your liking. This step is key for great flavor. Now, we assemble the croissants. Carefully slice each croissant in half. Place a lettuce leaf on the bottom half. This keeps the croissant from getting soggy. Let’s combine the base ingredients. In a large bowl, mix the chicken, mayonnaise, relish, and ranch seasoning. Use a spatula to blend well. Now, we add vegetables for crunch. Toss in a quarter cup of finely chopped green onions and celery. Mix until all the veggies are evenly spread throughout. Finally, we make the chicken salad shine. After seasoning, ensure everything is properly mixed. This is the moment when you can adjust the flavor if needed. For the finishing touch, scoop the chicken salad onto the lettuce-covered croissant halves. Pile it high for a tasty bite! Don't forget to garnish with extra dill pickle slices for added flavor. For the full recipe, refer to the beginning section. To get the best texture for your chicken salad, start with shredded chicken. It's key to keep the pieces small and evenly shredded. This helps each bite feel tender and smooth. Use cooked chicken that’s still warm, as it mixes better with the other ingredients. When it comes to seasoning, don’t hold back. The ranch seasoning mix adds a great taste. I always suggest starting with a tablespoon. You can adjust to your liking. Taste as you mix. Add salt and pepper, a little at a time, until it’s just right. Presentation can make your croissants stand out. Arrange them neatly on a platter. You can serve them whole or cut in half for easy grabbing. Place a small bowl of extra dill pickles next to them. This adds a nice touch and makes it easy for guests. For sides, consider serving fresh fruit or a light salad. A simple green salad pairs nicely. You can even add some crunchy chips for texture. This makes for a fun and tasty meal that everyone will enjoy. {{image_4}} You can change this recipe to suit your taste. Here are some ideas. - Alternative proteins to try: Instead of chicken, use turkey or canned tuna. Both work well and give a new twist. For a meat-free option, try chickpeas or tofu for a healthy plant-based salad. - Different seasoning blends: Swap the ranch mix for other blends, like garlic or lemon pepper. You can also add some hot sauce for a spicy kick. If you seek healthier choices, here are some easy swaps. - Low-calorie alternatives: Use Greek yogurt instead of mayonnaise. This keeps the creamy texture but cuts calories. You can also use less chicken or add more veggies to lighten it up. - Gluten-free options for croissants: Look for gluten-free croissants at your local store. You can also use lettuce wraps or gluten-free bread for a crunchy and satisfying meal. Explore these variations to make your Pickle Ranch Chicken Salad Croissants even more exciting. For the full recipe, check the recipe section above. To keep your pickle ranch chicken salad croissants fresh, store any leftovers in an airtight container. This helps prevent drying out. You can place a paper towel in the container to absorb moisture. The best time to eat them is within three days for optimal taste. After that, the croissants may become soggy or lose flavor. You might want to enjoy your croissants warm. To reheat them, use an oven or toaster oven. Heat at 350°F for about 5-7 minutes. This keeps the croissants crisp. Avoid using a microwave, as it can make them chewy. If you have extra chicken salad, you can use it in wraps or on a bed of greens. This way, you can create a new meal with the leftovers that is just as tasty! Can I use rotisserie chicken? Yes, rotisserie chicken works great in this recipe. It saves time and adds flavor. Simply shred the chicken and mix it in. How do I make this salad ahead of time? You can make the salad a day in advance. Store it in an airtight container in the fridge. Just assemble the croissants when you’re ready to serve. What are some good sides to serve with these croissants? Some tasty sides include fresh fruit, chips, or a simple green salad. These pair well and add color to your plate. Where can I buy ready-made chicken salad? You can find ready-made chicken salad at grocery stores or deli counters. Look for local options for the freshest taste. Can I substitute the croissants with other bread? Yes, you can use any bread you like. Try using bagels, pita, or even lettuce wraps for a low-carb option. This blog post covered how to make a tasty chicken salad for croissants. You learned the key ingredients and the steps for mixing and assembling. I shared tips to get the best flavors and textures. You can also try different proteins or seasonings to make it your own. Store any leftovers properly to keep them fresh. This dish is great for gatherings or a simple meal at home. Enjoy making your delicious chicken salad and impress your friends and family!](https://dishtreats.com/wp-content/uploads/2025/07/dff408d1-932c-47c7-977b-b0a9332b2143-768x768.webp)
![- 2 cups diced apples - 1 cup celery, thinly sliced - 1 cup red grapes, halved - 1/2 cup walnuts, chopped - 1/2 cup raisins or dried cranberries - 1 cup plain Greek yogurt - 1 tablespoon honey - 1/2 teaspoon fresh lemon juice - Salt and pepper to taste - Lettuce leaves for serving Fresh produce makes this salad shine. I love using crisp apples, like Granny Smith, for their tartness. They add a nice crunch. The celery brings a refreshing snap, while juicy red grapes add sweetness. Nuts and dried fruits give texture and flavor. Chopped walnuts are my go-to. Toast them for even more flavor. Raisins or dried cranberries add a touch of sweetness, balancing the dish well. For the dressing, I use plain Greek yogurt. It’s creamy and healthy. Honey adds sweetness, and a bit of lemon juice brightens the flavors. Season with salt and pepper to enhance everything. Finally, serve on fresh lettuce leaves. They make a great base and add color. This combination of ingredients creates a delightful Waldorf salad. You can find the full recipe at [Full Recipe]. - Start by adding 2 cups of diced apples to a large bowl. - Drizzle the apples with 1/2 teaspoon of fresh lemon juice. This keeps them fresh and bright. - Next, slice 1 cup of celery into thin pieces. Add this to the bowl. - Halve 1 cup of red grapes and toss them in too. - In the same bowl, mix the fruit with 1/2 cup of chopped walnuts. - Add 1/2 cup of raisins or dried cranberries for sweetness. Gently toss the mixture. - In a separate bowl, combine 1 cup of plain Greek yogurt with 1 tablespoon of honey. Stir until smooth. - Carefully fold the yogurt dressing into the fruit mixture. Make sure everything is coated. - Season with salt and pepper to taste, folding gently to mix. - Cover the bowl and chill it in the fridge for at least 30 minutes. This helps the flavors blend. - When ready, serve on fresh lettuce leaves for a beautiful presentation. Enjoy your Waldorf salad! - For the complete recipe, check out the Full Recipe. You can swap out fruits and nuts to suit your taste. Try pears or oranges for a fresh twist. For nuts, almonds or pecans work well, too. If you want a creamier texture, use Greek yogurt instead of mayonnaise. The yogurt adds protein and keeps the salad light. Toasting walnuts really boosts their flavor. Just place them in a dry pan over medium heat. Stir them until they smell nutty and are lightly browned. You can also adjust sweetness or tartness. If the salad is too sweet, add a dash of lemon juice. For more sweetness, drizzle in extra honey. Serve your Waldorf salad on crisp lettuce leaves for a vibrant look. Arrange the salad in a large bowl or individual cups. Garnish with mint leaves for a fresh pop of color. You can also sprinkle extra toasted walnuts on top for added crunch. These simple touches make your dish stand out. For the full recipe, refer to the Waldorf Wonderland Salad 🥗. {{image_4}} The classic Waldorf salad uses simple, fresh ingredients. It combines apples, celery, grapes, and walnuts in a creamy dressing. Modern twists can add new flavors. You might see variations like adding chicken or swapping yogurt for mayonnaise. These changes keep the dish fresh and fun. You can experiment with spices, too. A hint of cinnamon or nutmeg can add warmth. If you want a vegan Waldorf salad, swap Greek yogurt for a plant-based option. Silken tofu blended with lemon juice makes a great dressing. For a gluten-free version, check your nuts and dried fruits. Most are safe, but some brands add gluten. You can also cut calories by using low-fat yogurt. This keeps the creaminess while reducing fat. Seasonal fruits can enhance the Waldorf salad. In fall, add sliced pears for sweetness. In winter, pomegranate seeds add color and crunch. Fresh berries in summer create a bright, juicy contrast. Each season brings a new twist to this classic salad. Try different fruits to match the season and your taste. The full recipe allows you to mix and match as you please. To store leftover Waldorf salad, place it in an airtight container. This keeps the salad fresh. Use a lid or plastic wrap to seal it well. The salad can last up to 3 days in the fridge. After that, the texture and flavor may change. If you see any browning apples, it’s best to toss them out. You can prepare some ingredients in advance. Chop your apples, celery, and grapes a day before. Keep them in separate containers in the fridge. This saves time when you want to make the salad. If you want to freeze Waldorf salad, I suggest not freezing it whole. The fruits will lose their crunch. Instead, freeze just the nuts or dried fruits. This keeps them fresh longer. When you are ready, mix them in fresh, chilled salad. You can enjoy that fresh taste even after storage! For the full recipe, check out the Waldorf Wonderland Salad. Waldorf Salad dates back to the late 1800s. A chef at the Waldorf Astoria Hotel in New York created it. The original recipe had only apples, celery, and mayonnaise. Over time, people added more ingredients, like walnuts and grapes. This salad became popular at formal dinners and events. It has a classic, timeless appeal that many enjoy today. Yes, you can prepare Waldorf Salad ahead of time. Make it a few hours before serving for best results. Just follow the steps of mixing everything and keep it in the fridge. This helps the flavors blend well. If you plan to serve it the next day, be careful with the apples. They can brown, so use lemon juice to keep them fresh. Waldorf Salad is quite healthy! It features fresh fruits and nuts, which offer great nutrients. Apples provide fiber and vitamins, while walnuts add healthy fats. The Greek yogurt dressing gives protein and a creamy texture. This salad is a great choice for a light meal or side dish. Eating it can help you feel full and satisfied. You can find the full recipe for this delightful salad [here](#). Waldorf salad combines fresh produce, nuts, and a creamy dressing. You learned how to prepare it step-by-step. I shared tips to enhance flavor and presentation. Feel free to adjust ingredients based on your taste. You can also explore various dietary options and seasonal fruits. This salad is not only tasty but also healthy. With proper storage methods, you’ll enjoy it for days. Now, it's time to create your own delicious version!](https://dishtreats.com/wp-content/uploads/2025/06/24fb7af7-5454-4649-a19f-39fd463a867f-768x768.webp)