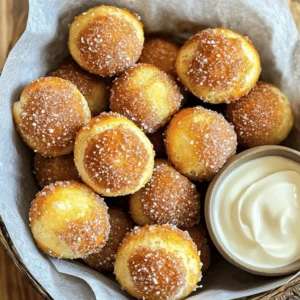
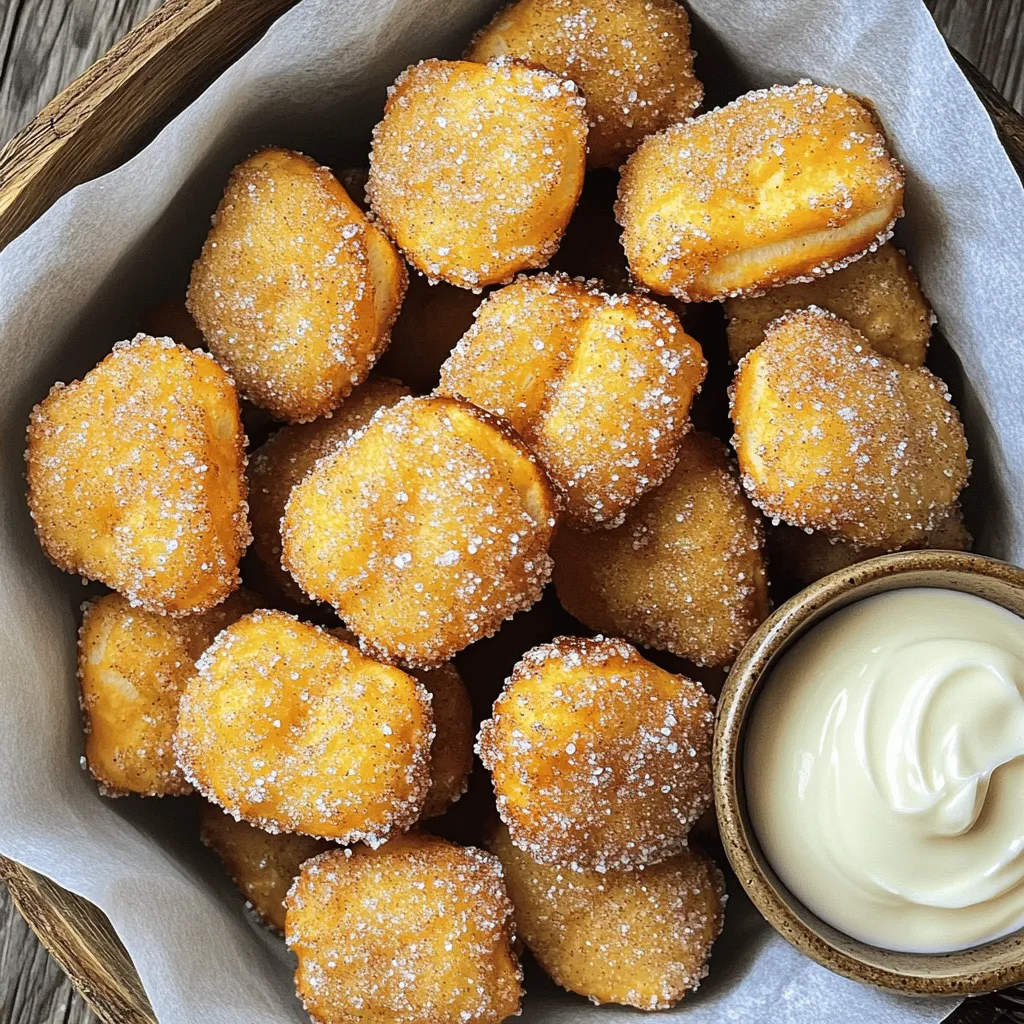
Air Fryer Cinnamon Sugar Pretzel Bites Delight

Craving a sweet and salty treat? Let me show you how to make Air Fryer Cinnamon Sugar Pretzel Bites. These bites are soft, fluffy, and coated with a delicious mix of cinnamon and sugar. You’ll impress your friends and family with this fun recipe they will love. Let’s dive into the ingredients and get started on this tasty adventure!
Ingredients
List of Essential Ingredients
To make Air Fryer Cinnamon Sugar Pretzel Bites, you will need:
- 1 cup warm water (around 110°F/45°C)
- 2 tablespoons granulated sugar
- 2 teaspoons active dry yeast
- 2.5 cups all-purpose flour
- 1 teaspoon salt
- ½ teaspoon baking soda
- ¼ cup unsalted butter, melted
- ½ cup granulated sugar (for coating)
- 1 tablespoon ground cinnamon
- Coarse sea salt (for sprinkling)
These ingredients create a soft and tasty pretzel bite with a sweet topping.
Optional Ingredients for Enhanced Flavor
You can add some fun twists to your pretzel bites with these extras:
- Vanilla extract for a hint of sweetness
- Nutmeg for a warm spice flavor
- Cream cheese icing for dipping
- Chocolate sauce for a sweet treat
These add-ons make your pretzel bites even more delightful.
Equipment Needed for Preparation
To prepare your pretzel bites, gather these tools:
- Large mixing bowl
- Whisk
- Floured surface for kneading
- Air fryer
- Plate for dipping
- Brush for butter
Having the right equipment makes the process smooth and easy.
Step-by-Step Instructions
Preparing the Yeast Mixture
Start by gathering a large mixing bowl. In this bowl, add 1 cup of warm water. The water should be around 110°F, which feels warm but not hot. Next, mix in 2 tablespoons of granulated sugar and 2 teaspoons of active dry yeast. Give it a quick whisk. Let it sit for about 5 to 10 minutes. You want to see bubbles forming on top. This means your yeast is active and ready to go.
Mixing and Kneading the Dough
Now it’s time to add the dry ingredients. Pour in 2.5 cups of all-purpose flour and 1 teaspoon of salt. Stir until a dough starts to form. Once it comes together, transfer it to a floured surface. Knead the dough gently for about 5 minutes. You are looking for a smooth and elastic texture. This step is crucial for great pretzel bites.
Allowing the Dough to Rise
After kneading, place your dough in a greased bowl. Cover it with a clean kitchen cloth. Set it in a warm spot and let it rise for about 1 hour. The dough should double in size. This rising time helps create a lighter pretzel bite.
Preparing the Cinnamon Sugar Coating
While you wait for the dough, you can prepare the cinnamon sugar. In a small bowl, mix ½ cup of granulated sugar with 1 tablespoon of ground cinnamon. Stir until well combined. Set this aside for later. The sweet scent of cinnamon will make your kitchen smell amazing.
Shaping the Pretzel Bites
Once the dough has risen, it’s time to shape the bites. Gently punch down the dough to release air bubbles. Divide it into 8 equal pieces. Roll each piece into a rope about 1 inch thick. Slice each rope into bite-sized pieces, about 1-2 inches long.
Cooking the Pretzel Bites in Air Fryer
Now, prepare a baking soda solution. Mix ½ teaspoon baking soda into 2 cups of warm water. Briefly dip each pretzel bite into this solution for a few seconds. This step adds flavor and color. Then, brush each bite with melted butter. Sprinkle the cinnamon sugar mixture generously over them. Arrange them in the air fryer basket without overcrowding. Cook at 350°F for 5-6 minutes until golden brown. Remove and sprinkle with coarse sea salt while warm. Enjoy the sweet, warm aroma of your freshly made pretzel bites!
Tips & Tricks
Ensuring Proper Yeast Activation
To make great pretzel bites, you must activate the yeast. Start with warm water, about 110°F. Mix in sugar and yeast. Let it sit for 5-10 minutes. You should see bubbles forming. This shows the yeast is alive. If no bubbles appear, your yeast might be old. Always check the expiration date.
Kneading Techniques for Best Texture
Kneading dough is key for good texture. After mixing your dough, transfer it to a floured surface. Use your palms to push and fold the dough. Knead for about 5 minutes. You want a smooth and elastic dough. This helps the pretzel bites rise well and stay soft.
How to Avoid Overcrowding in Air Fryer
Air fryers need space for hot air to flow. When placing pretzel bites in the basket, leave space between them. This ensures even cooking. If your air fryer is small, cook in batches. Well-cooked bites will be golden and crisp. Overcrowding leads to soggy pretzels.
Serving Suggestions and Pairings
Serve your warm pretzel bites in a cute basket. Line it with parchment paper for style. You can pair bites with cream cheese icing or chocolate sauce. These dips add fun flavors. Try adding a sprinkle of coarse sea salt right after cooking. It enhances the taste and makes them irresistible!

Variations
Sweet vs. Savory Pretzel Bites
You can make your pretzel bites sweet or savory. For sweet bites, use cinnamon and sugar. These flavors make a delightful treat. You can also add chocolate chips for a richer taste. For savory bites, skip the sugar. Instead, sprinkle garlic powder or cheese. This gives a nice flavor twist. Your pretzel bites will be tasty no matter which way you choose.
Gluten-Free Alternatives
If you need gluten-free options, you can use a gluten-free flour blend. Look for blends made for baking. These blends work well in this recipe. Be sure to check the package for the right measurements. You might need to add a bit more liquid. This helps to get the right dough texture. Enjoy delicious pretzel bites without the gluten!
Different Coating Ideas (Chocolate, Sprinkles, etc.)
There are many fun ways to coat your pretzel bites. After baking, dip them in melted chocolate for a sweet treat. You can also roll them in sprinkles for a festive look. Use different toppings like crushed nuts or coconut. This adds extra flavor and texture. Get creative and make your own special version. Your friends will love trying all the different kinds!
Storage Info
Best Practices for Storing Leftovers
To keep your pretzel bites fresh, store them in an airtight container. Let them cool completely before sealing. This helps prevent moisture from making them soggy. Place a paper towel in the container to absorb extra moisture. They will stay good for about 2-3 days at room temperature.
Reheating Tips for Optimal Texture
For the best taste, reheat your pretzel bites in the air fryer. Set it to 350°F (175°C) and heat for about 3-5 minutes. This will make them warm and crispy again. You can also use a microwave, but they may turn soft. If you use the microwave, heat them for about 15-20 seconds.
Freezing Instructions
If you want to save some for later, freezing is a great option. First, let the pretzel bites cool. Then, place them in a single layer on a baking sheet. Freeze them for about 1-2 hours until solid. After that, transfer them to a freezer bag or container. They can be frozen for up to 2 months. When ready to eat, thaw them overnight in the fridge and reheat as mentioned above.
FAQs
How do I make sure my pretzel bites are soft?
To keep your pretzel bites soft, use warm water and active yeast. This helps the dough rise well. Knead the dough until smooth but don’t over-knead. Let it rise in a warm place until it doubles in size. This gives it a nice, fluffy texture.
Can I use a different type of flour?
Yes, you can use whole wheat flour or bread flour. Whole wheat adds a nutty flavor. Bread flour has more gluten, making pretzel bites chewier. Just keep in mind that it may change the texture slightly.
What is the best air fryer for making pretzel bites?
A good air fryer should have a capacity of at least 3 to 5 quarts. This size allows for even cooking. Look for one with adjustable temperature settings. A digital display can help with timing and accuracy.
How long do pretzel bites last after cooking?
Cooked pretzel bites last for about 2-3 days at room temperature. Store them in an airtight container. If you want them to last longer, you can freeze them. They freeze well and can be reheated easily.
Can I prepare the dough in advance?
Yes, you can make the dough a day ahead. After kneading, place it in the fridge. Cover it with plastic wrap to keep it fresh. Let it sit at room temperature before shaping and cooking. This can add flavor too!
Making pretzel bites can be fun and tasty. We covered key ingredients, steps, and helpful tips. You learned how to prepare, shape, and cook these bites with ease.
Try different toppings and storage methods to keep them fresh. Practice makes perfect, so don’t worry if they are not great at first. You’ll soon enjoy warm, soft pretzel bites made your way!


![To make classic chocolate brownies, you need the following ingredients: - 1 cup (2 sticks) unsalted butter - 2 cups granulated sugar - 4 large eggs, at room temperature - 1 teaspoon pure vanilla extract - 1 cup all-purpose flour - 1 cup unsweetened cocoa powder - ½ teaspoon baking powder - ½ teaspoon sea salt - 1 cup semi-sweet chocolate chips - Optional: ½ cup chopped walnuts or pecans for added crunch You can use margarine if you need a butter alternative. For a deeper flavor, try using dark cocoa powder instead of regular cocoa. If you want to make this recipe gluten-free, swap the all-purpose flour with a gluten-free blend. Feel free to customize your brownies with these fun ideas: - Nuts: Consider using walnuts or pecans for extra texture. Almonds also work great. - Chocolate types: Mix semi-sweet and dark chocolate chips for rich flavor. - Flavor variations: Add a teaspoon of mint extract or some orange zest for a twist. These add-ins can enhance the taste and make your brownies unique. Mixing flavors can lead to exciting new experiences in every bite. To make the brownie batter, follow these steps: 1. Melt the butter: Start by melting 1 cup of unsalted butter in a medium saucepan over low heat. Stir often until it’s fully melted. 2. Add sugar: Once the butter is melted, remove it from the heat. Stir in 2 cups of granulated sugar until it looks smooth. 3. Add eggs: Crack 4 large eggs into the butter-sugar mix. Add them one at a time. Mix well after each egg, so the batter combines nicely. 4. Mix in vanilla: Add 1 teaspoon of pure vanilla extract. This gives the brownies a nice flavor. 5. Combine dry ingredients: In another bowl, sift together 1 cup of all-purpose flour, 1 cup of unsweetened cocoa powder, ½ teaspoon of baking powder, and ½ teaspoon of sea salt. This helps mix the dry ingredients well. 6. Fold dry into wet: Gently fold the dry mix into the wet mix. Use a spatula to combine until just mixed. Do not overmix, or the brownies won’t be fudgy. 7. Add chocolate chips: Toss in 1 cup of semi-sweet chocolate chips. If you like, add ½ cup of chopped walnuts or pecans for crunch. Mix until they are spread evenly in the batter. 8. Prepare the pan: Grease a 9x13-inch baking pan or line it with parchment paper. This makes it easy to remove the brownies later. 9. Pour batter: Pour the brownie batter into the pan. Use a spatula to spread it evenly. Now, it’s time to bake! 1. Preheat oven: Set your oven to 350°F (175°C). This ensures even baking. 2. Bake brownies: Place the pan in the oven. Bake for 30 to 35 minutes. 3. Check for doneness: To check, insert a toothpick into the center. It should come out with a few moist crumbs. If it’s wet, bake a little longer. Avoid overbaking for that perfect fudgy texture. After baking, let’s cool and cut the brownies. 1. Cool in the pan: Allow the brownies to cool in the pan for at least 15 minutes. This helps them firm up. 2. Transfer to wire rack: After 15 minutes, move the brownies to a wire rack. Let them cool completely before cutting. 3. Cutting tips: Use a sharp knife for clean cuts. Wipe the knife after each cut for neat squares. 4. Serving size: Cut into generous squares. Each piece should be a lovely bite of fudgy goodness. For a special touch, dust the brownies with powdered sugar before serving. Enjoy these delightful treats with a scoop of vanilla ice cream for extra indulgence. For the complete recipe, refer to the Full Recipe. To make the best fudgy brownies, focus on mixing. After melting the butter, stir in the sugar until smooth. Add eggs one at a time. Mix well after each egg. This helps create a rich texture. Don't overmix the dry and wet ingredients. Fold them gently just until combined. Common mistakes include overbaking and using too much flour. Overbaking leads to dry brownies. Aim for a toothpick with few moist crumbs. If you use too much flour, your brownies will be cake-like. Measure carefully for the best results. Brownies keep well at room temperature. Store them in an airtight container for up to five days. If you want to keep them longer, the fridge is a good option. Just remember, cold brownies can lose some flavor. To revive leftovers, warm them in the microwave for 10-15 seconds. This restores their fudgy goodness. You can also serve them with a scoop of ice cream for a tasty treat. For the full recipe, check out the [Full Recipe]. {{image_4}} For a gluten-free treat, try flourless brownies. You can use almond flour or ground oats instead of regular flour. These options add a nice texture and flavor. You should also reduce baking time. Check them after 25 minutes to avoid dryness. If you want a lighter version, use less sugar. You can swap half of the sugar with unsweetened applesauce. This keeps the brownies moist. For fats, use avocado or coconut oil. These substitutes make the brownies healthier but still tasty. To spice things up, add a dash of coffee or a pinch of sea salt. These flavors enhance the chocolate taste. You can also use extracts like almond or orange for a lovely twist. Just a little goes a long way in changing the flavor profile. Serving classic chocolate brownies is easy and fun. You can serve them warm with a scoop of ice cream. Vanilla ice cream works great, but try mint or coffee flavors for a twist. You can also top brownies with whipped cream. A sprinkle of chocolate shavings adds a nice touch. For a beautiful presentation, cut the brownies into squares. Place them on a decorative plate. Dust with powdered sugar for a fancy look. Add fresh berries or a sprig of mint beside each brownie. These details make the dish more appealing. Brownies are versatile and can be served in many ways. One fun idea is a brownie sundae. Start with a warm brownie, add a scoop of ice cream, and drizzle chocolate sauce on top. Finish with whipped cream and a cherry for a delightful treat. You can pair brownies with drinks too. A strong cup of coffee complements the rich chocolate flavor. Hot cocoa or milk also works well. For a unique twist, serve brownies with a side of fresh fruit. The sweetness of the fruit balances the rich brownies. For more ideas, check out the Full Recipe to explore all the delicious details! To check if your brownies are done, look for a few signs. The top should look set and slightly shiny. When you insert a toothpick in the center, it should come out with a few moist crumbs. This means your brownies are fudgy and perfect. If the toothpick comes out with wet batter, they need more time. Keep a close watch in the last few minutes of baking to avoid overbaking. Yes, you can freeze brownies! To freeze them, let them cool completely first. Cut your brownies into squares, then wrap each piece in plastic wrap. Place them in a freezer bag or container. They can last up to three months in the freezer. When you're ready to eat them, thaw them in the fridge overnight or at room temperature for a few hours. For neat cuts, use a sharp knife. First, let the brownies cool completely in the pan. For even cleaner cuts, wipe the knife with a damp cloth after each cut. This way, you have smooth edges. You can also use a pizza cutter for quick slicing. If you want, line your baking pan with parchment paper. This makes it easy to lift out the brownies for cutting. You’ve learned how to make classic chocolate brownies, from ingredients to serving tips. Whether you prefer fudgy or flourless, options abound to suit your taste. Remember, small changes can create big flavors. Experiment with add-ins or healthier swaps to make them your own. With these steps, you can enjoy delicious brownies any time. Happy baking!](https://dishtreats.com/wp-content/uploads/2025/07/8475203d-ada8-4920-a61c-065e4c50bd3f-768x768.webp)
![To create this tasty dip, you will need key ingredients that bring out the fall flavors. Here’s what you’ll need: - 8 oz cream cheese, softened to room temperature - 1 cup pumpkin puree (not pumpkin pie filling) - 1/2 cup powdered sugar - 1 tablespoon packed brown sugar - 1 teaspoon pure vanilla extract - 1 teaspoon pumpkin pie spice (plus extra for garnish) - 1/2 teaspoon ground cinnamon - 1/2 cup whipped topping (such as Cool Whip) - Assorted dippers: graham crackers, fresh apple slices, or pretzels Using the correct measurements is vital for the best flavor and texture. Too much cream cheese can make the dip thick. Too little sugar can make it bland. I recommend sticking closely to these amounts. This balance creates a creamy dip that is not too sweet. When it comes to serving your dip, you need the right dippers. Here are my favorites: - Graham crackers give a nice crunch. - Fresh apple slices add a crisp and juicy touch. - Pretzels offer a salty contrast. Feel free to mix and match! These options will make your dip even more fun. For the full recipe, check the recipe section. Start by taking your softened cream cheese. Place it in a large mixing bowl. Use an electric mixer on medium speed. Beat the cream cheese until it is smooth. Make sure there are no lumps left. This step is key for a creamy dip. Next, add the pumpkin puree into the cream cheese. Mix it in well. Now, add the powdered sugar, brown sugar, and vanilla extract. Include the pumpkin pie spice and ground cinnamon. Continue mixing on low speed. Ensure everything is combined but still smooth. You want a uniform texture without any streaks. Take your whipped topping and gently fold it in. Use a spatula for this step. Be careful to keep the dip light and fluffy. Stop mixing as soon as the whipped topping is blended in. This lightness adds to the creamy texture of the dip. For the full recipe, you can refer back to the beginning. Enjoy your creamy pumpkin spice cheesecake dip! To boost the flavor of your Pumpkin Spice Cheesecake Dip, try adding a pinch of nutmeg. This spice adds depth and warmth. If you like it sweeter, add more powdered sugar or brown sugar. You can also swap in maple syrup for a rich twist. For a touch of tang, mix in a bit of cream cheese with a hint of lemon juice. Taste as you go for the best result. Serving your dip in a fun bowl can make it pop. Use a bright or themed bowl for special occasions. A light dusting of pumpkin pie spice on top looks nice and smells great. Arrange your dippers around the bowl for a colorful display. This not only makes it pretty but also invites guests to dig in. You can even use cookie cutters to shape apple slices for extra flair. Making this dip ahead of time is a smart move. Chill it for at least 30 minutes before serving. This helps the flavors mix well and taste better. You can prepare it a day in advance and keep it covered in the fridge. Just remember to add the whipped topping right before serving for that fluffy texture. For the full recipe, check out the details above. {{image_4}} You can make a lighter version of this dip. Use Greek yogurt instead of cream cheese. Greek yogurt adds protein and tang. It keeps the dip creamy and delicious. Just blend 1 cup of Greek yogurt with the other ingredients. This swap helps cut down on calories while keeping flavor intact. Want to try something different? You can change the flavor profile easily. Swap pumpkin puree for sweet potato puree. This gives a unique taste that is still rich. You can also add a splash of maple syrup for a sweet twist. Another fun option is to mix in some Nutella for a chocolatey delight. Use seasonal ingredients to enhance your dip. In fall, add a handful of chopped pecans or walnuts for crunch. In winter, try mixing in dried cranberries for a tart flavor. You can also sprinkle some fresh nutmeg on top for a fragrant touch. These seasonal additions make your dip even more inviting and festive. For the full recipe, check out the [Full Recipe]. To keep your pumpkin spice cheesecake dip fresh, store it in an airtight container. Make sure the lid is tight to prevent air from getting in. I recommend refrigerating it as soon as you're done serving. This dip stays creamy and flavorful when stored properly. You can freeze this dip, but keep in mind it may change texture. To freeze, place the dip in a freezer-safe container. Leave some space at the top for expansion. When you're ready to use it, let it thaw in the fridge overnight. Stir well before serving to help regain some creaminess. The dip lasts about 3 to 5 days in the fridge. Check for any off smells or changes in texture. If it looks or smells funny, it’s best to toss it. To enjoy its best flavor, eat it within the first couple of days. For full instructions, see the Full Recipe. Yes, you can use homemade pumpkin puree! It adds a fresh taste. To make it, roast a pumpkin until soft, then blend until smooth. Just ensure it is thick like store-bought puree. This helps your dip stay creamy. To cut the sweetness, reduce the powdered sugar. You can also add more cream cheese. Another option is to mix in a bit of plain yogurt. This gives a nice tang, balancing the sweet flavors. Taste as you go to find your perfect mix. Absolutely! If you want to make it dairy-free, try vegan cream cheese. For a lower sugar option, use a sugar substitute. If you need gluten-free dippers, serve with apple slices or gluten-free pretzels. Be creative and adapt the recipe to fit your needs! For the full recipe, check out the details above. This article explored how to make a delicious pumpkin spice cheesecake dip. We covered key ingredients, the steps for mixing and folding, and helpful tips for flavor enhancements. You learned about storage options and creative variations, like using Greek yogurt or seasonal ingredients. Remember, making this dip can be fun and easy. Use fresh ingredients for the best taste. Enjoy creating your own version, and don’t forget to share with friends!](https://dishtreats.com/wp-content/uploads/2025/07/05024715-abe0-47f7-b5fb-2040be13b0f2-768x768.webp)


