S’mores Skillet Cookie Irresistible Dessert Idea
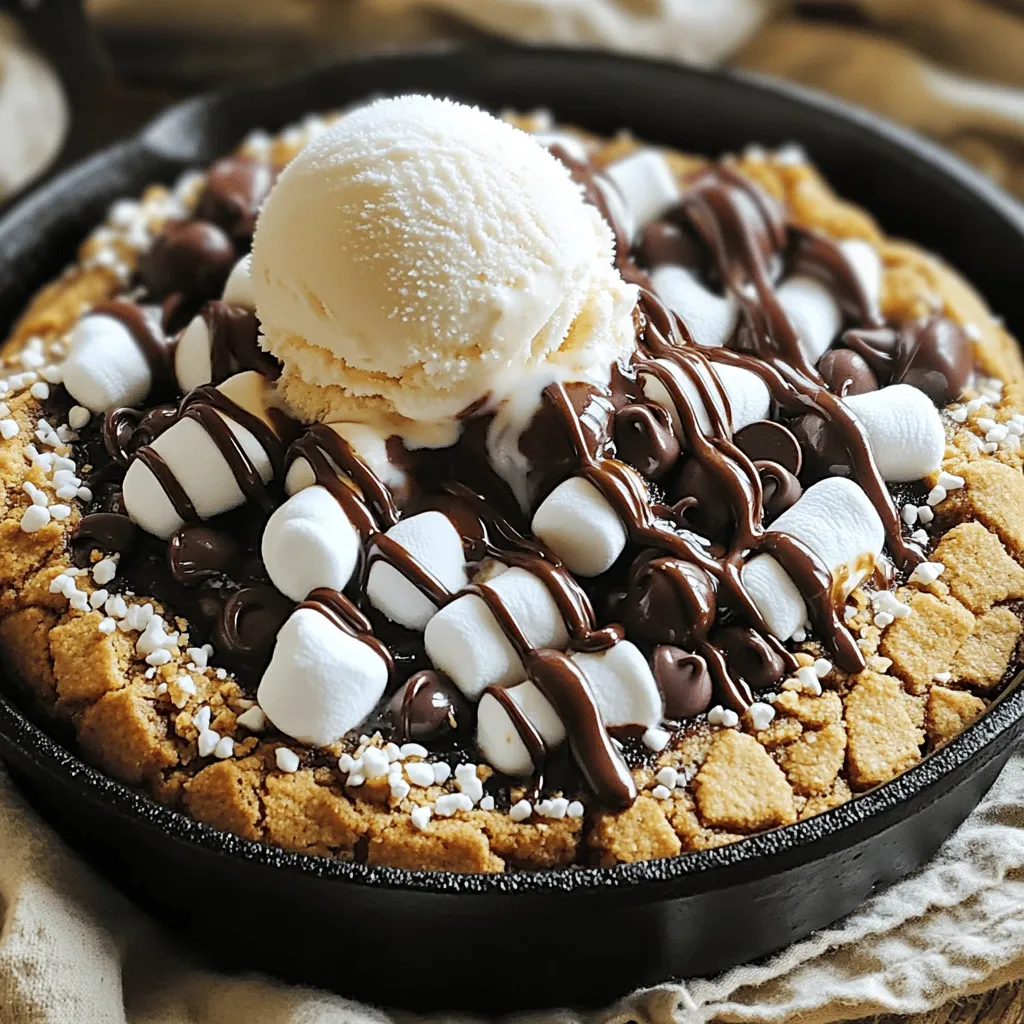
Craving a sweet treat that screams comfort? Let me introduce you to the S’mores Skillet Cookie! This warm, gooey dessert mixes rich chocolate, fluffy marshmallows, and tasty graham crackers all in one delicious pan. Trust me, this dessert is a game-changer for parties or cozy nights in. Join me as we explore how to create this irresistible dessert that will have everyone asking for seconds!
Ingredients
List of Required Ingredients
To make the S’mores Skillet Cookie, you need:
- 1 cup all-purpose flour
- 1/2 teaspoon baking soda
- 1/4 teaspoon salt
- 1/2 cup unsalted butter, softened
- 1/2 cup packed brown sugar
- 1/4 cup granulated sugar
- 1 large egg
- 1 teaspoon pure vanilla extract
- 1/2 cup semi-sweet chocolate chips
- 1/2 cup mini marshmallows
- 1/2 cup crushed graham crackers
- Additional marshmallows and chocolate chunks for topping
Ingredient Substitutions
You can swap some ingredients if needed. Use whole wheat flour for a healthier option. Coconut oil works well in place of butter. If you want less sugar, try using a sugar substitute. For a nutty flavor, add almond extract instead of vanilla. If you have a nut allergy, skip the nuts entirely or use sunflower seeds.
Tips for Selecting Quality Ingredients
Always choose fresh ingredients. For flour, look for a fine texture. Check the butter; it should be creamy without any discoloration. When buying chocolate, choose high-quality semi-sweet chips. Fresh marshmallows should be soft and squishy. For graham crackers, pick ones that are crisp and not stale. Quality ingredients make a big difference in taste!
Step-by-Step Instructions
Prepping the Oven and Mixing Bowls
Start by preheating your oven to 350°F (175°C). This step is key for even baking. While the oven warms up, grab two mixing bowls. One will hold the dry ingredients, and the other will hold the wet ones.
In the first bowl, whisk together 1 cup of all-purpose flour, 1/2 teaspoon of baking soda, and 1/4 teaspoon of salt. Set this bowl aside. You will need it soon.
Creating the Cookie Dough
In your larger mixing bowl, cream together 1/2 cup of softened unsalted butter with 1/2 cup of packed brown sugar and 1/4 cup of granulated sugar. Beat this mixture until it’s light and fluffy, which should take about 2-3 minutes.
Next, add in 1 large egg and 1 teaspoon of pure vanilla extract. Mix until everything is well blended.
Now, slowly add the flour mixture to the wet ingredients. Keep mixing until a soft dough forms. Make sure there is no dry flour left.
Once your dough is ready, fold in 1/2 cup of semi-sweet chocolate chips, 1/2 cup of mini marshmallows, and 1/2 cup of crushed graham crackers. Use a spatula to gently mix these in.
Baking the S’mores Skillet Cookie
Grease your cast-iron skillet with cooking spray or a little butter. This will help keep the cookie from sticking.
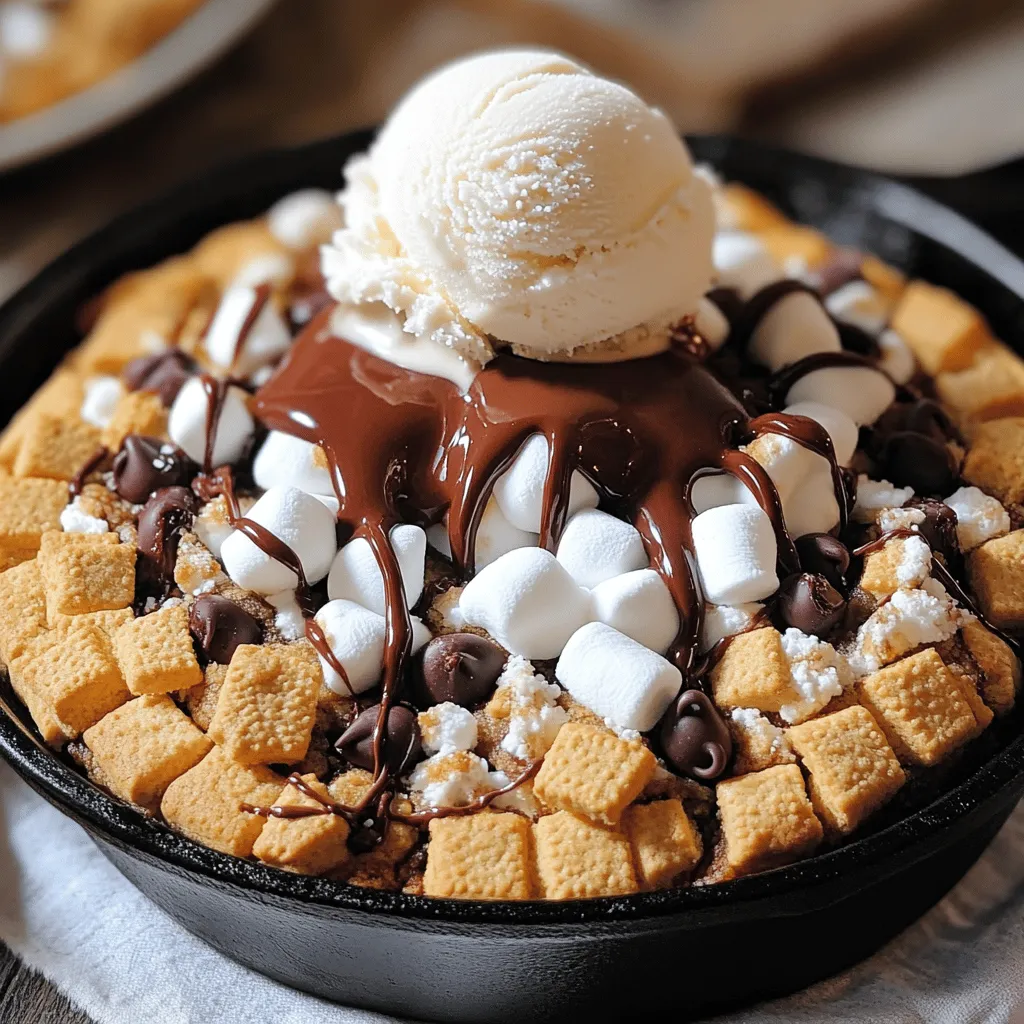
Spread the cookie dough evenly into the skillet. Make sure it reaches the edges for even baking. For a fun twist, sprinkle extra marshmallows and chocolate chunks on top.
Now, place the skillet in the preheated oven. Bake for 20-25 minutes. Watch closely! The cookie should be golden brown on top, and the edges may pull away from the skillet.
When done, take the skillet out and let it cool for 5-10 minutes. This waiting time helps set the cookie and makes it easier to slice and serve. Enjoy your delicious S’mores Skillet Cookie!
Tips & Tricks
How to Achieve the Perfect Texture
To get that soft and gooey inside, mix your dough gently. Do not over-mix after adding flour. This keeps the cookie light. Use room-temperature butter for a creamy texture. It blends better with sugars. Bake until the edges are golden, but the center remains soft. Let it cool for a few minutes before serving. This helps it set up nicely.
Serving Suggestions for S’mores Skillet Cookie
Serve this treat right in the skillet. It adds a rustic feel. Top it with a scoop of vanilla ice cream. Drizzle chocolate sauce on top. Sprinkle crushed graham crackers for extra crunch. Add some extra mini marshmallows for a fun touch. You can even serve it with fresh berries for a fruity twist.
Common Mistakes to Avoid
One common mistake is using cold butter. Cold butter won’t mix well. Make sure you measure your flour correctly. Too much flour makes the cookie dry. Don’t skip the additional toppings before baking; they add great flavor. Lastly, avoid baking too long. Check your cookie around the 20-minute mark to ensure it’s perfect.
Variations
Alternative Flavor Combinations
You can mix up the flavors in your S’mores Skillet Cookie. Try using white chocolate chips instead of semi-sweet. They add a sweet twist. You can also swap in peanut butter chips for a nutty taste. If you love fruit, add dried cherries or cranberries for a tart touch.
Gluten-Free Adaptation
To make this dessert gluten-free, use a 1:1 gluten-free flour blend. This works well in most recipes. Be sure to check that all other ingredients are gluten-free. Look for gluten-free graham crackers. They are easy to find in stores.
Custom Toppings Ideas
Get creative with toppings! You can sprinkle crushed pretzels for a salty crunch. Add fresh berries for a pop of color and flavor. If you love caramel, drizzle some on top before serving. You can also use flavored ice cream, like chocolate or mint, for an extra treat.
Storage Info
How to Store Leftovers
Store any leftover S’mores Skillet Cookie in an airtight container. Keep it at room temperature for up to two days. If you want it to last longer, place it in the fridge. Just make sure to wrap it well to avoid drying out.
Reheating Instructions
To reheat your S’mores Skillet Cookie, preheat your oven to 350°F (175°C). Place the cookie in the oven for about 10 minutes. This warms it up nicely. You can also use a microwave. Heat it for 15-20 seconds for a quick warm-up. Just be careful not to overheat it.
Freezing for Future Enjoyment
If you want to save some for later, freezing is a great option. Cut the cookie into portions and wrap each piece in plastic wrap. Place them in a freezer-safe bag. Your cookie will stay fresh for up to three months. To enjoy later, just thaw it overnight in the fridge and reheat as needed.
FAQs
Can I use different types of chocolate?
Yes, you can use different types of chocolate. You might try milk chocolate or dark chocolate. Each type adds a unique taste. Milk chocolate brings sweetness, while dark chocolate adds richness. Mix and match to find your favorite blend.
How do I make it without a cast-iron skillet?
If you don’t have a cast-iron skillet, use a different oven-safe pan. A ceramic or metal baking dish works well too. Just be sure to grease it, so the cookie doesn’t stick. The baking time may change slightly, so check it often.
How do I know when the cookie is done baking?
The cookie is done when it turns golden brown on top. The edges should pull away from the pan a little. If you insert a toothpick in the center, it should come out with a few moist crumbs. This shows it’s soft but not raw.
You learned about the key ingredients and tips for making a s’mores skillet cookie. I shared how to prepare the dough, bake it, and serve it. I also covered common mistakes, storage methods, and fun variations you can try.
Remember, using quality ingredients makes a big difference. Enjoy your baking journey and make this treat your own. Happy cooking!

![To make these tasty peanut butter banana oat bars, you'll need a few simple items. Here’s your shopping list: - 2 ripe bananas, well mashed - 1 cup peanut butter (smooth or crunchy) - 1/2 cup honey or maple syrup - 2 cups rolled oats - 1/2 teaspoon ground cinnamon - 1/4 teaspoon salt - Optional ingredients for enhancement: - 1/2 cup dark chocolate chips - 1/4 cup chopped nuts These ingredients come together to create a sweet, hearty snack. The ripe bananas add natural sweetness and moisture. The peanut butter gives a rich, creamy texture. Oats provide a filling base that keeps you energized. You can choose honey or maple syrup for sweetness. The cinnamon adds warmth and flavor, while salt enhances all the tastes. If you want to make them extra special, add dark chocolate chips or nuts for crunch. You can find the full recipe at the end of this guide. Enjoy gathering your ingredients and preparing for a delicious treat! - Preheat your oven to 350°F (175°C). - Line an 8x8 inch baking pan with parchment paper. - Combine bananas and peanut butter in a large mixing bowl. - Incorporate honey or maple syrup into the mixture. - Mix in oats, cinnamon, and salt. - Add dark chocolate chips and nuts if desired. - Spread the mixture into the prepared pan. - Bake for 20-25 minutes until golden brown. - Allow the bars to cool in the pan before transferring to a wire rack. - Cut into squares or rectangles. These simple steps lead you to a tasty treat. Follow the [Full Recipe] for more details. Enjoy your healthy snack! To make the best peanut butter banana oat bars, use overripe bananas. They add natural sweetness and moisture. Mix your ingredients well to get an even consistency. If you don’t mix well, some bites may taste different. Make your bars look great! Dust them with a sprinkle of cinnamon. You can also drizzle some extra peanut butter on top. This small touch adds flavor and makes them look appealing. Serve them on a decorative plate for a nice touch. A beautiful plate can make your snack feel special. Don’t be afraid to get creative! You can try adding spices like nutmeg or vanilla extract. These spices can bring out new flavors in your bars. Just a pinch can change your whole snack experience. Have fun experimenting to find your favorite taste! For the full recipe, check out the section above. {{image_4}} If you want a nut-free option, you can swap the peanut butter. Use sunflower seed butter or almond butter. Both options give a great taste. Sunflower seed butter adds a nice, nutty flavor without nuts. Almond butter gives a creamy texture that works well too. This change makes the bars safe for kids with nut allergies. For a gluten-free version, choose certified gluten-free rolled oats. Regular oats can often have gluten. Using gluten-free oats ensures everyone can enjoy these bars. They still taste delicious and keep all the good flavors. You won’t lose any texture or taste with this swap. To change the flavor, add dried fruits like cranberries or raisins. These fruits bring a sweet and chewy contrast to the bars. You can also mix in some chopped nuts for extra crunch. Feel free to get creative and use your favorite dried fruits. This way, you can make each batch of bars unique and exciting. Try these variations to find your favorite way to enjoy these tasty Peanut Butter Banana Oat Bars. If you want the full recipe, check out the section above. Store your peanut butter banana oat bars in an airtight container. This keeps them fresh at room temperature. If you want to keep them longer, put them in the fridge. They will stay good for about a week. If you want to save some bars for later, wrap them tightly in plastic wrap. Then, cover them with foil to prevent freezer burn. You can freeze them for up to three months. Just thaw them in the fridge when you're ready to enjoy. When you're ready to eat a bar, warm it in the microwave. A few seconds will give it a soft texture. This small step makes a big difference in taste and enjoyment. Yes, you can make these bars vegan. Just swap honey for maple syrup. Also, check that your chocolate chips are dairy-free. Look for golden brown edges and a set center. This means they are ready to come out. If you need a substitute, applesauce works well. It adds moisture and sweetness to the bars. When stored properly, these bars last up to a week in the fridge. You can freeze them for longer storage, too. Peanut butter banana oat bars are easy and tasty. You start by mixing ripe bananas, peanut butter, and oats. Then, you bake them until golden brown. Remember to cool and slice before serving. You can store them at room temp or freeze for later. Try adding dried fruits or other nut butters for more fun. With these simple steps, you can enjoy healthy snacks for days! Enjoy experimenting with your own versions!](https://dishtreats.com/wp-content/uploads/2025/06/65bd505b-0ff3-4866-91fc-ab6a46460c2c-768x768.webp)