Air Fryer Parmesan Zucchini Chips Crisp and Tasty Snack
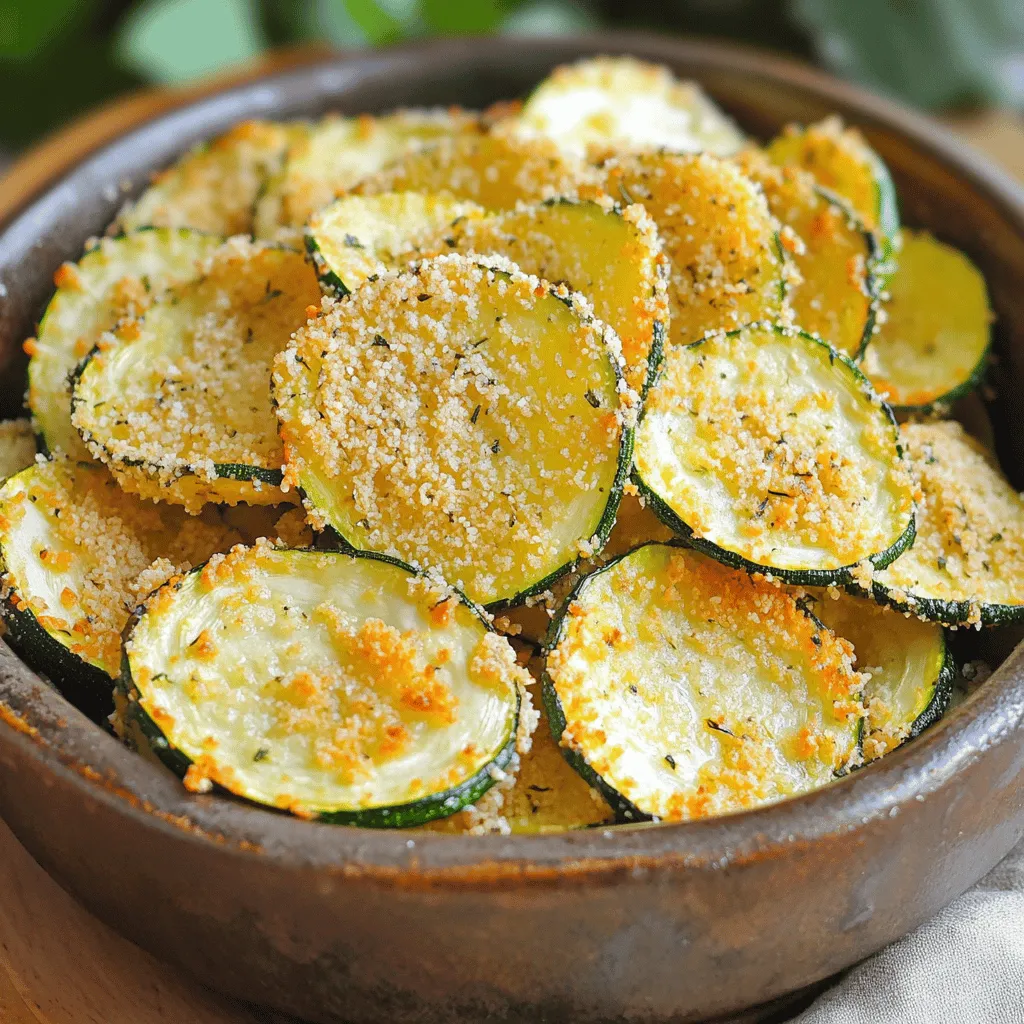
Are you ready for a snack that’s both crispy and healthy? Air Fryer Parmesan Zucchini Chips bring you the best of both worlds! With just a few simple ingredients, you can whip up a tasty treat that satisfies your cravings without the guilt. In this article, I’ll guide you through each step, share my top tips, and explore fun variations. Get ready to impress your taste buds with this easy recipe!
Ingredients
List of Ingredients
- Zucchinis and Preparation
You need 2 medium zucchinis. Slice them into thin rounds. Thin slices will crisp up nicely.
- Parmesan Cheese and Breadcrumbs
Use 1/2 cup of freshly grated Parmesan cheese. This cheese adds a rich flavor. Add 1/2 cup of panko breadcrumbs. They give the chips a satisfying crunch.
- Seasoning and Egg
For flavor, you will need:
- 1 teaspoon garlic powder
- 1 teaspoon onion powder
- 1 teaspoon Italian seasoning blend
- Salt and freshly ground black pepper, to taste
You will also need 1 large egg, beaten until frothy. This helps the coating stick to the zucchini. Finally, have olive oil spray ready to coat the air fryer basket and the chips.
Step-by-Step Instructions
Preheating the Air Fryer
Start by preheating your air fryer to 400°F (200°C). This step is key to getting crispy zucchini chips. The heat will help cook the chips evenly. Make sure your air fryer is ready before you prep the zucchini.
Preparing the Coating Mixture
In a mixing bowl, combine the following ingredients:
- 1/2 cup freshly grated Parmesan cheese
- 1/2 cup panko breadcrumbs
- 1 teaspoon garlic powder
- 1 teaspoon onion powder
- 1 teaspoon Italian seasoning blend
- Salt and freshly ground black pepper, to taste
Stir these ingredients well. This mixture will give your zucchini chips a great flavor and crunch.
Dipping and Coating Zucchini Slices
Grab your zucchini and slice it thinly into rounds. Take one slice and dip it into a beaten egg until fully coated. Then, press the slice into the breadcrumb mixture. Make sure both sides are covered well. Repeat this for all the slices. This step is key for a tasty, crispy finish.
Cooking the Zucchini Chips
Lightly spray the air fryer basket with olive oil. Place the coated zucchini chips in a single layer. Avoid overcrowding; it’s best to cook in batches if needed. For extra crispiness, spray the tops with olive oil. Air fry the zucchini chips for 12-15 minutes. Flip them halfway through to ensure even cooking. When they turn golden brown, they are ready. Let them cool for a minute before serving.
Tips & Tricks
Achieving Maximum Crispiness
To get the best crunch from your zucchini chips, slice them thin. Aim for about 1/4 inch thick. Thin slices cook faster and crisp up nicely. After slicing, sprinkle a bit of salt on the zucchini. This step draws out excess moisture, which helps make the chips crispy. Let them sit for about 10 minutes before coating. This simple trick works wonders for texture.
Preventing Sticking in the Air Fryer
To avoid sticking, spray your air fryer basket with olive oil. This quick step makes a big difference. Arrange the zucchini chips in a single layer. Overcrowding the basket leads to uneven cooking. If you have lots of zucchini, cook them in batches. Trust me, it’s worth the wait for perfectly crispy chips.
Serving Suggestions and Dipping Sauces
These zucchini chips shine when served warm. For a fun twist, try dipping them in marinara sauce or ranch dressing. You can also sprinkle extra Parmesan cheese on top for added flavor. Serve them in a rustic bowl for a nice presentation. Your guests will love this tasty snack!

Variations
Different Cheese Options
You can mix it up with different cheeses. Try using mozzarella for a gooey texture. Cheddar gives a sharp taste, while pecorino adds a wonderful bite. Each cheese brings its own flavor twist. Experiment and find your favorite.
Adding Spices or Flavors
Get creative with spices! You can add a pinch of cayenne pepper for heat. Smoked paprika gives a nice, smoky flavor. Mix in some dried herbs like basil or oregano for a fresh taste. The right spice can make your chips even more exciting.
Gluten-Free Alternatives
If you need a gluten-free option, swap panko for crushed rice cereal or gluten-free breadcrumbs. Almond flour is another great choice. These alternatives still give you that satisfying crunch while keeping your dish gluten-free. Enjoy your chips without worry!
Storage Info
How to Store Leftover Zucchini Chips
To store leftover zucchini chips, let them cool completely. Then, place them in an airtight container. This keeps them fresh for a short time. You can keep them in the fridge for up to 2 days. If you want to enjoy them later, consider freezing.
Reheating Tips for Optimal Crispiness
To reheat your zucchini chips, use the air fryer. Set it to 350°F (175°C). Heat the chips for about 3-5 minutes. This method helps them regain their crunch. You can also use a regular oven at the same temperature. Just place them on a baking sheet for crispiness.
Freezing and Thawing Instructions
To freeze zucchini chips, layer them between parchment paper in a freezer-safe bag. This prevents them from sticking together. They can stay in the freezer for up to 2 months. When ready to eat, thaw them in the fridge overnight. Then, reheat using the air fryer for the best taste.
FAQs
How do I make Air Fryer Parmesan Zucchini Chips without an air fryer?
You can bake zucchini chips in your oven. Start by heating the oven to 425°F (220°C). Prepare the zucchini slices as you would for the air fryer. Place them on a baking sheet lined with parchment paper. Make sure to space them out to avoid sticking. Bake for about 20-25 minutes, flipping halfway through. Watch for a golden color and crisp texture.
Can I use pre-shredded Parmesan cheese?
Yes, you can use pre-shredded Parmesan cheese. However, freshly grated cheese melts better and gives a richer flavor. Pre-shredded cheese may not stick as well to the zucchini. If you use it, consider adding a bit of extra binding with the egg mixture.
How do I know when the zucchini chips are done cooking?
Zucchini chips are done when they turn golden brown and feel crispy. The cooking time is about 12-15 minutes in an air fryer. Flip them halfway for even cooking. If you bake them, check around 20 minutes. You want them crunchy but not burnt.
You’ve learned how to make tasty Air Fryer Parmesan Zucchini Chips. We covered the right ingredients, from fresh zucchinis to Parmesan cheese. I shared step-by-step instructions to ensure perfect chips every time. Remember the tips for crispiness and serving ideas. You can even try fun variations to keep it fresh.
Get ready to enjoy your homemade snacks! These zucchini chips are not just delicious; they are also healthy. They make a great choice for any gathering or a quick treat. Dive in and savor each crunchy bite.

![- 2 cans young green jackfruit - 1 tablespoon olive oil - 1 medium onion, finely chopped - 1 teaspoon smoked paprika - 1 teaspoon ground cumin - 1 teaspoon chili powder - 1/2 teaspoon black pepper - 1/2 teaspoon cayenne pepper (adjust to taste) - 4 sturdy sandwich rolls - Coleslaw (optional, for topping) When making BBQ pulled pork sandwiches, the ingredients are key. Young green jackfruit is the star. It has a texture similar to pulled pork and absorbs flavors well. Use two cans for four servings, and don’t forget to rinse and drain them! For the base flavor, olive oil and onion work wonders. The oil helps to sauté the onion, which adds sweetness and depth. A finely chopped onion is best for even cooking and flavor distribution. Spices bring the dish to life. Smoked paprika adds a lovely smokiness, and ground cumin gives it warmth. Chili powder adds a kick, while black and cayenne pepper let you control the heat. For the sandwich, sturdy rolls hold up best. Choose your favorite type. Optional coleslaw adds crunch and creaminess. It’s a nice touch that balances the rich BBQ flavor. For the full recipe, follow the steps to create your BBQ pulled pork sandwiches that are simple and tasty! To start, you need to shred the jackfruit. Grab two cans of young green jackfruit, and drain them well. Rinse the jackfruit under cool water. With clean hands or two forks, pull apart the jackfruit into thin strands. Aim for a texture that mimics pulled pork. Set the shredded jackfruit aside for later use. Now, let’s sauté the onions and garlic. Heat one tablespoon of olive oil in a large skillet over medium heat. Add one finely chopped medium onion. Stir occasionally until the onion turns soft and translucent, about five minutes. Next, add minced garlic. Use four cloves for a nice kick. Sauté for another minute. You want the garlic fragrant, not browned. It’s time to bring it all together! Add the shredded jackfruit to the skillet. Mix well to coat the jackfruit with the onion and garlic. Now, it’s spice time! Incorporate one teaspoon of smoked paprika, one teaspoon of ground cumin, and one teaspoon of chili powder. Add half a teaspoon of black pepper and half a teaspoon of cayenne pepper. Stir everything together for a minute to let the flavors meld. Next, pour in one cup of BBQ sauce. You can use store-bought or homemade, depending on your preference. Mix until all the jackfruit strands are covered in sauce. Lower the heat and cover the skillet. Let it simmer for 20 to 25 minutes. Stir occasionally, adding a splash of water if it looks dry. Taste and season with salt as needed. Now, while the jackfruit simmers, you can toast the sandwich rolls. Preheat your oven or a skillet. Lightly toast the rolls until golden brown. This step adds a nice crunch. Once the jackfruit is ready, it’s time to assemble your sandwiches. Grab a toasted roll, spoon a good amount of BBQ jackfruit onto the bottom half. If you want, add some coleslaw for extra crunch. Top with the other half of the roll, and enjoy your smoky sweet BBQ pulled jackfruit sandwich! For the full recipe details, check [Full Recipe]. To get the best taste, adjust the spices to fit your likes. Start with the base spices: smoked paprika, ground cumin, and chili powder. These give the jackfruit a deep, rich flavor. If you like it spicy, add more cayenne pepper. Remember, you can always add more spice, but you can’t take it away! Toasting the rolls makes a big difference. Use a skillet or an oven. If using a skillet, heat it over medium heat. Place the rolls cut-side down and toast until golden brown. If you choose the oven, set it to 375°F (190°C). Bake the rolls for about 5-7 minutes. This adds a nice crunch that pairs well with the soft jackfruit. When serving BBQ pulled pork sandwiches, make it fun! Use a wooden board for a rustic look. Place the sandwiches on it and add a small bowl of BBQ sauce for dipping. You can also add extra coleslaw on the side for a pop of color and crunch. This makes your meal look inviting and delicious. For the full recipe, check out the recipe section! {{image_4}} Using a slow cooker makes this dish simple and hands-off. Start by shredding the jackfruit as before. Place it in the slow cooker with olive oil, chopped onion, and minced garlic. Stir in the spices: smoked paprika, ground cumin, chili powder, and black pepper. Pour in your BBQ sauce. Cover and cook on low for 6 to 8 hours. The jackfruit will absorb all the flavors and become tender. You’ll love how easy this method is! Different areas have their own special takes on BBQ pulled pork. In the South, you might try adding vinegar-based sauces for a tangy twist. In Texas, a smoky chipotle sauce can add a kick. Up North, you might find a sweeter sauce with apple cider. Feel free to explore these local flavors. Your sandwiches will reflect your own region's tastes! If you want to switch things up, there are other great options. You can use mushrooms or lentils. Both provide a hearty texture. For a lighter option, consider using shredded zucchini or eggplant. They soak up flavors well too. Just remember to adjust your spices to match. Enjoy the creativity in your kitchen! To keep your leftover sandwiches tasty, store them in an airtight container. Make sure to separate the jackfruit mixture from the rolls. This helps prevent sogginess. Leftover jackfruit can last in the fridge for about three to four days. If you plan to eat them soon, add some extra BBQ sauce to keep them moist. If you want to save the jackfruit mixture for later, freezing works well. First, let the jackfruit cool completely. Then, place it in a freezer-safe container or bag. Make sure to remove any air. This helps avoid freezer burn. The mixture can stay fresh for about three months. Just remember to label the container with the date. When you’re ready to enjoy your pulled pork sandwiches, reheating is key. For the best results, use the stovetop. Place the jackfruit in a skillet over low heat. Add a splash of water or BBQ sauce to keep it moist. Stir until heated through. If you prefer the oven, preheat it to 350°F (175°C). Cover the jackfruit in a baking dish with foil. Heat for about 15 minutes. Enjoy your delicious BBQ pulled pork sandwiches! Yes, you can make BBQ pulled pork sandwiches ahead of time. This dish is perfect for meal prep. I suggest cooking the jackfruit and storing it in the fridge. It stays fresh for about 3 to 5 days. When you're ready to eat, just reheat it on the stove. You can also toast the rolls just before serving. This way, the sandwiches taste fresh and warm. The best BBQ sauce is one that fits your taste. If you like sweet, try a honey BBQ sauce. If you prefer spicy, go for a chipotle sauce. There are many great store-bought options, like Sweet Baby Ray's or Stubb's. You can also make your own. A mix of ketchup, vinegar, and spices creates a great flavor. To make jackfruit taste like pulled pork, focus on flavor. Start by shredding the jackfruit into thin strands. Cook it with onions, garlic, and spices like smoked paprika and cumin. These add depth to the dish. The BBQ sauce is key too. It coats the jackfruit and infuses it with rich flavor. Let it simmer for a while to soak up all those tasty notes. This article covered how to make BBQ pulled jackfruit sandwiches. You learned about the main ingredients, spices, and how to prepare each component. I shared step-by-step instructions to help you shred, sauté, and combine ingredients. You also received tips for perfecting flavor, toasting rolls, and creative presentations. Lastly, we explored variations, storage info, and frequently asked questions. Enjoy cooking this tasty dish that’s both fun and simple to make!](https://dishtreats.com/wp-content/uploads/2025/06/394fc23c-fade-4441-b59c-acd30966e9f2-768x768.webp)
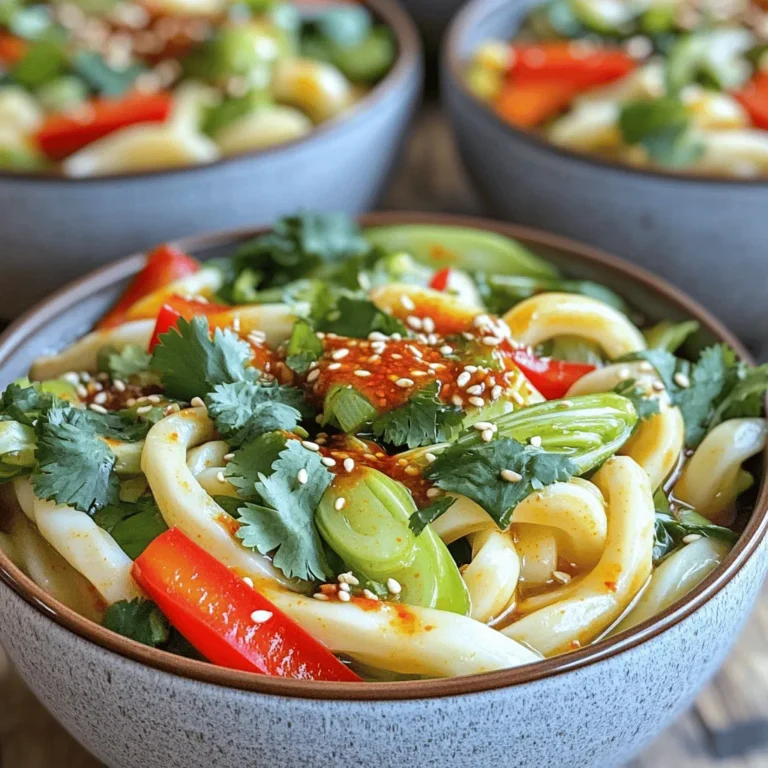
![- 8 oz. spaghetti or pasta of your choice - 1 cup cherry tomatoes, halved - 1 cup zucchini, sliced into half-moons - 1 cup mixed bell peppers, sliced - 1 cup broccoli florets - 1 cup fresh spinach - 2 tablespoons extra virgin olive oil - 3 cloves garlic, finely minced - Zest and juice from 1 medium-sized lemon - 1 teaspoon dried oregano - Salt and freshly ground black pepper, to taste - Fresh basil leaves and grated Parmesan cheese (optional) When I craft my Pasta Primavera, I focus on fresh and vibrant veggies. The cherry tomatoes burst with flavor, giving a sweet touch. Zucchini adds a nice crunch, while bell peppers bring color. Broccoli florets add a delightful bite, and fresh spinach wilts perfectly into the mix. I love using extra virgin olive oil for its rich taste. Garlic gives it a fragrant kick. The zest and juice of the lemon brighten the dish and enhance all the flavors. Dried oregano is my go-to herb here, adding warmth and depth. A pinch of salt and pepper brings it all together. For a finishing touch, I often sprinkle fresh basil on top. You can also add grated Parmesan cheese for creaminess. This recipe is simple yet packed with flavor, perfect for any meal. To see the full recipe, check out the details above. - Fill a large pot with salted water. - Bring to a boil and cook pasta until al dente. - Reserve pasta water and drain. To cook the pasta, I fill a big pot with water and add a good amount of salt. This helps to flavor the pasta. Once the water boils, I add my spaghetti or whatever pasta I choose. I cook it until it is al dente, which means it is firm but cooked. Before draining, I set aside about one cup of the pasta water. This water is full of starch and will help make my sauce creamy later. - Heat olive oil in a skillet. - Sauté minced garlic for fragrance. - Add broccoli and mixed bell peppers, sauté for 3-4 minutes. Next, I heat some olive oil in a large skillet over medium heat. Once the oil is hot, I add minced garlic and sauté it for about 30 seconds. The smell is amazing! I have to be careful not to burn it. After that, I toss in the broccoli and mixed bell peppers. I sauté these for 3-4 minutes until they soften a bit but still have some crunch. - Incorporate zucchini and cherry tomatoes. - Add reserved pasta water and seasonings. - Let simmer to create sauce. Now, I add my zucchini and cherry tomatoes to the skillet. I stir everything for about three minutes. The tomatoes will start to release their juices, making the dish juicy. I then pour in the reserved pasta water, followed by the lemon juice and zest, and dried oregano. This creates a light sauce. I let it simmer for two minutes to blend the flavors. - Add drained pasta and fresh spinach. - Toss until well mixed. - Season to taste and plate with garnishes. Finally, I gently add the drained pasta to the skillet along with fresh spinach. I toss everything well so the pasta gets coated in the sauce. The heat wilts the spinach just right. I taste the dish and season it with salt and black pepper. To serve, I plate the pasta in deep bowls and garnish with fresh basil and a sprinkle of Parmesan cheese if I want. This dish looks and tastes great. You can find the full recipe for this delightful dish to enjoy! To achieve al dente pasta, you need to watch the clock. Start checking your pasta a minute before the package time. It should be firm but not hard. The texture is key! Reserving pasta water is a must. Always save about one cup before you drain it. This water is starchy and helps create a silky sauce later. It can make your dish creamy without adding heavy cream. To boost flavor, think about adding fresh herbs like parsley or thyme. You can also sprinkle in some red pepper flakes for heat. These add extra layers of taste and excitement. When sautéing vegetables, keep the heat high but don’t overcook them. Stir them quickly to keep their crunch. A short cooking time keeps veggies bright and fresh. For a beautiful presentation, use deep bowls for serving. This allows the colors to pop. A splash of lemon zest on top adds brightness, too. Garnishing can elevate your dish. Scatter fresh basil leaves over the top. A sprinkle of grated Parmesan cheese adds a nice touch. It makes your dish look like it came from a restaurant! For the full recipe, check out the detailed instructions above. Enjoy your cooking adventure! {{image_4}} You can change up the veggies in your Pasta Primavera with Lemon. Seasonal veggies work best. Try using asparagus, snap peas, or carrots. These will add color and flavor. If fresh veggies aren't available, frozen ones are a great option too. Just remember to thaw them and drain any excess water before cooking. This keeps your dish from getting soggy. Want to make your Pasta Primavera heartier? You can add protein! Chicken, shrimp, or tofu are great choices. If you use chicken, cook it in the skillet first, and then add the veggies. For shrimp, toss them in when the veggies are almost done. They only need a few minutes to cook. If you prefer tofu, press it to remove moisture, then cube and sauté until golden before adding it to the mix. Pasta Primavera is very flexible with pasta types. You can choose gluten-free pasta if you need it. Options like brown rice or quinoa pasta work well. Whole grain pasta is another healthy choice, adding fiber to your meal. If you want something unique, try legume-based pasta made from lentils or chickpeas. These add a nice twist and extra protein. For the full recipe, check out the [Full Recipe]. To keep your Pasta Primavera fresh, refrigerate it right after cooling. Place it in airtight containers. This helps lock in flavors and keeps it safe to eat. Always store leftovers within two hours of cooking. The pasta will taste great for up to three days in the fridge. When you reheat your pasta, use a stove or microwave. For the stove, add a splash of water or olive oil. Stir gently to heat evenly. If using a microwave, cover it to keep moisture in. Avoid overheating to prevent soggy pasta. Heat just until warm. To freeze Pasta Primavera, let it cool first. Transfer it to freezer-safe containers, leaving space for expansion. This dish can be frozen for up to three months. When ready to eat, thaw it overnight in the fridge. Reheat it on the stove or microwave, adding a bit of water to help it steam. Enjoy your flavorful veggie delight later! For the full recipe, check out the details above. Pasta Primavera lasts about 3 to 5 days in the fridge. To keep it fresh, store it in an airtight container. It’s best to let the pasta cool before sealing. This helps prevent moisture buildup, which can make it soggy. Yes, you can make Pasta Primavera ahead of time. To prepare, cook the pasta and veggies as usual. Let everything cool completely before storing. When you are ready to eat, just reheat it in a skillet over low heat. Add a splash of water or extra olive oil to keep it moist. If you need a lemon substitute, try lime juice or vinegar. Use the same amount, about 2 tablespoons. You can also use orange juice for a sweeter flavor. Adjust to your taste, as different fruits can change the dish's profile. Pasta Primavera is healthy and full of nutrients. It has lots of veggies like broccoli, spinach, and bell peppers. These provide vitamins and fiber. The olive oil adds healthy fats. Overall, this dish is low in calories and high in flavor, making it a great choice. Pasta Primavera is a simple and tasty dish. We discussed the essential ingredients, like pasta, fresh vegetables, and seasonings. I shared step-by-step instructions for cooking and combining ingredients. You can enhance flavors with herbs and spices while following tips for perfect presentation. Consider variations with protein and different pasta types for more options. Lastly, I covered storage and reheating to keep leftovers fresh. This dish is not only delicious but also healthy, making it a great meal for everyone. Enjoy experimenting with it!](https://dishtreats.com/wp-content/uploads/2025/05/1202f33f-9285-4746-af91-946a78d77e80-768x768.webp)