
Slow Cooker Cinnamon Roll French Toast Delight
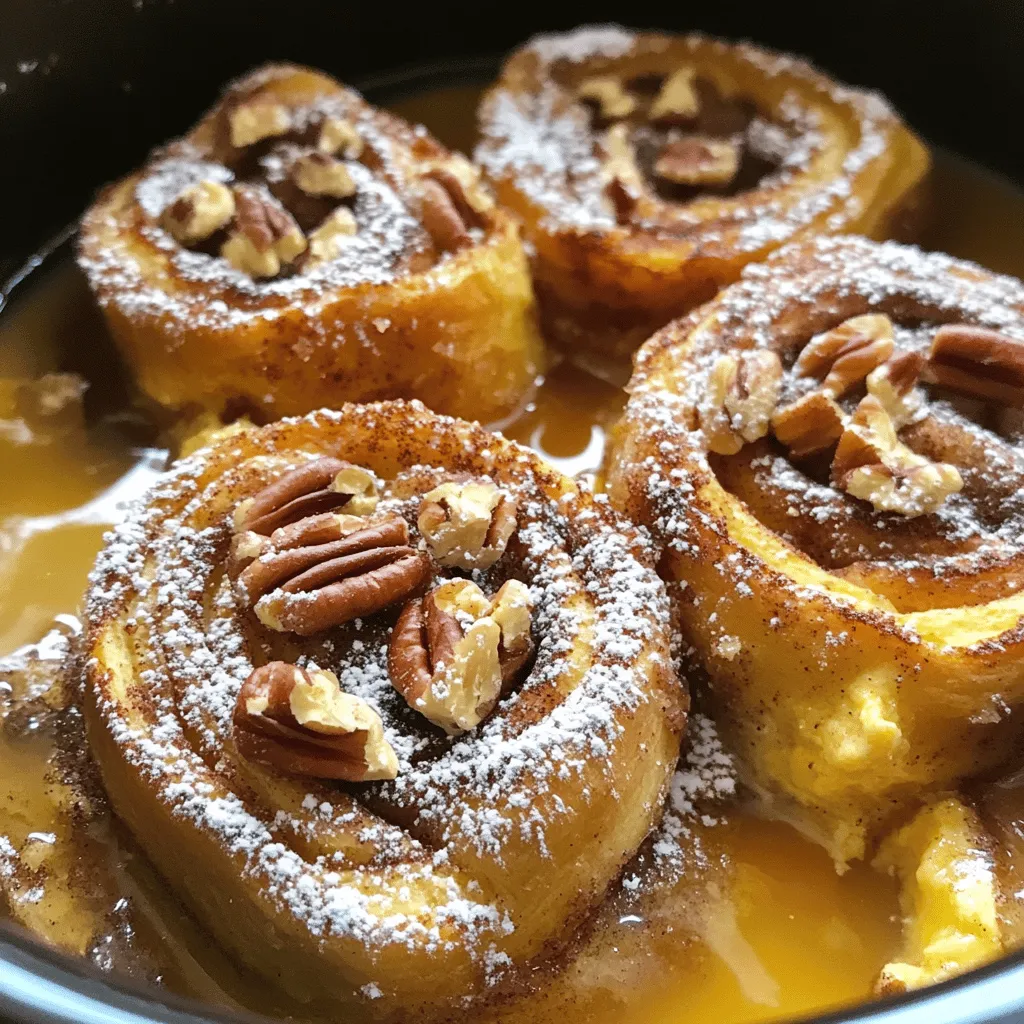
Are you ready to wake up to a warm, sweet breakfast that makes mornings special? With my Slow Cooker Cinnamon Roll French Toast Delight, you can create a breakfast that everyone will love. Imagine soft, fluffy cinnamon rolls soaked in a creamy egg mix, cooked low and slow for a tasty treat. Join me as I guide you through easy steps and tips for this delightful dish that’ll make your breakfast the star of the day!
Ingredients
List of Ingredients
- 1 can (16 oz) refrigerated cinnamon rolls, cut into quarters
- 6 large eggs
- 1 cup whole milk
- 1 teaspoon pure vanilla extract
- 1 teaspoon ground cinnamon
- 1/2 teaspoon ground nutmeg
- 1/2 cup pure maple syrup
- 1/2 cup chopped pecans (optional for added texture)
- 1/2 cup powdered sugar (for drizzling)
Optional Ingredients for Added Flavor
You can add 1/2 cup of raisins or chocolate chips. Both bring sweetness and chewiness. For a twist, try adding orange zest for a bright flavor. It pairs well with the cinnamon.
Recommended Substitutes for Healthier Options
For a lighter dish, use egg whites instead of whole eggs. Almond milk works as a great low-calorie milk substitute. If you want to reduce sugar, you can use a sugar substitute like stevia or monk fruit. These swaps keep the taste while making it healthier.
Step-by-Step Instructions
Preparing the Slow Cooker
Start by greasing the inside of your slow cooker. You can use cooking spray or butter. This step keeps the dish from sticking. A well-greased pot makes serving much easier. Don’t skip this part!
Creating the Egg Mixture
In a large bowl, whisk together six large eggs. Add in one cup of whole milk. Then, mix in one teaspoon of pure vanilla extract. Next, add one teaspoon of ground cinnamon and half a teaspoon of nutmeg. Make sure to blend it all until smooth. This mixture gives the dish its rich flavor.
Layering the Ingredients in the Slow Cooker
Open the can of cinnamon rolls. Cut each roll into quarters. Layer these pieces evenly at the bottom of the greased slow cooker. Pour the egg mixture over the cinnamon roll pieces. Ensure that every piece is well-coated. Gently press down on the rolls. This helps them soak up the egg mixture.
Cooking Guidelines and Timing
Drizzle half a cup of pure maple syrup over the top. If you want, sprinkle half a cup of chopped pecans for some crunch. Cover the slow cooker with its lid. Cook on low for about four hours. Check for doneness with a toothpick. It should come out clean when the center is set. After cooking, turn off the slow cooker. Let it cool for a few minutes before serving. Drizzle powdered sugar over the top for a sweet finish. Enjoy your warm, gooey treat!
Tips & Tricks
How to Prevent Sticking in the Slow Cooker
To keep your Slow Cooker Cinnamon Roll French Toast from sticking, grease the pot well. Use cooking spray or butter on the inside. Make sure to coat all sides. This step is key. It helps the cinnamon rolls lift out easily once cooked.
Ensuring Even Soaking of Cinnamon Rolls
To soak the cinnamon rolls evenly, layer them flat in the slow cooker. Cut each roll into quarters and spread them out. Pour the egg mixture over them slowly. Press down gently to help the rolls absorb the egg. This ensures every piece gets that rich flavor.
Serving Suggestions for a Complete Meal
Serve your French toast with fresh fruit on the side. Berries or sliced bananas add color and taste. You can also add crispy bacon or sausage for a savory touch. Drizzle extra maple syrup over the top for sweetness. A dollop of whipped cream makes it feel special. Enjoy it warm to get the full flavor!

Variations
Seasonal Variations (e.g., Pumpkin Spice)
One fun way to change this dish is by adding seasonal flavors. For fall, try a pumpkin spice version. Just add 1 cup of pumpkin puree to the egg mixture. Also, include 2 teaspoons of pumpkin pie spice instead of cinnamon. This twist brings warmth and comfort to your breakfast table.
Alternative Toppings and Mix-Ins
You can also play with toppings and mix-ins to make this dish your own. Try adding fresh berries, like blueberries or strawberries, on top after cooking. They add a nice tartness. You could also swap the pecans for walnuts or almonds for a different crunch. For extra sweetness, drizzle chocolate syrup on top.
Adjusting for Dietary Restrictions (Gluten-Free, Dairy-Free)
If you have dietary needs, don’t worry! You can make this dish gluten-free by using gluten-free cinnamon rolls. Many brands offer tasty options that work well. For a dairy-free version, swap whole milk with almond or oat milk. Use a dairy-free cream cheese frosting in place of powdered sugar for a rich finish. These adjustments keep the dish delicious for everyone!
Storage Info
Recommended Storage Practices
To keep your Slow Cooker Cinnamon Roll French Toast fresh, store it in an airtight container. Make sure it cools down completely before you put it away. This dish can last in the fridge for up to three days. If you want to keep it longer, freezing is a great option.
Reheating Instructions
When you are ready to enjoy leftovers, reheating is simple. Place the desired portion on a microwave-safe plate. Heat it in the microwave for about 30 seconds to 1 minute. Check if it’s warm enough. You can also reheat it in the oven at 350°F for about 10-15 minutes, covered with foil.
Freezing for Later Use
If you want to freeze your Slow Cooker Cinnamon Roll French Toast, cut it into portions first. Wrap each piece tightly in plastic wrap, then place them in a freezer bag. It can stay in the freezer for up to two months. To enjoy, simply thaw in the fridge overnight before reheating.
FAQs
Can I use frozen cinnamon rolls for this recipe?
Yes, you can use frozen cinnamon rolls. Just thaw them first. Cut the rolls into quarters, as you would with fresh ones. This will help them soak up the egg mixture better. Keep in mind that cooking time may vary slightly.
How do I know when the Slow Cooker Cinnamon Roll French Toast is done?
To check if it’s done, insert a toothpick into the center. If it comes out clean, it is ready. You should see that the center is no longer jiggly. The edges may brown slightly, which is normal.
What can I serve with Slow Cooker Cinnamon Roll French Toast?
You can serve this dish with fresh fruit, like berries or bananas. Whipped cream adds a nice touch too. A drizzle of extra maple syrup can make it even sweeter. If you want more crunch, add crispy bacon or sausage on the side.
You can make a delicious Slow Cooker Cinnamon Roll French Toast with just a few simple steps. Start with the right ingredients and layers them well. Use tips to avoid sticking and get even soaking. Explore fun variations to suit your tastes. Lastly, store any leftovers properly for later enjoyment.
This dish is easy, fun, and sure to please everyone at your table. Enjoy cooking and sharing this delightful treat!


![To make these delightful cookies, you need a few key ingredients: - 1 cup ricotta cheese - 1/2 cup unsalted butter, softened - 1 cup granulated sugar - 1 large egg - 2 teaspoons fresh lemon zest - 2 tablespoons fresh lemon juice - 2 cups all-purpose flour - 1 teaspoon baking powder - 1/2 teaspoon baking soda - 1/4 teaspoon fine sea salt - Powdered sugar for dusting These ingredients create a soft and tasty cookie that bursts with lemon flavor. For this recipe, you will need: - A large mixing bowl - An electric mixer - A medium mixing bowl - Whisk - Baking sheet - Parchment paper - Cookie scoop or spoon - Wire rack Having the right tools makes baking easy and fun. You can easily swap some ingredients if needed: - Use low-fat ricotta for a lighter option. - Replace unsalted butter with coconut oil for a dairy-free cookie. - Substitute lemon with orange for a different flavor. - Use gluten-free flour to make these cookies gluten-free. These alternatives let you customize the recipe to fit your needs. For the full recipe, check the details provided above. First, heat your oven to 350°F (175°C). This step is key for baking. Next, line a baking sheet with parchment paper. This prevents the cookies from sticking. In a large bowl, mix the ricotta cheese and softened butter. Use an electric mixer on medium speed. Beat them for about 2-3 minutes. You want a smooth and creamy mix. This will be the base of your cookies. Now, it’s time to add the sugar. Gradually sprinkle in the granulated sugar, mixing as you go. Keep beating until it’s light and fluffy. Next, crack in the egg. Add the lemon zest and lemon juice. Mix until everything is well combined. In a separate bowl, whisk together the flour, baking powder, baking soda, and sea salt. Once mixed, add the dry ingredients to the ricotta mix. Stir gently until just combined. Be careful not to overmix. This helps keep the cookies soft. Use a spoon or cookie scoop to drop rounded tablespoons of dough onto the baking sheet. Leave about 2 inches of space between each cookie. This allows them to spread while baking. Place the sheet in the oven and bake for 12-15 minutes. Look for lightly golden edges and soft centers. After baking, let the cookies cool on the sheet for about 5 minutes. Then carefully transfer them to a wire rack. Let them cool completely. Once cooled, dust lightly with powdered sugar for a sweet touch. Enjoy these delightful lemon ricotta cookies! For the complete recipe, check out the [Full Recipe]. To make your lemon ricotta cookies soft, use fresh ricotta cheese. It adds moisture and flavor. Avoid overmixing the dough. Mix just until combined. This keeps the cookies light. Let the dough chill for about 30 minutes. Chilling helps the cookies hold their shape while baking. Accurate measurements are key to great cookies. Use dry measuring cups for flour and sugar. Spoon the flour into the cup, then level it off with a knife. Do not pack it down. For liquids, use a clear liquid measuring cup. Fill it to the desired line while checking at eye level. One common mistake is not preheating the oven. Always preheat to ensure even baking. Another mistake is baking on an ungreased or unlined pan. Use parchment paper to prevent sticking. Finally, don’t skip cooling the cookies on a wire rack. This helps them set and stay soft. For the full recipe, check out the step-by-step guide. {{image_4}} You can add chocolate chips for a sweet twist. Use semi-sweet or milk chocolate chips. Just fold in one cup of chips into the dough after mixing in the dry ingredients. This change creates a fun contrast with the lemon flavor. The rich chocolate and bright lemon make each bite exciting! To make these cookies gluten-free, swap the all-purpose flour with a gluten-free blend. Look for a blend that includes xanthan gum. This ingredient helps the cookies hold their shape. Follow the same recipe steps, and you will have delicious gluten-free cookies that everyone can enjoy. You can enhance the flavor by adding herbs or spices. Try mixing in a teaspoon of fresh thyme or rosemary for a unique taste. You could also use vanilla extract for warmth. These small changes can take your lemon ricotta cookies to a whole new level. Experiment with flavors and find what you like best! To keep your lemon ricotta cookies fresh, place them in an airtight container. This will help maintain their soft texture. I recommend layering the cookies with parchment paper. This way, they won’t stick together. Store the container at room temperature for up to five days. If you live in a humid area, consider refrigerating them. Just remember to bring them to room temperature before enjoying. If you want to save some cookies for later, freezing is a great option. First, let the cookies cool completely. Then, place them in a single layer on a baking sheet. Freeze for about an hour until firm. After that, transfer the cookies to a freezer-safe bag or container. Make sure to remove as much air as possible. You can freeze them for up to three months. When you’re ready to enjoy, thaw them in the fridge overnight. Lemon ricotta cookies are best enjoyed fresh, but they can last. If stored correctly, they stay soft for about five days at room temperature. Over time, they may become a bit dry. To refresh them, you can microwave a cookie for about 10 seconds. This will bring back some of the softness. Always check for any signs of spoilage before eating. If they smell off or look strange, it’s best to toss them. Enjoy your cookies! For the full recipe, refer to the main article. Yes, you can use pre-made ricotta cheese. Just make sure it is fresh and creamy. Store-bought ricotta saves time and still brings great taste. If it's a bit watery, drain it before use. This will keep your cookies from getting too soggy. To make these cookies dairy-free, replace ricotta cheese with tofu. Use firm tofu, blend it, and add a bit of lemon juice for flavor. For butter, try coconut oil or a dairy-free spread. These swaps keep the cookies soft and delicious without dairy. The best way to glaze these cookies is with a simple lemon glaze. Mix powdered sugar with fresh lemon juice until smooth. Drizzle the glaze over cooled cookies for a sweet finish. You can also add lemon zest on top for extra flavor. You will know the cookies are done when the edges turn golden. The centers should still look soft and puffy. A toothpick inserted in the center should come out clean or with a few crumbs. Avoid over-baking for the softest texture. Yes, you can make these cookies healthier. Use whole wheat flour instead of all-purpose flour. Replace granulated sugar with coconut sugar or a sugar substitute. You can also cut down on butter by using applesauce or Greek yogurt. These changes keep cookies tasty and lower in calories. For the full recipe, check the [Full Recipe]. In this post, we covered how to make lemon ricotta cookies step by step. We explored key ingredients, baking equipment, and helpful tips. I shared ways to customize the cookies with flavors and special diets. Finally, we discussed storage methods to keep them fresh. With these insights, you can bake delicious cookies that are soft and bright in flavor. Enjoy your baking experience and share these treats with friends!](https://dishtreats.com/wp-content/uploads/2025/07/5405bae2-00aa-4997-8585-ece8a42539ac-768x768.webp)
![When making peach streusel muffins, the right ingredients make all the difference. Here’s what you need: - 1 ½ cups all-purpose flour - 1 tsp baking powder - ½ tsp baking soda - ¼ tsp salt - ½ cup granulated sugar - ¼ cup packed brown sugar - ⅓ cup unsalted butter, melted - 1 large egg - 1 tsp vanilla extract - ½ cup buttermilk - 1 ½ cups fresh peaches, peeled and diced - ⅓ cup rolled oats - 1 tsp ground cinnamon These ingredients create a lovely balance of flavors. The fresh peaches add sweetness and moisture. The streusel topping gives a nice crunch. This recipe is simple and uses common items. I love how easy it is to find these ingredients at any store. For the full recipe, check out [Full Recipe]. It's a delightful way to enjoy seasonal peaches in a warm muffin. First, preheat your oven to 375°F (190°C). This step warms the oven, helping the muffins bake evenly. Next, prepare your muffin tin. You can line it with muffin liners or grease it lightly with some non-stick spray or butter. This will keep the muffins from sticking. In a medium bowl, whisk together the dry ingredients. Combine 1 ½ cups of all-purpose flour, 1 teaspoon of baking powder, ½ teaspoon of baking soda, and ¼ teaspoon of salt. Mix well until everything is blended. Set this bowl aside for now. In a large mixing bowl, combine the sugars and melted butter. Use ½ cup of granulated sugar and ¼ cup of brown sugar. Mix them well until they blend together. Then, add 1 large egg and 1 teaspoon of vanilla extract. Beat the mixture until it looks fluffy. Next, pour in ½ cup of buttermilk and stir gently. Now, it’s time to add the dry ingredients. Gradually fold the flour mixture into the wet ingredients. Be gentle and avoid overmixing. It’s okay if the batter has a few lumps. Finally, fold in 1 ½ cups of diced peaches. Make sure they are evenly spread throughout the batter. In a small bowl, mix together ⅓ cup of rolled oats, 1 teaspoon of ground cinnamon, and a pinch of sugar for the streusel topping. This mix will add a crunchy texture to your muffins. Using a scooper or a spoon, fill each muffin liner with the batter. Aim to fill them about two-thirds full. This gives your muffins room to rise. Once filled, sprinkle a generous amount of the streusel topping over each muffin. This adds that crispy layer on top. Place the muffin tin in your preheated oven. Bake for 18 to 20 minutes. Check for doneness by inserting a toothpick into the center of a muffin. If it comes out clean, your muffins are ready. After baking, let the muffins cool in the pan for about 5 minutes. Then, transfer them to a wire rack to cool completely. For a complete recipe and detailed instructions, check out the Full Recipe. To make great muffins, avoid overmixing the batter. When you mix too much, muffins can turn tough and dry. Gently fold the dry ingredients into the wet. Leave some lumps; they are okay! The batter should feel thick but not dry. Aim for a smooth mix with small bits of flour still visible. This keeps the muffins soft and fluffy. To keep your muffins fresh, store them in an airtight container at room temperature. They will stay good for up to three days. If you want to keep them longer, freeze them. Wrap each muffin in plastic wrap, then put them in a freezer bag. When ready to eat, thaw them in the fridge overnight or microwave them for about 20 seconds. This keeps them soft and tasty. These peach streusel muffins pair well with coffee or tea. They also taste great with a glass of milk. For a nice touch, dust the muffins with powdered sugar before serving. You can also add a slice of fresh peach on the side. This extra step makes your muffins look fancy and adds more peach flavor. Enjoy the delightful mix of tastes! {{image_4}} You can switch the peaches for other fruits. Blueberries and raspberries work great! They add a nice burst of flavor. You can even mix fruits, like peaches and blueberries, for a fun twist. Remember to adjust the amount of fruit based on what you use. Keep it around 1 ½ cups to fill the muffins well. Need a gluten-free option? Use a gluten-free flour blend instead of all-purpose flour. For a dairy-free version, replace buttermilk with almond milk or coconut milk. You can also use a flax egg instead of a regular egg. Just mix 1 tablespoon of flaxseed meal with 2.5 tablespoons of water. Let it sit for a few minutes to thicken. This will keep your muffins tasty and friendly for different diets. Want to kick up the flavor? Try adding nuts like walnuts or pecans to the batter. They give a nice crunch. You can also sprinkle some cinnamon or nutmeg in the batter for warmth. For a little zing, add a splash of lemon juice or zest. These small changes can make your muffins more exciting and tasty. For the full recipe, look for the Peach Streusel Muffins instructions above! You can store Peach Streusel Muffins at room temperature. Place them in an airtight container. This helps keep them fresh and soft. They will stay tasty for up to three days. If you want to keep them longer, consider freezing. Freezing is a great way to save these muffins for later. Wrap each muffin in plastic wrap. Then, place them in a freezer bag or container. This keeps them from getting freezer burn. You can freeze them for up to three months. To enjoy them later, thaw your muffins. Take them out of the freezer and let them sit at room temperature. This usually takes about an hour. You can also warm them in the oven at low heat for a fresh-baked taste. For the best experience, try the Full Recipe to make these delightful muffins again! Yes, you can use canned peaches. Look for peaches packed in juice or water. Drain them well and pat them dry to remove excess moisture. This step helps avoid soggy muffins. Cut the peaches into small pieces, similar to fresh ones. Canned peaches can be sweeter, so reduce the sugar in the recipe by a tablespoon. This keeps your muffins balanced. If your batter is thick, add a splash of milk or buttermilk. Mix well until you reach a smooth texture. Thick batter can lead to dry muffins. You want a batter that can easily drop from a spoon but is not runny. Another tip is to gently fold in a bit more diced peaches. This adds moisture and flavor. Check for doneness by inserting a toothpick into the center of a muffin. If it comes out clean or with a few crumbs, your muffins are ready. Look for a golden-brown top and a slight spring when you touch the surface. If the muffins still look wet or jiggly, bake them a few more minutes. Yes, you can prepare the batter ahead. Store it in the fridge for up to 2 hours. Mix the wet and dry ingredients separately. Combine them just before baking. This helps keep the muffins light and fluffy. If you plan to store longer, consider freezing the batter in muffin tins. This way, you can bake fresh muffins anytime. For the full recipe, check above. These peach muffins are easy to make and full of flavor. We covered the ingredients, step-by-step instructions, and tips to improve texture and taste. From using fresh peaches to adding oats, each detail counts. You can experiment with flavors and storage methods. Enjoy these muffins fresh or store them for later. Happy baking!](https://dishtreats.com/wp-content/uploads/2025/07/b62cebd8-d26b-48c0-b1ab-fab18f37a599-768x768.webp)