
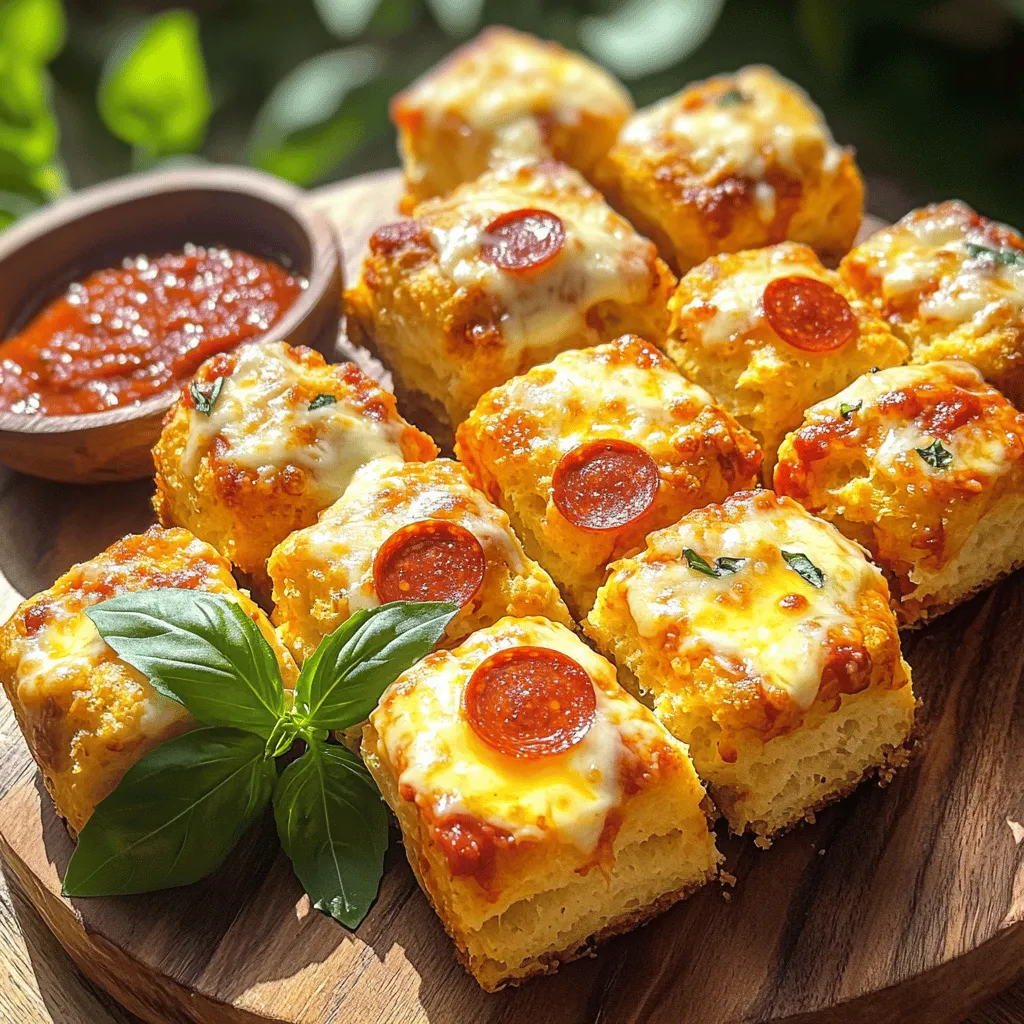
Pepperoni Pizza Monkey Bread Tasty Easy Dinner Option

Craving a tasty and fun dinner? Look no further than Pepperoni Pizza Monkey Bread! This quick and easy dish combines all your favorite pizza flavors into a pull-apart treat that’s perfect for sharing. In this blog, I’ll guide you through the ingredients and steps to create this mouthwatering meal that everyone will love. Let’s dive in and make dinner exciting again!
Ingredients
Cooking is all about the right ingredients. For this tasty Pepperoni Pizza Monkey Bread, you’ll need:
- 3 cups refrigerated biscuit dough, cut into quarters
- 1 cup pepperoni slices, chopped
- 1 cup shredded mozzarella cheese
- 1/2 cup grated Parmesan cheese
- 1/4 cup pizza sauce (plus extra for dipping)
- 2 teaspoons Italian seasoning
- 1 teaspoon garlic powder
- 1/4 cup unsalted butter, melted
- 1/4 teaspoon red pepper flakes (optional)
- Fresh basil leaves for garnish (optional)
These simple items come together to create a fun and delicious dish. The refrigerated biscuit dough is perfect for quick prep. The pepperoni gives it that classic pizza flavor, while the cheeses add richness. Pizza sauce ties everything together with its zesty taste. Italian seasoning and garlic powder boost the flavor, making every bite delightful.
If you like some heat, add red pepper flakes. The melted butter helps the monkey bread get that golden crust. Finally, fresh basil leaves not only look pretty but add a fresh kick.
With these ingredients, you’re set for a fun cooking adventure. Enjoy making this dish with your family or friends!
Step-by-Step Instructions
Preheating and Preparing the Pan
First, preheat your oven to 350°F (175°C). This step is key for even baking. While your oven heats, grab your bundt pan. Spray it well with non-stick cooking spray. This helps the monkey bread come out easily later.
Mixing the Ingredients
In a large bowl, take the biscuit dough and cut it into quarters. Then, add the chopped pepperoni. Use your hands to mix them together gently. You want the dough to be coated in pepperoni. Next, add the shredded mozzarella cheese and grated Parmesan cheese. Pour in the pizza sauce, Italian seasoning, and garlic powder. Mix well until everything is combined. If you like heat, toss in red pepper flakes and stir again.
Assembling the Monkey Bread
Now, pour the melted butter into the bottom of your greased bundt pan. This adds flavor and helps with removal. Spoon half of your biscuit mixture into the pan. Spread it out evenly. Then, layer the rest of the mixture on top. Press it down gently to pack it in. Place the bundt pan in your preheated oven and bake for 25-30 minutes. Look for a golden brown top. A toothpick should come out clean when inserted in the center. Once done, let it cool in the pan for about 10 minutes. Then, carefully flip it onto a serving platter. Enjoy your warm monkey bread with extra pizza sauce for dipping!
Tips & Tricks
Perfecting the Texture
To get the best bake, keep these tips in mind:
- Use a bundt pan: This shape helps heat circulate, cooking evenly.
- Do not overpack: Gently layer the dough in the pan. Too much pressure will make it dense.
- Check early: Start checking at 25 minutes to avoid overbaking. You want it golden brown.
Enhancing Flavor
Add fun twists to your monkey bread:
- Spice it up: Add crushed red pepper or Italian herbs for extra flavor.
- Toppings: Try olives, bell peppers, or cooked sausage. They add crunch and taste.
- Dips: Pair with ranch, marinara, or garlic butter for fun dipping options.
Serving Suggestions
Make your dish shine when serving:
- Presentation: Invert the bundt pan onto a plate. The shape is fun and inviting.
- Garnish: Add fresh basil leaves on top for color and flavor.
- Complete the meal: Serve with a salad or some garlic bread for a hearty dinner.
Variations
Vegetarian Option
You can easily make this dish meat-free. Just swap the pepperoni for your favorite veggies. Think bell peppers, mushrooms, or spinach. These add color and taste. You can also play with cheeses. Try using cheddar or feta for a new flavor twist.
Different Flavors
Get creative with your toppings. You can add olives, cooked sausage, or even pineapple. Each option gives a unique taste. Customizing your spice blend is fun too. Mix in some oregano or crushed red pepper for extra zing.
Family-Friendly Modifications
Make mini versions for kids. Use a muffin tin to bake smaller bites. They are perfect for little hands. Adjust spice levels for younger eaters. Skip the red pepper flakes if your kids prefer milder flavors.
Storage Info
Proper Storage Techniques
To keep leftover monkey bread fresh, first let it cool. Wrap it tightly in plastic wrap or foil. Store it in an airtight container. This keeps it safe from air and moisture. You can also place it in the fridge for up to three days. For best flavor, eat it fresh.
Reheating Instructions
When you want to enjoy your monkey bread again, you have two good options for reheating: the oven or the microwave.
- Oven Method: Preheat your oven to 350°F (175°C). Place the monkey bread on a baking sheet and cover it with foil. Heat for about 10-15 minutes. This helps keep the outside crispy and the inside warm.
- Microwave Method: Place a slice on a microwave-safe plate. Heat for about 30 seconds. This method is fast but may make it a bit softer.
To keep the texture, reheating in the oven is best.
Freezing the Monkey Bread
You can freeze monkey bread before or after baking. If you want to freeze it raw, assemble it in the bundt pan but don’t bake it. Wrap the pan tightly in plastic. Place it in the freezer for up to a month.
When ready to bake, let it thaw in the fridge overnight. Then, bake as normal. If you freeze it after baking, cool it down first. Wrap it well and store it in an airtight container. Thaw it in the fridge before reheating. Enjoy the same great taste!
FAQs
How long does Pepperoni Pizza Monkey Bread last?
Pepperoni Pizza Monkey Bread can last up to three days when stored properly. Keep it in an airtight container at room temperature for the best taste. You can also refrigerate it to extend its shelf life. Just make sure to reheat it well before serving.
Can I use homemade biscuit dough?
Yes, you can use homemade biscuit dough! It adds a nice touch to the dish. Just make sure your dough is soft and easy to work with. The flavor of homemade dough can enhance the taste of the monkey bread. Experiment with your favorite recipes to find the best fit.
Is this recipe customizable for gluten-free diets?
Absolutely! You can use gluten-free biscuit dough for this recipe. Brands like Bob’s Red Mill and Pillsbury offer good options. Just check the packaging for instructions. You can also try almond flour or chickpea flour mixes. These choices can keep the dish tasty while being gluten-free.
This blog post shared how to create delicious Pepperoni Pizza Monkey Bread. You learned the key ingredients, step-by-step instructions, and handy tips to make this dish perfect. We also explored fun variations to adjust flavors and offered storage advice for leftovers. In closing, I encourage you to try this recipe and let your creativity shine. Enjoy every bite!

![- 4 boneless, skinless chicken thighs - 1 cup teriyaki sauce - 1/2 fresh pineapple, sliced into 1/2-inch rings - 2 tablespoons soy sauce - 1 tablespoon brown sugar - 1 teaspoon freshly grated ginger - 2 cloves garlic, finely minced - 1 tablespoon sesame oil - 1 tablespoon rice vinegar - 2 green onions, finely chopped - Sesame seeds Gathering the right ingredients is key for Grilled Pineapple Teriyaki Chicken. Start with fresh chicken thighs. They stay juicy and tender when grilled. You can use store-bought or homemade teriyaki sauce. I often prefer making my own, as it gives a fresh taste. Next, you want ripe pineapple. Choose one that feels heavy and smells sweet. The sweetness will balance the salty teriyaki sauce. For the marinade, you need a few simple items. Soy sauce adds saltiness, while brown sugar gives a nice caramel note. Ginger and garlic bring warmth and depth. Sesame oil adds a nutty flavor, and rice vinegar gives a bit of tang. Finally, for garnishing, chop green onions for color and freshness. A sprinkle of sesame seeds adds a nice crunch. These ingredients come together to create a vibrant, tasty dish. For the full recipe, check the provided link. First, gather your ingredients for the marinade. In a bowl, mix teriyaki sauce, soy sauce, brown sugar, grated ginger, minced garlic, sesame oil, and rice vinegar. Whisk these together until smooth. Add the chicken thighs and coat them well with the marinade. Cover the bowl with plastic wrap and put it in the fridge. Let the chicken marinate for at least 30 minutes. For more flavor, let it marinate for up to 2 hours. While the chicken marinates, preheat your grill to medium-high heat. If you’re using charcoal, wait for the coals to glow red. This will ensure even grilling and great flavor in your chicken. Now it's time to grill the pineapple. Take your pineapple rings and brush both sides with teriyaki sauce. Once the grill is hot, place the pineapple on it. Grill for about 3-4 minutes on each side. You want to see nice grill marks and a caramelized look. When done, set the grilled pineapple aside on a plate. Next, take the chicken thighs out of the fridge. Let any extra marinade drip off. Place the chicken on the hot grill. Cook for about 5-7 minutes per side. Aim for an internal temperature of 165°F (75°C). In the last few minutes, brush on more marinade for added flavor. When the chicken is cooked, take it off the grill. Let it rest for a few minutes. This helps keep the juices inside. To serve, place a grilled pineapple ring on each plate. Top it with a grilled chicken thigh. For a beautiful touch, sprinkle chopped green onions and sesame seeds on top. Enjoy your meal! For the full recipe, check out [Full Recipe]. For juicy chicken, preheat your grill to medium-high heat. This temperature helps create a nice sear on the chicken. A hot grill also locks in moisture, making the meat tender. If using charcoal, wait until the coals glow red and spread evenly for the best result. The marinade is key to great flavor. I suggest marinating the chicken for at least 30 minutes. This time allows the flavors to soak in. For an even richer taste, let it marinate for up to 2 hours. Just remember, don’t go over 2 hours, or the chicken might turn mushy. When picking a pineapple, look for one that feels heavy for its size. The skin should be golden and slightly soft at the base. A ripe pineapple smells sweet at the bottom. Avoid ones that are too green or have brown spots. A good pineapple adds the perfect touch to your grilled chicken. For more details and to try the dish, check out the Full Recipe. {{image_4}} You can easily swap chicken for other proteins. Try pork tenderloin or shrimp for a tasty twist. Tofu is a great choice for a vegetarian option. Just make sure to press the tofu to remove extra moisture. This helps it absorb the marinade better. No matter what protein you choose, aim for similar cooking times for best results. Want to kick up the flavor? Add red pepper flakes for heat or lime juice for zest. You can also mix in a dash of sesame seeds or a splash of orange juice for sweetness. Experimenting with spices like smoked paprika or five-spice powder can add depth. This way, you can create a unique flavor profile each time. Pair your grilled pineapple teriyaki chicken with steamed rice or a fresh salad. Jasmine rice complements the dish's sweetness well. For salads, consider a mix of greens with a light vinaigrette. You can also serve it with grilled vegetables for added color and nutrition. These options enhance your meal and make it more satisfying. For the full recipe, check out the details above. Store your Grilled Pineapple Teriyaki Chicken in an airtight container. This keeps it fresh and prevents odors from mixing. The chicken and pineapple can last in the fridge for about 3 to 4 days. Always let the chicken cool down before sealing it. This helps avoid condensation inside the container. To freeze your grilled chicken and pineapple, first, let them cool completely. Wrap each piece tightly in plastic wrap. Then place them in a freezer bag or a container. This keeps air out and prevents freezer burn. You can freeze it for up to 3 months. Label the bags with the date for easy tracking. To reheat your chicken, use the oven or stovetop. Preheat your oven to 350°F (175°C). Place the chicken in a baking dish and add a splash of water or broth. Cover it with foil. Heat for about 15-20 minutes until warm. For stovetop, use a skillet over medium heat. Add a bit of oil and warm the chicken gently. Avoid high heat to keep it juicy. You can make teriyaki sauce easily at home. Here’s how: - 1 cup soy sauce - 1/2 cup brown sugar - 1/4 cup rice vinegar - 2 tablespoons sesame oil - 1 teaspoon grated ginger - 2 cloves minced garlic Combine all these ingredients in a saucepan. Heat over medium until the sugar dissolves. Stir it well, and let it simmer for a few minutes. Your homemade teriyaki sauce is ready to use! Yes, you can use chicken breasts. They are leaner but may dry out faster than thighs. To prevent this, marinate them longer. Chicken thighs stay juicy and tender. If you prefer breasts, just keep an eye on cooking time. Many sides pair well with this dish. Here are some ideas: - Steamed jasmine rice - Grilled vegetables - Asian slaw - Quinoa salad These sides will complement the sweet and savory flavors of the chicken. Marinate the chicken for at least 30 minutes. For the best flavor, aim for 2 hours. The longer it sits, the more flavor it absorbs. Just don’t marinate too long, or the texture may change. Yes, you can grill indoors! Use a grill pan on your stovetop. Another option is to use a broiler in your oven. Both methods will give you a nice char and keep the flavor intact. This blog post covered how to make Grilled Pineapple Teriyaki Chicken. We explored key ingredients, marinade tips, and grilling steps. I shared variations and storage info to help you enjoy this dish longer. Always remember to adjust the marinade and experiment with flavors. Whether serving to friends or family, this dish is sure to impress. With these tips, you'll cook with confidence and skill. Enjoy the process and the delicious outcome!](https://dishtreats.com/wp-content/uploads/2025/06/0924d723-9b8a-4a49-9695-7d965ac302d4-768x768.webp)
. To make your soup even tastier, think about adding spices. A pinch of smoked paprika gives a nice depth. You can also try a dash of red pepper flakes for some heat. Fresh herbs like thyme or dill can brighten the flavors. To get the best creaminess, use full-fat coconut milk. It adds a rich texture. If you prefer cashew cream, blend soaked cashews with water until smooth. This makes a wonderful base too. If you want a thicker soup, let it simmer longer. This lets more water evaporate. You can also blend in some cooked potatoes for extra creaminess. To make it more nutritious, add veggies like carrots or spinach. Just chop them small and add them early in the cooking process. They will soften and blend well with the soup. You can also stir in cooked lentils for added protein and texture. {{image_4}} You can change the type of tomatoes you use. Fresh tomatoes add brightness. Canned tomatoes provide convenience and consistent flavor. Both work well in this soup. Choose what suits your taste and time best. For cream alternatives, coconut milk is my favorite. It gives a smooth and rich flavor. You can also use cashew cream or almond milk for a lighter option. Each choice offers a unique taste. Want to add protein? Beans or lentils are great options. They boost nutrition and make the soup heartier. Try adding white beans for a creamy texture or lentils for a bit of bite. You can mix and match until you find your favorite blend. Pair this soup with a side salad or sandwich. A fresh green salad balances the rich soup. A grilled cheese sandwich adds comfort and crunch. Both choices enhance your meal experience. For a fun twist, serve the soup in bread bowls. You can hollow out a crusty loaf and fill it. This adds a delicious element to your meal. Top the soup with fresh basil or a drizzle of olive oil for extra flair. These simple touches make the dish special. I encourage you to explore these ideas to create your own version of Vegan Creamy Tomato Soup. Check out the Full Recipe for all the details to get started! To keep your Vegan Creamy Tomato Soup fresh, store it in airtight containers. This helps prevent spoilage. Make sure the soup cools down before sealing the container. You can keep it in the fridge for up to five days. If you want to save it longer, consider freezing it. Pour the cooled soup into freezer-safe bags or containers. Leave some space at the top, as the soup will expand when frozen. This soup can last for up to three months in the freezer. When you want to enjoy your soup again, reheating it properly is key. The best method is to use the stovetop. Pour the soup into a pot and heat it over low to medium heat. Stir it often to keep it from sticking. This way, you keep the flavor and creaminess intact. If you prefer to use a microwave, pour the soup into a microwave-safe bowl. Heat it in short bursts, stirring in between, to ensure even warming. Be careful not to overheat, as this can change the texture. How to make Vegan Creamy Tomato Soup spicier? You can add red pepper flakes or a pinch of cayenne. Start with a small amount. Taste the soup after mixing. This way, you can control the heat. Another option is to add diced jalapeños. These will give your soup a nice kick! Can I substitute coconut milk with another plant-based milk? Yes, you can use almond milk, soy milk, or oat milk. Just ensure it is unsweetened. Coconut milk adds creaminess, but other milks work too. Each will change the flavor slightly, but they will still taste great. How long does the soup last in the fridge? The soup lasts about 3 to 5 days in the fridge. Store it in an airtight container. Always check for any changes in smell or color before eating. What is the best method to puree the soup? An immersion blender works best for pureeing. It keeps the soup in the pot, and it’s easy to use. If you don’t have one, use a regular blender. Just blend in small batches to avoid spills. Can I use fresh tomatoes instead of canned for this recipe? Yes, fresh tomatoes can be used! You will need about 2 pounds of ripe tomatoes. Blanch them first to remove the skins. This adds a fresh flavor to your soup. What garnishes pair well with Vegan Creamy Tomato Soup? Fresh basil leaves are a great choice. They add color and flavor. You can also drizzle some extra coconut milk on top. Croutons or a sprinkle of nutritional yeast also work well! This blog post covers how to make Vegan Creamy Tomato Soup. We broke down the needed ingredients, their nutritional value, and suggested substitutes. I provided step-by-step instructions for preparation and cooking. Tips for flavor, thickness adjustments, and variations helped enhance your soup. You'll find storage and reheating info to keep your leftovers fresh. With these insights, you can enjoy a delicious, creamy soup that's easy to make, healthy, and versatile. Get creative and have fun experimenting!](https://dishtreats.com/wp-content/uploads/2025/06/e1561612-3c52-470f-b0a5-4bd51ef2e908-768x768.webp)

. - Preheat the oven to 425°F (220°C). - Slice the red bell peppers in half. Remove the seeds and membranes. Place them skin-side up on a lined baking sheet. - Roast the peppers for about 25 minutes until the skin is blistered. - Let the peppers cool. Once cool, peel off the skin and chop them into bite-sized pieces. - Rinse 1 cup of quinoa thoroughly under cold water. - In a saucepan, combine the rinsed quinoa with 2 cups of water. Bring it to a boil. - Reduce the heat to low, cover, and simmer for about 15 minutes until the water is absorbed. - Fluff the quinoa with a fork and let it cool. - In a large mixing bowl, combine the cooled quinoa with the roasted peppers, halved cherry tomatoes, finely diced red onion, and diced cucumber. - Mix gently to ensure even distribution of all ingredients. - In a small bowl, whisk together 3 tablespoons of olive oil, 2 tablespoons of balsamic vinegar, and 1 teaspoon of garlic powder. - Add a pinch of salt and freshly ground black pepper, to taste. - Drizzle the dressing over the salad mixture and toss gently to coat. - If you want, sprinkle 1/4 cup of crumbled feta cheese on top and mix lightly. - Finally, garnish with freshly chopped parsley for a colorful finish. For more details, refer to the Full Recipe. To get that perfect blistered skin on your red peppers, follow these steps: - Choose fresh peppers: Look for firm, shiny skin. - Cut them right: Slice each pepper in half lengthwise. This helps them roast evenly. - High heat is key: Roast at 425°F (220°C) for about 25 minutes. - Watch for bubbles: The skin should bubble and char slightly. This adds great flavor. For seasoning your peppers, try these ideas: - Simple salt and pepper: This lets the natural sweetness shine. - Add garlic powder: This gives a rich taste. - Sprinkle paprika: This adds a nice smoky flavor. To ensure your quinoa is fluffy and not mushy, use this method: - Rinse well: Rinse quinoa under cold water to remove bitterness. - Water ratio matters: Use 2 cups of water for every 1 cup of quinoa. - Don’t skip the simmer: Bring to a boil, then lower the heat and cover. Let it simmer for 15 minutes. You can also hydrate quinoa with broth instead of water. This adds extra flavor to your dish. To make your Roasted Red Pepper Quinoa Salad even tastier, consider these tips: - Add fresh herbs: Basil or cilantro can brighten the dish. - Spice it up: A pinch of red pepper flakes adds heat. - Mix textures: Add nuts for crunch or avocado for creaminess. These simple changes can elevate your salad and keep it exciting. For the full recipe, refer to the earlier section. {{image_4}} For a vegan twist, you can skip the feta cheese. Instead, use avocado or vegan cheese. These options add creaminess without dairy. You can also mix in other vegetables. Try adding spinach, roasted zucchini, or artichokes. They boost flavor and nutrition. Want to make your salad heartier? Add chickpeas or grilled chicken. Chickpeas add fiber and protein. They make the salad more filling. If you prefer meat, grilled chicken works great. You can also try other legumes like black beans or lentils. They offer different flavors and textures. You can change the salad with the seasons. In summer, use fresh corn, tomatoes, or cucumber. These veggies are sweet and crunchy. You might also swap roasted red peppers for grilled asparagus or eggplant. These changes keep the salad exciting and fresh all year. For the full recipe, check out the details above. To keep your roasted red pepper quinoa salad fresh, store it in the fridge. Use an airtight container to avoid moisture loss. Place a piece of parchment paper between the salad and the lid. This helps keep it crisp. This salad lasts about 3 to 5 days in the refrigerator. Look for signs of spoilage like an off smell or slimy texture. If the salad looks or smells bad, it’s best to toss it. You can freeze quinoa, but it's best not to freeze the whole salad. Freezing can change the texture of the veggies. To freeze quinoa, cook it and let it cool. Then, place it in a freezer-safe bag. Remove as much air as possible. This way, you can use it later for quick meals. Yes, you can make this salad ahead. Prepare it in advance for busy days. I suggest making it up to two days before serving. Store it in an airtight container in the fridge. The flavors will meld nicely. Just keep the dressing separate until you’re ready to eat. This keeps the salad fresh and crisp. If you want a change, try using brown rice, farro, or couscous. Each option gives a different taste and texture. You can even use lentils for a protein boost. Just make sure to cook them according to package directions. This keeps your salad hearty and filling. This salad has a mild flavor. The roasted peppers add sweetness, not heat. If you like spice, you can add jalapeños or red pepper flakes. For a milder taste, skip the spicy additions. You can also add more cucumber or feta to balance the heat. This salad works great as a side or main dish. Pair it with grilled chicken or fish for protein. It also complements roasted veggies or a light soup. For a vegetarian option, add chickpeas or serve with hummus. You can enjoy it as part of a larger meal or on its own. Check out the Full Recipe for more ideas! This Roasted Red Pepper Quinoa Salad is easy and tasty. We covered key ingredients, cooking steps, and helpful tips. You can customize it to fit your diet and likes. Always store leftovers properly to enjoy later. Remember, fresh flavors and textures make this salad shine. With these ideas, you can impress your friends or family at any meal. Enjoy making and sharing this healthy dish!](https://dishtreats.com/wp-content/uploads/2025/06/1f28db07-8093-4cb7-8796-796da85cb13a-768x768.webp)