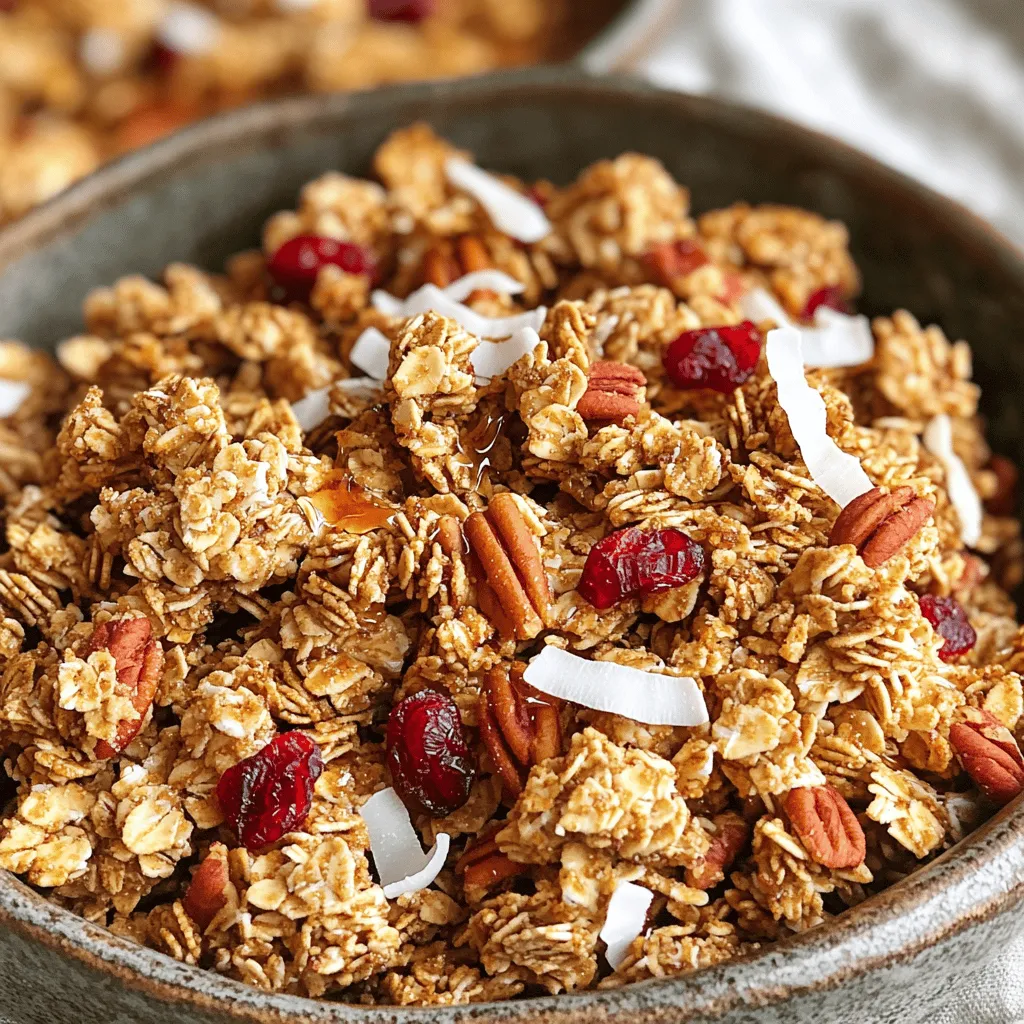
Maple Pecan Granola Crunchy and Flavorful Recipe

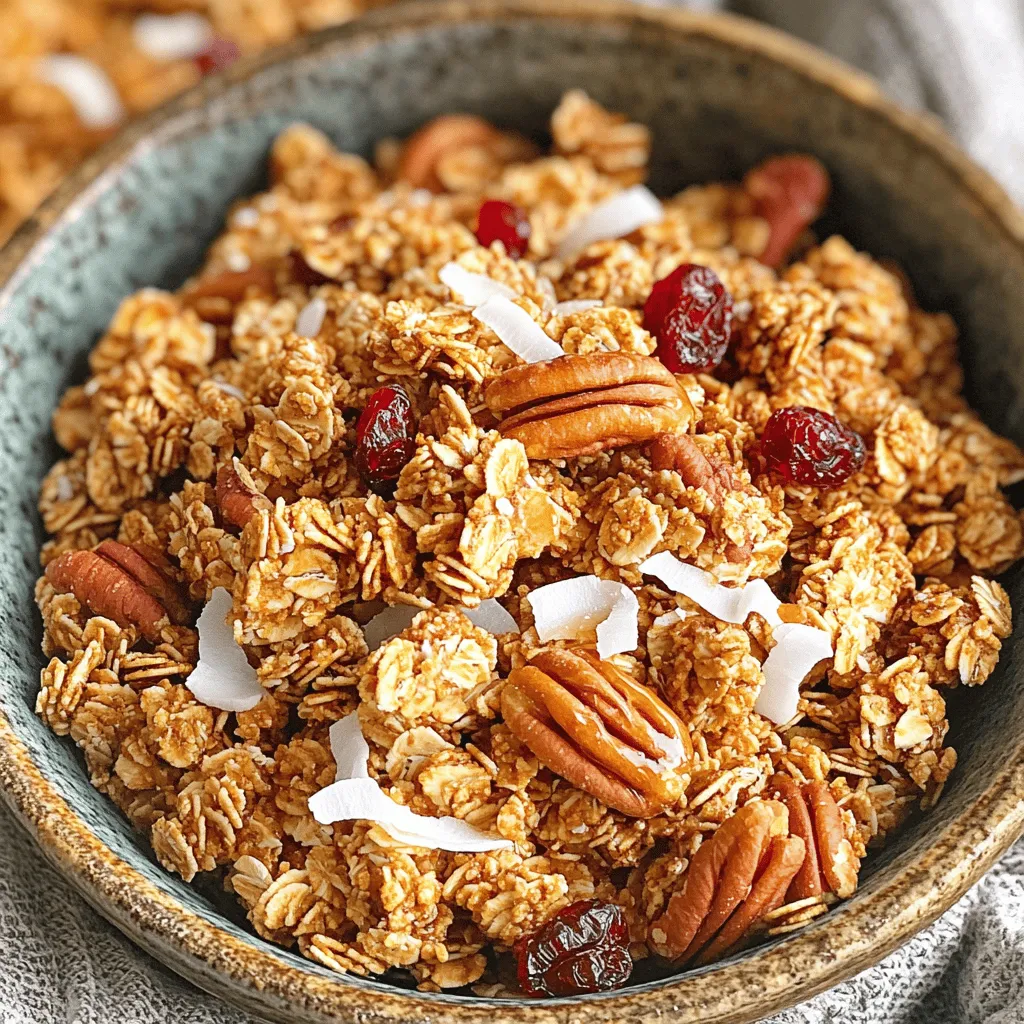
Are you ready to elevate your breakfast game? This Maple Pecan Granola recipe is crunchy and packed with flavor. With simple ingredients and easy steps, you can whip up a delightful treat that’s perfect for snacking, topping yogurt, or enjoying with milk. I’ll share my tips and tricks to achieve the best texture and flavor. Let’s dive into making your new favorite granola!
Ingredients
Required Ingredients for Maple Pecan Granola
- 2 cups rolled oats
- 1 cup pecans, roughly chopped
- 1/2 cup unsweetened shredded coconut
- 1/2 cup pure maple syrup
- 1/4 cup melted coconut oil
- 1/2 teaspoon pure vanilla extract
- 1/2 teaspoon ground cinnamon
- 1/4 teaspoon fine sea salt
- 1/2 cup dried cranberries (or other dried fruits)
You will need a mix of wholesome ingredients for this granola. First, rolled oats form the base. They provide fiber and help create a crunchy texture. Next, we add pecans, which give a rich flavor and a nice crunch. Don’t forget the unsweetened shredded coconut; it adds a tropical touch.
Using pure maple syrup as the sweetener brings a lovely depth of flavor. Coconut oil keeps the granola moist while adding healthy fats. The vanilla extract, ground cinnamon, and sea salt enhance the taste. Lastly, I recommend adding dried cranberries or any dried fruit you like for a sweet bite. These ingredients work together to create a tasty Maple Pecan Granola that you will love!
Step-by-Step Instructions
Preheating the Oven
First, set your oven to 350°F (175°C). This is the perfect heat for crisping the granola. Next, grab a large baking sheet and line it with parchment paper. This paper stops the granola from sticking and makes clean-up easy.
Mixing Dry Ingredients
In a big mixing bowl, toss in 2 cups of rolled oats, 1 cup of roughly chopped pecans, and 1/2 cup of unsweetened shredded coconut. Using a spoon, stir these dry ingredients well. Make sure everything is mixed evenly. This step is key for balanced flavor.
Creating the Wet Mixture
In another bowl, whisk together 1/2 cup of pure maple syrup, 1/4 cup of melted coconut oil, 1/2 teaspoon of pure vanilla extract, 1/2 teaspoon of ground cinnamon, and 1/4 teaspoon of fine sea salt. Mix until it’s smooth. This wet mixture adds sweetness and flavor to your granola.
Combining Wet and Dry Ingredients
Pour the wet mixture over the dry ingredients. Gently stir everything together. You want to ensure all the oats and pecans get coated in the sweet maple blend. This step helps the granola clump together as it bakes.
Baking the Granola
Spread the granola mixture evenly on the lined baking sheet. Make sure it’s in a single layer for even cooking. Place the sheet in your preheated oven and bake for 20-25 minutes. Halfway through, stir the granola to help it brown evenly. Keep an eye on it to avoid burning.
Cooling and Adding Dried Fruit
After baking, take the sheet out of the oven. Let the granola cool completely on the baking sheet. This cooling time is crucial for the crunchy texture you want. Once cooled, gently fold in 1/2 cup of dried cranberries. This adds a nice touch of sweetness and color to your granola.
Tips & Tricks
Achieving the Perfect Crunch
To get that perfect crunch in your granola, cooling is key. After you bake it, let it cool on the sheet. This cooling time helps form clusters. Once it’s cool, break it into pieces. If you try to break it apart while it’s hot, it will crumble.
Ingredient Substitutions
You can switch out the coconut or sweeteners if needed. For coconut, try using nuts like almonds. If you want a different sweet taste, agave syrup works great. Honey is also a good choice if you are not vegan. Feel free to experiment until you find your favorite mix!
Baking Tips
Stir the granola halfway through baking. This helps everything cook evenly. Keep an eye on it to avoid burning. If you see it turning dark, take it out sooner. The best granola is golden brown, not burnt. These small steps will ensure your granola turns out just right!

Variations
Flavor Variations
You can change the flavor of your granola easily. Try adding chocolate chips for a sweet twist. Dark chocolate pairs well with the maple and pecans. You can also use spices. A pinch of nutmeg or ginger adds warmth. These flavors make your granola exciting and new.
Nut Alternatives
If you want to switch it up, use different nuts. Almonds or walnuts work great in this recipe. They add a nice crunch and flavor. You can even mix different nuts together. Just make sure to chop them roughly for even baking.
Additional Ingredients
Add seeds or dried fruits for extra texture. Pumpkin seeds or sunflower seeds boost nutrition. They add a good crunch too. For dried fruits, try raisins, apricots, or figs. These fruits add sweetness and chewiness. Mixing these extras creates a fun and tasty granola.
Storage Info
Best Storage Practices
To keep your maple pecan granola fresh, store it in airtight containers. These containers prevent air and moisture from getting in. You can use glass jars or plastic bins with tight lids. This way, your granola stays crunchy and tasty for longer.
Shelf Life
When stored properly, your granola lasts about two weeks. After that, it may lose its crunch and flavor. Check for any signs of spoilage, like odd smells or changes in texture. If it smells great and looks good, it’s still good to eat!
Freezing Instructions
If you want to save some for later, you can freeze your granola. Place it in a freezer-safe bag or container. Remove as much air as you can before sealing. Granola can last for about three months in the freezer. When you’re ready to eat it, just let it thaw at room temperature. Then, enjoy your crunchy snack!
FAQs
How do I make Maple Pecan Granola vegan?
To make this granola vegan, substitute the honey with maple syrup. Use plant-based oils like coconut oil. Ensure your vanilla extract is pure and vegan-friendly. You can also add a splash of almond milk if you want a creamier texture.
Can I use other nuts in this recipe?
Yes! You can use a variety of nuts. Try walnuts, almonds, or cashews. Mixing different nuts adds flavor and crunch. Just keep the total amount the same, so your granola bakes evenly.
Is the granola gluten-free?
Yes, this granola can be gluten-free. Use certified gluten-free oats. Always check labels on other ingredients like nuts and dried fruits. This way, you ensure no gluten sneaks in.
How can I customize my granola recipe?
You can add your favorite seeds like chia or flaxseeds. Try different dried fruits such as apricots or figs. Add spices like nutmeg or cardamom for a twist. Make it your own by mixing flavors you love!
Making Maple Pecan Granola is simple and fun. You need just a few ingredients and clear steps. We talked about key ingredients like oats, pecans, and maple syrup. I showed you how to mix and bake them for a tasty snack. Remember to cool your granola for a great crunch. You can try different nuts or flavors to make it your own. Store it right to keep it fresh. Enjoy your delicious creation, and share it with friends!


. First, preheat your oven to 400°F (200°C). This sets the perfect baking temp for our scones. While the oven heats up, line a baking sheet with parchment paper. This keeps the scones from sticking and makes cleanup easy. In a large bowl, mix the dry ingredients. Add 2 cups of flour, 1/3 cup of sugar, 1 tablespoon of baking powder, and 1/2 teaspoon of salt. Whisk these together until they are well blended. Next, add in 1/2 cup of cold, diced butter. Use your fingers or a pastry cutter to mix the butter in until it looks like coarse crumbs. Now, add 1 cup of blueberries and the zest of 1 lemon. Gently fold these into the mix without squishing the berries. In another bowl, prepare the wet ingredients. Whisk together 1/4 cup of heavy cream, 1 large egg, 1 teaspoon of vanilla extract, and 1 tablespoon of fresh lemon juice. Once mixed, pour this into the dry mix. Stir gently until the dough just comes together. It should feel a bit sticky. Turn the dough out onto a floured surface. Knead it gently a few times, just until it holds together. Pat the dough into a round shape about 1 inch thick. Use a sharp knife to cut the dough into 8 wedges. Place these on your lined baking sheet, leaving space between them. Now, they are ready for the oven. For the full recipe, check the details provided above. Enjoy making your lemon blueberry scones! To make your scones fluffy and flaky, keep your butter cold. When you mix the butter with the dry ingredients, it should stay in small chunks. This creates pockets of steam while baking, giving you that perfect texture. Also, avoid overmixing the dough. Mix just until everything comes together. A little stickiness is okay. One common mistake is using warm butter. Always use chilled butter for best results. Another mistake is overworking the dough. If you knead too much, your scones may become tough. Lastly, don’t skip chilling the dough before baking. This helps the scones hold their shape. You can boost the flavor of your scones easily. Try adding a pinch of cinnamon for warmth. Diced strawberries or raspberries can replace some blueberries for a twist. For more zing, add a teaspoon of lemon zest to the wet mix. You can also mix in some chopped nuts for crunch. These small changes can elevate your Lemon Blueberry scones and make them even more delightful. For the complete recipe, check out the Full Recipe section. {{image_4}} You can change the flavor by using other fruits. Raspberries, strawberries, or blackberries work well. Just swap them for the blueberries in the recipe. Each fruit adds a unique twist. For a mixed berry scone, combine different berries together. This gives you a colorful and tasty treat. If you need a gluten-free option, use a 1:1 gluten-free flour blend. Make sure it has xanthan gum for the right texture. The process stays the same, and you can enjoy scones that fit your diet. The taste will still be delightful and fresh. You can also spice things up with flavors. A pinch of cinnamon or nutmeg adds warmth to your scones. If you like nuts, try adding chopped walnuts or pecans. These add a nice crunch and depth of flavor. Mix these ingredients in when you add the blueberries and lemon zest. For more ideas, check the Full Recipe to explore how you can make these scones your own! To keep your leftover scones fresh, place them in an airtight container. This helps them stay soft and moist. You can add a slice of bread to the container. The bread helps keep the scones from drying out. If you want to freeze your scones, wrap each one tightly in plastic wrap. Then, place them in a freezer bag. Press out any extra air before sealing the bag. You can freeze them for up to three months. When you're ready to eat them, just thaw them in the fridge overnight. To reheat your scones, preheat your oven to 350°F (175°C). Place the scones on a baking sheet and warm them for about 5 to 10 minutes. This makes them soft and fresh again. You can also use a microwave. Heat them for about 15 to 20 seconds. Enjoy your warm lemon blueberry scones with a cup of tea! For the full recipe, check out the earlier section. Fluffy scones come from the right balance of dry and wet ingredients. You need to use cold butter and avoid overmixing. The butter creates air pockets as it melts, which helps the scones rise. Baking powder also plays a key role. It gives the scones lift during baking, making them light and airy. Yes, you can make these scones ahead. Prepare the dough and cut it into wedges. Then, wrap them well and place them in the fridge for up to 24 hours. When you're ready to bake, just pop them in the oven. If you want to freeze them, wrap the unbaked scones tightly and store them for up to three months. Bake straight from the freezer; they may need a few extra minutes. Serve these scones warm for the best taste. You can add a drizzle of glaze made with powdered sugar and lemon juice. Pair them with butter or clotted cream for a rich flavor. For a fun twist, enjoy them with fresh fruit or a dollop of jam. These scones shine as a breakfast treat or afternoon snack. Scones come from the UK, with roots in Scotland. People often served them with tea. The lemon blueberry version is a modern twist that adds bright flavor. This combination reflects a love for fresh fruit and citrus in baked goods. Now, you can find these scones in cafes and bakeries worldwide, making them a beloved treat for many. This blog post covers all you need for perfect lemon blueberry scones. We discussed ingredients, offering substitutes when needed. I shared steps for mixing and shaping your dough, plus tips for a flaky texture. You learned how to store and reheat your scones. Enjoy the flexibility of variations and try different fruits or gluten-free options. Baking should be fun, so don’t stress about mistakes. With practice, you’ll create sunny, delicious scones every time. Now, gather your ingredients and get baking!](https://dishtreats.com/wp-content/uploads/2025/06/d51723ca-834e-49ab-95e6-d1b73b522f9f-768x768.webp)
![When making apple cinnamon overnight oats, you need simple and healthy ingredients. Here’s what you’ll need: - 1 cup rolled oats - 2 cups almond milk (or your preferred milk) - 1 medium apple, diced (a Granny Smith works great for a touch of tartness) - 1 tablespoon chia seeds - 1 tablespoon maple syrup (adjust based on your sweetness preference) - 1 teaspoon ground cinnamon - 1/2 teaspoon vanilla extract - A pinch of salt - Toppings: sliced almonds, additional apple slices, and a sprinkle of cinnamon These ingredients make a tasty breakfast that is full of fiber and nutrients. Rolled oats provide a solid base. Almond milk adds creaminess without extra calories. Diced apple brings natural sweetness and crunch. Chia seeds boost fiber and omega-3s. Maple syrup gives a touch of sweetness, while ground cinnamon adds warmth and flavor. A pinch of salt balances everything out. Feel free to adjust the ingredients to fit your taste. You can add more or less maple syrup, depending on how sweet you like it. I recommend using fresh apples for the best flavor. For a fun twist, try adding your favorite nuts or seeds on top. Check out the Full Recipe for all the details on making this delicious dish! To make apple cinnamon overnight oats, start with a clean space. Gather your ingredients first. This helps make the process smooth and quick. It only takes about ten minutes to prepare. You will need rolled oats, milk, chia seeds, and other tasty items. In a medium bowl, combine 1 cup of rolled oats and 2 cups of almond milk. Then, add 1 tablespoon of chia seeds, 1 tablespoon of maple syrup, and 1 teaspoon of ground cinnamon. Don't forget 1/2 teaspoon of vanilla extract and a pinch of salt. Whisk everything together until it’s mixed well. Next, fold in 1 diced apple. Make sure the apple pieces spread evenly through the mixture. This adds great flavor to every spoonful. Now, take two jars or airtight containers. Spoon the oat mixture evenly into them. Leave some space at the top. This space is important as the oats will expand. Seal the containers tightly and place them in the fridge. Let them chill overnight or for at least six hours. When you wake up, the oats will be ready! Just stir them, and if they are too thick, add a bit of almond milk to reach your desired creaminess. Enjoy! You can find the full recipe [here]. To get the best creamy oats, use the right milk. I like almond milk, but any milk will work. Soaking the oats overnight is key. This allows them to absorb the liquid. If your oats look too thick in the morning, add a splash of milk. Stir well to reach your perfect texture. Choosing the right apple makes a big difference. I recommend using Granny Smith apples for a nice tart flavor. They contrast well with the sweetness of the maple syrup. Other good choices are Honeycrisp or Fuji apples. Both add a sweet crunch and vibrant taste. For a beautiful presentation, use clear glass jars. Show off those lovely layers of oats, apples, and toppings. Just before serving, drizzle extra maple syrup on top. This adds shine and an extra touch of sweetness. Garnish with sliced almonds or apple slices for a pop of color. Enjoy the visual feast as much as the taste! {{image_4}} You can swap almond milk for any milk you like. Cow's milk gives a creamy taste. Cashew milk adds richness. Coconut milk brings a tropical twist. Each milk changes the flavor a bit, so try different ones to find your favorite. Maple syrup is the base for sweetness, but it’s not the only choice. You can use honey if you want a floral note. Agave syrup works well for a mild sweetness. If you prefer less sugar, try mashed bananas or stevia for a low-cal option. Adjust to your taste! Adding more ingredients is easy! You can mix in nuts or seeds for healthy fats. Try flax seeds for extra fiber. Some berries can add antioxidants and a pop of color. A spoonful of yogurt can make it creamy and add protein. Feel free to experiment with different add-ins to boost your overnight oats. Check the Full Recipe for more details on ingredients! You can store your apple cinnamon overnight oats in airtight containers. Glass jars work great. Make sure each jar is sealed tightly. This keeps the oats fresh and tasty. Place them in the fridge after making them. They last well in the cold. These oats are best when eaten within five days. After five days, their taste and texture change. If you see any mold, throw them away. Always check for a sour smell too. It’s better to be safe than sorry! You can freeze overnight oats if you want to keep them longer. Use freezer-safe containers or bags. Just leave some space to allow for expansion. When you're ready to eat, thaw them in the fridge overnight. You can also warm them in the microwave. This way, you enjoy a healthy breakfast boost anytime! For the full recipe, check out the details above. Yes, you can use instant oats, but the texture will change. Instant oats cook faster and may become mushy when soaked. If you want a creamier texture, stick with rolled oats. They absorb liquid well and hold their shape, giving you a better bite. You can change the flavor in many ways. Try different spices like nutmeg or ginger. Add a scoop of peanut butter or almond butter for creaminess. You can also mix in dried fruits, like raisins or cranberries, for a sweet touch. Experimenting with toppings can add crunch, too! Absolutely! This recipe is perfect for meal prep. Make a batch and store it in jars. It will last in the fridge for up to five days. Each morning, you can grab a jar, stir it up, and enjoy a healthy breakfast. Check the full recipe for more details on making these oats. This blog post showed you how to make delicious overnight oats. We covered the key ingredients and step-by-step instructions. Tips helped you achieve creamy texture and great flavor. Plus, I shared fun ways to personalize your oats. Remember, these oats store well, making them perfect for meal prep. Enjoy your tasty and healthy breakfast with ease. You can mix it up as you like and keep it fresh! Start experimenting today and make breakfast something you look forward to.](https://dishtreats.com/wp-content/uploads/2025/07/b5672784-8b9d-49df-af82-0a82d4d3c269-768x768.webp)
