Cinnamon Maple Roasted Almonds Tasty Snack Recipe

Looking for a tasty snack that’s easy to make? You’re in the right place! This Cinnamon Maple Roasted Almonds recipe combines sweet maple syrup with a warm cinnamon touch. It’s a delicious treat that’s perfect for sharing or enjoying solo. Gather your ingredients, and let’s dive into this simple, satisfying recipe that will leave your taste buds dancing! Keep reading to find out how to make this flavorful snack.
Ingredients
List of Ingredients
- 2 cups raw almonds
- 1/4 cup pure maple syrup
- 2 tablespoons coconut oil, melted and slightly cooled
- 1 teaspoon ground cinnamon
- 1/2 teaspoon pure vanilla extract
- 1/4 teaspoon fine sea salt
- 1/4 teaspoon ground nutmeg (optional for an extra warm spice flavor)
To make cinnamon maple roasted almonds, gather these key ingredients. The raw almonds serve as the base. Their natural crunch pairs well with sweet maple syrup. I love using pure maple syrup for its rich flavor. The coconut oil adds a nice touch while helping the spices stick. Ground cinnamon is a must for that warm, cozy taste. I also like a splash of pure vanilla extract to enhance the sweetness. Fine sea salt balances the sweetness. Lastly, ground nutmeg is optional but adds an extra layer of warmth.
These ingredients combine to create a delicious snack. You can enjoy them on their own or use them in different dishes. They add a crunchy texture to salads or a tasty topping on oatmeal.
Step-by-Step Instructions
Preparing the Oven and Baking Sheet
Preheat your oven to 350°F (175°C). While the oven heats, line a baking sheet with parchment paper. This helps the almonds not stick and makes cleanup easy.
Mixing the Coating
In a large bowl, mix together 1/4 cup of pure maple syrup and 2 tablespoons of melted coconut oil. Add 1 teaspoon of ground cinnamon, 1/2 teaspoon of pure vanilla extract, and 1/4 teaspoon of fine sea salt. If you like, add 1/4 teaspoon of ground nutmeg for extra warmth. Whisk until smooth.
Coating the Almonds
Next, add 2 cups of raw almonds to your bowl. Use a spatula or wooden spoon to gently toss them in the syrup mixture. Make sure each almond gets a nice coating.
Roasting the Almonds
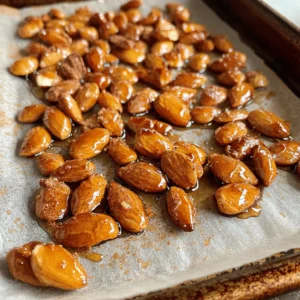
Spread the coated almonds in a single layer on the baking sheet. Avoid overlapping them. Roast in the oven for 10 to 12 minutes. Stir them halfway through to ensure they roast evenly. Watch them closely in the last few minutes to prevent burning.
Cooling and Storing the Almonds
Once golden brown and fragrant, remove the almonds from the oven. Let them cool on the baking sheet for a few minutes. This cooling helps them firm up. Once cooled, transfer the almonds to an airtight container. They will last at room temperature for up to two weeks. But trust me, they might not last that long!
Tips & Tricks
Ensuring Even Roasting
To get the best results, spread the almonds in one layer. This helps them roast evenly. If you pile them up, some will burn while others stay raw. Halfway through roasting, stir the almonds gently. This step is key for an even golden color.
Adjusting Sweetness and Spice Levels
You can change the sweetness by adding more or less maple syrup. If you want less sweetness, use only two tablespoons. For more spice, add a bit more cinnamon or nutmeg. Just remember, a little goes a long way. Taste the coating before adding the almonds to find your perfect mix.
Using Fresh Ingredients for Optimal Flavor
Always choose fresh almonds for the best taste. Old nuts can taste stale. Pure maple syrup should be real, not imitation. Check the label to make sure it’s pure. Fresh coconut oil and spices also make a big difference. They bring out the flavors and make every bite special.

Variations
Adding Other Nuts
You can mix in other nuts with your almonds. Pecans, walnuts, or cashews work well. Just keep the same recipe. Use the same amount of maple syrup and oil. This adds different flavors and textures. Each nut brings its own taste to the mix. Experiment until you find your favorite combination.
Experimenting with Different Sweeteners
If you want to change up the sweetness, try honey or agave syrup. Each sweetener offers a unique flavor. You might also use brown sugar for a richer taste. Just remember to keep the same amount as the maple syrup. Adjusting sweeteners can create new flavor profiles. This allows you to personalize the snack to your liking.
Incorporating Additional Spices
Want to spice things up? You can add more spices for extra flavor. Try a pinch of cayenne for heat or ginger for warmth. Pumpkin spice can give a fall vibe. You can mix in a bit of cocoa powder for a chocolate twist. Just be cautious with how much you add. A little goes a long way, and it can change the taste.
Storage Info
Best Storage Practices
To keep your cinnamon maple roasted almonds fresh, store them in an airtight container. This helps lock in their crunch and flavor. You can use a glass jar or a plastic container with a tight lid. Make sure to place them in a cool, dry place. Avoid direct sunlight or heat, as this can make them go stale faster.
Shelf Life of Roasted Almonds
When stored correctly, these tasty almonds last up to two weeks. If you want them to last even longer, consider freezing them. In the freezer, they can stay good for up to six months. Just remember to let them come back to room temperature before you enjoy them.
Reheating Tips
If you want to warm up your almonds, preheat your oven to 350°F (175°C). Spread the almonds on a baking sheet and heat for about 5 to 7 minutes. This will bring back their crunchy texture. Keep an eye on them, so they don’t burn. Enjoy them warm for a cozy snack!
FAQs
Can I use other types of nuts?
Yes, you can use other nuts. Try walnuts, pecans, or cashews. Each nut brings its own flavor. Adjust roasting time as needed, since different nuts cook at different rates. Just make sure they are raw and unsalted.
How can I make them less sweet?
To reduce sweetness, cut back on maple syrup. Use only 2 tablespoons instead of 1/4 cup. You can also add more spices like cinnamon or nutmeg. This adds flavor without extra sugar.
What can I pair cinnamon maple roasted almonds with?
These almonds are great on their own. You can also pair them with yogurt, oatmeal, or salads. They add a nice crunch and a sweet flavor. Try mixing them into trail mix for extra energy.
How do I know when the almonds are done roasting?
Look for a golden brown color. They should smell sweet and toasty. Stir them halfway through to check for even cooking. Be careful not to burn them; ovens can vary in heat.
This post shared ways to make cinnamon maple roasted almonds. We covered simple ingredients and easy steps for great taste. I shared tips to enhance flavors and ensure even roasting. You can create fun variations with other nuts or spices. Proper storage will keep them fresh longer. Roasted almonds are a delicious snack or topping. Enjoy the process and flavor!

![To make Honey Mustard Chicken Thighs, you need simple, fresh ingredients. Here’s what you will need: - 4 bone-in chicken thighs, skin-on - 1/4 cup honey - 1/4 cup Dijon mustard - 2 tablespoons olive oil - 3 cloves garlic, minced - 1 teaspoon dried thyme - 1 teaspoon paprika - Salt and black pepper to taste - Fresh parsley for garnish These ingredients bring great flavor to your meal. The honey adds sweetness, while the Dijon mustard gives it a nice tang. Olive oil keeps the chicken juicy, and garlic boosts the taste. Dried thyme and paprika add depth, making every bite delicious. Don’t forget the parsley! It makes your dish look pretty and fresh. This recipe is quick and easy, perfect for any night. For the full instructions, check the Full Recipe. First, preheat your oven to 400°F (200°C). This heat will cook your chicken just right. In a small bowl, whisk together these ingredients: - 1/4 cup honey - 1/4 cup Dijon mustard - 2 tablespoons olive oil - 3 cloves garlic, minced - 1 teaspoon dried thyme - 1 teaspoon paprika - Salt and black pepper to taste Make sure to mix well. This creates a smooth and tasty marinade. Next, take your chicken thighs and place them in a large bowl or a resealable bag. Pour the marinade over the chicken. Ensure each piece is coated well. For the best flavor, let it marinate for at least 30 minutes. If you have more time, refrigerating it overnight works wonders. Now, heat a large oven-safe skillet over medium-high heat. Once hot, add the marinated chicken thighs, skin-side down. Sear them for about 5-7 minutes until the skin is golden brown. This step gives the chicken a nice crisp. After that, flip the thighs using tongs. Transfer the skillet to your preheated oven. Bake for 25-30 minutes. Check that the internal temperature reaches 165°F (75°C). If the juices run clear, the chicken is done. Once cooked, take the skillet from the oven and let the chicken rest for 5 minutes. This helps keep it juicy. Before serving, sprinkle some fresh parsley on top for a lovely finish. For the complete recipe, don't forget to check the [Full Recipe]. To get the best flavor, marinate the chicken thighs well. Use a large bowl or a resealable plastic bag for this. After mixing the marinade, pour it over the chicken. Make sure each piece is coated. For great results, let the chicken sit in the marinade for at least 30 minutes. You can also refrigerate it overnight. This extra time helps the flavors soak in deep. Cooking chicken thighs at the right temperature is key. Preheat your oven to 400°F (200°C). This hot oven cooks the chicken evenly and keeps it juicy. After searing the chicken for 5-7 minutes on the stovetop, transfer it to the oven. Bake for 25-30 minutes. Check the chicken's internal temperature. It should reach 165°F (75°C) for safe eating. Let it rest for 5 minutes before serving, which helps keep it moist. When serving, presentation matters. Place the chicken thighs on a white platter or a wooden board. Drizzle any leftover marinade over the top for added flavor. Garnish with fresh parsley for a pop of color. This simple touch makes the dish look more inviting. You can pair the chicken with roasted veggies or a fresh salad. These sides complement the sweet and tangy flavors of the honey mustard. For the full recipe, check out the details above. {{image_4}} You can change the sauce to fit your taste. Try using maple syrup instead of honey. This gives a unique sweetness. You can also mix in some soy sauce for a savory twist. If you like heat, add a dash of hot sauce or cayenne pepper. For a tangy flavor, consider apple cider vinegar. Each option adds a new layer to the dish. While chicken thighs are great, you can also use chicken breasts. They cook faster but stay moist if cooked right. Drumsticks are another option. They have lots of flavor and a nice crisp skin. You can even use a whole chicken, just adjust cooking time. Each cut brings its own charm to the recipe. For a full meal, add vegetables. Root veggies like carrots and potatoes roast well. Toss them in the marinade for extra flavor. You can also use green beans or broccoli. Place them in the skillet with the chicken. They will soak up the sauce and cook perfectly. This way, you have a tasty one-pan meal that's easy to serve. For the full recipe, check out the previous section. After cooking, let the chicken cool down. Place the chicken thighs in an airtight container. Store them in the fridge for up to three days. Make sure the temperature stays below 40°F (4°C). This keeps your chicken safe and tasty. If you want to store the chicken longer, freezing is a great option. Wrap each thigh tightly in plastic wrap. Then put them in a freezer-safe bag. You can freeze them for up to three months. Remember to label the bag with the date. When you are ready to enjoy leftovers, preheat your oven to 350°F (175°C). Place the chicken in a baking dish. Cover it with foil to keep it moist. Heat for about 20-25 minutes. You can also use a microwave, but it may dry the chicken out. For the best taste, the oven is the way to go. Enjoy your meal again! You should marinate honey mustard chicken thighs for at least 30 minutes. This allows the flavors to soak into the meat. If you have time, marinating overnight works even better. It deepens the taste and makes the chicken more tender. Yes, you can use boneless chicken thighs. They cook faster than bone-in thighs. Adjust the cooking time to about 20-25 minutes in the oven. Always check that the internal temperature reaches 165°F (75°C) for safety. Honey mustard chicken thighs pair well with many sides. Here are some ideas: - Steamed vegetables: Broccoli or green beans add color. - Rice or quinoa: Both soak up the sauce nicely. - Salad: A fresh green salad balances the meal. - Mashed potatoes: Creamy potatoes are a great comfort food option. You can find the full recipe to help you create this delicious meal. In this post, I shared ingredients and steps for making honey mustard chicken thighs. I provided tips for marinating and cooking this dish to enhance its flavor. You learned about variations and how to store leftovers properly. Remember, simple changes can make a big impact on taste. I encourage you to try these ideas for yourself. Enjoy cooking and delight in every bite!](https://dishtreats.com/wp-content/uploads/2025/06/0b4fb8df-5400-4b6b-9acb-490ad2d6fca7-768x768.webp)
![To make the best ever lemon blueberry muffins, you need: - 2 cups all-purpose flour - 1 cup granulated sugar - 1 tablespoon baking powder - 1/2 teaspoon baking soda - 1/2 teaspoon salt - Zest of 1 large lemon - Juice of 1 large lemon (about 1/4 cup) - 1/2 cup unsalted butter, melted - 1 cup buttermilk (substitute: milk with 1 tablespoon lemon juice added) - 2 large eggs, at room temperature - 1 teaspoon pure vanilla extract - 1 1/2 cups fresh blueberries (or frozen, if out of season) - Optional: Extra blueberries and lemon zest for decoration These ingredients create a bright, fluffy muffin. Each bite bursts with lemon and blueberry flavor. If you can't find a specific ingredient, here are some good substitutes: - All-purpose flour: Use whole wheat flour for a nutty taste. - Granulated sugar: Coconut sugar works well for a deeper flavor. - Buttermilk: Mix regular milk with lemon juice for a quick fix. - Unsalted butter: Use coconut oil for a dairy-free option. These swaps keep your muffins tasty and fun, even if you lack some ingredients. Want to enhance your muffins? Consider these tasty add-ins: - Nuts: Chopped walnuts or pecans add crunch. - Spices: A pinch of cinnamon or nutmeg adds warmth. - Coconut: Shredded coconut gives a tropical twist. - Chocolate chips: For a sweet touch, add white or dark chocolate. These options let you personalize your muffins for any occasion. Enjoy creating your perfect lemon blueberry muffin! Start by gathering your ingredients. You will need the following: - 2 cups all-purpose flour - 1 cup granulated sugar - 1 tablespoon baking powder - 1/2 teaspoon baking soda - 1/2 teaspoon salt - Zest of 1 large lemon - Juice of 1 large lemon (about 1/4 cup) - 1/2 cup unsalted butter, melted - 1 cup buttermilk - 2 large eggs, at room temperature - 1 teaspoon pure vanilla extract - 1 1/2 cups fresh blueberries First, preheat your oven to 375°F (190°C). Prepare your muffin tin with paper liners or non-stick spray. This step helps you remove the muffins easily after baking. In a large bowl, mix the flour, sugar, baking powder, baking soda, and salt. This will be your dry mix. In another bowl, blend the melted butter, buttermilk, eggs, lemon zest, lemon juice, and vanilla extract. Whisk until smooth. Now, pour the wet mixture into the dry mix. Stir gently until just combined; some lumps are okay. This keeps your muffins light and fluffy. Next, fold in the blueberries carefully, saving some for the top. Use a spoon or ice cream scoop to fill the muffin cups about 3/4 full. This allows room for rising. Top each muffin with the saved blueberries and a sprinkle of lemon zest for flair. Place the muffin tin in the preheated oven. Bake for 18-20 minutes. Check with a toothpick; it should come out clean. Keep an eye on them near the end to avoid overbaking. Once they are done, let the muffins cool in the tin for about 5 minutes. This helps them set. Then, transfer them to a wire rack to cool completely. This prevents sogginess and keeps them fresh. If you have leftovers, store them in an airtight container. You can also freeze them for longer freshness. Enjoy these muffins warm with a cup of tea or coffee for a delightful treat! For the complete recipe, check out the Full Recipe link. To get that perfect muffin texture, follow a few key steps. First, measure your flour carefully. Too much flour can make muffins dense. Use the spoon and level method for accuracy. Next, mix the batter gently. Overmixing creates tough muffins. Stir until just combined. Some lumps are okay! Lastly, let your muffins cool for a few minutes in the tin. This helps them set and makes them easier to remove. To ensure every bite is bursting with flavor, add the lemon zest early. It infuses the batter, making each muffin bright and zesty. When folding in blueberries, toss them in a bit of flour first. This prevents them from sinking to the bottom. Also, consider mixing some blueberries into the batter and saving a few for the top. This creates a beautiful and flavorful muffin. If your muffins are too dry, check your measurements. Too much flour or not enough liquid can cause this. If they are too wet, bake them a little longer. Just watch them closely so they don’t burn. For flat muffins, make sure your baking powder is fresh. Old leavening agents can lead to sad, flat muffins. Always check expiration dates when baking. For the best results, follow the full recipe closely. {{image_4}} You can make these muffins gluten-free. Use a 1:1 gluten-free flour blend instead of all-purpose flour. Look for blends that include xanthan gum for better texture. This will help keep your muffins soft and fluffy. The rest of the recipe stays the same. You still get that bright lemon and sweet blueberry flavor. You can mix it up with different fruits. Try raspberries, strawberries, or blackberries. Each fruit adds its own twist. For a tropical flair, use diced mango or pineapple. Just keep the ratio of fruit similar to the blueberries in the recipe. This way, you maintain great texture and taste. Want to boost the flavor? Add spices like cinnamon or nutmeg. Just a pinch can add warmth. You can also use other citrus zests. Try lime or orange for a unique taste. These small changes can make your muffins stand out. Don't forget to check the [Full Recipe] for the base muffin instructions. To keep your muffins fresh, store them in an airtight container. This will help keep moisture in and prevent them from drying out. If you plan to eat them within two days, place them at room temperature. For longer storage, refrigeration is a good option. Just remember to let them cool completely before sealing. Freezing muffins is a smart way to save any extras. First, let the muffins cool down. Wrap each muffin tightly in plastic wrap or aluminum foil. Then, place them in a freezer bag. You can freeze them for up to three months. When you want to enjoy one, take it out and let it thaw at room temperature or warm it in the microwave. To bring back the fresh-baked taste, reheat your muffins. You can use the oven or microwave. For the oven, preheat it to 350°F (175°C). Place the muffin on a baking sheet for about 5-10 minutes. For the microwave, heat each muffin for about 15-20 seconds. Keep an eye on them to avoid overheating. Enjoy your warm, delicious muffins! To cut down on sweetness, use less sugar. You can reduce the sugar by up to 1/4 cup. Another option is to add more lemon juice. The tart flavor balances the sweetness. You could also use a sugar substitute if you prefer. Yes, you can use frozen blueberries! They work well in this recipe. Just toss them in a bit of flour before adding them to the batter. This helps prevent them from sinking. Remember, frozen berries may make the muffins a bit more moist, so adjust your baking time slightly. If you don't have buttermilk, you can make a quick substitute. Use 1 cup of milk with 1 tablespoon of lemon juice added. Let it sit for about 5 minutes before using. This mixture will mimic the tangy flavor of buttermilk well. Check the muffins around the 18-minute mark. Insert a toothpick into the center of a muffin. If it comes out clean, they are ready. If there’s batter on it, give them a few more minutes. Keep an eye on them to avoid overbaking. In this post, I shared how to make the best lemon blueberry muffins. We talked about key ingredients, cool swaps, and tasty add-ins. I walked you through making, baking, and storing your muffins. Tips helped you master texture and flavor. Plus, we explored fun variations and answered common questions. Now, you have all the tools to create delicious muffins at home. Enjoy the baking process and share your tasty results!](https://dishtreats.com/wp-content/uploads/2025/07/01ebfef5-11c2-4c5e-aff7-696639161096-768x768.webp)