Peach Raspberry Crisp Delightful and Simple Dessert

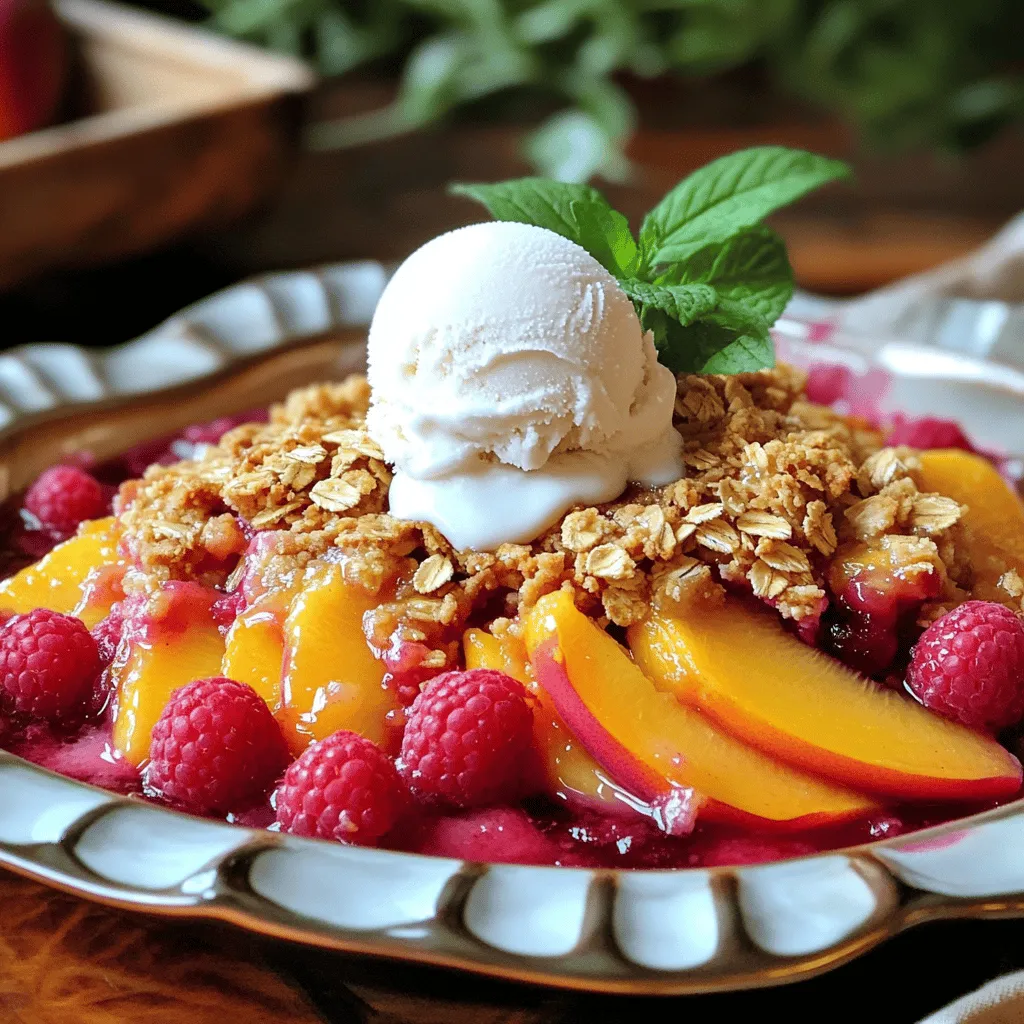
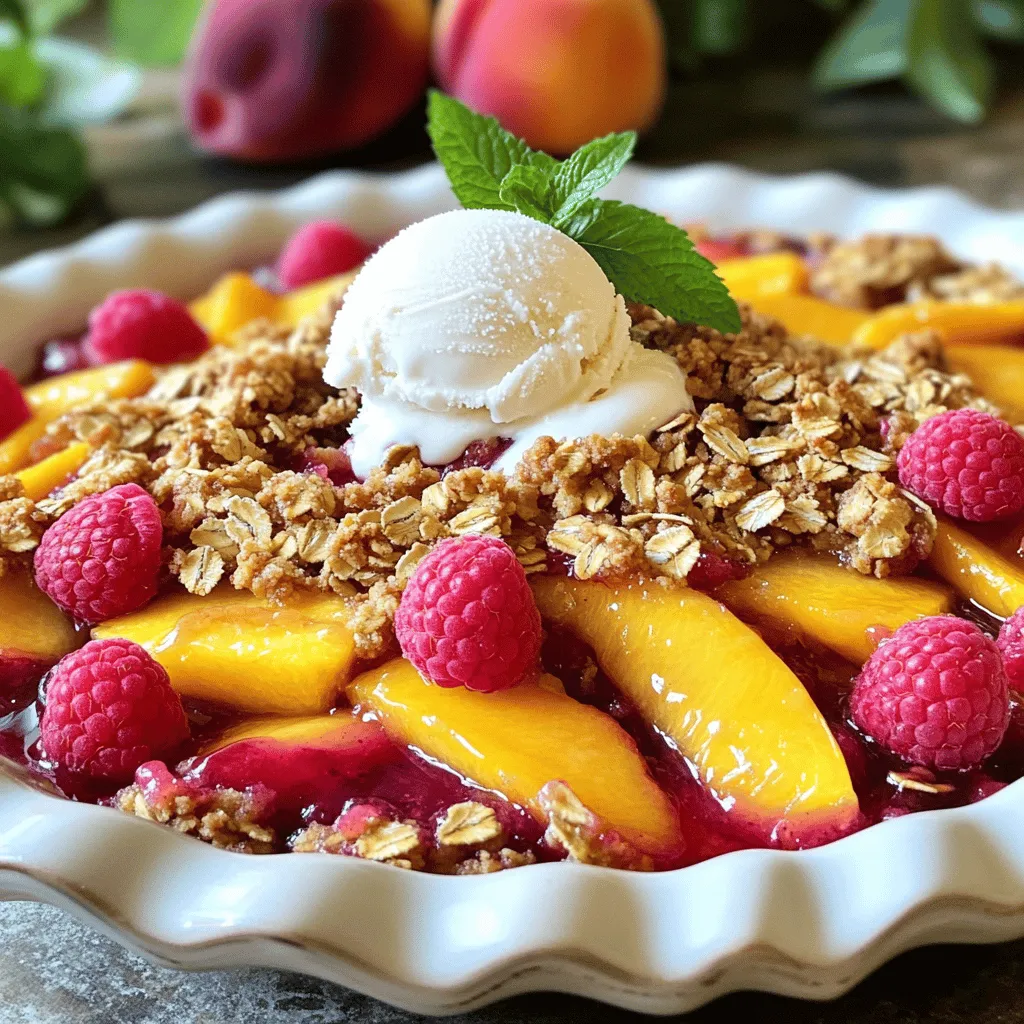
If you crave a sweet treat that’s easy to make, you’re in for a delight! This Peach Raspberry Crisp combines juicy peaches and tart raspberries, all topped with a crunchy, buttery mixture. It’s simple enough for beginners and delicious enough to impress. Whether you enjoy it warm with a scoop of vanilla ice cream or on its own, this dessert will become a favorite. Let’s dive into the recipe and create this scrumptious delight together!
Ingredients
Fresh Fruit
- 4 ripe peaches, peeled and thinly sliced
- 1 cup fresh raspberries, rinsed
Topping Ingredients
- 1 cup rolled oats
- 1/2 cup all-purpose flour
- 1/2 cup packed brown sugar
- 1/4 cup granulated sugar
- 1 teaspoon ground cinnamon
- 1/4 teaspoon salt
- 1/2 cup cold unsalted butter, cut into small cubes
- 1 teaspoon pure vanilla extract
Optional Serving Suggestion
- Vanilla ice cream, for serving
Each ingredient plays a key role in making this dessert shine. The ripe peaches bring a sweet, juicy flavor. Fresh raspberries add a nice tang that balances the dish. For the topping, rolled oats create a chewy texture, while brown sugar gives a rich taste. Granulated sugar adds sweetness, and cinnamon adds warmth. The cold butter helps form those perfect crumbs. Vanilla extract ties all the flavors together. If you want to elevate this dish, serve it with a scoop of vanilla ice cream. This adds creaminess and makes each bite feel special.
Step-by-Step Instructions
Preparing the Oven and Fruit
1. Preheat your oven to 350°F (175°C). This step helps your crisp cook evenly.
2. In a large bowl, combine the sliced peaches and fresh raspberries. Add 1/4 cup of granulated sugar to the fruit. Toss gently, so the sugar coats the fruit well. Set it aside for a few minutes. This allows the sweetness to deepen.
Mixing the Topping
1. In a separate bowl, mix the rolled oats, all-purpose flour, packed brown sugar, ground cinnamon, and 1/4 teaspoon of salt. Stir until everything is combined.
2. Add the cold butter cubes into the dry mixture. Use your fingers or a pastry cutter to blend the butter in. You want it to look like coarse crumbs. This step is key for a crunchy topping.
Assembling the Crisp
1. Grease a 9×9-inch baking dish with butter or oil. Spread the fruit mixture evenly at the bottom of the dish.
2. Sprinkle the oat topping over the fruit layer. Make sure to cover all the fruit. This layer gives you that delicious crunch.
Baking the Crisp
1. Place the baking dish in the preheated oven. Bake for 30-35 minutes. You want the topping to turn a nice golden brown and the fruit to bubble around the edges.
2. Once it’s ready, take it out and let it cool for about 10 minutes. This will help the juices settle, making it easier to serve.
Tips & Tricks
Best Practices for Peeling Peaches
To peel peaches easily, use a sharp knife to make a small “X” on the bottom. This will help the skin come off with less effort. Next, boil water in a pot. Once boiling, drop the peaches in for about 30 seconds. After that, place them in ice water. This method makes peeling quick and simple.
Achieving the Perfect Crisp Topping
For the best crumb texture, mix cold butter into the dry ingredients. Use your fingertips to work the butter in until it feels crumbly. You want small, pea-sized pieces of butter. This step is key for a crispy topping. When you sprinkle the topping, make sure it covers the fruit evenly. This ensures every bite is tasty and crunchy.
Enhancing Flavor
To boost flavor, consider adding spices like nutmeg or ginger. These spices can add warmth and depth to your dish. You can also try using different sweeteners. For example, honey or maple syrup can replace sugar. This gives the crisp a unique twist. Don’t hesitate to experiment until you find your perfect flavor.

Variations
Berry Combinations
You can change the berries in your crisp. Try adding blueberries or blackberries for a fun twist. Mixing berries gives a nice mix of flavors. You can also use just one type of berry. If you prefer, stick with only raspberries or peaches for a simpler taste.
Gluten-Free Options
If you need a gluten-free option, it’s easy! Substitute regular flour with almond or coconut flour. Both work well and add a nice flavor. When using gluten-free oats, make sure they are certified gluten-free. This helps avoid any cross-contamination for those with allergies.
Seasonal Twists
You can switch up the fruits based on the season. In fall, try adding sliced apples or plums. They provide a new taste and texture. Adjust your spices too! For example, add nutmeg in winter or a hint of lemon in spring for a fresh feel. This keeps your peach raspberry crisp exciting all year round!
Storage Info
Storing Leftovers
To keep your Peach Raspberry Crisp fresh, store it in an airtight container. Place it in the fridge. It will stay good for about 3 to 4 days. Make sure to let it cool completely before storing. This will help keep the topping crisp.
Reheating Instructions
When reheating, use the oven for the best results. Preheat the oven to 350°F (175°C). Place the crisp in a baking dish and cover it with foil. Heat for about 15 to 20 minutes. This will help keep the texture nice and crunchy. If you use a microwave, heat in short bursts. Be careful not to make it soggy.
Freezing the Crisp
You can freeze Peach Raspberry Crisp before or after baking. If freezing before baking, wrap it tightly in plastic wrap. Then, place it in a freezer-safe bag. For best taste, use it within 3 months. If you freeze it after baking, let it cool first. Store it the same way. When you’re ready to eat, bake it straight from the freezer, adding a few extra minutes to the baking time.
FAQs
Can I use frozen peaches or raspberries?
Yes, you can use frozen fruit. However, fresh peaches and raspberries have more flavor. Frozen fruit may release more juice while baking. This can make the crisp a bit soggier. If you use frozen fruit, you may want to increase the baking time. Keep an eye on it to ensure the topping stays crisp.
How can I make the crisp topping healthier?
To make the topping healthier, reduce the sugar. You can cut the brown sugar by half. Consider adding chopped nuts like almonds or walnuts. Nuts add crunch and healthy fats. You can also swap some butter for applesauce. This change lowers the fat content and adds moisture.
What can I serve with Peach Raspberry Crisp?
Besides vanilla ice cream, you can serve it with whipped cream or yogurt. A drizzle of honey adds sweetness. You might also try a scoop of gelato. For a twist, serve with a scoop of lemon sorbet. Each pairing adds a unique flavor to the dish.
Can I make this recipe vegan?
Yes, you can make this recipe vegan. Use coconut oil or a vegan butter substitute instead of regular butter. For the sugar, ensure it is vegan-friendly. You can also try maple syrup as a sweetener. This keeps the recipe tasty while meeting vegan needs.
In this article, we explored how to create a delicious Peach Raspberry Crisp. We covered fresh ingredients, topping options, and step-by-step baking instructions. I shared tips for perfecting your crisp and suggested variations to spice things up.
Remember, you can customize this recipe to fit your taste. Enjoy the tasty results with friends and family. Happy baking!


![To make your chocolate chip banana bread, you need these key ingredients: - 2 ripe bananas, thoroughly mashed - 1/3 cup coconut oil, melted - 1 teaspoon pure vanilla extract - 1/2 cup packed brown sugar - 1/4 cup granulated sugar - 2 large eggs at room temperature - 1 teaspoon baking soda - 1/4 teaspoon fine salt - 1 1/2 cups all-purpose flour - 1/2 cup semi-sweet or dark chocolate chips - 1/4 cup walnuts or pecans, chopped (optional) Each ingredient plays a vital role in crafting a moist and tasty loaf. Ripe bananas add sweetness and moisture. Coconut oil gives a rich flavor and a soft texture. The sugars create that perfect crust while the eggs help bind everything together. You can personalize your chocolate chip banana bread with fun add-ins. Here are some ideas: - Chopped nuts for crunch - Dried fruits like cranberries or raisins - A sprinkle of cinnamon for warmth - Peanut butter or nutella swirls for extra richness Feel free to mix and match! These add-ins can bring new flavors and textures to your bread. Using high-quality ingredients makes a big difference. Choose ripe bananas; they should be spotty and soft. Fresh eggs bring richness and flavor. Use pure vanilla extract for the best taste. For the oils, opt for organic coconut oil if possible. Quality flour helps create the right texture. Remember, great ingredients lead to great results! For the full recipe, check out the [Full Recipe]. Start by preheating your oven to 350°F (175°C). This step is crucial for even baking. Next, grab a 9x5 inch loaf pan. Lightly grease it with cooking spray or butter. You can also use parchment paper to line the pan. This makes removing the banana bread easier. In a large mixing bowl, take 2 ripe bananas and mash them well. You want them smooth with no lumps. Then, add 1/3 cup of melted coconut oil. Mix them together until they blend into a creamy base. This combination gives your bread moisture and flavor. Add 1 teaspoon of pure vanilla extract, 1/2 cup of packed brown sugar, and 1/4 cup of granulated sugar to the banana mix. Stir until it’s smooth. Now, crack in 2 large eggs. Mix well after each egg. Then, sprinkle 1 teaspoon of baking soda and 1/4 teaspoon of fine salt over the mix. Stir gently. Next, sift in 1 1/2 cups of all-purpose flour. Fold it in carefully. Don’t overmix; this keeps your loaf tender. Finally, gently fold in 1/2 cup of semi-sweet or dark chocolate chips. If you like, add 1/4 cup of chopped nuts too. Pour the batter into your prepared loaf pan. Smooth the top with a spatula. Place it in the oven and bake for 55-65 minutes. It’s done when a toothpick comes out clean or with a few crumbs. Let the bread cool in the pan for 10 minutes. Then, carefully move it to a wire rack to cool completely. This cooling step helps set the flavors. For the full recipe, refer to the section above. To get the best texture, use ripe bananas. The riper, the better! They must be soft and spotty. This way, you get a sweet and moist bread. Mash them well to avoid lumps. Mix ingredients gently after adding the flour. Over-mixing can make your bread tough. Aim for a light, fluffy loaf. Keep your banana bread fresh by wrapping it tightly. You can use plastic wrap or foil. Store it at room temperature for up to four days. If you want it to last longer, place it in the fridge for about a week. To keep it even longer, freeze it. Slice it before freezing for easy serving. Just make sure to wrap each slice well. Serve your chocolate chip banana bread warm. It tastes best right out of the oven! Add some butter on top for richness. You can also sprinkle powdered sugar for a sweet touch. For extra fun, top with fresh banana slices or more chocolate chips. This makes it look pretty and taste even better! For the complete recipe, check out the Full Recipe section in this article. {{image_4}} You can enjoy chocolate chip banana bread without gluten. Use a gluten-free flour blend. This blend works well as a one-to-one substitute. Make sure it has xanthan gum. This helps bind the ingredients. The flavor stays rich and delicious. Just follow the same steps as in the Full Recipe. You will love the texture and taste. For a vegan version, swap eggs for flax eggs. To make a flax egg, mix one tablespoon of flaxseed meal with three tablespoons of water. Let it sit for a few minutes to thicken. Use non-dairy milk and coconut oil as well. This keeps the bread moist and soft. You can still add chocolate chips, just choose dairy-free ones. You can add your favorite spices for extra flavor. Cinnamon and nutmeg pair well with bananas. A pinch of each can make a big difference. You can also try almond or coconut extract. These extracts add depth. Experiment to find your favorite combo. Each twist makes the bread unique and fun. To keep your chocolate chip banana bread fresh, store it at room temperature. Wrap it tightly in plastic wrap or foil. This helps keep moisture in. Place it in a cool, dry spot, away from direct sunlight. If you prefer, you can also use an airtight container. This will help maintain its soft texture and rich flavor. Freezing is a great option if you want to save some for later. First, let the banana bread cool completely. Then, wrap it tightly in plastic wrap, followed by aluminum foil. This extra layer prevents freezer burn. You can freeze it for up to three months. When you're ready to enjoy it, simply thaw it in the fridge overnight. Reheating banana bread can bring back its lovely warmth. You can use a toaster oven or a conventional oven. Preheat your oven to 350°F (175°C). Slice the bread and place it on a baking sheet. Heat for about 5-10 minutes. If you want a softer texture, cover it with foil. You can also pop a slice in the microwave for about 10-15 seconds. Enjoy it warm for a cozy treat! Your chocolate chip banana bread is done when a toothpick comes out clean. Insert it in the center. If it has a few crumbs, that is fine too. The bread usually bakes for 55-65 minutes. The top should look golden brown. Yes, you can substitute some ingredients. For example, use olive oil instead of coconut oil. You can also swap brown sugar for maple syrup. Make sure to adjust the amounts as needed for the best results. Chocolate chip banana bread lasts about 3-4 days at room temperature. Store it in an airtight container. For longer storage, keep it in the fridge for a week. You can also freeze it for up to 3 months. You can use applesauce or mashed bananas as egg substitutes. Use 1/4 cup of applesauce or 1/2 banana for each egg. Both options keep the bread moist and flavorful. This chocolate chip banana bread stands out because of its rich flavors. The combination of ripe bananas and chocolate chips creates a sweet treat. Using coconut oil adds a subtle depth to the taste. The option to add nuts gives extra texture. You can find the complete recipe in the Full Recipe section. This blog post covered how to make delicious chocolate chip banana bread. We discussed key ingredients, optional add-ins, and the importance of ingredient quality. I shared step-by-step instructions to guide you through the baking process. We explored tips for the perfect texture, storage methods, and fun variations like gluten-free and vegan options. With these insights, you can easily bake this treat and impress everyone. Enjoy your baking journey!](https://dishtreats.com/wp-content/uploads/2025/06/ff2d306f-7b8f-4bb2-a8a5-5e2882fba681-768x768.webp)
![- 1 cup rolled oats - 2 cups almond milk (or your preferred milk) - 1 medium sweet apple, diced (suggestions: Fuji or Gala) - 1 teaspoon ground cinnamon - 2 tablespoons maple syrup (or honey if you prefer) - 1/2 teaspoon vanilla extract - 1/4 cup plain Greek yogurt (optional) - Pinch of salt - Chopped nuts for topping - Extra apple slices and cinnamon for garnish Apple cinnamon overnight oats are easy to make and full of flavor. The oats soak overnight, making them creamy and delicious. You can customize this recipe based on your taste. For the base, I use rolled oats and almond milk, but feel free to pick any milk you like. The diced apple brings sweetness and crunch. I suggest using Fuji or Gala apples since they are sweet and juicy. Ground cinnamon adds warmth and a cozy touch. Maple syrup gives the oats a natural sweetness. If you want a little creaminess, add Greek yogurt. Don’t forget the pinch of salt; it enhances all the flavors. Chopped nuts add a nice crunch on top. You can use walnuts, pecans, or any nuts you enjoy. Finally, garnish with extra apple slices and a dusting of cinnamon for a pretty finish. - Different types of milk (coconut, oat, etc.) - Sweeteners (agave syrup, stevia, etc.) - Additional fruit (berries, bananas, etc.) If you want to try something different, there are many options. Swap almond milk for coconut or oat milk if you prefer. You can change sweeteners too; agave syrup or stevia work well. Add in more fruits like berries or sliced bananas for extra flavor. This makes each serving unique and fun. The best part? You can make it just how you like it! For the full recipe, check out Apple Cinnamon Overnight Oats Delight. - Step 1: Combine rolled oats with milk and yogurt. In a large bowl, mix 1 cup of rolled oats with 2 cups of almond milk. If you like, add 1/4 cup of Greek yogurt for creaminess. Stir until mixed well. - Step 2: Add apples, cinnamon, sweetener, vanilla, and salt. Fold in 1 diced apple, 1 teaspoon of ground cinnamon, and 2 tablespoons of maple syrup. Add 1/2 teaspoon of vanilla extract and a pinch of salt. Mix until everything is evenly distributed. - Step 3: Transfer mixture into jars and refrigerate. Spoon the oat mix into jars. Make sure each jar has some apple pieces. Close the lids and place them in the fridge overnight. - Evenly distribute diced apples among jars. This ensures each jar has the same amount of apple flavor. - Layer ingredients for visual appeal. Create a pretty look by layering oats and apples. This makes your breakfast even more inviting. - Stir before serving and adjust consistency. When you take the jars out, give them a good stir. If they feel too thick, add a splash of milk. - Top with nuts and additional apple slices. Finish with a sprinkle of chopped nuts and a few apple slices for crunch. A dash of cinnamon adds warmth and flavor. For full details, check the [Full Recipe]. To get the best texture, always use rolled oats. They soak up the liquid well. Steel-cut oats take longer to soften. You might want to avoid them for overnight oats. Adjust the sweetness by adding more or less maple syrup. Taste as you mix to find your perfect balance. Make a big batch of oats for quick breakfasts. You can prepare up to five jars at once. Store them in the refrigerator for up to five days. This way, you’ll have a quick meal ready on busy mornings. Feel free to experiment with spices like nutmeg or cardamom. Just a pinch can add a warm kick. You can also add seeds like chia or flaxseed. These add fiber and make your oats even better for you. {{image_4}} You can easily make apple cinnamon overnight oats vegan. Just swap the Greek yogurt for a plant-based yogurt. Use almond, coconut, or oat milk for a creamy base. These changes keep the flavor rich and tasty while being dairy-free. If you need gluten-free options, choose certified gluten-free oats. Many brands offer oats that are safe for those with gluten sensitivities. This way, you can enjoy your oats without worry. You can mix in other fruits to change the taste. Try berries like strawberries or blueberries for a fresh twist. Bananas also work well, adding sweetness and creaminess. For toppings, nuts and seeds add crunch. Chopped almonds, walnuts, or sunflower seeds all taste great. You can also sprinkle chia seeds for extra fiber and health benefits. In fall, add pumpkin spice to your oats for a cozy taste. Just mix in a teaspoon or two for that warm, spiced flavor. It pairs perfectly with apples. In summer, think about fresh fruits like peaches or mangoes. These fruits add a bright, juicy flavor. You can mix them in or use them as a topping for a colorful and tasty breakfast. For the complete recipe, check out the [Full Recipe]. To keep your apple cinnamon overnight oats fresh, use jars or airtight containers. Glass jars work great. They seal well and let you see the yummy layers. Make sure to refrigerate them right after you prepare them. This keeps the oats safe to eat. You can freeze individual servings of overnight oats. First, pour the oats into freezer-safe containers or jars. Leave some space at the top, as they will expand. To enjoy later, thaw them in the fridge overnight. Once thawed, stir well. You might want to add a splash of milk to make them creamy again. Apple cinnamon overnight oats can stay fresh in the fridge for up to five days. Check for any signs of spoilage before eating. If the oats smell sour or have a strange color, throw them away. Always trust your nose and eyes! For the best taste, enjoy them within the first few days. Apple cinnamon overnight oats are a tasty breakfast. They combine oats, milk, apples, and cinnamon. The mixture sits in the fridge overnight. This soaking makes the oats soft and creamy. You get a nice blend of flavors. It’s a quick way to enjoy a healthy meal. Yes, you can use quick oats. However, they have a different texture. Quick oats cook faster and become mushy. If you use them, soak for less time. Rolled oats keep a firmer bite and work better for overnight oats. Overnight oats last about 5 days in the fridge. Store them in airtight jars or containers. Check for bad smells or changes in texture. If they look or smell off, toss them out. Yes, kids love apple cinnamon overnight oats! They are sweet and fun to eat. Serve in small jars for a cute look. You can also add toppings like nuts or more fruit for variety. This makes it a family-friendly dish everyone can enjoy. Apple cinnamon overnight oats offer a delightful and easy breakfast option. You can prepare them quickly with just a few simple steps. This meal not only fills you up but also lets you customize flavors to your taste. Experiment with different fruits, sweeteners, and spices to keep it fun. Remember to store your oats correctly for freshness. Enjoy this nutritious dish throughout the week! Your mornings can be bright and delicious with this recipe.](https://dishtreats.com/wp-content/uploads/2025/06/6eb7544b-1d16-4ecc-8a32-decb7f29ee21-768x768.webp)

