
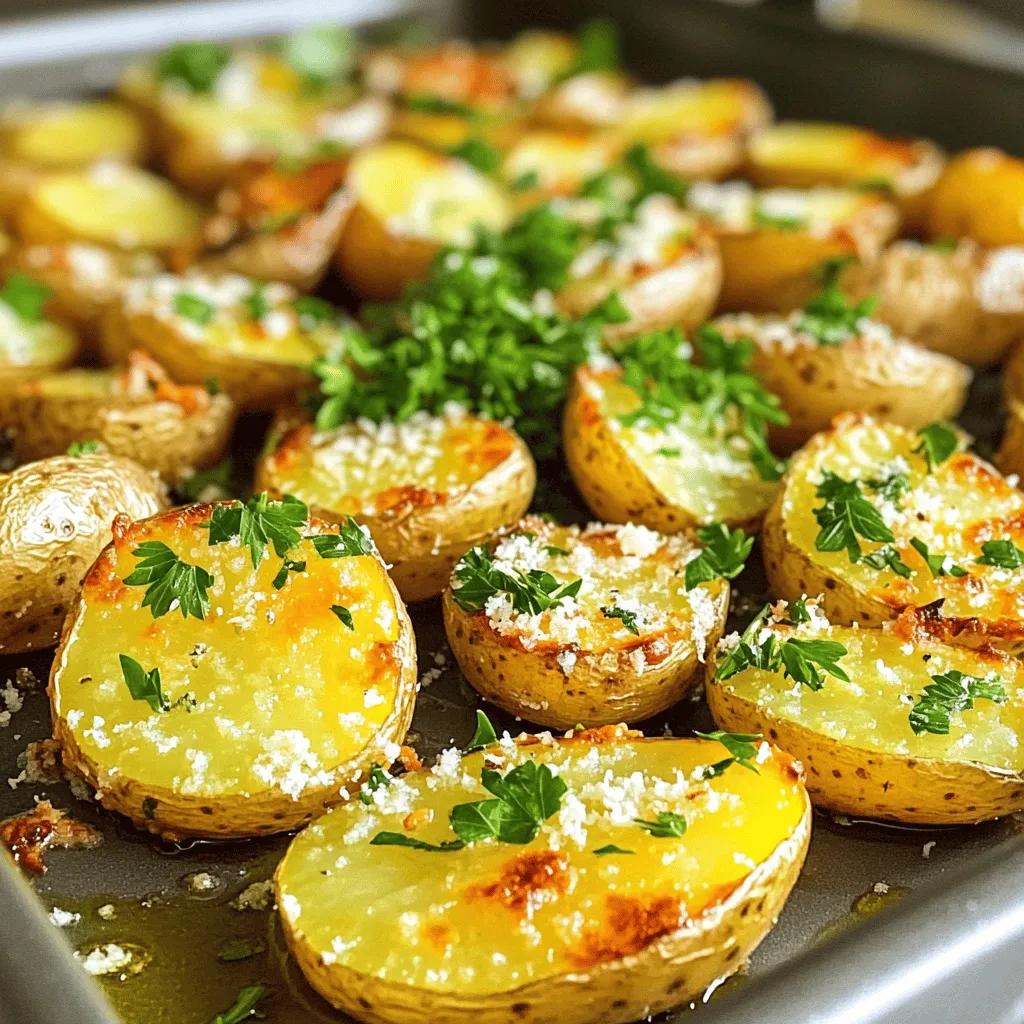
Parmesan Herb Roasted Potatoes Flavorful Side Dish

Looking for a tasty side dish that packs a punch? You’ll love these Parmesan Herb Roasted Potatoes! They are easy to make and full of flavor. With a crispy exterior and soft inside, they elevate any meal. In this post, I’ll walk you through the ingredients, steps, and tips to make them perfect. Let’s dive in and get cooking!They are simple to make and fill your home with a warm, cozy aroma. This dish pairs well with almost any main meal. You can enjoy them at family dinners or casual get-togethers.
List of Ingredients
To make these roasted potatoes, here is what you need:
- 2 pounds baby potatoes, halved
- 1/2 cup freshly grated Parmesan cheese
- 3 tablespoons extra-virgin olive oil
- 2 teaspoons dried oregano
- 2 teaspoons dried thyme
- 1 teaspoon garlic powder
- Salt and freshly ground black pepper to taste
- Fresh parsley or chives, finely chopped, for garnish (optional)
Optional Ingredients for Variation
You can change this recipe to fit your taste. Here are some ideas:
- Add red pepper flakes for a bit of heat.
- Use fresh herbs instead of dried ones for a stronger flavor.
- Swap Parmesan cheese with Pecorino Romano for a sharper taste.
- Mix in lemon zest for a refreshing twist.
These optional ingredients can make your dish even more exciting!
Step-by-Step Instructions
Preparation Steps
To start, gather all your ingredients. You need 2 pounds of baby potatoes. Halve each potato to help them cook evenly. In a large mixing bowl, toss the halved potatoes with 3 tablespoons of olive oil. This oil adds flavor and helps with crisping. Next, sprinkle in 2 teaspoons of dried oregano and 2 teaspoons of dried thyme. Then add 1 teaspoon of garlic powder, salt, and pepper. Toss well to coat each potato half in the herb mix.
Cooking and Roasting Directions
Now, it’s time to roast! Preheat your oven to 425°F (220°C). This step is key for crispy potatoes. Line a baking sheet with parchment paper for easy cleanup. Spread the seasoned potatoes in a single layer. Make sure they have space between them; this helps them roast better. Place the baking sheet in the oven and roast for 25-30 minutes. Halfway through, take them out and toss the potatoes. This ensures they brown evenly. Keep an eye on them; you want them golden brown and crispy.
Final Touches Before Serving
Once the potatoes are roasted to perfection, remove them from the oven. Let them cool for a few minutes. For a fresh finish, sprinkle with finely chopped parsley or chives. This adds color and a burst of flavor. Your Parmesan herb roasted potatoes are now ready to enjoy!
Tips & Tricks
How to Achieve Crispy Potatoes
To get crispy potatoes, start with the right oven temperature. Preheat your oven to 425°F (220°C). Use baby potatoes for the best results. Halve them to allow more surface area for browning. Toss the potatoes with olive oil and seasonings. The oil helps them crisp up nicely. Spread the potatoes in a single layer on the baking sheet. Make sure they have space between them. This step is key for airflow and even cooking. Toss the potatoes halfway through roasting to ensure they brown evenly.
Flavor Enhancements
To boost the flavor of your Parmesan herb roasted potatoes, consider adding fresh herbs. Fresh rosemary or basil can add a nice twist. You can also mix in some chili flakes for a little heat. A squeeze of lemon juice right before serving brightens the dish. If you love garlic, try roasting a few whole cloves with the potatoes. It adds a sweet and rich flavor that pairs well with Parmesan.
Substitutions for Ingredients
If you run out of Parmesan cheese, try using Pecorino Romano instead. It has a similar flavor and works well. You can swap olive oil for melted butter for a richer taste. For herbs, fresh ones can take the dish to the next level. Use about three times as much fresh herbs as dried ones. If you need a dairy-free option, try nutritional yeast for a cheesy flavor. Each of these substitutions keeps the dish tasty while adding your personal touch.
Variations
Herb Variations
You can change the herbs in these potatoes. Try rosemary for a piney taste. Basil adds a sweet flavor. You can also use fresh herbs if you have them. Just chop them finely. Mix about one tablespoon of fresh herbs instead of the dried ones.
Cheese Options
Parmesan shines in this dish, but you can switch it up. Try Pecorino Romano for a sharper kick. Cheddar adds creaminess and a different taste. For a richer flavor, use Gruyère. Just make sure to grate it finely for even melting.
Alternate Cooking Methods
If you want to try a different way to cook these potatoes, consider air frying. Set your air fryer to 400°F and cook for about 20 minutes. Shake the basket halfway for even cooking. You can also boil the potatoes first. This makes them soft inside before roasting.
Storage Info
How to Store Leftovers
To store your leftover Parmesan herb roasted potatoes, let them cool first. Place them in an airtight container. They will keep well in your fridge for about three days. Make sure to keep them away from strong-smelling foods to avoid absorbing those odors.
Reheating Instructions
When you’re ready to enjoy your leftovers, preheat your oven to 400°F (200°C). Spread the potatoes on a baking sheet. Heat them for about 10-15 minutes, or until they are hot and crispy again. You can also use a microwave, but this may make them a bit soft.
Freezing Parmesan Herb Roasted Potatoes
If you want to freeze these potatoes, it’s best to do it before cooking. After mixing the potatoes and spices, place them on a baking sheet in a single layer. Freeze them for a couple of hours, then transfer them to a freezer bag. When you want to cook them, no need to thaw; just roast them straight from the freezer. Be sure to check the cooking time, as it may need a bit longer.
FAQs
How long do Parmesan Herb Roasted Potatoes last?
Parmesan Herb Roasted Potatoes last about 3 to 5 days when stored properly. Place them in an airtight container and keep them in the fridge. This way, they stay fresh and tasty for your next meal.
Can I make these potatoes ahead of time?
Yes, you can make these potatoes ahead of time. Cook them fully, then let them cool. Store the cooked potatoes in the fridge for up to 5 days. When you’re ready to serve, you can reheat them in the oven for a crispy finish.
What can I serve with Parmesan Herb Roasted Potatoes?
Parmesan Herb Roasted Potatoes go well with many dishes. They pair nicely with grilled chicken, steak, or roasted fish. You can also serve them with a fresh salad or as part of a veggie platter.
You learned about making tasty Parmesan Herb Roasted Potatoes. We covered the key ingredients, step-by-step cooking, and helpful tips. Remember, feel free to mix things up with variations or different herbs. Proper storage extends your leftovers, and reheating keeps them tasty. With these easy steps, you’ll impress family and friends. Enjoy this simple dish anytime.

. Yes, you can use fresh black beans. - Preparation: You must soak the beans overnight. This helps them cook evenly. - Cooking Time: Fresh beans take longer to cook. Boil them for about 1-1.5 hours before adding to the chili. Using fresh beans gives a great texture and taste, but it requires more time. To add spice, try these methods: - Chili Powder: Increase the amount of chili powder. - Jalapeños: Add diced jalapeños when you sauté the vegetables. - Hot Sauce: Drizzle hot sauce on top before serving. Feel free to adjust the spice level to fit your taste! This chili is packed with nutrients: - Sweet Potatoes: High in vitamins A and C. Great for your immune system. - Black Beans: A good source of protein and fiber. They help keep you full. - Vegetables: Onions and peppers add vitamins and minerals without many calories. Enjoying this chili means you get a tasty meal that’s also good for you. Yes, you can make this chili ahead of time. - Meal Prep: Cook the chili and let it cool. Store in a container. - Best Practices: Refrigerate for up to 3 days. For longer storage, freeze it in portions. Reheat in the microwave or on the stove before serving. Making it in advance saves time and enhances flavors! This blog post covered everything you need for Sweet Potato Black Bean Chili. We explored the main and optional ingredients, provided step-by-step instructions, and shared useful tips. Remember, using fresh ingredients boosts flavor and health benefits. Feel free to adjust spices or try different variations to make it your own. Enjoy this comforting dish, whether you serve it plain or dressed with toppings! Happy cooking!](https://dishtreats.com/wp-content/uploads/2025/06/d8445fbe-e2a0-4bb7-bab4-282b1fdf418c-768x768.webp)
![- 4 large bell peppers (any color) - 1 lb ground chicken - 2 cups fresh spinach, roughly chopped - 1 cup cooked quinoa (or rice) - 1 cup mozzarella cheese, shredded - 1 small onion, finely minced - 2 cloves garlic, minced - 1 teaspoon Italian seasoning blend - ½ teaspoon red pepper flakes - Salt and pepper to taste - 1 tablespoon olive oil - Fresh basil leaves for garnish When I make chicken and spinach stuffed peppers, I love using fresh ingredients. The bell peppers can be red, green, yellow, or orange. Each color adds a fun touch and a slight flavor difference. Ground chicken gives a light taste and pairs well with spinach. I usually chop the spinach roughly. This keeps some texture in the filling. Quinoa or rice adds a nice base and helps the stuffing stick together. I recommend using cooked quinoa for a nutty flavor and added protein. Mozzarella cheese brings creaminess and melts beautifully on top. The minced onion and garlic create a fragrant base. I often sauté these first to build flavor. The Italian seasoning and red pepper flakes bring warmth and depth. Adjust the red pepper flakes to suit your taste. Lastly, a sprinkle of salt and pepper enhances all the flavors. The olive oil adds richness and helps everything cook evenly. I often finish with fresh basil leaves for a bright and fresh touch. You can find the full recipe to make these delicious stuffed peppers! - Preheat your oven to 375°F (190°C). - Prepare the bell peppers by removing the tops and seeds. Start by heating your oven. This ensures it’s hot for your peppers. While waiting, grab your bell peppers. Cut off the tops and scoop out the seeds inside. You want them ready to hold all that tasty filling. A little olive oil on the outside adds flavor and color. - Sauté onion and garlic in olive oil. - Add ground chicken and cook thoroughly. - Stir in spinach, quinoa, and spices. Now, heat olive oil in a large skillet over medium heat. Add the finely minced onion and sauté for about 3-4 minutes. You want them soft and clear. Then, toss in your minced garlic and cook for one more minute. It will smell amazing! Next, add the ground chicken. Use a spoon to break it apart as it cooks. This should take about 6-8 minutes. Make sure the chicken is brown and fully cooked. Then, mix in the chopped spinach, cooked quinoa, Italian seasoning, red pepper flakes, salt, and pepper. Cook for another 2-3 minutes until the spinach wilts and blends in. - Mix in mozzarella and stuff peppers. - Bake covered and then uncovered until cooked. Remove the skillet from heat. Now, add half of the shredded mozzarella cheese to the filling. Stir until it melts and mixes well. Carefully spoon this tasty mixture into each pepper. Press it down to fill them well. Finally, sprinkle the remaining mozzarella over the tops of each pepper. Cover your dish tightly with foil and place it in the oven. Bake for 25 minutes. This helps the peppers cook through. After that, take off the foil and bake for another 10-15 minutes. Look for tender peppers and bubbly, golden cheese. Your Chicken and Spinach Stuffed Peppers are almost ready! - Choosing the right peppers for optimal flavor: I love using bell peppers in various colors. Each color brings a unique taste. Red peppers are sweet, while green ones are more bitter. Choose your favorite or mix them for a colorful dish. - Ensuring even cooking of the filling: To cook the filling evenly, chop the spinach and onion small. This helps them blend well with the ground chicken. Stir often while cooking to make sure everything heats up at the same time. - Plates and garnishes for serving: Use bright plates to showcase your stuffed peppers. A white plate makes the colors pop. Add fresh basil leaves on top for a nice touch. It adds color and flavor. - Drizzling options for added flavor: Consider drizzling a balsamic reduction over the peppers. This gives a sweet and tangy kick. You can also use olive oil or a bit of hot sauce if you like spice. - Low-calorie ingredient options: If you want to cut calories, use ground turkey instead of chicken. You can also skip the cheese or use a low-fat version. This keeps the rich taste without the extra calories. - Gluten-free substitutes: For a gluten-free option, use quinoa or rice as a base. Both are great alternatives. Make sure your seasonings are also gluten-free to keep the dish safe for everyone. For the full recipe, check out the details above. {{image_4}} You can switch the protein in your stuffed peppers. Ground turkey works great as a leaner choice. It has a mild flavor that blends well with the spices. Ground beef is another option. It adds richness and depth to the dish. If you want a vegetarian option, try black beans or chickpeas. They add protein and fiber. You can mash them for a creamy texture or leave them whole for a nice bite. Spicing up your stuffed peppers can elevate the dish. Add cumin or smoked paprika for a smoky flavor. You can also try chili powder for a bit of heat. If you love sauces, think about adding salsa or barbecue sauce to the filling. A drizzle of ranch or yogurt on top can enhance the taste too. These simple tweaks can really make your meal pop. Stuffed peppers pair well with many sides. A fresh salad with greens and a lemon vinaigrette works nicely. You can also serve them with rice or quinoa on the side. For meal prep, these stuffed peppers are great to make ahead. They store well and taste even better the next day. Leftovers can be enjoyed cold or reheated easily, making them perfect for quick lunches. If you want to impress, plate them on colorful dishes and garnish with fresh herbs. For the full recipe, check [Full Recipe]. After you make your chicken and spinach stuffed peppers, let them cool. Place leftovers in an airtight container. This keeps them fresh and tasty. You can store them in the fridge for up to three days. When you want to enjoy them again, simply reheat in the oven or microwave. If using the oven, cover with foil to keep the moisture in. Heat at 350°F (175°C) for about 15-20 minutes. If using a microwave, heat in one-minute bursts until hot. If you want to save some for later, freezing is a great option. Wrap each stuffed pepper in plastic wrap. Then put them in a freezer-safe bag. This keeps them from getting freezer burn. You can freeze them for up to three months. When you’re ready to eat, take them out and let them thaw in the fridge overnight. You can bake them from frozen, but it will take longer. Bake at 375°F (190°C) for about 40-50 minutes. Make sure they are hot all the way through. Enjoy the convenience of having these delicious meals ready to go! How long do stuffed peppers last in the fridge? Stuffed peppers can last up to four days in the fridge. Store them in an airtight container. Can I use frozen spinach instead of fresh? Yes, you can use frozen spinach. Just thaw and drain it first to remove excess water. What can I substitute for quinoa in this recipe? You can use rice instead of quinoa. Brown rice or white rice works well for this dish. Are stuffed peppers healthy? Yes, stuffed peppers are healthy. They are full of protein, fiber, and vitamins. How can I tell when the peppers are done cooking? Peppers are done when they are tender and the cheese is bubbly and golden. Can I prep these ahead of time? Yes, you can prep them a day in advance. Just store the stuffed peppers in the fridge. What sides pair well with stuffed peppers? Great sides include a light salad, garlic bread, or steamed veggies. Enjoy your meal! In this article, we explored a tasty recipe for chicken and spinach stuffed peppers. We covered detailed ingredients, step-by-step instructions, cooking tips, and variations to try. Stuffed peppers are fun to make and easy to adapt. You can even store leftovers or freeze them for later. This dish is not only healthy but also full of flavor that everyone will enjoy. Try it out and get creative!](https://dishtreats.com/wp-content/uploads/2025/06/8d5b3b7f-ae7d-4f86-a3ac-77abf09c6433-768x768.webp)